Page is loading ...

GN-WS53HN1
802.11 b/g/n Mini Card
User’s Manual
http://www.gigabyte.com.tw
Rev. 1.0 First Edition

Federal Communication Commission Interference Statement:
This equipment has been tested and found to comply with the limits for a Class B digital
device, pursuant to Part 15 of the FCC Rules. These limits are designed to provide
reasonable protection against harmful interference in a residential installation. This
equipment generates, uses and can radiate radio frequency energy and, if not installed
and used in accordance with the instructions, may cause harmful interference to radio
communications. However, there is no guarantee that interference will not occur in a
particular installation. If this equipment does cause harmful interference to radio or
television reception, which can be determined by turning the equipment off and on, the
user is encouraged to try to correct the interference by one of the following measures:
• Reorient or relocate the receiving antenna.
• Increase the separation between the equipment and receiver.
• Connect the equipment into an outlet on a circuit different from that to which the
receiver is connected.
• Consult the dealer or an experienced radio/TV technician for help.
FCC Caution:
To assure continued compliance, any changes or modifications not expressly approved by
the party responsible for compliance could void the user's authority to operate this
equipment.
This device complies with Part 15 of the FCC Rules. Operation is subject to the following
two conditions: (1) This device may not cause harmful interference, and (2) this device
must accept any interference received, including interference that may cause undesired
operation.
For product available in the USA/Canada market, only channel 1~11 can be
operated. Selection of other channels is not possible.
IMPORTANT NOTE
FCC Radiation Exposure Statement:
This equipment complies with FCC radiation exposure limits set forth for an uncontrolled
environment. This equipment should be installed and operated with minimum distance
20cm between the radiator & your body.
This transmitter must not be co-located or operating in conjunction with any other antenna
or transmitter.
IMPORTANT NOTE:
This module is intended for OEM integrator. The OEM integrator is still responsible for the
FCC compliance requirement of the end product, which integrates this module.
20cm minimum distance has to be able to be maintained between the antenna and the
users for the host this module is integrated into. Under such configuration, the FCC
radiation exposure limits set forth for an population/uncontrolled environment can be
satisfied.
Any changes or modifications not expressly approved by the manufacturer could void the
user's authority to operate this equipment.
USERS MANUAL OF THE END PRODUCT:

In the users manual of the end product, the end user has to be informed to keep at least
20cm separation with the antenna while this end product is installed and operated. The
end user has to be informed that the FCC radio-frequency exposure guidelines for an
uncontrolled environment can be satisfied. The end user has to also be informed that any
changes or modifications not expressly approved by the manufacturer could void the
user's authority to operate this equipment. If the size of the end product is smaller than
8x10cm, then additional FCC part 15.19 statement is required to be available in the users
manual: This device complies with Part 15 of FCC rules. Operation is subject to the
following two conditions: (1) this device may not cause harmful interference and (2) this
device must accept any interference received, including interference that may cause
undesired operation.
LABEL OF THE END PRODUCT:
The final end product must be labeled in a visible area with the following " Contains TX
FCC ID: JCK-GN-WS53HN1 " & IC:6655A-GNWS53HN. If the size of the end product is
larger than 8x10cm, then the following FCC part 15.19 statement has to also be available on
the label:
This device complies with Part 15 of FCC rules. Operation is subject to the following two conditions:
(1) this device may not cause harmful interference and (2) this device must accept any
interference received, including interference that may cause undesired operation.

This Class [*] digital apparatus complies with Canadian ICES-003.
Cet appareil numérique de la classe [*] est conforme à la norme NMB-003 du Canada.
Statement:
This device complies with RSS-210 and IC ES-003 of the Industry Canada Rules. Operation is
subject to the following two conditions: (1) This device may not cause harmful interference,
and (2) this device must accept any interference received, including interference that may
cause undesired operation of this device.
Le présent appareil est conforme aux CNR d'Industrie Canada applicables aux appareils radio
exempts de licence. L'exploitation est autorisée aux deux conditions suivantes : (1) l'appareil
ne doit pas produire de brouillage, et (2) l'utilisateur de l'appareil doit accepter tout brouillage
radioélectrique subi, même si le brouillage est susceptible d'en compromettre le
fonctionnement.
OEM integrator is still responsible for testing their end product for any additional compliance
requirements required with this module installed (for example, digital device emissions, PC
peripheral requirements, etc.).
IMPORTANT NOTE: In the event that these conditions can not be met (for example certain
laptop configurations or co-location with another transmitter), then the IC authorization is no
longer considered valid and the IC No. can not be used on the final product. In these
circumstances, the OEM integrator will be responsible for re-evaluating the end product
(including the transmitter) and obtaining a separate IC authorization.
End Product Labeling
This transmitter module is authorized only for use in device where the antenna may be
installed such that 20 cm may be maintained between the antenna and users. The final end
product must be labeled in a visible area with the following: “Contains TX IC :
6655A-GNWS53HN”.

Contents
END PRODUCT LABELING 錯誤! 尚未定義書籤。
MANUAL INFORMATION THAT MUST BE INCLUDED 錯誤! 尚未定義書籤。
CHAPTER 1. PRODUCT OVERVIEW 1
1-1. INTRODUCTION...........................................................................................................1
1-2. FEATURES .................................................................................................................1
1-3. PHYSICAL DIMENSIONS/PACKAGING.............................................................................1
1-4. SYSTEM REQUIREMENTS ............................................................................................1
CHAPTER 2. INSTALLING THE WLAN CARD 3
2-1. INSTALLING THE WIRELESS MINI CARD ADAPTER ..........................................................3
2-2. DRIVER & UTILITY INSTALLATION - WINDOWS
®
98SE ....................................................4
2-3. DRIVER & UTILITY INSTALLATION - WINDOWS
®
ME........................................................6
2-4. DRIVER & UTILITY INSTALLATION - WINDOWS
®
2000.....................................................8
2-5. D
RIVER & UTILITY INSTALLATION - WINDOWS
®
XP ......................................................10
CHAPTER 3 USING THE GIGABYTE WLAN CONFIGURATION UTILITY 12
3-1. THE PROFILE TAB ....................................................................................................12
3-2. T
HE LINK STATUS TAB..............................................................................................19
3-3. T
HE SITE SURVEY TAB .............................................................................................20
3-4. “STATISTICS” SETTING..............................................................................................21
3-5. THE ADVANCED TAB.................................................................................................22
3-6. THE ABOUT TAB.......................................................................................................23
CHAPTER 4 TROUBLESHOOTING 24
CANNOT ENABLE 802.1X, WPA OR WPA-PSK..........................................................24
CANNOT ESTABLISH CONNECTION TO A WIRELESS NETWORK......................................24
CAN CONNECT TO AN ACCESS POINT, BUT CANNOT ACCESS THE INTERNET..................24
POOR LINK QUALITY AND WEAK SIGNAL STRENGTH....................................................24
CHAPTER 5 HARDWARE SPECIFICATIONS 25

1
Chapter 1. Product Overview
1-1. Introduction
The GN-WS53HN1 full mini-card 802.11b/g/n Wireless Local Area Network (WLAN)
PCI-Express Mini card adapter is composed of single-chip MAC/Baseband/RF transceiver,
PCI Express v1.2 interface and two RF connectors. It operates at 2.4GHz frequency band,
providing fast (up to 300Mbps) and secure (support WEP 64/128/152, TKIP, AES, 802.1x,
WPA and WPA2) connections to 802.11n networks. It is backward compatible with 11b,
11g and 11n from a single adapter. This product is designed for any PCI-Express
mini-card enabled notebooks to get online easily and running wireless anywhere.
1-2. Features
Conforms to IEEE 802.11b, 802.11g and draft 802.11n specifications.
Wireless transmits/receives data rate up to the maximum speed of 300/300Mbps.
Support 64/128/152-bit WEP encryption, TKIP, AES, 802.1x, WPA and WPA2.
Dynamically scales the data rate
PCI-Express Mini-Card specification v1.2
Automatic power management to reduce battery consumption
Seamless roaming between 11b, 11g and draft 11n networks
1-3. Physical Dimensions/Packaging
Dimensions: 50.8mm*29.8mm*3.65mm ± 0.15mm
Please check that the package contents include:
• GN-WS53HN1 Wireless Mini-Card
In case of damaged or missing package contents, please contact your local distributor or
authorized reseller immediately. Should you require returning the product, please include
all original packing materials or the warranty will be voided.
1-4. System Requirements

2
• IBM PC/AT compatible computer
• Windows
®
98SE/Me/2000/XP

3
Chapter 2. Installing the WLAN Card
This chapter will assist you in completing the hardware and software installation of the
GN-WS53HN1 Wireless Mini Card Adapter successfully. Please refer to the driver & utility
installation section that matches your operating system.
2-1. Installing the Wireless Mini Card Adapter
Step 1: Turn off your PC and disconnect the power cord.
Step 2: Remove the PC cover.
Step 3: Locate an available Mini Card slot and remove its back plate from the PC
chassis.
Step 4: Insert the GN-WS53HN1 Mini Card Adapter into the slot and fasten it to the
chassis using the screws in step 3.
Step 5: Power on your desktop PC.

4
2-2. Driver & Utility Installation - Windows
®
98SE
Step 1: When the Add New Hardware Wizard screen appears, click Cancel to exit.
Step 2: Insert the GN-WS53HN1 Installation CD into the CD-ROM drive. The GIGABTYE
GN-WS53HN1 Wireless Mini Card Adapter setup screen appears.
Step 3: Drag your mouse over Install Wireless LAN Utility and click on it to start the
utility installation program.
Step 4: When the Welcome screen appears, click Next.
Step 5: The Check Setup Information screen displays the Operating System of your
computer. If it is correct, click Next to continue.
Step 6: An information box screen appears. Click OK to go to the next screen.
Step 7: After the software utility installation is complete, click Finish. You are now
ready to install 802.1x authentication software.
Step 8: Drag your mouse over Browse the CD and click on it.

5
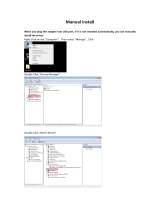
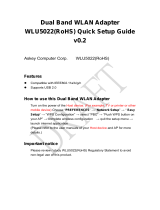
Step 9: The Windows file explorer opens. Double-click on the file “AegisI2.exe”.
Step 10: When the AEGIS Protocol Installation window appears click the Install button to
begin installing program files.
Step 11: When the message AEGIS Protocol Installed Successfully appears in the
dialog box, click the Cancel button. Windows
®
98 may or may not automatically
reboot your PC.

6
2-3. Driver & Utility Installation - Windows
®
ME
Step 1: When the Add New Hardware Wizard screen appears, click Cancel to exit.
Step 2: Insert the GN-WS53HN1 Installation CD into the CD-ROM drive. The GIGABTYE
GN-WS53HN1 Wireless Mini Card Adapter setup screen appears.
Step 3: Drag your mouse over Install Wireless LAN Utility and click on it to start the
utility installation program.
Step 4: When the Welcome screen appears, click Next.
Step 5: The Check Setup Information screen displays the Operating System of your
computer. If it is correct, click Next to continue.
Step 6: An information box screen appears. Click OK to go to the next screen.
Step 7: After the software utility installation is complete, click Finish. You are now
ready to install 802.1x authentication software.
Step 8: Drag your mouse over Browse the CD and click on it.

7
Step 9: The Windows file explorer opens. Double-click on the file “Aegisl2.exe”
Step 10: When the AEGIS Protocol Installation window appears click the Install button to
begin installing program files.
Step 11: When the message AEGIS Protocol Installed Successfully appears in the
dialog box, click the Cancel button. Windows
®
ME may or may not
automatically reboot your PC.

8
2-4. Driver & Utility Installation - Windows
®
2000
Step 1: When the Found New Hardware Wizard screen appears, click Cancel to exit.
Step 2: Insert the GN-WS53HN1 Installation CD into the CD-ROM drive. The GIGABTYE
GN-WS53HN1 Wireless Mini Card Adapter setup screen appears.
Step 3: Drag your mouse over Install Wireless LAN Utility and click on it to start the
utility installation program.
Step 4: When the Welcome screen appears, click Next.
Step 5: The Check Setup Information screen displays the Operating System of your
computer. If it is correct, click Next to continue.
Step 6: After the software utility installation is complete, click Finish. You are now
ready to install 802.1x authentication software.
Step 7: If the screen below appears, this does not mean there is a problem. Click Yes to
continue.
Step 8: Drag your mouse over Browse the CD and click on it.
Step 9: The Windows file explorer opens. Double-click on the file “AegisI2.exe”.
Step 10: When the AEGIS Protocol Installation window appears click the Install button

9
to begin installing program files.
Step 11: When the message Installed Successfully appears in the dialog box, click the
Close button. Windows
®
2000 may or may not automatically reboot your PC.

10
2-5. Driver & Utility Installation - Windows
®
XP
Step 1: When the Found New Hardware Wizard screen appears, click Cancel to exit.
Step 2: Insert the GN-WS53HN1 Installation CD into the CD-ROM drive. The GIGABTYE
GN-WS53HN1 Wireless Mini Card Adapter setup screen appears.
Step 3: Drag your mouse over Install Wireless LAN Utility and click on it to start the
utility installation program.
Step 4: When the Welcome screen appears, click Next.
Step 5: The Check Setup Information screen displays the Operating System of your
computer. If it is correct, click Next to continue.
Step 6: After the software utility installation is complete, click Finish. You are now
ready to install 802.1x authentication software.
Step 7: Drag your mouse over Browse the CD and click on it.
Step 8: The Windows file explorer opens. Double-click on the file “AegisI5.exe”.

11
Step 9: When the AEGIS Protocol Installation window appears click the Install button to
begin installing program files.
Step 10: When the message Installed Successfully appears in the dialog box, click the
Close button. Windows
®
XP may or may not automatically reboot your PC.

12
Chapter 3 Using the GIGABYTE WLAN Configuration
Utility
The Gigabyte WLAN Utility is a powerful application that helps you to configure the
GN-WS53HN1 Wireless Mini Card Adapter as well as monitor the network status link. It
automatically appears as an icon in the system tray at the bottom right corner of screen
whenever the card is operating (see Figure 3-1). The icon displays signal strength (one
green box = weak signal, 4 green boxes = strong signal) and double-clicking on it
launches the utility.
Figure 3-1 Gigabyte Configuration & Monitor Utility Icon
You may also open the Gigabyte WLAN Utility from the Windows Start menu, selecting
Programs and then Gigabyte WLAN Utility.
Note: Modifications to WLAN configuration settings can be done when GN-WS53HN1 is in
use or through the network configuration tool provided by Windows
®
when it is inactive.
3-1. The Profile Tab
Click on the Profile tab in the Gigabyte WLAN Configuration Utility to view the values for
each defined profile. Click the Add button to create a new profile (see section below for
further details), the Delete button to delete a selected profile, the Edit button to modify a
selected profile and click the Activate button to have a selected profile become active.
Figure 3-2 Profile Tab

13
Profile Name -
Name associated with specific wireless parameters and settings. The icon indicates
the currently active profile.
SSID –
Displays the Service Set Identity (wireless network name) associated with active profile.
Channel –
Displays which channel the profile is operating on.
Authentication –
Displays authentication type associated with profile.
Encryption –
Four encryption types currently used in the profile include “None”, “WEP”, “AES” and
“TKIP”.
Network Type –
Displays the wireless mode (Infrastructure or Ad-Hoc) associated with the profile.
3-1-1. Add Profile – Configuration Tab
Figure 3-3 Add Profile – Configuration Tab

14
Profile Name –
Type in a unique profile name, set the corresponding parameters and click the Apply
button to add profile.
SSID –
Select a defined Service Set Identity detected by the system from the drop-down list or
input a new SSID (32-character maximum).
Power Saving Mode –
Select the PSM option to enable power saving feature (when no data will be transmitted)
or the CAM option to have device always on.
Network Type –
Displays the current wireless mode (Infrastructure or Ad-Hoc) the Mini Card Adapter is
operating in. Infrastructure is the most common and is used when connecting your PC to a
wireless access point or wireless router. Ad-Hoc mode is used to connect to another
computer without the use of a wireless access point or wireless router. In Ad-Hoc mode,
the Preamble and Channel can be manually set (see Figure 3-4).
Figure 3-4
TX Power –
Allows you to define the transmit power at various percentage levels with 100% being the
default value.
RTS Threshold –
Define the packet size the wireless node uses to determine appropriate transmission
mechanism.
Fragmentation Threshold –
Define the packet length used for fragmentation. Packets larger than value will be
fragmented.

15
3-1-2. Add Profile - Authentication and Security
If an authentication or security setting is configured in a wireless access point or wireless
router, it is necessary for the Wireless Mini Card Adapter profile to match the security
parameters in order to obtain access and establish a connection. Both WEP Encryption
and 802.1X Authentication protocols are supported.
Figure 3-5. Authentication and Security
Table 3-1
Authentication
Type
Security
Secure Key
Setting
802.1X Enabled
None None None
WEP Key Setting
YES
None None Shared
WEP Key
YES
TKIP None WPA
AES None
YES
TKIP WPA-PSK Key WPA-PSK
AES WPA-PSK Key
NO
3-1-2-1. Authentication and Security
Authentication –
Before a station connects to a SSID, the authentication type used by the SSID must be
known. Authentication types include OPEN SYSTEM, WAP, WAP-PSK and SHARED.
Security –
To prevent unauthorized access to data transmitted on the network, WLAN card provide a
data encryption of high security. The access point must have the same password and
encryption to connect with you. Different authentication types have different level of
security. Please refer to Table 3-1.
WEP Encryption –
/