Page is loading ...

1
Installation and Service Manual
Alternating Current Systems (A/C)
Stair Lift
ThyssenKrupp Access
Part #470269
Rev. C
Warning!
STRICT ADHERENCE TO THESE INSTALLATION INSTRUCTIONS is required and will promote the safety of those
installing this product, as well as those who will ultimately use it for the purpose intended.
Any deviation from these instructions will void the LIMITED WARRANTY that accompanies the product.
Additionally, any party installing the product who deviates from the INSTALLATION INSTRUCTIONS shall be
taken to agree to INDEMNIFY, SAVE AND HOLD HARMLESS the manufacturer from any and all loss, liability or
damage, including attorneys fees, that might arise out of or in connection with such deviation.
ThyssenKrupp
Citia and

2
xxIM0805-470251
This stair lift Installation and Service Manual has been written
to provide clear and precise instructions for proper installation
procedures of both the Citia A/C and Aveya A/C stair lifts.
Please refer to the Owner's Manual for warranty information and
operating instructions. The Owner's Manual must be given to
the owner of the lift before it is put into service.
Any alterations to the equipment without written authorization
by ThyssenKrupp Access may void the warranty.
If you have questions concerning the installation or service
of the Citia A/C or the Aveya A/C please contact the Service
Department:
ThyssenKrupp Access
4001 East 138th Street
Grandview, MO 64030
800-409-3349
Table of Contents
I. PRELIMINARY CHECKS .......................................................3
A. Installation site requirements ...............................................................3
B. Tools required ......................................................................................3
C. Shipment ..............................................................................................3
II. TYPICAL COMPONENTS ........................................................4
III. INSTALLATION PROCEDURES ............................................4
A. Determine where the track will be installed .........................................4
B. Measure for the track ...........................................................................4
C. Cut the track to length ..........................................................................7
D. Install mounting hardware ...................................................................7
E. Install splice bars ................................................................................7
F. Time the gear rack ...............................................................................8
G. Install lower end cap ............................................................................9
H. Mount the track to the staircase ...........................................................9
I. Install the chassis assembly into the track .........................................10
J. Ground the Power Cable ...................................................................12
K. Install the Top End Cap ......................................................................12
L. Install the Junction Box ......................................................................13
M. Adjust the tracking rollers ..................................................................14
N. Test run the chassis ...........................................................................14
O. Level the seat hub .............................................................................15
P. Install the seat ....................................................................................15
Q. Adjust seat height if desired ...............................................................16
R. Remote control label ..........................................................................16
S. Charging the orientation of the pendant holster .................................16
T. Velcro Pendant Control ......................................................................16
IV. COMPLETION PROCEDURES ............................................17
A. Completion Checklist .........................................................................17
B. Before Leaving the Jobsite ................................................................17
V. E.T.L. REQUIREMENTS ........................................................18
VI. SERVICE INFORMATION....................................................18
A. Generalspecications .......................................................................18
B. Standard equipment ..........................................................................18
C. Control Board Operation Notes .........................................................19
D. Control Board Diagnostics .................................................................19
E. Up/Down Logic ..................................................................................19
F. Whattodoiftheliftisstuckonanallimitswitch ............................19
G. Troubleshooting Flowchart if lift won’t run..........................................20
Important! It is imperative that this manual be read and understood prior to
attempting installation of the stair lift. Also, please observe all cautions and
warnings in this manual, as well as labels on the equipment.

3
C. SHIPMENT
Verify all components are included with the shipment:
Dedicated* 115VAC, 60 Hz, 3-wire grounded outlet
within 13’ of the top or bottom of the staircase.
Stair angle between 25° and 45°.
Indoor residential installation.
* NEC requirement
A. INSTALLATION SITE REQUIREMENTS
B. TOOLS REQUIRED
Set of Phillips head screwdrivers
Tape measure
3/8” reversible drill with 3/8” hex socket and a 6”
extension
3/16” Allen wrenches
13mm socket
Flatmetalle
Torque wrench rated to at least 18ft.lbs. of torque
Portable band saw or hack saw (for cutting track)
Safety items: steel toe shoes, safety glasses, gloves,
etc.
Torpedo level
Combination Square
Tools for removing hand rail if it interferes with the
travel of the stair lift
Stubby 13mm open end wrench
1/2" combination wrench
4mm Allen wrench
1/8" Allen wrench
Wire cutters
Knife
I. PRELIMINARY CHECKS
Seat Box:
•Seatassembly
Chassis Box:
•Chassisassembly
•(1)Powersupply
•(2)Remotecontrols
•(2)9voltbatteriesforremotecontrols
•Unitsmallparts
- (4) Chassis wheels
- (1) Tube of lubricant
- (1) Set of Velcro
®
- (1) Fuse
Track Box:
•(2)8’piecesoftrackwithgearrackandsplicebars
•(1)38”longpieceofgearrack(loose)
•(6)Trackbrackets
•(2)Trackendcaps
•Smallpartskit:
- (1) 4” long piece of gear rack for splice timing
- Fasteners for track brackets and track end caps
- (12) Track bracket covers
- (2) Splice bars
- (4) set screws

4
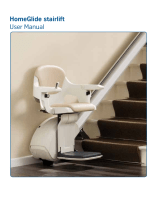
II. TYPICAL COMPONENTS
A. DETERMINE WHERE THE TRACK WILL
BE INSTALLED
Determine which side of the stairway the lift will be installed
on.
Note: The gear rack must be installed on the side nearest
the wall, regardless of whether it is a right-hand or
left-hand installation.
Mount This way, OR this way
Gear Rack
Gear Rack
(against wall)
Starlift Tracks
Fixed or
Fold-Up Seat
(depends on
model)
Chassis
Folding
Footrest
Swivel Seat
Handle
Unit Control
Pictured above is a Citia Select on a BOS track.
The Citia and Aveya models both feature
interchangeable seats. The seat on the unit you
are installing may not look exactly like this. The
A/C track has a channel down the middle which
Regardless, the installation procedures are alike for
all Citia and Aveya models.
If you change the unit to Left Hand, you will need
to change a plug on the unit. Information for hand
changing on the unit can be found on page 10.

5
B. INSTALL MOUNTING HARDWARE
Lay out the sections of track on the staircase, with
the back side facing up.
Insert the appropriate number of T-bolts into the
slots on the bottom of the track.
Note: There will be three (3) brackets per each 8’ sec-
tion. This must be done before the splice bars
can be inserted.
Assemble the mounting brackets on the T-bolts as
shown.
Slide the (2) pieces of track together and secure
the splice bars with the set screws. Ensure that a
tight, hairline joint is formed all the way around the
track joint.
Note: Snug the bolts, but do not tighten at this time
as the brackets will need to be adjusted.
Splice bars slide
into track slots
Mounting bracket
T-bolts
Gear Rack fits in
this channel
E. INSTALL SPLICE BARS
5
/
16
-18 x ¾"
cage bolts
C. TIME THE GEAR RACK
Loosen the set screws in the top sections of gear rack
and slide them up until the gear rack in the upper track
sectionis6⅛”fromthetop.
Note:Thereareatotalofvesectionsofgearrackthat
need be slid up. This may cause the gear rack to not
beushwiththeendofthetrack.Thisisacceptable,
thereisatoleranceanywherefromushtowithin
5⅝"frombottomoftrack.Anydistancebetweenthere
isne.Ifyouhavegearrackextendingbeyondthe
track, please cut it off.
5.625"
There is a tolerance of up to
5⅝”betweenthegearrack
and the end of the track.
Anywhere between here is
ne.
The gear rack MUST be
6⅛"fromthetopofthetrack.
Make sure this measurement
is accurate.
6⅛"

6
Load the loose 38” piece of gear rack from the top, and
slide up to meet the other gear rack. Time and tighten
gear rack.
Turn the track assembly right side up on the stairway.
A short piece of gear rack is
provided in the small parts
kit to properly space the gear
rack splices.
Do not tighten gear rack until the
proper spacing has been achieved.
There may be a gap between two pieces of gear
rack when spacing the splice. This is acceptable
as long as the distance between the teeth is
consistent.Thiscanbeveriedbymatchingthe4”
piece of gear rack to the splice.
Area able to be omitted in
rack splice
Use the 4" piece of gear rack included in the small
parts kit to time the gear rack.
Tighten the pieces of gear rack down in place.
Note: There is not a top or bottom end of the gear rack.
D. INSTALL LOWER END CAP
Slide one T-bolt on the gear rack side of the track.
STEP MAY NOT APPLY TO YOU: Slide 1 T-bolt on each
T-slot ONLY in installations where track does not touch
theoorofthebottomlanding,suchaswhentrackstops
onrststep.Ifthetrackwillberestingontheoor,skip
this step and proceed to step 4.
Slide the end cap onto the lower end of the track,
inserting the dove tail into the groove on the top of the
track.
Note: If you skipped step 3 because of the type of
installation you are performing, skip step 6 as well.
Fasten the end cap to the track with the T-bolts and
nuts provided.

7
E. MOUNT TRACK TO THE STAIRCASE
Snap on the track mounting bracket covers.
Lightly lubricate the entire length of gear rack.
Lubricant is provided in the small parts kit.
Position the track on the staircase with the bottom side
of the track resting across the stair nosings, the lower
track end cap resting on the lower landing, and the
back side of the track 3 ½” away from the wall or other
obstructions, such as the power supply. If installing a
Citia Silver or Aveya Premier this distance will need to
increase to 6 ¼" to accommodate the wider seat.
Note: These instructions are for mounting to a standard
wood staircase. For installation on hard surface
stairs, anchors may be needed and different screws
may be required.
Note: This distance is needed for clearance of the seat
back in the riding and swivelled position.
Attach the track to the staircase with track mounting
brackets. The brackets attach to the stair treads
with wood screws. Locate one bracket at each of
the following positions:
1st tread at the bottom of the
stair
Tread below the top landing
Tread above a track splice
Tread below a track splice
Center of each section of track
5
/
16
-18 T-bolt
into slot in bottom of track
Track mounting
bracket
Track

8

9

10
I. INSTALL THE CHASSIS ASSEMBLY INTO
THE TRACK
NOTE: If you will need to change remote frequencies on
the call/send remote controls do this PRIOR to mounting
the chassis on the track. With the chassis close to the
wall,itmaybecomedifculttoremovetheshroudand
access the control board. Refer to Step C of the Service
Information for instructions on changing the frequency
of the remote control.
Measureforthelenghtoftheexchain.Theexchain
should be the same length as your track. If it is too long,
snap the chain at the correct link and discard the excess
plastic links.
Move the chassis to the top landing. Do not pick up
by the plastic shroud. Remove the front seat mounting
cover. You must remove the screws from the back
side of the cover rst.
From the factory the A/C unit will be Right Handed. To
change the handed-ness of the unit remove the cover
from the footrest/seatpost area.
It should look like this:
There will be two harnesses, one marked RH (right
hand) and one marked LH (left hand). Plug in the har-
ness that corresponds with the handed-ness of the
unit.
Right
Hand
Harness
Left Hand
Harness

11
Determine whether the installation is to be a right
orlefthandinstallation.Theexchainisfactory
conguredforarighthandinstallation.Forlefthand
installationstheexchainmustberemountedon
the mounting bracket.
Measurethefulllengthoftrack.Theexchainmust
be shortened to the same length. Chain links can
be removed by snapping links apart. Reinstall the
end mounting link to chain. When reinstalling the
end mounting link route the wire as shown.
Notethepowerwirecomesthroughttheex-
chain and exits before the last link. The wire is
then on the top of the last link
Chain Mounting Clip
The Chain Mounting Clip
installs here.
Install the chain mounting clip with the two Philips
head screws located at the end of the Flex Chain.
Connect the three wire leads protruding from
the bottom of the chassis’s switch plate to the
corresponding wire leads found at the bracket
mountedendoftheexchain.Eachwireleadhas
a corresponding match paired connector, i.e., it will
onlytwiththecorrectwire.
wires from
exchain
wires from
chassis
face of screws
holding Flex-
Chain to mounting
bracket are
pointing down
towards gear.
These screws hold the mounting
bracket to the chassis.
The chain only bends one way, so make sure that the
loop is heading OUT of the end that will be heading
DOWN.
Determine which end of the chassis will be the "downhill"
end.Whenfolded,thefoldedloopoftheex-chainmust
be toward the "downhill" end of the chassis. Remounting
theex-chaintotheoppositeendofthebracketmay
be required
Center Channel
of Citia track
Flex Chain
TheChainwilltlikethis:
Flex Chain
Center Channel
of Citia track
I. INSTALL FLEX CHAIN

12
Flex Chain
Final link in Flex Chain
Chain mounting
clip
Unsnap the last link with the chain mounting clip attached
to it and resnap it to the end of the Flex Chain in the
track. Whe you snap the new link on, your Flex Chain
should look like this:
Hook the chain mounting clip over the side edge of the track.
It should hang oppostie the wall side of the track.
Chain mounting
Chassis
Power Wire
View of chassis mounted on track, without top
end cap, looking down the stairs.
J. GROUND THE POWER CABLE
Look down the shaft where the power cable is located. It is
crucial that the bracket that attaches the power cable
to the bottom of the chassis is directly in the center of
the shaft (see illustration).
Mounting Bracket (located in
center of opening)
Stair Lift Track
Stair Lift Chassis
Notice how the bracket lines up directly between the
walls of the track shaft.
Track End Cap
Flex Chain loop
Chassis
Keep this link
NOTE: Make sure to retain last link with chain mounting
clip. You WILL need it later.
Once you've started the Flex Chain into the channel,
slide the unit on to the track, using the guide wheels
to help put the track in place. From the bottom of the
chassis, the unit should look like this:
Line up the splice bars of the starter track with the top
end of the track bolted to the staircase.
While holding the chassis, remove the long bolt from
the starter track and gently slide the unit down the track
until the chassis is fully on the mounted track and the
gears have engaged.

13
L. INSTALL JUNCTION BOX
Determine where, underneath the track, you’ll be
mounting the junction box. Route the power wire
from under the end cap, down the center of the
underside of the track to where the box will be. Give
yourself an inch or two of slack and strip back the
wires.
The junction box will come from the factory
pre-wired to the Edison Plug that goes to the wall.
You will have to wire the grey power wire from the
Flex Chain.
All needed connectors are supplied in the
junction box.
Insert the grey wire and connect these ends on the
wires:
Note that there are two black wires. Their jackets are
labeled L1 and L2. It DOES matter which one goes
where.
Now make the connections. There are six wires total
in the junction box, three coming in from the track,
and three going out to the plug in the wall. Below is
a chart to help you double check your wiring.
From Grey Cable Should be connected to:
Black wire (L1) Top Circuit Breaker
Black wire (L2) Wire nutted together with
White wire
Green and Yellow Striped Wire Bolted to Grounding Nut
From Black Cable Should be connected to:
White wire Wire nutted together with
Black wire (L2)
Dark Green Wire Bolted to Grounding Nut
Black wire Bottom Circuit Breaker
The nished product should look something like
this:
Green
White
Green and
Yellow
stripe
Black
(to wall)
Black L1
Black L2
Circuit Breaker
Wire Nut
Ground Nut
Power Wire Connection Chart
Black wire (L1) Spade Connector
Black wire (L2) Leave Bare
Green and Yellow Striped wire Ring Terminal
Place the black Heyco plug into the hole where the
grey power wire enters the junction box. Heyco
pliers come in especially handy here.
Slide a T-bolt down each side of the track. Attach
the Junction box to the track using two T-bolts and
two nuts.
Plug into the wall.

14
K. INSTALL THE TOP END CAP
Route the power wire
out through the
bottom of the end
cap.
IT IS CRUCIAL
that the power
wire fit into the
recessed area of
the end cap on
its way out. If it
is anywhere else
the wire will pinch
and may possibly
short out.
Wire MUST
t in this
area
To help further explain
the power wire
placement, refer to the
illustrations below. The
side view features a
cutaway of the side of
the end cap to reveal
how the power wire is
routed out of the track,
into the end cap and
down under the track.
The bottom view shows
how the power wire
runs under the track,
down the center to the
junction box.
Side View of end cap
end cap
Track
Power Wire
Bottom View
of end cap
end cap
Track
Power Wire
Junction Box
Junction Box
M. ADJUST THE TRACKING ROLLERS
Loosen locknuts on take-up assembly
Using a wrench, tighten jack-nuts against the chassis.
The gear set wheel should now be tight against the
track.
Tighten locknuts.
Take care in tightening locknuts. The take up assembly
should be level with the track.
Bottom of Track
Track and Chassis (Bottom View)
Chassis
Locknuts
Take-up assembly
Take-up Assembly
(Bottom View, Track in Place)
Jack-nuts
Locknuts
Gear Set Wheel
Take Up Wheels
Bottom of Track

15
N. TEST RUN THE CHASSIS
Operate pendant control to verify that the stair lift
will go up and down properly, while holding the
seat swivel switch in.
Readjust the tracking rollers, if necessary. Refer
to Step J.
O. LEVEL THE SEAT HUB
Note: If you run out of slot, remove the bolts and replace them
in different holes until the seat will plumb to vertical.
Tighten the bolts.
It is very important to torque the nuts to a minimum of
18 ft. lbs. (24.4 Km) to lock the seat hub into place.
Loosen the three (3) bolts on the chassis
behind the footrest.
Place a torpedo level on either the seat hub
or the footrest.
Rotate mounting bracket on the bolts until the
seat mounting shaft is vertical and plumb.
Bolts
Footrest
P. INSTALL THE SEAT
Place the seat assembly onto the seat shaft.
Rotate the swivel seat handle and slide the seat fully
onto the shaft. Release the handle and make sure the
seat locks into position.
Rotate the swivel seat handle and check that the seat
locks in the loading, riding, and unloading positions.
Note: The swivel handle is installed on the right hand side
of the seat. If desired, the handle can be moved to
the left-hand side. Refer to the assembly drawing
in the Service Information section for assistance.
Citia or
Aveya seat
Seat handle
Locking Mechanism
Seat Post
Seat Post
Seat Post Collar
Locking Mechanism

16
Q. ADJUST SEAT HEIGHT IF DESIRED
Loosen the allen screws on the two seat clamps.
Slide the seat up or down as desired and tighten
the screws.
Install the front seat mounting cover into position.
R. REMOTE CONTROL LABEL
Note: Refer to Step C of the Service Information for in-
structions on changing the frequency of the remote
control.
Apply the appropriate directional label to the face of
the remote control, depending upon whether it is a
righthandorlefthandinstallations.Conrmdirection
ofremotebuttonsrst.
S. VELCRO PENDANT CONTROL
Apply one side of Velcro to back of pendant control and
the other to the unit, so pendant will adhere to the unit.
Placement of pendant control is up to the customer,
ThyssenKrupp Access recommends the arm of the
unit. Velcro will hold pendant to unit when unit is not in
use.
T. CHANGING THE ORIENTATION OF THE
PENDANT HOLSTER
The Citia and the Aveya come with a Pendant Holster
attached under the armrest.
Pendant Holster
Pendant Holster
with pendant
The pendant holster comes
from the factory already
attached, however, you may
need to change which side
the holster is attached to for
the comfort of the user.
The holster attaches in one
of two ways depending on
which model of stairlift you're
installing.
Option 1: There are two screws under the armrest which
attach the armrest to the chair arm. Undo these screws,
remove the holster, reattach the armrest and install on the
other side.
Right-Hand arm of stair lift
Armrest
Pendant Holster

17

18
IV. COMPLETION PROCEDURES
A. COMPLETION CHECKLIST
The following features must be veried as operational
before the stair lift can be released for use:
Upper and lower limits: Verify the lift stops auto-
matically at the top and bottom of the track.
Final limits: Verify the lift is inoperable in both direc-
tionswheneachnallimitswitchispressed.
Running Clearance: Verify the lift clears all obstruc-
tions.
Track Mounting Brackets: Verify all track mounting
brackets are securely attached to the stair treads, the
track and at the pivot points.
Track Splice: Verify track joints are smooth and free
of burrs and gaps.
Gear Rack:Verifythegearrackissufcientlylubri-
cated.
Track End Covers: Verify the track end covers are
securely fastened to the track.
Track: Verify the inside of the track is free of foreign
objects.
Chassis Rollers: Verify the chassis roller axles
have been lubricated.
Footrest:
Verify the footrest clears all stair nosings.
Verify the lift stops when the footrest runs into
an obstruction.
Verify the footrest folds up and stays in the up
position.
Verify the unit does not beep when it stops at
the upper and lower limits. The unit will beep if
stopped and not on the charging strip
B. BEFORE LEAVING THE JOBSITE
The following should be completed before leaving the
jobsite:
Clean up work area.
Assist customer on orientation ride.
Demonstrate proper operation, lubrication and
maintenance to the user of the lift and other fam-
ily members at the residence.
Give customer a copy of the Owner’s Manual for
reference. Please take time to insert your business
card or write your company name, address and
telephone number inside the Owner’s Manual in the
area provided.
Assisttheownerinllingoutthewarrantycardwith
date of installation
Seat:
Verify the seat is level.
Verify the seat swivels 70° towards each land-
ing and locks into position.
Verify the lift will not operate when the seat is
not locked in the riding position.
For optional folding seat: Verify the seat will
fold up and stay in the up position.
Verify the seat belt works properly.
Clean Up: Verify the lift is free of all grease, dirt, etc.

19
V. E.T.L. REQUIREMENTS
This E.T.L. listed stairway lift must meet the latest ASME
A18.1aspecicationsfortheE.T.L.listingtobevalid.
The following rules must be complied to at the installation
site.
Rule 7.1.1
A free passage width of no less than 20 in. shall be provided.
If the seat and platform can be folded when not in use, the
distance shall be measured from the folded position.
Rule 7.1.2
The structure on which the equipment is installed shall be
capable of safely supporting the loads imposed.
Rule 7.1.3
The installation of all electrical equipment and wiring shall
conform to the requirements ANSI/NFPA 70.
Rule 7.6.4
At no point in its travel shall the edge of the footrest facing
the upper landing be more than 24 in. above the step or
landing as measured vertically.
Rule 7.7.2
No lift shall be installed to operate on a greater incline than
45 deg. as measured on the mean.
VI. SERVICE INFORMATION
A. GENERAL SPECIFICATIONS
Rated Load: 375 lbs. (170 kg)
Speed: 18-25 fpm (dependant on angle of install and
load)
Travel: 32’ max. (track length)
Power Supply: Dedicated* 115VAC, 60 Hz, 3-wire
grounded outlet
Incline Limits: 25° to 45°
ETL Listed when properly installed
B. STANDARD EQUIPMENT
Drive System: Rack and pinion
Motor: .5 hp, 120 VDC
Motor Controller: SoftStart/SoftStop
Brake: Self locking worm gear
Seat:
•Standard-18”widexedseatwithtwoxedarmsOR
•Select-18”widexed,upholsteredseatwithOR
•Excel-19”widefoldingseatwithtwoxedarms
•Seatbelt
•70°lockingswivelatupperandlowerlandings
Controls: Low voltage up-down hand-held control on unit
and two wireless remote controls
upper and lower
stops
upperandlowernallimit

20
* ASME A18.1a / NEC Requirement
Notes:
• The call/send controls (transmitters) use infrared signals.
There are two infrared sensors located on the chassis
access cover. There is a combination of 4 different fre-
quencies the transmitters can be set to (both transmitters
must be set to the same frequency).
• There is a half second delay after a control button is
pressed before the lift starts to move. After the lift stops,
the up/down controls are disabled for 3 seconds.
Safety Devices:
Footrest obstruction sensor
Swivel seat cut-off switch
Final limits
Warranty: Five years on drive train (motor and gear)
Two years on all component parts
Caution!
The control board is sensitive to static charge. To avoid
damage, touch a metal surface on the lift to discharge
yourself of static charge. Never touch the chips on the
control board.
Always disconnect the 115 VAC power when working
on the lift.
Remote Control (Transmitter) Frequencies
The standard wireless remote controls (transmitters) use
infrared signals. One button on the transmitter is UP and
other button is DOWN. There are two infrared sensors
(receivers) located on the chassis access cover.
A combination of 4 different transmitter frequencies allow
for more than one lift in a single home. The two transmit-
ters must be set to the same frequency (for each lift). For
example1to1,2to2,etc.
To change a frequency:
Ensure the infrared receivers (in chassis cover) are con-
nected to the control board. Use the seat control to move
the lift away from the end of the track. Take the back off of
C. CONTROL BOARD OPERATION NOTES
the transmitters and set the red jumpers (in each transmit-
ter) to the same code. Change the corresponding code in
the control board J1 (see chart). Press and hold the yellow
"learn" button on the control board, then press and hold
one of the up/down buttons on one of the transmitters. The
controller board should beep and the lift start to move after
you release the transmitter button when the frequency has
been successfully changed.
Note that if the lift is on an upper or lower limit switch, the
frequency may not be able to be changed.
To access the controller board the footrest support and
shroud must be removed. The footrest plug can be tempo-
rarily jumpered out while changing frequencies.
D. CONTROL BOARD DIAGNOSTICS
Steady Green on PWR LED - Run Mode
E. UP/DOWN LOGIC
When the lift is commanded to run, the controller board
will immediately sound a single beep and the lift will pause
momentarily before moving.
If the lift is commanded to stop by releasing a control
switch/button, the lift will decelerate to a stop in 1.5 seconds.
However, if the switch/button is pressed again, before the
lift has reached a complete stop, the lift will immediately
start to accelerate.
Thelifthasaxedaccelerationrateof3.0seconds.
The priority of the input signal to the lift for a direction com-
mandisdependantonwhichinputwasreceivedrst.
F. WHAT TO DO IF THE LIFT IS STUCK ON
A FINAL LIMIT SWITCH
(MANUALLY LOWERING THE LIFT)
Remove the seat mount shroud.
Unplug the unit from A/C power.
Insert an 8mm socket over the hex shaft located at the
end of the motor. Rotate the shaft to move the stair lift
offofthenallimitswitch.
J1 Control Board
Remote
/