Page is loading ...

Guide to Installing Your
Guide to Installing Your
AmeriGlide Rubex Stair LiftAmeriGlide Rubex Stair Lift

2
T A B L E O F CONTENT S
WELCOME TO THE AMERIGLIDE FAMILY
Congratulations on your purchase of an AmeriGlide Stair Lift. These
instructions will assist you in making sure your installation is safe and
successful. Please read through them completely prior to attempting
to install the unit.
AmeriGlide
Page 2 ..... Welcome to the
AmeriGlide Family
Page 3 ..... Before you start
Page 4 ..... Required tools;
Receipt of unit
Page 5 ..... Installing the lower
tracks
Page 6 ..... Checking the track
Page 8 ..... Routing the lower
call control wire;
Installing the unit
Page 9 ..... Slack cable reset
procedure
Page 10 ..... Installing plastic
chain & traveling
power cable
Page 11 ..... Installing the
power cord
Page 12 ..... Installing the seat
Page 14 ..... Installing the upper
limit cam; Installing
the call controls
Page 15 ..... Completing track
installation;
Final checks;
Additional notes

2 3
B E F O R E Y O U S T A R TW E L C O M E T O T H E S U M M I T F A M I L Y
C
ongratulations on your purchase of a Summit Stairway
Lift. These instructions will assist you in making sure your
installation is safe and successful. Please read through them
completely prior to attempting to install the unit.
TABLE OF CONTENTS
Page 2 ....... Welcome to the
Summit Family
Page 3 ....... Before you start
Page 4 ....... Required tools;
Receipt of unit
Page 5 ....... Installing the lower
tracks
Page 7 ....... Checking the track
Page 8 ....... Routing the lower
call control wire;
Installing the unit
Page 9 ....... Slack cable reset
procedure
Page 10 ..... Installing plastic
chain & traveling
power cable;
Page 11 ..... Installing the
power cord
Page 12 ..... Installing the seat
Page 14 ..... Installing the
upper limit cam;
Installing the call
controls
Page 15 ..... Completing track
installation;
Final checks;
Additional notes
Pre-Installation Checklist
.............. Is there any visible damage to the
packaging? If so, immediately contact
the freight carrier and report the damage.
.............. The side of the stairs on which the
unit and track will be installed are
marked on the chassis and seat boxes.
Verify that you have received the
correct hand unit (as looking up from
the bottom of the stairs.)
.............. Is a properly grounded 110-volt,
15amp (standard outlet) available
within 10’ of the top of the track?
.............. Have you “pulled” the necessary
permits in your area for installation?
.............. Are your stairs wood? If not, special
mounting hardware will be required.
Contact your dealer for assistance.
.............. The track will extend – 6” beyond the top
step. Is there a door or other obstruction
at the top that will interfere? If so,
contact your dealer for assistance.
.............. If after reading the instructions, you
don’t feel capable or comfortable with
completing the stairway lift installation,
please contact your dealer for assistance
in finding a qualified installer in your area.
ETL REQUIREMENTS
This ETL listed stair lift must meet
the latest ASME A18.1 standards for
the ETL listing to be valid.
The following clauses must be
complied to at the installation site.
ASME Clause 4.1.1*
Lifts shall be installed so that means
of egress is maintained as required
by the authority having jurisdiction.
ASME Clause 4.1.2*
The structure on which the equipment
is installed shall be capable of safely
supporting the loads imposed.
ASME Clause 4.7.2
Limitation of Angle. No lift shall be
installed to operate on a greater incline
than 45 deg as measured on the mean.
* Applicable to stair lifts installed in locations other than in or at a private residence.

4 5
REQUIRED TOOLS
RECEIPT OF UNIT
You will need the following tools to
complete the installation:
a) 5/32 allen wrench
b) 3/8, 7/16 & 9/16 open-end wrench
c) phillips screwdriver
d) 3/8 socket on 8” extension in an
electric or cordless drill
allen
wrench
open-end
wrench
phillips
screwdriver
electric drill
and socket
with extension
1Your stairway lift will arrive in three
boxes.
These will consist of:
a) seat box – 38 lbs
b) unit and top 2’ track – 115 lbs.
c) track box – 40-80 lbs (depending
on track length)
2Check each box for any possible
shipping damage.
CAUTION: Use a dolly or get
assistance in carrying the chassis
box to avoid injury.
3Carry the seat box and unit box to
the top step and leave aside.
4Bring the track box to the lower
landing of the staircase. Open the
box and remove the track, track
brackets and small parts package.
INSTALLING THE LOWER TRACKS
5In the small parts package you will
find:
a) track bracket bolts
b) wood screws
c) 2 self-drilling screws
d) call control extension
cord and bracket
metal end plate at
bottom of stairs
track brackets
6Identify the bottom track section. It will have a metal end plate at one end.
Lay the lower track section on the steps as shown in the picture above.
NOTE: Top track section will be installed with the unit after installation of
bottom and mid tracks. It requires 2 brackets.
d
c
ba
NOTE: The chassis is shipped attached
to the top 2’ of track.

6 7
7Use the track bracket bolts to
fasten brackets to nuts in the
track channel.
Position track brackets as follows:
a) 1 bracket pair on bottom step
b) 1 bracket pair on top step
c) 1 bracket pair above and below
where the tracks splice together
Hand tighten the bolts only - the
brackets will need to slide for
correct positioning.
do not remove foam
packing
NOTE: attach a bracket on the bottom nut,
but leave the nut second from the bottom
unused – it will be used later.
INSTALLING THE LOWER TRACKS
8Splice bars are used to join the track sections together. Locate the splice
bars and loosen the set screws from their shipping position. Slide the
splice bars to half way and tighten the two set screws remaining in the
track to hold them in place. The tracks will not slide together if the set
screws protrude beyond the splice bar.
ALLEN WRENCH
ALLEN WRENCH
detail of track section
showing position of splice bars
splice bar splice bar
9Slide the upper track section onto the lower
track section. Tighten the splice bar set screws
to lock tracks together.
CAUTION: Do not put your fingers between the
track sections at any time as injury could occur.
Only secure the
bottom brackets
2 Pull a piece of string taut from the
top of the track to the bottom. Mark
any places where the string is not
parallel with the track. Check the
results by using the string again. Track
and string should now be parallel.
The wall-side of the track may be
pulled down further than the stair-
side of the track on steps with thick
carpeting/pad. Final track adjust-
ment should occur after the unit is
installed.
The track should still move vertically in
the bracket slots for final adjustment.
Ilus1. - Track shown
with sagging area
due to “short” step
10
11 With bracket resting on step, position track bolt in
upper half of track bracket slot.
12 Starting with the bottom step, screw the
bracket half-way down – remove book – and
finish securely attaching bracket to the step.
13 Securely tighten remaining track brackets
to the steps using provided wood screws.
Slide the track and brackets against the wall or molding. This will
position the track the required 2” from the wall. If there is an
obstruction on the wall; ex: handrail, window sill, etc; the track
will need to be positioned 2” out further than the obstruction.
Temporarily set something under the bottom of the track to raise
it 1/2” – 3/4” off the bottom landing. This will prevent the track
from hitting the floor later when the track brackets are tightened.
NOTE: If your lift has been ordered with the optional
Wide Seat, the track needs to be positioned 3 1/2” from
the wall or obstruction.

8 9
ROUTING THE LOWER CALL CONTROL WIRE
1On the wall-side of the track, attach
call control bracket to the second
nut up from the bottom just
above the bottom track bracket.
2Route the wire through
the top track channel
on the wall-side of the
track.
3At the top of the middle section
of track, tuck the wire underneath
the track out of the way.
4You will finish routing the call
control wire after the top track
section is in place.
1Open unit box by cutting down
the sides of the box. Fold the
sides of the box down and slide
the unit and top track to the edge
of the steps.
2Remove cardboard packing from
back of footrest.
3Remove the shipping brace from
the upper section of track and set
aside.
CAUTION: Assistance may be needed for this part of the
installation due to unit’s and upper track section’s weight.
INSTALLING THE UNIT
4Loosen the
splice bars
from their
shipping
position
and slide
them out to half way.
Tighten the splice bars.
5Slide the upper track
section onto the lower
track section. Tighten the
splice bar set screws to
lock tracks together. The
tracks will not slide
together if the set screws
protrude beyond the splice
bar.
6Attach track brackets to
the side of the top track
section. Hand tighten.
ALLEN WRENCH
track section showing position of splice bars
splice ba
SLACK CABLE RESET PROCEDURE
1During shipping, the slack cable
device may engage and need to
be reset.
The slack cable safety prevents
the lift from running when there
is not enough tension on the
cable.
2
The illustrations show overhead
and cut-away views of the unit.
Completely
remove the
packing
bracket.
Make sure the packing bracket is
removed and discarded before
attempting to operate the lift.
ALLEN WRENCH
CAUTION:
Do not put
your
fingers
between
the track
sections at
any time as
injury
could
occur.

10 11
1
INSTALLING THE POWER CORD
INSTALLING PLASTIC CHAIN AND TRAVELING POWER CABLE
1
2Take one side of the traveling cable and tuck into
the bottom channel in the middle of the track.
NOTE: The power cable will face in toward the metal
channel.
3Feed the
other side of
the cable into
the channel
on the
opposite side.
SLACK CABLE RESET PROCEDURE
3
INSTALLING PLASTIC CHAIN AND TRAVELING POWER CABLE
For AC Powered Lifts
Locate the power cable and plug into
the side of the upper track cover. The
green light should light up - indicating
the unit is receiving power. If not,
check the circuit breaker under the
green light.
CAUTION: Do not ride. Track brackets are
not yet completely anchored.
2 For DC Powered Lifts
The batteries need to be connected
prior to the unit being installed.
To do this, connect the negative
wire (black wire) to the battery
next to the motor on top of the unit.
The charger must be plugged into
115 VAC grounded outlet, and left
plugged in all the time for the batteries
to properly charge. TheOwners Manual
has a page that describes the
lights that show on the charger.
4After laying the trailing cable and
guide chain into the track channel,
pull down on the cable to make
sure there is no slack and it is
straight under the left channel
tight against the side
5While holding the cable tight in
place, use a ¼” driver to run the
self drilling screw into the track
utilizing one of the two holes in
the guide chain mounting bracket.
Two holes are provided in the mounting
bracket in the event that one of the
holes would happen to be directly over
a splice between two pieces of track.
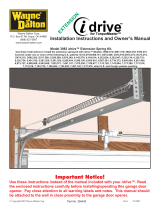
AC
plug
call-send plugs
call-send plugs
green light
not supplied on
DC powered lifts
AC Powered Header DC Powered Header
DC
plug

12 13
INSTALLING THE SEAT
3Remove the four screws from the top of
the unit. Set the screws/washers aside.
CAUTION: Be careful not to drop screws/
washers into unit while removing.
4Set seat on top of unit chassis. Tip seat
sideways and locate seat control wire.
Plug into the unit seat control wire. Plugs
can only go together one way.
5Lower the seat to the unit chassis. Screw
in place with four screws and lock
washers previously set aside. Pull up on
swivel arm to rotate the seat to gain
access to all 4 holes.
6If the seat is not level, then you will need
to adjust the seat leveling.
7There are 4 hex head screws that hold the
seat level. There are two on the footrest
side of the chassis, and two on the back
side. Loosen all four a couple of turns
(they cannot be taken out).
8Firmly level the seat by pushing up on
one arm and down on the other arm, until
the seat is level.
9Re-tighten the 4 hex head screws..
NOTE: While these screws are primarily used
to adjust the level of the seat, they also serve
to loosen the chassis so it realigns itself when
needed.
NOTE: The unit is designed so it will not run
unless the seat is facing forward and the
swivel lock is in place.
1The upper and lower limit cams
are safety devices that automati-
cally stop the unit at each
landing. They are on opposite
sides of the track to hold the unit
in place during shipping.
2Locate the lower limit cam (on
the track under the unit) and
move to the bottom of the track -
butting it against the bottom
track cover and tighten into
place.
Lower limit cam
NOTE: Before the upper limit cam can be moved to its proper position, the
seat will have to be attached to the unit chassis.
1Open the seat box and remove the
seat and two call controls from
the box. Set the call controls
aside.
INSTALLING THE SEAT
2Remove the two screws from the
back of the backrest. Use them to
attach the backrest to the
preferred height position on the
seat back bar.
INSTALLING THE LOWER LIMIT CAM

14 15
COMPLETING TRACK INSTALLATION
1The unit should be parked in the
middle of the track to evenly
distribute its weight.
2To complete the track installation,
tighten each of the brackets -
making sure they are tight to the
stairs.
3Press down on the track at each
bracket and tighten the track
bracket bolts to further anchor
the track and minimize any flex in
the track.
ADDITIONAL NOTES
FINAL CHECKS
1Read the Owner’s Manual before
riding the lift or allowing anyone
else to ride the unit.
2Test unit controls located on the
chair arm – run unit a short
distance down and up.
3Test operation of upper and lower
call controls.
4Check footrest safety.
5Warranty is in the owners manual.
6Start enjoying years of reliable
service from your new Summit
Stairway Lift.
INSTALLING THE UPPER LIMIT CAM
1
2Locate the upper limit cam and move to the top of
the track – position it approximately ½” from top
track cover and tighten into place.
1Finish routing the call control
wire into the upper track channel
on the wall side of the track. Plug
into one of the two call control
connectors.
2Plug in the upper call control box
to a call control connector.
3Plug in the lower call control box
to the call control connector at
the bottom of the track.
NOTE: Call controls can be
mounted to the floor so they can
be operated by your foot, or
placed on the wall and operated
by hand.
4Run the unit down to a few
inches past the lowest track
splice.
INSTALLING THE CALL CONTROLS
lower call
control box
upper call
control box
3Final Limit Switch Actuator
In the event that the lift over travels or
is moved up past the normal upper stop
position, the lift will push the final limit
actuator up into the final limit switch
disabling the unit. In order to return the lift to operation, you must manually
hand crank the lift down the track a few inches, and then slide the final limit
actuator down approximately one inch by tapping on it.
To install the upper limit cam, run the lift down about 1 foot by
using the control on the armrest.

15
COMPLET I N G T R A C K I N S T ALL A T I O N
ADDI T I O N A L N O T E S
FIN A L C H E C K S
1 Read the Owner’s Manual before
riding the lift or allowing anyone
else to ride the unit.
2 Test unit controls located on the
chair arm - run unit a short distance
down and up.
3 Test of operation of upper and
lower call controls.
4 Check footrest safety.
5 Warranty is in the Owner’s Manual.
6 Start enjoying years of reliable
service from your new AmeriGlide
Stair Lift.
1 The unit should be parked in the
middle of the track to evenly
distribute its weight.
2 To complete the track installation,
tighten each of the brackets - making
sure they are tight to the stairs.
3 Press down on the track at each
bracket and tighten the track bracket
bolts to further anchor the track and
Rubex Stair Lift
/