Kenmore 625.34867 User manual
- Category
- Water dispensers
- Type
- User manual
This manual is also suitable for

PRINTED IN U.S.A.
SAVE THIS MANUAL
Use plastic bag and tie provided, to hang manuals nearby
the softener for future reference.
Genius II Water Softener
u Warranty
u Start Up / Setting Timer
u How It Works
u Care Of
u Specifications
u Repair Parts
Sears, Roebuck and Co., Hoffman Estates, IL 60179 USA
OWNER’S
MANUAL
MODEL NO.
625.348670
Caution:
Read and Follow
All Safety Rules and
Operating Instructions
Before First Use of
This Product.
If you have questions when
installing, operating or main-
taining your softener, and
when setting the timer, call
this toll--free number...
1--800--426--9345

WARRANTY
2
SEARS RESIDENTIAL WATER SOFTENER
FULL TEN YEAR WARRANTY AGAINST LEAKS
Fortenyearsfromthe dateofpurchase,Sears willfurnishandinstall anewcurrentmodel watersoften-
er tank or salt storage drum, free of charge, if either the tank or drum develop a leak.
FULL THREE YEAR ELECTRONICS WARRANTY
For a period of three years from date of purchase, Sears will replace the BRINE TANK LIGHT, ELEC-
TRONIC BOARD, SENSOR HOUSING, WIRING HARNESS, TRANSFORMER, MICRO SWITCH,
DRIVE MOTOR, OR POWER CABLE, should they be defective in material or workmanship.
FULL ONE YEAR WARRANTY ON WATER SOFTENER
For one year from the date of purchase, when this watersoftener isinstalled and maintained inaccor-
dance with our instructions, Sears will repair, free of charge, all other parts which may be defective in
material or workmanship.
TOOBTAINWARRANTYSERVICE,SIMPLY CONTACT THE NEARESTSEARS SERVICECENTER
THROUGHOUT THE UNITED STATES. This warranty applies only while this product is in use in the
United States.
This warranty gives you specific legal rights, and you may have other rights which vary from state to
state.
Sears, Roebuck and Co., D/817 WA, Hoffman Estates, IL 60179
If you want your water softener professionally installed, talk to your Sears Salesman. He will arrange for a
prompt, quality installation by Sears Authorized Installers.
SEARS INSTALLATION POLICY
All installation labor arranged by Sears shall be
performed in a neat, workmanlike manner in accor-
dance with generally accepted trade practices. Fur-
ther, allinstallations shallcomplywithall locallaws,
codes, regulations, and ordinances. Customer shall
also be protected, during installation, by insurance
relating to Property Damage, Workman’s Com-
pensation and Public Liability.
SEARS INSTALLATION WARRANTY
In addition to any warranty extended to you on the
Sears merchandise involved, which warranty be-
comeseffectivethedatethemerchandiseininstalled,
should the workmanship of any Sears arranged
installation prove faulty within one year, Sears will,
upon notice from you, cause such faults to be
corrected at no additional cost to you.
FACTS AND FIGURES TO KEEP
Fill in the blanks below and keep this book in a safe
place so you always have these facts.
Water Softener Model No.†
Serial Number
Date Installed
Water Hardness Grains Per Gallon
Iron Content Parts Per Million
*pH Taste And/Or Odor
Water Pressure Pounds/Square Inch
Water Flow Rate Gallons Per Minute
† The model number is on the rating decal, located
on the rim, under the salt hole cover.

TABLE OF CONTENTS
3
PAGE
NO.
SECTION 1 SOFTENER START UP
A. SAFETY GUIDES 4
B. CHECK LIST OF STEP-BY-STEP GUIDES TO INSTALL 5
C. PROGRAM THE TIMER 6-7
D. SANITIZING THE WATER SOFTENER 8
E. FILL THE STORAGE TANK WITH SALT 9
SECTION 2 HOW YOUR WATER SOFTENER WORKS
A. FACE PLATE TIMER FEATURES 10-12
B. SOFT WATER SERVICE AND REGENERATION 13-15
SECTION 3 CARE OF YOUR SOFTENER
A. SALT: REFILLING STORAGE TANK, SALT BRIDGE 16
B. KEEPING THE WATER SOFTENER CLEAN 17
C. KEEP THE SOFTENER FROM FREEZING 18
D. HELPFUL HINTS CHECKLIST 19
SECTION 4 OTHER THINGS TO KNOW
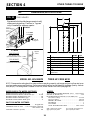
A. DIMENSIONS/SPECIFICATIONS 20
SECTION 5 SERVICE TECH INFORMATION
A. TROUBLESHOOTING 21-24
B. ROTARY VALVE SERVICE 25
C. WATER FLOW THROUGH THE SOFTENER VALVE 26-28
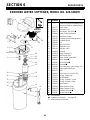
SECTION 6 REPAIR PARTS 30-33

WATER SOFTENER START-UP
SECTION 1
4
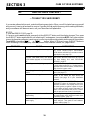
1A. SAFETY GUIDES
s Read all steps, guides and rules carefully be-
fore installing andusing your new watersoftener.
Follow all steps exactly to correctly install. Fail-
ure to follow them could cause personal injury or
property damage. Reading this book will also
help you to get all of the benefits from your water
softener.
s Your water softener will remove hardness min-
erals and “clear water” iron from water, up to the
limits shown on page 20. It will not remove other
types of iron, acids, tastes and odors, etc. It will
not purify polluted water or make it safe to drink.
s Protect the softener and piping from freezing.
Damage from freezing voids the softener warran-
ty. See page 18.
CAUTIONS
PLEASEREAD ANDCOMPLYWITH THEFOL-
LOWING GUIDES TO PREVENT DAMAGE TO
THE SOFTENER OR OTHER PROPERTY,
PERSONAL INJURY, OR POSSIBLE FATAL
SHOCK.
s THIS SOFTENER WORKS ON 24 VOLTS
ONLY.BESURETOUSETHETRANSFORMER
INCLUDED, AND PLUG IT INTO A 120V OUT-
LET.
s Unplug the transformer right away if the
power cable sould become damaged or
frayed. Make repairs before plugging back
into the power outlet.
s Always unplug the softener from electrical
power before removing outer valve covers.

WATER SOFTENER START-UP
SECTION 1
5
1B. CHECK LIST OF ALL STEP-BY-STEP GUIDES TO INSTALL
To be sure you have done all the steps to install the
softener, readthe followinglist. Refer to theInstalla-
tion Manual, part no. 7183613, for step-by-step
guides.
Page numbers referred to are in the Installation
Manual unless otherwise noted.
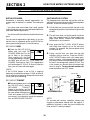
4 Is the house water flow goingINTO the softener
valve INLET? Trace piping to be sure. See pages
10 and 11.
4 Is theplumbingbypass valve(or3valves) setfor
SERVICE?Bypassvalve(s)shouldalwaysremain
in soft water service position. Position in “by-
pass”onlyifneededforsoftenerrepairs.SeeFIG.
12, page 20 of this manual.
4 Is the valve drain hose connected the right way,
andwithoutsharpbends orkinksthatcouldstop
or reduce water flow? See page 16.
Page numbers referred to are in the Installation
Manual unless otherwise noted.
4 Is the softener power cable connected to the
transformer? Is the transformer plugged into an
inside, 120V-60Hz electrical outlet? See page 20
in the installation manual, and the wiring sche-
matic on page 21 of this manual.
4 Be sure to restart the water heater. See page 20.
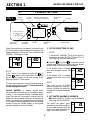
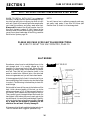
VALVE
INLET
plastic
3--valve
Bypass Valve(s)

SIGNAL
LIGHT
ADJUST
DOWN button
UP button
display
#1 SELECT
button
ON/OFF--HOLD button
(Recharge Tonight--Now)
SELECT
1
ON/OFF
HOLD
RECHARGE TO-
NIGHT
RECHARGE NOW
Genius II Water Softener
Kenmore Water Line
for Customer Assis-
tance
1--800--426--9345
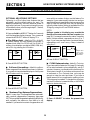
SALT
LEVEL
ADJUST
LOW SALT
salt level
adjust button
signal light
adjust button
TANK
LIGHT
SELECT
2
#2 SELECT
button
tank light
on/off button
low salt
indicator
WATER SOFTENER START-UP
SECTION 1
6
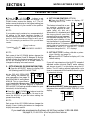
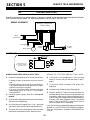
1C. PROGRAM THE TIMER
FIG. 1
When the transformer is plugged in, the modelcode
HF32,andatestnumber(example:A2.0)showinthe
faceplate display for 4 seconds. Then, 12:00 AMand
PRESENT TIME begin to flash.
AM
PRESENT TIME
8
7
6
5
4
3
2
1
SALT
LEVEL
SIGNAL
LEVEL
8
7
6
5
4
3
2
1
SALT
LEVEL
SIGNAL
LEVEL
NOTE:
If HF-- shows in the display, press the UP or
DOWN button until HF32 shows. Then, press
the #1 SELECT button to set, and change to the
flashing PRESENT TIME display.
To check the model code, unplug the transformer at
the walloutlet andplug inagain. Ifother thanHF32
shows, see page 19 to reset.
SOUND “BEEPER”: A “beeper” sounds while
pressing buttons fortimerset-up.Onebeep signals a
change in the faceplate display. Repeated beeps
mean the timer will not accept a change from the
button you have pressed, telling you to use another
button.Forexample,whilesettingthehardness(step
2), the beeper sounds repeatedly when the display
reaches 1 using the DOWN button, or the highest
hardness setting using the UP button.
1. SET PRESENT TIME OF DAY:
NOTE:
If the words¼PRESENT TIME do not show in
the display, press the #1 SELECTbutton (FIG.1)
until they do, or see the notes above.
n Press the UP/DOWN buttons to set the
present time. Press UP to move the display ahead;
press DOWN to move the time backward.
If the present time is between
noon and midnight, be sure PM
shows.
If the present time is between
midnight and noon, be sure AM
shows.
NOTE:
Each press of the UP/DOWN
buttons changes the time by 1
minute. Holding the buttons in
changes the time32 minutes each
second.
2. SET WATER HARDNESS NUMBER:
n Press the#1 SELECTbutton onceto display25
(flashing) and HARDNESS.
The grains per gallon (gpg)
hardnessofyourwatersupplyis
onyourwateranalysisreport.Be
suretoenterwatertestresultson
page 2, for future reference.
PM
PRESENT TIME
8
7
6
5
4
3
2
1
SALT
LEVEL
SIGNAL
LEVEL
AM
PRESENT TIME
8
7
6
5
4
3
2
1
SALT
LEVEL
SIGNAL
LEVEL
HARDNESS
8
7
6
5
4
3
2
1
SALT
LEVEL
SIGNAL
LEVEL

WATER SOFTENER START-UP
SECTION 1
7
1C. PROGRAM THE TIMER
n Press the UP/DOWN buttons to set
your water hardness number in the display. The
DOWN button moves the display to 1. The UP
button moves the display to the highest setting (see
maximum setting for your model in the specifica-
tions).
NOTE:
If yourwater supply contains iron,compensate forit
by adding to the water hardness number. For
example,assumeyourwateris15gpghardand contains2
ppmiron.Add 5to thehardness numberfor each1 ppmof
iron.In thisexample, you woulduse 25for yourhardness
number.
15 gpg hardness
2 ppm iron x 5 = 10 +10
(times) 25 HARDNESS NUMBER
NOTE:
Each press of the UP/DOWN button changes the
display by 1 between 1 and 25. Between 25 and the
highest number, thedisplaychanges5atatime¼25,
30, 35, etc. Holding the UP or DOWN button in
changes the display twice each second.
3. SETRECHARGE (REGENERATION)TIME:
n Press the #1 SELECT button to display 2:00
AM (flashing) and RECHARGE TIME.
At the 2:00 AM RECHARGE
TIME setting, the softener be-
gins regeneration (see pages 13
and14)at2:00AM,endingabout
4:30 AM. This is a good time in
most households because water is not being used
(see AUTOMATIC BYPASS, page 15). If a different
RECHARGE TIME setting would be better for your
household, do the following.
n Press the UP/DOWN buttons to set the
desired RECHARGE starting hour. Be sure to ob-
serve the AM-PM as you did when setting the
present time of day.
NOTE:
Each press of the UP/DOWN buttons changes the
display 1 hour. Holding the buttons in changes the
display twice each second.
4. SET CLEAN FEATURE OPTION:
n Press the SELECT button to display OFF
(flashing) and CLEAN.
This feature is beneficial on wa-
ter supplies containing iron
and/or high amounts of sedi-
ments (sand, silt, dirt, etc.).
WhensettoON,abackwashand
fast rinse cycle will occur first,
preceedingthenormalregenera-
tionsequence(seepage13).This
provides extra cleaning of the
resin bed beforeit isregenerated
with the salt brine. To conserve water, if your water
supply does not contain iron or sediments, be sure
this feature is set to OFF. Use the UP / DOWN
buttons to change the ON / OFF displays.
5. SET SALT TYPE (sodium chloride or potas-
sium chloride, see page 9):
n Press the SELECT button to display nACl, the
default setting.
If you will use potassium chloride (KCl) instead of
standard sodium chloride (NaCl) water softener
salt, be sure to set KCl in the display using the UP
button. The KCl setting adjusts regeneration cycle
times to compensate for the variable dissolving rate
of potassium chloride.
8
7
6
5
4
3
2
1
SALT
LEVEL
SIGNAL
LEVEL
8
7
6
5
4
3
2
1
SALT
LEVEL
SIGNAL
LEVEL
KCl
n Press the#1 SELECTbutton onceagain, toreturn
the present time,and RECHARGE TONIGHT inthe
display.
PM
RECHARGE TONIGHT
8
7
6
5
4
3
2
1
SALT
LEVEL
SIGNAL
LEVEL
If you need help programming the timer, call toll free, number 1-800-426-9345.
See pages 10, 11 and 12 for other face plate timer features.
AM
TIME
8
7
6
5
4
3
2
1
SALT
LEVEL
SIGNAL
LEVEL
RECHARGE
CLEAN
8
7
6
5
4
3
2
1
SALT
LEVEL
SIGNAL
LEVEL
CLEAN
8
7
6
5
4
3
2
1
SALT
LEVEL
SIGNAL
LEVEL

WATER SOFTENER START-UP
SECTION 1
8
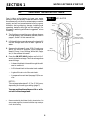
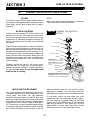
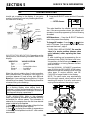
1D. SANITIZING THE WATER SOFTENER
Care is taken at the factory to keep your water
softener clean and sanitary. Materials used to make
thesoftenerwillnotinfectorcontaminateyourwater
supply, and will not cause bacteria to form or grow.
However, during shipping, storage, installing and
operating, bacteria could get into the softener. For
thisreason,sanitizingasfollowsissuggested
¬
when
installing.
1. The first time you sanitize your softener, be sure
to do allsteps in the installation manual, andon
pages 5, 6 and 7 of this manual first.
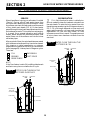
2. Liftthesaltholecoveranduseapailorhosetofill
the salt storage tank with at least 3 gallons of
water.
3. Remove the brinewell cover (FIG. 3) and pour
about 3/4 ounce of common 5.25% household
bleach (Clorox,Linco, BoPeep,White Sail,Eagle,
etc.) in the softener brinewell.
4. Press the ON/OFF-HOLD button and hold for 3
secondstostartarecharge.Thisfirstrechargedoes
several things.
— It draws thebleach intoand throughthe soft-
ener to sanitize it.
— It fills thesalt tankto the water levelneeded.
— It gets all the air out of the resin tank.
— It prepares theresin bed(see page13) forser-
vice.
NOTES:
This recharge takes about 2-1/2 or 2-3/4 hours,
depending on the salt type setting (page 7).
You can sanitize the softener with or with-
out salt in the storage tank.
FIG. 2 ADD WATER
water,
about 3 gallons
brinewell
cover
(remove and add
about 3/4 oz. bleach)
brinewell
hose
salt hole
cover
¬
Recommended by the Water Quality Association. On
somewatersupplies,thewatersoftenermay need pe-
riodic disinfecting.

WATER SOFTENER START-UP
SECTION 1
9
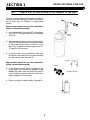
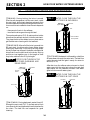
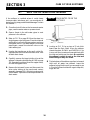
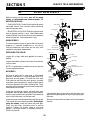
1E. FILL THE STORAGE TANK WITH SALT
Brine(saltdissolvedinwater)is neededforeachand
every regeneration. The water for making brine is
metered into the salt storage tank by the softener.
However, you must keep the tank filled with salt.
Fill the tank with NUGGET or PELLET water
softener salt. DO NOT use rock salts, as they have
dirt and sediments that will stop the softener from
working.
Before filling, be sure the brinewell cover is in place
on the top of the brinewell. Salt storage capacity is
shown on page 20. Be sure to set the salt monitor
system (see page 10).
POTASSIUM CHLORIDE, alternate to salt: The
design of this softener allows for the use of potas-
sium chloride in place of salt (sodium chloride).
Potassium chloride does not add sodium to the
water, and is more ecologically friendly. Disadvan-
tages include higher cost, irregular dissolving fac-
tors, and the need for longer softener regeneration
times.Ifyoudousepotassiumchloride,seepage7to
set the timer for its use.
NOTES:
The salt monitorsystem,page10,is calibrated tothe
density of nugget or pellet water softener salt. The
monitorwill notwork as accuratelywith othertypes
of salt including potassium chloride, rock and solar.
In humid areas, it is best to fill the storage tank
half-full, and to refillit moreoften. Salt bridging(see
page 16) occurs more often when conditions are
humid.
WATER SOFTENING SALT WITH IRON REMOV-
ING ADDITIVES — Some salts have an additive to
help the softener handle iron in the water supply.
Althoughthisadditivemayhelptokeep thesoftener
resin clean, it may also release corrosive fumes that
will weaken and shorten the life of some softener
parts.
FIG. 3 ADD SALT
salt
storage
tank
brinewell
cover
brinewell
Sodium information: Water softeners using sodium
chloride for regeneration add sodium to the water.
Persons who are on sodium restricted diets should
consider the added sodium as part of their overall
sodium intake.
For example, if your water supply is 15 grains hard,
you would have to drink 3 quarts of softened water
to consume 335 milligrams of sodium. That is
equivalent to eating 2-1/2 slices of white bread.
Persons who are concerned about their drinking
water should consider a Kenmore Drinking Water
Systemthatwillremoveorreduceinexcessof90%of
the sodium and other drinking water contaminants.
Thedesignof thissofteneralsoallows theuseofpotassium
chloride as an alternate tosalt (see above, left).Potassium
chloride does not add sodium to the water.
You have now finished the water softener start up. After the sanitizing recharge, on
page 8, the softener will be giving you soft water.

HOW YOUR WATER SOFTENER WORKS
SECTION 2
10
2A. FACEPLATE TIMER FEATURES
EXTRA RECHARGE
Sometimes, a manually started regeneration (re-
charge) may be desired, or needed. Two examples
are:
--You have used more water than usual (guests
visiting)andyoumayrunoutofsoftwaterbeforethe
next timer started regeneration.
--Youdidnotrefillthesoftenerwithsaltbeforeitwas
gone.
You can start a regeneration right away, or you can
set the timer to regenerate at the next 2:00 AM (or
other preset recharge time). Do the following.
RECHARGE NOW
n Press the ON/OFF-HOLD
button and hold until RE-
CHARGE, SERV and FILL be-
gin to flash in the display.
Upon reaching fill, the first
cycleofregeneration,theflash-
ing SERV goes off and FILL is on steady. RE-
CHARGE continues to flash. This regeneration
willlastforabout2-1/2to2-3/4hours.Afterthis
time, you will have soft water again.
*NOTE:
If the CLEAN feature is set to ON, a cleaning
backwash precedesthe recharge.CLEAN andBkwsh
orRinseflashesinthedisplay,alongwiththeminutes
of the clean cycle remaining.
RECHARGE TONIGHT
n Pressandrelease(donothold)
the ON/OFF-HOLD button.
RECHARGE TONIGHT
flashes in the display, and the
softenerbegins regenerationat
the next preset recharge time.
Press and release the ON/OFF-HOLD button
once more if you decide to cancel the regenera-
tion, and RECHARGE TONIGHT.
SALT MONITOR SYSTEM
The faceplate timer has a low salt monitor with an
indicatorlighttoremindyoutorefillthestoragetank
with salt. To set this monitor system:
1. Lift the salt hole cover and level the salt in the
storagetank(presstanklightbuttontolightinside
of tank).
2. The salt level decal, on the brinewell inside the
tank, has numbers from 0 to 8 (see drawing on
page 9 and below). Observe the number the
leveled salt is at or closest to.
3. Now, press the SALT LEVEL ADJUST button
until black bars display up to the salt level
number. For example, the pictures below show
the salt level at 6.
4. Finally, set the level you want the low salt
indicator light to come on. Press the SIGNAL
LIGHT ADJUST button until a (T) shows oppo-
site this number. In the example below, the light
willcomeonwhenthestoredsaltdropstolevel2.
At level 2, the storage tankis about1/3full.This
is the lowest you should allow the stored salt
level to drop to. To turn the salt monitor off,
press the button until OFF shows.
SALT
LEVEL
brinewell
decal
salt
level
bars, salt
level
8
7
6
8
7
6
5
4
3
2
1
SALT
LEVEL
SIGNAL
LEVEL
TANK
LIGHT
SIGNAL
LIGHT
ADJ.
SALT
LEVEL
ADJ.
indicator light
LOW SALT
NOTE:
For accurate salt monitor operation, always use
nugget or pellet water softener salt. See page 9. If
potassium chloride is used, be sure to adjust the
timer to the KCl setting on page 7.
8
7
6
5
4
3
2
1
SALT
LEVEL
SIGNAL
LEVEL
PM
RECHARGE
Serv
Fill
8
7
6
5
4
3
2
1
SALT
LEVEL
SIGNAL
LEVEL
PM
RECHARGE TONIG
H

HOW YOUR WATER SOFTENER WORKS
SECTION 2
11
2A. FACEPLATE TIMER FEATURES
OPTIONAL ADJUSTABLE SETTINGS
Following is a list of other timer features that are
adjustable, and the default setting for each. The
defaults automatically set when electrical power is
applied to the timer. If you want tochange fromany
ofthedefaultvalues,scrollthroughsteps 1 - 5below,
and reset as desired.
1.Pressandholdthe#1SELECTbuttonfor3seconds
until the faceplate display changes. Then, press and
release the #1 SELECT button to display 12 hr.
"12 or 24 Hour clock - defaultsto 12hr: Atthe 12
hr default setting, all time displays are shown in
standard clock time (1 to 12 PM; and 1 to 12 AM). If
military time displays are desired (0100, 0200, etc.),
set to 24 hr by pressing the UP button.
8
7
6
5
4
3
2
1
SALT
LEVEL
SIGNAL
LEVEL
8
7
6
5
4
3
2
1
SALT
LEVEL
SIGNAL
LEVEL
TIME TIME
AM
PM
2. Press #1 SELECT BUTTON
" Gallon or Liter readings - defaults to gallons:
Waterusageandflowdisplays areshown ingallons.
Ifyouprefertohavethesamedisplaysinliters,press
the UP button until Liter shows.
8
7
6
5
4
3
2
1
SALT
LEVEL
SIGNAL
LEVEL
8
7
6
5
4
3
2
1
SALT
LEVEL
SIGNAL
LEVEL
GALLONS
LITERS
3. Press #1 SELECT BUTTON
" Maximum Days Between Regenerations -
default is zero days: The faceplate timer automati-
cally controls regeneration frequency (see page
14).Thisprovidesthegreatestoperatingefficiency,
and normally the maximum days feature is not
needed.If youwant tobecertainaregenerationwill
occur within a number of days, use this feature. For
example,if yourwater supply contains ironand you
wantthesoftenertoregenerateatleastonceeveryfew
days to keep the resin bed clean, set the display as
typically shown below. Setting is available from 1 to
15 days by using the UP and DOWN buttons.
NOTE:
Setting a number in this display may override the
function of the water meter andtimer computer (see
page 15). For example,assume the meter/computer
would initiate softener regenerations every 6 or 7
days. If you have maxdays setto 4,as shownbelow,
regenerations will occur every 4 days instead of
every 6 or 7.
8
7
6
5
4
3
2
1
SALT
LEVEL
SIGNAL
LEVEL
8
7
6
5
4
3
2
1
SALT
LEVEL
SIGNAL
LEVEL
RECHARGE
DAY
default display
example: setto
4 days maxi-
mum between
regenerations
RECHARGE
DAY
4. Press #1 SELECT BUTTON
" CLEANfeatureminutes - defaultis7minutes:
If youhave set this featuretoON (page7),thelength
of the extra backwash cycle automatically sets to 7
minutes.However,youcanadjustthis timefrom1to
15 minutes inlength. If you have a minimum of iron
or sediments, a 3 or 4 minute clean cycle may be
enough to keep the resin bed clean. If you have a
higheramount ofironor sediments,asettingofover
7 minutes maybe needed.To change this cycle time,
usetheUP buttontoincreasethe time,ortheDOWN
button to shorten the time.
8
7
6
5
4
3
2
1
SALT
LEVEL
SIGNAL
LEVEL
8
7
6
5
4
3
2
1
SALT
LEVEL
SIGNAL
LEVEL
CLEAN
TIME
MIN
CLEAN
TIME
MIN
default minutes example: time set to 3 minutes
5. Press #1 SELECT to return the present time
display.

HOW YOUR WATER SOFTENER WORKS
SECTION 2
12
2A. FACEPLATE TIMER FEATURES
OTHER FEATURES
TANK LIGHT
To light the inside of the salt
storage tank, press the TANK
LIGHT button on the faceplate.
Press the same button again to
turn the light off, or it will go off
automatically in 4 minutes.
WATER FLOW RATE THROUGH SOFTENER
To view the gallon (or liter) per minute water flow
rate through the softener, if not already displayed,
press the #2 SELECT button. If
softwaterisbeingused,theflow
rateto theclosest1/10gallon(or
liters) shows. If all faucets and
water using appliances are off,
the display will show 0 flow.
AVERAGE DAILY GALLONS
or LITERS
Press the #2 SELECT button
again to show the average num-
ber of gallons of soft water the household uses each
day. This water usage figure is adjusteddaily by the
faceplate timer. To turn this display off, press the #2
SELECT button once more.
RECHARGE TIME REMAINING and VALVE
POSITION INDICATORS
One of thevalve positionindica-
tors (Serv, Fill, Brine, Bkwsh,
Rinse) is displayed while the
softener is recharging (See
*NOTE onpage 10if theCLEAN
feature is set to ON). RE-
CHARGE flashes in the display
and, beginning with Brine, the minutes of recharge
remainingbeforereturntoserviceappearsinplaceof
thepresenttime.Whenthevalveis movingfromone
cycle to another, both position indicators are flash-
ing.
LOW SALT INDICATOR LIGHT
Whenon, youneed torefillthe saltstorage areawith
salt. After refilling, reset the salt monitor to turn the
light off. Refer to Salt Monitor System, page 10.
PROGRAM MEMORY
If electrical power to the softener goes off, the time
display is blank but the faceplate timer keeps the
correct time for about 48 hours. When electrical
power comes onagain, youhave toreset thepresent
time only if the display is flashing. The HARDNESS
and RECHARGE TIME never require resetting
unless a change is desired.
Even if the timer is incorrect after a long power
outage, the softener works as it should to keep your
water soft. However, regenerations may occur at the
wrong time of day until you reset the timer to the
correct time of day.
ERROR CODE
An error code could appear in
thefaceplatedisplayifaproblem
occursinthesoftenerelectronics.
If you see an error code instead
ofthe presenttime ofday,please
call you local Sears Service De-
partment for service.
8
7
6
5
4
3
2
1
SALT
LEVEL
SIGNAL
LEVEL
PM
TANK
tank light ON
indicator
8
7
6
5
4
3
2
1
SALT
LEVEL
SIGNAL
LEVEL
PM
8
7
6
5
4
3
2
1
SALT
LEVEL
SIGNAL
LEVEL
PM
AVG. DAILY GALLO
N
FLOW RATE
GPM
8
7
6
5
4
3
2
1
SALT
LEVEL
SIGNAL
LEVEL
Serv
Fill
Brine MIN
RECHARGE
TIME REMAININ
G
valve
position
indicators
r
e
c
h
a
r
g
e
time
remaining
Bkwsh
Rinse
8
7
6
5
4
3
2
1
SALT
LEVEL
SIGNAL
LEVEL

HOW YOUR WATER SOFTENER WORKS
SECTION 2
13
2B. SOFT WATER SERVICE AND REGENERATION
SERVICE
Whenthesofteneris givingyousoftwater,itiscalled
“Service”. During service, hard water comes from
the house main water pipe into the softener. Inside
thesoftenerresintankis abedmadeupofthousands
of tiny, plastic resin beads (FIG. 4). As hard water
passes throughthebed,eachbeadattracts andholds
thehardnessminerals.Thisiscalledion-exchanging.
It is much like a magnet attracting and holding
metals. Water without the hardness minerals (soft
water) flows out of the softener and into the house
soft water pipes.
Afteraperiodof time,theresinbeads becomecoated
with hardness minerals andtheyhave to becleaned.
This cleaning is called regeneration or recharge.
Regeneration is started at 2:00 a.m. by the electronic
timer(seepage15).Ittakesplacein5stagesorcycles.
These are:
FILL
BRINING
BRINE RINSE
BACKWASH
FAST RINSE
1
2
3
4
5
NOTE:
If theClean featureis set toON, additionalbackwash
and fast rinse cycles occur before the fill cycle.
FIG. 4 WATER FLOW THROUGH THE
SOFTENER IN SERVICE
hard water
IN
soft water
OUT
resin tank
brine valve
salt storage
tank (salt
not shown)
resin bed
REGENERATION
¡ FILL: Salt, dissolved in water, is called brine.
Brine is needed to clean the hardness minerals from
the resin beads. To make the brine, water flows into
the salt storage areaduring thefillstageas shownin
FIG. 5. Fill cycle length depends on how much soft
water making capacity you have used since the last
regeneration. As you use more water, fill time
increases so morebrineis made.Thegreateramount
of brine cleans more hardness minerals from the
resin bed.
FIG. 5 WATER FLOW THROUGH THE
SOFTENER IN FILL
hard water
IN
soft water
OUT
brine valve
salt storage
tank
fill water

HOW YOUR WATER SOFTENER WORKS
SECTION 2
14
2B. SOFT WATER SERVICE AND REGENERATION
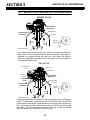
©BRINING: During brining, the brine is moved
from the salt storage area, into the resin tank. Inside
the resin tank, brine cleans hardness minerals from
theresinbeadsandtheyaredischargedoutthedrain.
Howmuchbrineisneededtocleantheresindepends
on:
--the amount of resin in the softener,
--how fast the brine goes through the bed.
The nozzle andventuri (FIG.6) makesuctiontotake
brinefromthe salt tankand putit intothe resintank.
Theykeep thebrine flowdown toa veryslowrateto
get the best resin cleaning with the least salt.
¢BRINE RINSE: Afterall ofthe brineis movedinto
the resin tank, the brine valve closes. Water keeps
flowing the same way it did during brining except
the brine flow has stopped. Hardness minerals and
brine flush from the resin tank to the drain. Brining
and brine rinse together vary in the length of time
they take, relative to the fill cycle length.
FIG. 6 WATER FLOW THROUGH THE
SOFTENER IN BRINING AND
BRINE RINSE
hard water
IN
hard water
bypass OUT
brine valve
drain
nozzle &
venturi
brine
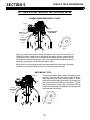
£BACKWASH: During backwash, water flows UP
through the resin tank (FIG. 7) at a fast rate to flush
ironminerals,dirtandsedimentsfromthebedandto
the drain. The bed lifts and expands for good
cleaning.
FIG. 7 WATER FLOW THROUGH THE
SOFTENER IN BACKWASH
h
a
r
d
w
a
t
e
r
IN
h
a
r
d
w
a
t
e
r
bypass OUT
drain
resin bed lifted
and expanded
¤FAST RINSE:Backwash is followed byafastflow
of water down through the resin tank. The fast flow
packs the resin bed and gets it ready for return to
service (FIG. 8).
After fast rinse, the softener returns to service. Hard
water goes into the resin tank where the resin bed
again takes out the hardness minerals. Soft water
goes to the house soft water pipes.
FIG. 8 WATER FLOW THROUGH THE
SOFTENER IN FAST RINSE
soft water
OUT
drain
h
a
r
d
w
a
t
e
r
IN

HOW YOUR WATER SOFTENER WORKS
SECTION 2
15
2B. SOFT WATER SERVICE AND REGENERATION
AUTOMATIC BYPASS
During the brining, brine rinse and backwash cycles
of regeneration, HARD water goes through the
softener valve and to the house pipes. If a faucet is
opened,hardwateristhereforyourneeds.However,
youshouldnotusehotwater,ifpossible,becausethe
waterheater will refillwith hardwater. Thesoftener,
asfactoryprogrammed,regeneratesfrom2:00AMto
about 4:30 or 4:45 AM (depending on the salt type
setting,page7),atimewhennot muchwateris used.
If you get up early in the morning and you can hear
the softener regenerating, changethe recharge start-
ing time. Set the recharge time to 12:00 AM or 1:00
AM (page 7). Then regeneration will start and end
thatmuchearlierandyourwaterheaterwillnotrefill
with hard water if a hot faucet is opened.
ELECTRONICS
Two main parts of the softener’s electronics are ¡ a
WATER METER, and © a COMPUTER.
¡ WATER METER — The water meter is in the
softener valve outlet. As water flows through the
meter, it sends electric pulses to the computer. The
computerchanges thepulsestoameasureingallons
of water.
© COMPUTER — The computer is part of the
faceplate timer circuit board. It is programmed to
know the softener’s capacity (how many grains of
hardness minerals itwill takeoutofthe waterbefore
a regeneration is needed). When starting the soften-
er, page 7, you set it for the grains per gallon (gpg)
hardness of the water.
To find a regeneration pattern best for your needs,
the computer uses: (1) water usage from the meter,
(2) hardness setting, (3) softener capacity, and (4)
time since the last regeneration. The computer
always adjusts this pattern to your water using
habits. It works toward providing you with soft
water for the longest time and at the most efficient
salt usage.
Softening capacity is used as hard water goes
through the softener and hardness minerals are
removed. When the computer determines that only
enough capacity remains to providesoft water upto
the next regeneration starting time (2:00 AM, or as
otherwise set) it will schedule a regeneration. RE-
CHARGE TONIGHT displays until the regeneration
begins. When the regeneration begins, TONIGHT
goes off and *RECHARGE or RECHARGE TIME
REMAININGflashes duringthe2-1/2or2-3/4hour
regeneration.
* NOTE:
If the CLEAN feature is set to ON, a cleaning
backwash (CLEAN and Bkwsh or Rinse flashes in the
display, along with the minutes of the clean cycle
remaining), precedes the recharge.

CARE OF YOUR SOFTENER
SECTION 3
16
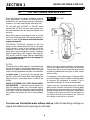
3A. SALT¼REFILLING STORAGE TANK/BREAKING A SALT BRIDGE
WHEN TO REFILL WITH SALT (or potassium
chloride):The Salt MonitorSystem (seepage 10)will
turn the low salt light on to warn you when to refill
with salt. Checkfor alow salt light afew weeksafter
you install the softener, and every week after that.
Always refill at about the #2 salt monitor level. At
this level, the tank is about 1/3 full. Never let the
softener use all the salt before refilling. Withoutsalt,
youwill soon havehardwater.After filling, resetthe
Salt Monitor System, page 10.
NOTE:
You will have a loss in softening capacity and may
get partly hard water if less than 10 inches (salt
monitor level 2) of salt is in the storage tank.
PLEASE SEE PAGE 9 FOR SALT FILLING DIRECTIONS.
BE SURE TO RESET THE SALT MONITOR, PAGE 10.
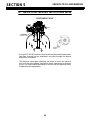
SALT BRIDGE
Sometimes, a hard crust or salt bridge forms in the
salt storage tank. It is usually caused by high
humidity or the wrong kind of salt. When the salt
bridges, an empty space forms between the water
and salt. Then salt will not dissolve (melt) in the
water to make brine. Without brine, the resin bed
does not regenerate and you will have hard water.
If thestoragetankis fullofsalt,itishardtotellifyou
have a salt bridge.Salt is looseontop,but thebridge
is under it.The followingis thebestwayto checkfor
a salt bridge.
Salt should be loose all the way to the bottom of the
tank. Hold a broom handle, or like tool, up to the
softener as shown in FIG. 9. Make a pencil mark on
the handle, 1² or 2² below the top height of the rim.
Then,carefullypushitstraightdownintothesalt.Ifa
hard object is felt before the pencil mark gets to the
topofthetank,it’smostlikelyasaltbridge.Carefully
pushintothebridgeinafewplacestobreakit.Donot
try to break the salt bridge by pounding on the
outside of the salt tank. You may damage it.
If thewrongkind ofsalt madethebridge,take itout.
Then fill the tank with nugget or pellet salt only.
FIG. 9 SALT BRIDGE
broom handle
push tool into salt
bridge to break
salt
salt bridge
water level
pencil
mark
1” -- 2”

CARE OF YOUR SOFTENER
SECTION 3
17
3B. KEEPING THE WATER SOFTENER CLEAN
COVERS
To keep your new Kenmore water softener looking
nice,applyacoatofpastewaxandrepeatonceayear.
When dusty, wipe it with a damp cloth to keep it
sparkling.
NOTE:
Never use cleaners having ammonia or abrasives.
They may scratch and dull the surface.
NOZZLE & VENTURI
Aclean nozzleand venturi(FIG. 10)is amustforthe
softener to work right. This small unit moves brine
from the salt storage tank to the resin tank during
regeneration. If it becomes plugged with sand, silt,
dirt, etc., the softener will not work and you willget
hard water.
Toget tothe nozzleand venturi,remove thesoftener
top cover. Be sure the softener is in service cycle (no
water pressure at nozzle and venturi), then turn off
the cap from the nozzle and venturi housing. Do not
losethelargeo-ringseal.Liftoutthescreensupportand
screen, then the nozzle and venturi. Wash and rinse
the parts in warm water until clean. If needed, use a
small brush to remove iron or dirt. Also check and
clean the gasket.
Carefully replace all parts in the correct order.
Lubricate the o-ring seal with silicone grease or
Vaseline and place in position. Install and tighten
the cap, by hand only. Do not overtighten and
break the cap or housing.
FIG. 10 CLEANING THE NOZZLE &
VENTURI
*Install with numbered side up concave
side down. Besure thelargestflow plugis
located in the nozzle & venturi housing.
Cap
O--ring Seal
Screen Support
Screen
Nozzle & Venturi
Gasket
*Flow Plug
(HVDC)
Nozzle & Venturi
Housing
Screen
IMPORTANT: Be sure small
holes in the gasket are cen-
tered directly over the small
holes in the nozzle & venturi
housing.
*Flow Plug
(1--EP)
IRON FROM THE RESIN BED
Your water softener takes hardness minerals (cal-
cium and magnesium) out of the water. Also, it can
control some “clear water” iron. See maximum
allowed in the specifications on page 20. With clear
wateriron,water froma faucetis clearwhenfirstput
into aglass. After 15 to30 minutes,the water begins
to cloud or turn rust colored. A water softener WILL
NOTremoveanyironwhichmakesthewatercloudy
or rusty as it comes from the faucet (called redwater
iron).To takered water ironout ofwater, or overthe
maximum of clear water iron, an iron filter or other
equipment is needed. Your local Sears store has
trainedpeopletohelpyouwithironwaterproblems.
If your water supply has clear water iron, even
though less than the maximum allowed, regular
resin bed cleaning is needed. Sears has resin bed
cleaner, Item No. 42-34426 for this. Clean the bed at
least every 6 months. If iron shows up in the soft
water before 6 months, clean more often. Printed
instructions are on the resin bed cleaner bottle.

CARE OF YOUR SOFTENER
SECTION 3
18
3C. KEEP THE SOFTENER FROM FREEZING
If the softener is installed where it could freeze
(summer cabin, lake home, etc.), you must drain all
waterfromittostoppossiblefreezedamage.Todrain
the softener —
1. Closetheshut-offvalveonthehousemainwater
pipe, near the water meter or pressure tank.
2. Open a faucet in the soft water pipes to vent
pressure in the softener.
3. Refer to FIG. 12 on page 20. Move the stem in a
singlebypassvalvetobypass.Closetheinletand
outletvalveina3-valvebypasssystem,andopen
the bypass valve. If you want waterin the house
pipes again, reopen the shut-off valve on the
main water pipe.
4. Unplug the transformer at the wall outlet. Re-
movethesaltholecoverandthemaincover.Take
off both drain hoses.
5. Carefully remove the large holding clips at the
softener inletand outlet(seeKeyNo.69,onpage
32). Separate the softener from the coppertubes,
or from the bypass valve.
6. Remove the brinewell cover and disconnect the
brine valve tubing at the nozzle and venturi
assembly(seepage32). Liftthebrinevalve outof
thebrinewell.Tip thebrinevalveupsidedownto
drain water.
FIG. 11 DRAIN WATER FROM THE
SOFTENER
wood block
floor
drain
7. Looking at FIG. 11, lay a piece of 2 inch thick
board near the floor drain. Move the softener
closetothedrain.SLOWLYandCAREFULLY,tip
it over until the rim rests on thewood blockwith
the inlet and outlet over the drain. Do not allow
the softener’ s weight to rest on the inlet and
outlet fittings or they will break.
8. Tipthebottomofthesoftenerupafewinchesand
hold until all water has drained. Leave the
softenerlayinglikethis untilyouarereadytouse
it.Plug theinlet andoutletwith ragsto keepdirt,
bugs, etc. out.

CARE OF YOUR SOFTENER
SECTION 3
19
3D. HELPFUL HINTS CHECKLIST
... TO HELP YOU SAVE MONEY
Ifyourwatersoftenerfailstowork,makethefollowingeasychecks.Often,youwillfindwhat’swrongyourself
andyou won’thave tocalland waitforservice.Ifyoudonotfindanythingwrong,whilemakingthechecks,
and your softener still does not work, call your Sears Service Department.
NOTES:
1. Also read ERROR CODE, page 12.
2.Ifanerrorcodeisnotdisplayed,press andholdthe#1SELECTbuttonuntilthedisplaychanges.Then,press
the#1SELECTbuttonagainandholduntilaflashingHFcodeappears.ItmustshowHF32.Ifanyothernumber
shows,thefaceplatecomputerisworkingonincorrectinputand wouldprobably bethecauseoftheproblem.
To set HF32, press either the UP or DOWN button. When HF32 shows, press #1 SELECT button to
return a flashing 12:00 AM display. Reset the present time, hardness number, etc., pages 6 and 7.
PROBLEM CAUSE CORRECTION
No soft water Nosalt(orsaltbridged) in the storagetank Refill with salt, or break the salt bridge (page
16). Press ON/OFF-HOLD (RECHARGE
NOW) button andhold for 3 secondsto start a
regeneration (see page 10).
Transfomer unplugged at the wall outlet,
or power cable leads loose, fuse blown,
circuit breaker popped, or circuit switched
off.
Check for loss of power due to any of these
and correct. With the power back on, look at
the time display and read PROGRAM
MEMORY, page 12.
Manualbypassvalve(s)inbypassposition Look at FIG. 12 on page 20. Move the stem in
a single valve to service. In a 3-valve bypass,
opentheinletandoutletvalves, and be sureto
fully close the bypass valve.
Dirty, plugged or damaged nozzle &
venturi
Take apart and clean or replace damaged
parts (see page 17).
Valve drain hose plugged The drain hose must not have kinks, sharp
bends, or be raised too high above the
softener (see page 16 in your installation
manual).
Water hard sometimes Hardness number setting too low Press and release the #1SELECT button until
HARDNESS shows in the display. Read the
hardness number in the display and be sure
the same grains per gallon number is shown
on your water analysis report. See page 7 to
reset. Press and release the SELECT button
until the present time shows in the display.
Using hot water when softener is
regenerating
Avoidusinghotwaterduringthistimebecause
the water heater refills with hard water (see
Automatic Bypass, page 15).
Increase in the grains of hardness in your
water supply
AskyourSearsretailorcatalogstoreforanew
water analysis. Then make a new hardness
number setting (page 7).

OTHER THINGS TO KNOW
SECTION 4
20
4A. DIMENSIONS/SPECIFICATIONS
FIG. 12 BYPASS VALVES
Bypass
Valve
Inlet
Valve
Outlet
Valve
3 -- VALVE
FOR SERVICE
close bypass valve
open inlet & outlet valves
FOR BYPASS
open bypass valve
close inlet & outlet valves
PUSH IN
for bypass
PULL OUT
for service
SINGLE
B
y
p
a
s
s
v
a
l
v
e
(
s
)
s
h
o
u
l
d
a
l
w
a
y
s
r
e
m
a
i
n
i
n
s
o
f
t
water service position. Position in “bypass”
only if needed for softener repairs.
A
B
C
D
E
F
INCHES CM
A Salt Tank Height 40-1/4 102.2
B Resin Tank Diameter (nominal) 9 22.7
C Resin Tank Height (nominal) 40 101.6
D Inlet-Outlet Height 41-1/2 105.4
E Overall Height 47 119.4
F
1
Length 19-1/2 49.5
F
2
Width 16-1/2 41.9
— Distance between inlet-outlet
center lines
3-7/8 9.8
MODEL NO. 625.348670 TIMER HF CODE HF32
NOTE: Please see the rating decal for water softener operatingcapacity,salt usageandserviceflowrate/pres-
sure loss performance specifications. Performance specifications are validated by the Water Quality Associa-
tion (WQA). The rating decal is located on the rim, under the salt hole cover (see page 30).
WATER SUPPLY TO WATER SOFTENER
MINIMUM WATER SYSTEM FLOW (gpm) 3. . . . . . . . . . . . . . . .
MINIMUM-MAXIMUM WATER PRESSURE (psi) 20-120. . . . . .
MAXIMUM WATER TEMPERATURE (°F) 120. . . . . . . . . . . . . . .
MAXIMUM WATER HARDNESS (gpg) 110. . . . . . . . . . . . . . . . . .
MAXMUM “CLEAR WATER” IRON (ppm) 8. . . . . . . . . . . . . . . . .
SALT FOR WATER SOFTENER
TYPE OF SALT NEEDED Nugget/Pellet. . . . . . . . . . . . . . . . . . . .
ALTERNATE TYPE OF SALT Pure, evaporated, compacted. .
water softener salt
STORAGE CAPACITY (pounds) 200. . . . . . . . . . . . . . . . . . . . . . .
OTHERS
TYPE OF ION EXCHANGE MATERIAL (resin) High Capacity
AMOUNT OF RESIN (cu.ft.) 1.05. . . . . . . . . . . . . . . . . . . . . . . . . .
REGENERATION (RECHARGE) CYCLE TIME (min.)
FILL (NaCL setting) 2.7-10.6. . . . . . . . . . . . . . . . . . . . . . . . . . .
FILL (KCl setting) 3.8-12.6. . . . . . . . . . . . . . . . . . . . . . . . . . . . .
BRINING / BR. RINSE 120-135. . . . . . . . . . . . . . . . . . . . . . . . .
BACKWASH 7. . . . . . . . . . . . . . . . . . . . . . . . . . . . . . . . . . . . . . .
FAST RINSE 3. . . . . . . . . . . . . . . . . . . . . . . . . . . . . . . . . . . . . . .
TOTAL REGENERATION TIME 139.4---164.4. . . . . . . . . . . .
gpm = gallons per minute psi = pounds per square inch
gpg = grains per gallon ppm = parts per million
Page is loading ...
Page is loading ...
Page is loading ...
Page is loading ...
Page is loading ...
Page is loading ...
Page is loading ...
Page is loading ...
Page is loading ...
Page is loading ...
Page is loading ...
Page is loading ...
Page is loading ...
Page is loading ...
Page is loading ...
Page is loading ...
-
 1
1
-
 2
2
-
 3
3
-
 4
4
-
 5
5
-
 6
6
-
 7
7
-
 8
8
-
 9
9
-
 10
10
-
 11
11
-
 12
12
-
 13
13
-
 14
14
-
 15
15
-
 16
16
-
 17
17
-
 18
18
-
 19
19
-
 20
20
-
 21
21
-
 22
22
-
 23
23
-
 24
24
-
 25
25
-
 26
26
-
 27
27
-
 28
28
-
 29
29
-
 30
30
-
 31
31
-
 32
32
-
 33
33
-
 34
34
-
 35
35
-
 36
36


Kenmore 625.34867 User manual
- Category
- Water dispensers
- Type
- User manual
- This manual is also suitable for
Ask a question and I''ll find the answer in the document
Finding information in a document is now easier with AI
Related papers
-
Sears 625.348420 User manual
-
Kenmore 625348350 Owner's manual
-
-
-
Sears 625.34855 User manual
-
-
-
Craftsman DELUXE 580.327071 Owner's manual
-
-
Other documents
-
GE GXSF23Z01 User manual
-
GE PNSF39Z01 User manual
-
-
-
-
CSI MS24V-S3 Installation & Operation Manual
-
CSI Signature 2 Series Installation & Operation Manual
-
 PRO+AQUA PRO-S-80E User manual
-
Krystal Pure KS15HE Owner's manual
-
Whirlpool WHES30 User manual
