Page is loading ...

D101628X012
Basis Weight Control SKF Actuator with PEAB
IC2000 Stepmotor Interface
Contents
Introduction 1. . . . . . . . . . . . . . . . . . . . . . . . . . . . . . .
Scope of Manual 1. . . . . . . . . . . . . . . . . . . . . . . . . . . . .
Specifications 3. . . . . . . . . . . . . . . . . . . . . . . . . . . . .
Valve 3. . . . . . . . . . . . . . . . . . . . . . . . . . . . . . . . . . . . . . .
Actuator and Stepmotor Interface 3. . . . . . . . . . . . . .
Feedback Transmitter 3. . . . . . . . . . . . . . . . . . . . . . . .
Driver Card 3. . . . . . . . . . . . . . . . . . . . . . . . . . . . . . . . .
System Description 4. . . . . . . . . . . . . . . . . . . . . . .
Installation 6. . . . . . . . . . . . . . . . . . . . . . . . . . . . . . . . .
Valve and Actuator 6. . . . . . . . . . . . . . . . . . . . . . . . . . .
Wiring 7. . . . . . . . . . . . . . . . . . . . . . . . . . . . . . . . . . . . . .
Settings 12. . . . . . . . . . . . . . . . . . . . . . . . . . . . . . . . . . .
Start Up 12. . . . . . . . . . . . . . . . . . . . . . . . . . . . . . . . . . .
Adjustment 15. . . . . . . . . . . . . . . . . . . . . . . . . . . . . . .
Limit Switches 15. . . . . . . . . . . . . . . . . . . . . . . . . . . . . .
Stroking Speed 16. . . . . . . . . . . . . . . . . . . . . . . . . . . . .
Valve Position Indicator 18. . . . . . . . . . . . . . . . . . . . . .
Maintenance 19. . . . . . . . . . . . . . . . . . . . . . . . . . . . . .
Troubleshooting 20. . . . . . . . . . . . . . . . . . . . . . . . . . . .
Test Procedures 21. . . . . . . . . . . . . . . . . . . . . . . . . . . .
Valve Maintenance 21. . . . . . . . . . . . . . . . . . . . . . . . . .
Removing the Actuator 21. . . . . . . . . . . . . . . . . . . . . .
Mounting the Actuator on the Valve 22. . . . . . . . . . .
Replacing Fuses 22. . . . . . . . . . . . . . . . . . . . . . . . . . . .
Replacing the Actuator Motor 22. . . . . . . . . . . . . . . . .
Replacing Modules 22. . . . . . . . . . . . . . . . . . . . . . . . . .
Replacing the Transformer 22. . . . . . . . . . . . . . . . . . .
Field Installation of the Remote Station 23. . . . . . . .
Parts List 23. . . . . . . . . . . . . . . . . . . . . . . . . . . . . . . . . .
COVER LATCH
Figure 1. Basis Weight System with Vee-Ball Valve, SFK
Actuator and IC2000 Stepmotor Interface
PEAB IC2000 CONTROL
CABINET
WIRE ACCESS PLATE
(ADDITIONAL PLATE ON BOTTOM)
PLUG-IN
ELECTRONICS
MODULES
SKF
ACTUATOR
STEPPING
MOTOR
LOCK
W5392 / IL
Introduction
Scope of Manual
This instruction manual provides instructions for ap-
plication and use of the SKF actuator and PEAB (Pro-
cess instrument and Electro AB) IC2000 Stepmotor
Interface in a basis weight system. Refer to the sepa-
rate instruction manual for valve instructions.
Instruction Manual
Form 5276
March 2000
Basis Weight Actuator

Basis Weight Actuator
2
Table 1. Specifications
Actuator Sizes
J 20HT J 30HT or J 40HT
HT denotes High Torque
Enclosure Protection
Actuator/Motor: IP54
IC2000: IP55
Remote Station: IP40
Resolution (for 90 Degrees of Valve Rotation)
(2)
Size 20HT: 5600 steps
Size 30HT: 8800 steps
Size 40HT: 11300 steps
Actuator Torque
0% Backlash Rating
Size 20HT: 180 NSm (1590 lbfSin)
Size 30HT: 380NSm (3360 lbfSin)
Size 40HT: 580NSm (5130 lbfSin)
Motor Torque Required
Size 20HT: 4.3 NSm (38 lbfSin)
Size 30HT: 5.7 NSm (50 lbfSin)
Size 40HT: 7.0 NSm (62 lbfSin)
Stroking Time
(2)
Size 20HT: 20 to 1120 seconds
Size 30HT: 20 to 1760 seconds
Size 40HT: 20 to 2260 seconds
Stepping Speeds (programmable)
Slow: 5–1000 steps/sec
Fast : 600–1000 steps/sec
Gear Ratio
(2)
Size 20HT: 1:56
Size 30HT: 1:88
Size 40HT: 1:113
Actuator Rotation
0 to 90 degrees
Motor Drive
Type: Bipolar, 20 KHz chopper
For Stepmotor Types: 2-phase, hybrid or permanent
magnet, 1mH to 10mH per phase, in 4, 6 or 8 wire
configuration
Current Adjustment: 2.1 to 3.0 A per phase, in 0.3 A
increments
Operation Modes: Half-step (default, for highest res-
olution) or full-step
Short Circuit Protection: Logic automatically inter-
rupts motor currents when a phase-to-phase or
across-phase fault occurs. Power must be cycled to
reset the fault.
Maximum Distance from IC2000 to Actuator
40 m (132 ft) with 1.5 mm
2
conductor
100 m (320 ft) with 2.5 mm
2
conductor
Control Signal (Customer Supplied)
(3)
Increase: Opens valve
Decrease: Closes valve
Slow Speed: Switches to the slow step speed
Temperature Range
Actuator: -20 to 60_C (-4 to 140_F)
IC2000: -20 to 50_C (-4 to 122_F)
Stepmotor: -20 to 40_C (-4 to 104_F)
(5)
Power Requirements
IC2000: 117, 220, or 240 Vac at 50–60 Hz, 225 VA
Remote Station: 24Vdc
(4)
Position Feedback
Transmitter Type: 4–20 mA, 2 wire transmitter, max
load 1 K ohm
Input Potentiometer: 1 K ohm over 320_ rotation,
Independent linearity +/– 0.5% of 320_ (+/–1.8% of
90_), Repeatability 0.1% over 90_
Approximate Weight
IC2000: 21 kg (47 lbs)
Size 20HT: 16 kg (35 lbs)
Size 30HT: 36 kg (80 lbs)
Size 40HT: 61 kg (135 lbs)
Remote Station: 1.4 kg (3.2 lbs)
Dimensions
See figure 2 and Bulletin 51.3:V150 (S1)
1. The pressure/temperature limits in this manual, and any applicable code or standard limitation, should not be exceeded.
2. SKF Crab Actuators using 50 tooth step motors in half-stepping mode have these characteristics for 0–90_ travel. The fastest stroking speeds are approximate. The torque falls off as
speed increases, and the motor may stall before the theoretical highest speed is reached.
3. Each control signal is normally asserted by pulling the input low through external relay contacts. The increase/decrease signals are optically isolated. The speed control input closes a
24 volt relay coil circuit. A factory option is available for Open-Collector logic supplied by 24 Vdc/8 mA from an external power supply.
4. When factory supplied, a bridge rectifier is mounted in the IC2000 to develop this from one of the power transformer windings. If field mounted, customer supplies the 24 Vdc power.
5. Free air ating at max current. Based on still air in motor without air sinks.

Basis Weight Actuator
3
Only personnel qualified through training or experience
should install, operate, or maintain this equipment.
Do not attempt to install, operate, or maintain this
product without this instruction manual and the valve
instruction manual. If you have any questions concern-
ing these instructions, contact your Fisher Controls
sales office or sales representative before proceeding.
Specifications
Valve
Refer to the appropriate valve instruction manual for
specifications.
Actuator and IC2000
See the Specifications table.
Driver Card
Description of Terminal Functions
Motor Phases 1A, 1B, 2A, 2B (pins 2, 4, 6, and 8 on
both rows). Connect one phase of the motor to 1A and
1B, and the other phase to 2A and 2B. To reverse the
direction of rotation relative to the direction input, inter-
change the connections to 1A and 1B.
+24 DC Out (pin 10, both rows). Use this output to
supply an external control module such as an indexer
card. The maximum current which may be drawn is
250 mA.
Logic Supply Inputs 1 and 2 (pins 12a and 14a).
When the drive is AC–powered, these two inputs are
connected to a center–tapped secondary on the power
transformer rated at 18–0–18 volts RMS. The center
tap is connected to power commom (pins 16 & 18,
both rows).
Motor Supply Inputs (pins 12c and 14c). For opera-
tion at a motor supply of 24v, these inputs may be driv-
en from the same transformer secondary as the logic
supply. An extended secondary rated at
26–18–0–18–26 volts RMS is required for operation at
36v, with the motor supply inputs fed from the 26–volt
taps.
Fast Input (pin 20a). Connect to 0v to run the internal
oscillator at the fast rate.
Slow Input (pin 22a). Connect to 0v to run the internal
oscillator at the slow rate.
Rate Adjust Inputs (pins 24a, 24c, and 26a). The
speed of the internal oscillator is determined by exter-
nal potentiometers connected across the appropriate
inputs. The normal values are 100K for the fast control
and 500K for the slow control, and these will give the
specified speed ranges. Higher values may be fitted to
reduce the minimum speed in each range.
Direction Input (pin 26c). Connect to 0v to reverse
the direction of motor rotation. This input should not be
changed when the ‘‘clock’’ input is low or while the mo-
tor is running above its start/stop speed.
Internal Clock Output (pin 28a). This is the output of
the internal oscillator which will normally be connected
to the clock input of the drive (pin 28c). The output
consists of low–going pulses approximately 25mS
wide.
Clock Input (pin 28c). The motor will step following a
low–going pulse on this input, the step occurring on
the rising edge of the pulse. The input should remain
low for at least 10mS, It may be driven from an external
oscillator card or the internal oscillator in the drive. The
latter method is used in the IC2000
Energize Input (pin 30c). The motor will be energized
with this input connected to 0v. Link 4 may be fitted as
an alternative to making an external connection to 0v.
Note that the drive should not be de–energized when
the motor is running at speed.
External Reference Input (pin 32a). The motor cur-
rent may be programmed by means of an external re-
sistor connected between this input and signal 0v
(32c). A 1K resistor will give approximately half the
rated current. This input is used to control the standby
or “braking” current in the IC2000.
Signal 0V (pin 32c). Use this pin as a return connec-
tion for the current programming resistor.
Two internal fuses are fitted to the drive power supply
circuits. These are 20 mm quick–blow types and are
rated in the specifications table.

Basis Weight Actuator
4
Dimension
20HT 30HT 40HT
mm
A
B
C
306
155
90
455
228
122
565
286
134
D
E
F
50
120
50
80
176
85
100
230
115
G
H
K
L
35
8.5
63
46
60
10.5
92
72
80
12.5
116
92
Inches
A
B
C
12.0
6.10
3.54
17.9
8.98
4.80
22.2
11.22
5.28
D
E
F
1.97
4.72
1.97
3.15
6.93
3.35
3.94
9.06
4.53
G
H
K
L
1.38
0.33
2.48
1.81
2.36
0.41
3.62
2.83
3.15
0.49
4.57
3.62
Figure 2. Actuator Dimensions
F
G
D
E
A
H
C
K
L
B
E0010 / IL
System Description
The SKF actuator, IC2000 Stepmotor Interface, and
Vee–Ball valve is a control system intended for basis
weight control. The system requires a 117, 220, or 240
Vac power supply and a control signal (provided by the
customer) that consists of a contact closure for in-
crease in valve position and a contact closure for de-
crease. The system consists of the following standard
and optional components.
The Vee–Ball Valve, a Design V150 or V200, is the
final control device that controls the amount of process
flow.
The SKF electrically operated actuator provides rotary
motion to open and close the valve. A stepping motor
in the actuator drives a ball screw. The linear motion of
the ball screw nut is transmitted to the valve shaft
through a rack and pinion arrangement and a
clamped, splined actuator–to–valve connection. Also
included in the actuator are a potentiometer (used to
provide a valve position feedback signal), limit
switches to shut off motor control signal when the trav-
el limit is reached, a handwheel for manual operation
of the valve, and a valve rotation indicator. The hand-
wheel can be operated only when no power is applied
to the actuator and Stepmotor Interface. The hand-

Basis Weight Actuator
5
Figure 3. SKF Actuator with Design V150 Valve
DESIGN V150 VALVE
MOTOR MOUNTING
SCREWS
COUPLING HOUSING
MOUNTING
BRACKET
INDICATOR
COVER
HANDWHEEL
INDICATOR ASSEMBLY
STEPMOTOR
W5393 / IL
wheel is intended for use during power outages or
when ac power has been removed at the external cir-
cuit breaker box.
The PEAB IC2000 Stepmotor Interface contains the
circuit cards necessary to operate the actuator. The
Stepmotor Interface is provided with a lock to discour-
age unauthorized access. Keep the key in a secure
location where only authorized people can get it.
All of the circuit components are plug–in modules.
Each component is mounted to a faceplate that is vis-
ible from the front of the Stepmotor Interface. Use the
faceplate handle to pull the plug–in module (compo-
nent) out of the cabinet. Connections between the
modules and the Stepmotor Interface are gold–plated
edge connectors.
Table 5 describes how each card within the IC2000 is
connected to the other cards. Each card has two col-
umns of pins labeled 2a, 4a, and up to 32a (also 2c,
4c, and up to 32c). The table indicates that 2ca is 24 V
and 32ca is ground, which is connected to power com-
mon (terminal 10 on terminal block TB1).
See figure 14 for information in the Input Signal Wiring
section. Also see the External Control Signal portion of
the Wiring section.
Included as standard in the Stepmotor Interface are:
SD13 Driver Card—This card (key 1, figure 5) sends
pulses to operate the stepping motor. See the Driver
Card section.
Power Transformer– This 225 VA toroidal transform-
er, mounted on the power supply backplane (see fig-
ure 7), supplies internal power.
Terminal Blocks—All field connections including con-
trol signals are made to terminal block TB1, TB2 or
optional TB3 (see figure 9).
IC500 Interface Card—This card (key 3, figure 5) re-
ceives the control signal, which is sent from a custom-
er–supplied control device, from the manual station
(key 4, figure 5), or from the optional remote station
(see figure 6).
The inputs are optically isolated. The card has four
direct inputs, two for manual operation of the actuator,
and two for computer operation of the actuator. The
IC500 gates the internal oscillator to the driver card
when input is low. If there is no low input, a transistor
sets the current to the motor at the standby “braking”
value to provide stiffness (holds the valve in position).
See figure 5. The IC500 card includes screwdriver ad-
justments on the lower half of the front panel for actua-
tor motor speed for both manual (MAN) and computer
(COMP) operation. Normally, a low speed is used for
computer operation, and a high speed is used for
manual operation.
The faceplate also has four LEDs on the interface
card. The LEDs allow you to verify that signals are
reaching the card. Different LEDs are provided for sig-
nals intended to open (INC) or close (DEC) the valve
in both manual (MAN) or computer (COMP) operation.
FT100 Motion Feedback Transmitter—This transmit-
ter (key 5, figure 5) senses actuator feedback poten-
tiometer resistance and provides a proportional 1 to 5
volt signal for internal use (valve position indicator)
and a proportional 4 to 20 mA dc signal for external
use (extra valve position indicator or input to a remote
computer).
Manual Station—This module (key 4, figure 4) allows
selection between manual and computer operation of
the actuator and valve. It also provides the means to
open or close the valve from the Stepmotor Interface.
It includes the digital valve position indicator (0–100%)
which is driven by the FT100 0–1 V output line.
For manual operation, press and release the local con-
trol button. Then, rotate the DEC–INC knob toward
DEC (decrease) to close the valve or toward INC (in-
crease) to open the valve. If you turn the knob all the
way to DEC or INC, the knob will remain engaged, and
the valve will open or close until a limit switch stops
motor operation.

Basis Weight Actuator
6
Figure 4. Actuator and Controls
INDICATOR BOX
ACTUATOR
OPTIONAL
REMOTE STATION
NOTES:
132 FEET (40m) MAX. WITH 1.5mm
2
CONDUCTORS
320 FEET (100m) MAX WITH 2.5mm
2
CONDUCTORS
MAX 1000 FT, (255m) WITH 0.75mm
2
CONDUCTORS
1
1
2
2
A3754-4 / IL
Note
For additional information on use of the
manual station when there is no remote
station, see the External Control Signal
portion of the Wiring section.
The Valve Position Indicator is a LED panel meter that
displays valve position from 0 to 100 percent. It is
mounted in the manual station.
The two additional options for remote position indica-
tion are the remote station described below and a cus-
tomer-supplied, remote indicator that can be con-
nected to the control box. See figure 6 and the
Optional Remote Position Indication portion of the Wir-
ing section of Installation.
Remote Station (Optional)—This station (figure 6)
allows manual control of the actuator and valve from a
location up to 1000 feet (305 meters) from the Step-
motor Interface. Maximum allowable distance between
the Stepmotor Interface and the remote station de-
pends on wire size. The limit is 1000 feet (305 meters)
for a wire size of 0.75 mm
2
(approximately 18 AWG).
Operation of the remote station overrides operation of
the manual station located in the Stepmotor Interface.
When the system is equipped with this remote station
and is under computer control, the manual station in
the Stepmotor Interface cannot gain control of the sys-
tem, until you first switch the remote station to MAN
(manual).
For manual operation of the valve from the remote sta-
tion, turn the MAN–COMP knob to MAN (manual).
Then, press and release the remote control button.
Now you can rotate the DEC–INC knob toward DEC
(decrease) to close the valve or toward INC (increase)
to open the valve. If you turn the knob all the way to
DEC or INC, the knob will remain engaged, and the
valve will open or close until a limit switch stops motor
operation. If you wish to operate the valve in slow
speed from the remote station, press the remote con-
trol button and continue to press it
while using the
DEC–INC knob.
Installation
Valve and Actuator
Normally, the actuator is shipped mounted on the
valve body. After you have wired the actuator, install
the valve in the pipeline by following instructions in the
separate valve instruction manual.
It is easier to determine the fully open and closed posi-
tion of a valve when the valve is out of the pipeline. If
possible, check the operation of the actuator limit
switches and of the valve position indicator before
installing the valve in the line. Refer to the Adjustment
section to check the operation of the limit switches and
indicator.
If the actuator and valve have been purchased sepa-
rately or if the actuator has been removed for mainte-
nance, mount the actuator on the valve by following
the Mounting the Actuator instructions in the Mainte-
nance section.

Basis Weight Actuator
7
Figure 5. IC2000 Control Cabinet Components
1
E0011 / IL
Figure 6. Remote Station
E0012 / IL
CAUTION
Incorrect valve shaft rotation can dam-
age internal valve parts. To avoid such
damage, be certain that the actuator will
provide the correct rotation direction for
the valve you are using.
Required valve shaft rotation is not the same for all
valves. Design V150 and V200 valves require clock-
wise valve shaft rotation to open the valve; valves in
the 8500 Series require counterclockwise rotation to
open the valve. Before mounting the valve, check to
see that the actuator will provide the correct rotation to
open and close the valve. If the rotation is not correct,
change the rotation direction by changing the switch
Settings and jumper locations on the control cards.
Refer to the Settings section.
Always use the standard mounting position shown in
figure 17 and check for proper rotation before installing
the actuator on the valve. Other mounting positions
might provide incorrect valve rotation.
Wiring
WARNING
Never make adjustments to the drive
current or terminal connections while
power is applied. Personal injury or
property damage might result.

Basis Weight Actuator
8
Figure 7. Remote Station Dimensions
A5966 / IL
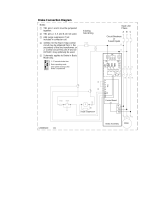
For assistance in wiring, refer first to the overall sche-
matic in figure 8 which includes references to more
detailed wiring schematics that show specific sections
of the system. Also refer to figure 9 for a schematic of
the power transformer connections.
Wire sizes are shown in the schematics in square milli-
meters (mm2). Approximate equivalents in AWG sizes
are:
mm2 AWG
0.50 20
0.75 18
1.5 16
2.5 12
Schematics for some special inputs (for example, input
from a Rolm computer) are not included in this instruc-
tion manual. If the schematics in this manual do not
appear to cover your equipment, determine the serial
number of the unit, and contact your Fisher Controls
sales office or sales representative.
Motor, limit switch, and feedback potentiometer wiring
is connected to the actuator before the unit is shipped.
The limit switch and feedback potentiometer wires are
provided with an appropriate connector at the actuator.
It is necessary to connect the other ends of these
wires to the Stepmotor Interface, as well as the alter-
nating current power and connecting wires from your
computer or other controlling device to the Stepmotor
Interface.
The Stepmotor Interface has a wire access plate on
top and bottom. Connect all wires through one of those
plates.
Note
It is necessary to drill holes in one of the
wire–access plates and provide connec-
tors for the power supply wires and the
control wires from your computer or
controlling device.
WARNING
To avoid personal injury from electrical
shock, keep hands and tools out of the
Stepmotor Interface and away from the
terminal connections on the actuator
whenever power is applied to the control
box or actuator. Always disconnect pow-
er before making or checking electrical
connections.
Remove the screws and the appropriate wire access
plates. Drill the required size holes and install connec-
tors that are appropriate for the installation location.
Replace the wire–access plate. Be sure to tighten the
connector and access plate securely.
Unlock the cabinet and open it. Then proceed to the
following instructions.

Basis Weight Actuator
9
Motor
Refer to figure 10. Use the wire color codes and termi-
nal numbers as shown in figures 9 and 10 when con-
necting motor wires to terminal block TB1.
Note
The wire color codes are subject to
change per availibility of cable. The con-
nections should be verified at both ends.
Limit Switches
Limit switch LS1 and LS2 (figures 11 and 12) interrupt
the input commands when the valve reaches the fully
open (LS1) and fully closed (LS2) positions. Use the
wire color codes and terminal numbers in figures 10,
11 or 12 when connecting the wires to terminal block
TB1.
Valve Position Potentiometer
A potentiometer located behind the valve rotation ar-
row on the actuator is used to operate the FT100 and
the digital meter on the manual station (key 4, figure
4). Use the wire color codes and terminal numbers in
figure 15 when connecting the wires to terminal block
TB1.
Power Supply
Connect an ac power supply of the correct voltage
(117, 220, or 240 Vac as specified on your order) to
terminal block TB2 (figure 9). The terminal block has
different terminal connections for different supply volt-
ages. Fuses F1, F2, and F3 are provided in a bag with
the actuator. Determine the correct fuse from figure 9.
1. Locate the correct fuse and install it in the correct
terminal.
2. Connect ground to the terminal block.
3. Connect the neutral wire (ACC or ac common) to
terminal 4 and then connect the line to the appropriate
terminal (1, 2, or 3).
4. Be sure that terminal 7 on terminal block TB2 is
connected to ground (GND––yellow–green) on TB2.
5. Provide 24 Vdc power to the remote station.
External Control Signal
Manual Station Input Wiring
4 basic command signals are sent to the IC2000 (3
external and 1 internal) when using the Manual Station
module between the user’s signals and the IC500 in-
terface module. See table 2.
Note
At power up the Manual Station is in Re-
mote Control mode, but will pass the re-
mote INC/DEC signals to the IC500 MAN
(fast) inputs. (This provides a means to
drive the MAN (fast) from a Remote Sta-
tion option.)
To select the slow preset speed, the COMP/MAN input
(TB1–14) must be held low. However, when TB1–14 is
low, the remote device always overrides any local at-
tempt to gain control. (The local INC/DEC switch is
locked out.) If the Remote Station option is not being
used, TB1–14 can be controlled in several ways.
1. Remote Lockout: The COMP/MAN input may be
controlled by a third set of relay contacts on the re-
mote device that are configured to close whenever the
remote device desires to be in command of the valve.
To provide a means of locking out the remote com-
mands while operating the valve from the Manual Sta-
tion, install a switch at the IC2000 cabinet (e.g. in one
of the blank front panels), to open this line to TB1–14.
Label this switch “Remote Lockout” at its open posi-
tion, and open it before pushing the LOCAL request
button on the Manual Station front panel. When fin-
ished using the Manual Station, set the “Remote Lock-
out” switch back to the closed position. The next re-
quest for control by the remote device will then switch
the Manual Station back into remote mode.
2. Local Lockout: The COMP/MAN input may be con-
trolled solely by a switch installed by the user at the
IC2000 cabinet. The switch should be wired to connect
TB1–14 to TB1–10 when closed. Label it “Local Lock-
out” at this position. When manual control is desired,
open this switch and press the LOCAL request button
on the Manual Station front panel. When finished using
the Manual Station, set the “Local Lockout” switch
back in the closed position, and the Manual Station will
immediately revert to remote mode.
3. “Dead Man” Switch: The COMP/MAN input may be
controlled by wiring the TB1–14 input to the normally
closed contact of the LOCAL request switch on the
Manual Station front panel. When the LOCAL request
button is released, the Manual Station will always be in
remote mode. The user will have to press and hold the
LOCAL request button with one hand and operate the
Manual Station INC/DEC switch with the other to move
the valve from the Manual Station.
4. If you have specified the optional remote station,
refer to figure 18 for a wiring schematic.
IC500 Inputs
The IC500 may be driven directly by remote INC/DEC
signals, bypassing the Manual Station. However, only
the slow input terminals of the IC500 are brought out
to the terminal block. Therefore, if local manual control

Basis Weight Actuator
10
Figure 8. System Schematic (Contact Closure Input)
E0013 / IL
ONLY ONE OF
THESE INSTALLED

Basis Weight Actuator
11
Table 2. Manual Station Inputs
Manual
Station Input
Terminal Type of Circuit Assert By Effect While Asserted
INC TB1–15
24V opto-
isolated
grounding to TB1–10
Commands the actuator to run in the direction to open the
valve, provided “max. open” limit switch is not tripped.
DEC TB1–16
24V opto-
isolated
grounding to TB1–10
Commands the actuator to run in the direction to close the
valve, provided “max. closed” limit switch is not tripped.
COMP/MAN TB1–14 24V relay coil grounding to TB1–10
Selects remote control of the IC2000 and the slow preset
speed. Locks out local requests for manual operation.
(When not asserted, the fast preset is selected.)
LOCAL
Normally open, momentary
panel switch
24V relay coil Push and release
Latches the IC2000 in Local Mode and fast preset speed.
Can be released only by asserting the COMP/MAN input.
Table 3. IC500 Inputs
Manual Station
Input
Terminal Type of Circuit Assert By Effect While Asserted
SLOW/INC TB1–18
24V opto-
isolated
grounding to
TB1–10
Commands the actuator to run in the direction to open the
valve, at the preset slow speed, provided “max. open” limit
switch is not tripped.
SLOW/DEC TB1–19
24V opto-
isolated
grounding to
TB1–10
Commands the actuator to run in the direction to close the
valve, at the preset slow speed, provided “max. closed” limit
switch is not tripped.
FAST/INC
(1)
IC500–14a rack slot
K28
24V opto-
isolated
grounding to
TB1–10
Commands the actuator to run in the direction to open the
valve, at the preset fast speed, provided “max. open” limit
switch is not tripped.
FAST/DEC
(1)
IC500–16a rack slot
K28
24V opto-
isolated
grounding to
TB1–10
Commands the actuator to run in the direction to close the
valve, at the preset fast speed, provided “max. closed” limit
switch is not tripped.
1. Non–field accessible.
is desired at the IC2000 cabinet, the Manual Station or
a customer-supplied interface card will be required.
The user is responsible for selecting the COMP (slow)
INC/DEC inputs, or the MAN (fast) INC/DEC inputs,
and insuring that only one set is used at a time. As-
serting more than one of the IC500 inputs simulta-
neously may have unpredictable results. See table 3.
Input Signal Options
You can use relay contacts or open collector transistor
outputs to control the standard IC500 interface mod-
ule.
To assert the inputs by applying a positive voltage sig-
nal from the controlling computer, you can request the
“ROLM OPTION” as a special build, and the additional
circuitry will be mounted in the IC500 card to accept
the positive signals. However, if using the Manual Sta-
tion, the COMP/MAN signal must still be asserted by
pulling it low, since it closes a relay coil circuit.
A special construction is available to accommodate a
4–20 mA position command signal from a user sys-
tem. This requires an input signal isolator, a positioner
to generate INC/DEC signals by comparing the posi-
tion command to the valve position feedback, and an
additional terminal block to accommodate the new
signal interface. A small reduction in resolution may
occur with this system, since some hysteresis must be
built in to the comparator to prevent “hunting” behav-
ior. Contact the factory for help with this option.
Optional Remote Position Indication
If you desire, use terminals 8 (positive) and 9 (nega-
tive) to supply a 4 to 20 mA dc signal for remote indi-
cation of valve position. Other indicators may be con-
nected in series. Total load is 1000 ohm. See figure
18. At these terminals, a 4 to 20 mA dc signal repre-
sents 0 to 90 degree valve position.
Completing the Wiring
After completing the wiring, tighten the wire access
plate screws and connectors where they connect to
the access plate.
Complete the steps in the Settings section before
proceeding.

Basis Weight Actuator
12
Table 4. SD13 Card Functions
Link Position Function Comments
Default
Setting
1
A–B
STANDBY
OUT
No standby
(braking)
current
selected
1
B–C STANDBY IN
50% standby
(braking)
current
selected
*
2
D–E HALF
Half-stepping
mode selected
(maximum
resolution)
*
E–F FULL
Full-stepping
mode selected
3
G–H ENERGIZE
Motor
permanently
energized
*
3
H–I DE-ENERGIZE
Motor
energized via
control signal
Settings
Before starting the actuator, use the following steps to
check to be sure that all switch and jumper selections
are correct for the desired action of your system.
1. Unlock and open the cover. Loosen the appropriate
captive screws.
2. Unplug the motor drive (key 1, figure 5). Locate the
jumpers on the card.
The programming links on the SD13 drive card allow
the user to tailor the operating mode to the application.
Table 4 describes the usage of the first 3 links in brief.
3. Make sure that the current limit jumpers are proper-
ly set. For size 20HT (2.4A), link 4 should be set to
short pins L-M; and for sizes 30HT and 40HT(2.7A),
link 4 should be set to short pins K-L.
4. Plug the motor drive back into the IC2000.
5. Unplug the IC500 module. On the side of the card
are two rows of jumper packages labeled A4 through
A7 and A1 through B3. A4 through A7 are set at the
factory; do not change these jumpers. The table in fig-
ure 16 indicates the correct jumpers that are to be
used on IC500 and FT100.
6. Look at the top of each jumper set. You can see a
strip of metal where there is a jumper and no metal
where there is no jumper. If the jumper location does
not match that required by figure 16, pull the jumper
assembly out of the card, invert the assembly, and re–
insert it in into the card.
For example, for the standard mounting position and
standard rotation, there should be a jumper at B1, A2,
and A3, and there should be no jumper at A1, B2, and
B3.
Note
Jumpers A4, A5, A6, and A7 are set at
the factory and are not field selectable.
7. Plug the IC500 module back into the cabinet.
8. Unplug the FT100 module. For the FT100 card, the
jumper should be at A for reversed rotation (increasing
signal rotates valve shaft counterclockwise) and at B
for standard rotation (increasing signal rotates valve
shaft clockwise).
9. Plug the FT100 module back into the cabinet.
Tighten the captive screws, close and latch the cover.
Start Up
1. Be sure you have completed the Wiring section and
that you have set all switches and jumpers as de-
scribed in the Settings section.
2. Check to be sure that the correct power supplies
and logic signal have been supplied.
WARNING
If the valve is out of the pipeline, keep
hands and tools away from the valve
when adjusting or stroking the valve.
The valve disk or ball opens and closes
with a shearing action that can injure
hands or damage tools.
3. Remove ac power at the external circuit breaker
box before using the handwheel. Use the handwheel
to carefully rotate the valve to the fully closed position.
Be careful to avoid rotating the valve ball or disk too
far into its seat. (If necessary, refer to the valve body
instruction manual to determine the fully closed posi-
tion.):
a. As the valve reaches the fully closed position,
listen carefully to be sure the limit switch activates
when the valve reaches the fully closed position.
(The limit switches are located under the indicator
cover. You can hear a click as the limit switch is
activated.) If adjustment is required, refer to the
Adjustment section.
b. Repeat the process to check the limit switch at
the fully open position.
Note
Check the limit switch when you release,
or close, it. If the mounting screws are

Basis Weight Actuator
13
Figure 9. Transformer Schematic
E0014 / IL
JUMPER
over-tightened, the switch action may
not allow the switch to close after it has
been tripped.
4. Turn on power to the Stepmotor Interface.
5. Check to be sure the valve rotation indicator in the
Stepmotor Interface and in the optional remote station
show zero percent for 0 degrees of valve rotation (fully
closed) and 100 percent for 90 degrees of valve rota-
tion (fully open). Refer to the Adjustment section for
adjustment instructions.
6. Adjust the stroking speed with the adjustments on
the IC500 card faceplate (key 3, figure 4). Clockwise
rotation of the adjustment increases the speed. If the
speed increases too much, the the torque will drop off
and cause the motor to stall.
With no pressure applied to the valve, apply a signal to
operate the valve in both directions (opening and clos-
ing) and in both the manual (MAN) and computer
(COMP) operating modes. As the valve ball or disk is
rotating, adjust speed until the motor operates smooth-
ly and as quietly as possible. If the valve moves with a
jerky motion, continue to adjust the speed. Refer to the
Stroking Speed section for more information.
After the valve is in service, you can adjust the speed
again. If it appears that motor torque is too low, de-
crease stroking speed.

Basis Weight Actuator
14
Figure 10. Motor Connection Schematic
E0015 / IL
MOTOR TERMINAL BOARD

Basis Weight Actuator
15
Figure 11. Limit Switch Connection Schematic, 2 Limit Switches (Standard)
NOTE:
LS1 & LS2 OPEN THE COMMAND CIRCUITS TO STOP THE ACTUATOR
AT THE LIMIT CONDITIONS.
E0016 / IL
(CABLE OD = 9.1mm)
Adjustment
Limit Switches
The Basis Weight Assembly is standardly shipped with
2 limit switches. 4 limit switches can be wired by the
customer.
1. Mark the position of the actuator travel indicator
cover (figure 2) so that you can return it to the same
position after adjustment. Loosen the screws and re-
move the actuator position indicator.
2. Use the handwheel to position the actuator to 0 de-
grees rotation (fully closed). If necessary, refer to the
valve body instruction manual to determine the fully
closed position.
3. Loosen (slightly) the two screws on the limit switch
for 0 degrees rotation (LS2). Move the switch until you
can hear a click, which indicates that the switch has
been actuated.
4. Tighten the limit switch screws.
Note
Check the limit switch when you release,
or close, it. If the mounting screws are

Basis Weight Actuator
16
Figure 12. Limit Switch Connection Schematic, 4 Limit Switches (Optional)
E0017 / IL
INSTALLED AT
FACTORY IN
DIN RAIL
(O.D. = 10.7mm)
over-tightened, the switch action may
not allow the switch to close after it has
been tripped.
5. Use the handwheel to position the actuator to 90
degrees rotation (fully open).
6. Repeat steps 3 and 4 for the limit switch for 90 de-
grees rotation (LS1).
7. Replace the travel indicator cover and screws.
Stroking Speed
Stroking speed adjustments for the manual (MAN) and
automatic (COMP) modes are on the faceplate of the
IC500 card (key 3, figure 4). If it appears that motor
torque is too low, decrease stroking speed.
Note
In this manual, the default half-step in-
crement is referred to as a step.
The two trim potentiometers (screwdriver adjustments)
on the front panel of the IC2000 are for setting each of
the selectable preset speeds. The slowest speed is
approx. 600 steps/second in Manual mode and
approx. 5 steps/second in Computer mode; this speed
is governed by trim potentiometer resistance. The
Fastest speed is about 20 seconds for full stroke in

Basis Weight Actuator
17
Figure 13. Valve Position Indicator Block Diagram
(PANEL ADJUST.)
VOLTAGE
AMP
(0–1 V)
(PANEL
ADJUST.)
(FACTORY
ADJUST.)
(FACTORY
ADJUST.)
CURRENT
DRIVER
INPUT TO
POSITION
INDICATOR
E0019 / IL
both modes, and is governed by the torque dropping
off enough that the motor stalls.
The stroking time is controlled by the frequency of the
internal oscillator. The oscillator triggers the stepper
motor drive card to provide properly phased currents
to the various windings of the stepper motor. The se-
quence of energization of the windings is designed to
move the rotor one motor step per oscillator pulse. In
this stepping mode, 400 positions are available per
motor revolution. The gear ratio of the specific actuator
then determines how many motor revolutions are re-
quired to produce 90 degrees of output shaft rotation,
providing the multiplier to determine the resolution of
the valve travel.
The shortest contact closure to which the IC2000/SKF
will respond depends on the setting of the computer
mode speed potentiometer and the time skew between
the user’s gating signal and the IC2000’s internal oscil-
lator.
The output of the oscillator is an asymmetric pulse sig-
nal which is low for about 25 microseconds of the peri-
od. The stepper motor is guaranteed to move one step
if the signal to the driver card has been low for at least
10 microseconds prior to going high again. However,
there is no way to synchronize the DCS contact clo-
sures with the internal oscillator. So, the external con-
tacts must be held closed for 10 microseconds longer
than the period of the oscillator to guarantee at least
one step movement of the motor. On occasion, this
length of contact closure will result in 2 steps move-
ment (specifically when the contact closure happens to
occur simultaneously with the beginning of the oscilla-
tor low phase).
Therefore, if you had an oscillator set up for 10.1 steps
per second (99msec/step) and sent an Increment com-
mand that lasted 200 milliseconds, you would move
the valve 2 steps in the open direction.

Basis Weight Actuator
18
Figure 14. Overall Connection Schematic for IC500/Manual Station/SD13
E0027 / IL
+24V
INC
LIM
DEC
LIM
JUMPER IN B1 POSITION
FAST
INC
FAST
DEC
SLOW
INC
SLOW
DEC
COMMON
BRAKING CURRENT
SET
SPEED
SETTINGS
1
SLOW RATE
RATE COMM
FAST RATE
STOP CURRENT
STOP CURRENT
RETURN
+24DC
SD13
DRIVE
CARD
POWER
COMMON
SLOW INPUT
DIRECTION
INPUT
FAST INPUT
NOTE:
SEE WIRING SECTION FOR TB1-14.
1
Valve Position Indicator
The indicator is located on the manual station (key 4,
figure 4), and it shows 0 to 100 percent of valve travel
as the valve travels from 0 to 90 degrees rotation.
Another indicator is located on the optional remote sta-
tion (figure 5).
To adjust the indicator (key 4, figure 4), proceed as
follows:
1. Position the valve at 0 degrees rotation (fully
closed).
2. The meter should now show zero percent. If it does
not show zero, rotate the zero screw on the FT100
station faceplate.
3. Position the valve at 90 degrees rotation (fully
open).
4. The meter should now show 100 percent. If it does
not show 100 percent, rotate the span screw.

Basis Weight Actuator
19
Figure 15. Control Connection Schematic without Remote Station and without Manual Station
WITH THIS CONNECTION TO COMPUTER THE ACTUATOR
CAN ONLY RUN WITH SLOW SPEED.
CR1=INCREASE
CR2=DECREASE
NOTE:
IF THE MANUAL STATION IS INSTALLED, CONTROL CONFLICTS MAY OCCUR, SEE WIRING SECTION.
E0021 / IL
5. Check the meter again at 0 degrees rotation to be
sure zero has not changed.
Maintenance
WARNING
Avoid personal injury from sudden re-
lease of process pressure. Before per-
forming any maintenance operations:
D Shut off any line providing, electri-
cal power or a control signal to the ac-
tuator and Stepmotor Interface. Be sure
the actuator cannot suddenly open the
valve.
D Use bypass valves or completely
shut off the process to isolate the valve
from process pressure. Relieve process
pressure on both sides of the valve.
Drain the process media from both sides
of the valve.
D Keep power off when working in the
Stepmotor Interface.
A brief troubleshooting guide is provided below. Fol-
lowing the troubleshooting guide are maintenance pro-
cedures that can be completed in the field. For other
maintenance, return the actuator to Fisher Controls.
Due to the care Fisher Controls takes in meeting all
manufacturing requirements (heat treating, dimension-
al tolerances, etc.), use only replacement parts sup-
plied by Fisher Controls.

Figure 16. Jumper Configurations
NOTE:
JUMPERS A4, A5, A6, AND A7 ARE NOT FIELD SELECTABLEUN-
LESS THIS OPTION HAS BEEN INSTALLED AT THE FACTORY.
E0020 / IL
1. STANDARD:
CONTACT CLOSURE OR
OPEN COLLECTOR LOGIC INPUTS
2. OPTIONS:
POSITIVE VOLTAGE PULSES
FOR OPTION, CONTACT FACTORY AND SPECIFY YOUR
INPUT.
Basis Weight Actuator
20
Troubleshooting
Table 5 describes how each card within the IC2000 is
connected to the other cards. Each card has two col-
umns of pins labeled 2a, 4a, and up to 32a (also 2c,
4c, and up to 32c). The table indicates that 2ca is 24 V
and 32ca is ground, which is connected with power
common terminal 10 on terminal block TB1. See the
Wiring section for more information on the correct con-
nections.
If the actuator will not operate,
1. Check to be sure that the power of the correct volt-
age is reaching the terminal block in the Stepmotor
Interface. Also check to be sure that the power supply
is connected to the appropriate terminal.
ROTATION
(BOTH IN
STD
JUMPER SETTINGS
STD
RIGHT
HAND
MTG)
IC500 FT100
CCW B1 B2 B3 A
CW B1 A2 A3 B
2. Check the fuses on terminal block TB2 and check
fuses FS1 and FS2 on the SD13 card. Replace fuses if
necessary.
3. Check the LEDs (light–emitting diodes) on interface
card IC500 light when a signal is applied to the control
box. The LEDs should turn on in response to an ap-
plied signal. If the LEDs do not turn on, no signal is
reaching the card. The limit switch may be open and
needing adjustment, the limit switches may be con-
nected incorrectly on TB1, or jumpers A1–A3 and
B1–B3 may be in the wrong position. See figure 13.
4. Check to see if power is reaching the actuator. If
power is reaching the actuator, the handwheel will be
difficult to turn. If power is not reaching the actuator,
the handwheel will be easy to turn.
/