Epson 24-Pin User guide

Category
Print & Scan
Type
User guide

This manual is also suitable for

24-pin Dot Matrix Printer
®
User’s Guide
This manual is divided into two sections: English and Spanish. The
English section begins after this page. The Spanish section begins
approximately at the middle of the manual.
Este manual está dividido en dos secciones: Inglés y Español. El
manual en español comienza aproximadamente a la mitad del libro. El
manual en inglés comienza después de esta página.
2
All rights reserved. No part of this publication may be reproduced, stored in a retrieval system, or
transmitted in any form or by any means, electronic, mechanical, photocopying, recording, or
otherwise, without the prior written permission of Seiko Epson Corporation. The information
contained herein is designed only for use with this Epson printer. Epson is not responsible for any
use of this information as applied to other printers.
Neither Seiko Epson Corporation nor its affiliates shall be liable to the purchaser of this
product or third parties for damages, losses, costs, or expenses incurred by the purchaser or
third parties as a result of: accident, misuse, or abuse of this product or unauthorized
modifications, repairs, or alterations to this product, or (excluding the U.S.) failure to strictly
comply with Seiko Epson Corporation’s operating and maintenance instructions.
Seiko Epson Corporation shall not be liable for any damages or problems arising from the
use of any options or any consumable products other than those designated as Original
Epson Products or Epson Approved Products by Seiko Epson Corporation.
Epson and Epson ESC/P are registered trademarks of Seiko Epson Corporation.
Epson Store, Epson Connection, and SoundAdvice are service marks of Epson America, Inc.
General Notice: Other product names used herein are for identification purposes only and may be
trademarks of their respective owners. Epson disclaims any and all rights in those marks.
© 2004 Epson America, Inc. 1/04 4047824-00
CPD-17641
3
Contents
Introduction
Options . . . . . . . . . . . . . . . . . . . . . . . . . . . . . . . . . . . . . . . . . . . . . . . . . . . 5
Chapter 1 -
Setting Up the Printer
Unpacking the Printer. . . . . . . . . . . . . . . . . . . . . . . . . . . . . . . . . . . . . . . 7
Choosing a Place for the Printer . . . . . . . . . . . . . . . . . . . . . . . . . . . . . . 7
Assembling the Printer . . . . . . . . . . . . . . . . . . . . . . . . . . . . . . . . . . . . . . 8
Connecting the Printer to Your Computer . . . . . . . . . . . . . . . . . . . . 11
Installing the Printer Software. . . . . . . . . . . . . . . . . . . . . . . . . . . . . . . 12
For DOS programs . . . . . . . . . . . . . . . . . . . . . . . . . . . . . . . . . . . . 15
Installing and Using the Online Reference Guide . . . . . . . . . . . . . . 15
Installing the Remote Configuration Manager . . . . . . . . . . . . . . . . . 15
Chapter 2 -
Paper Handling
Setting the Paper Release Lever . . . . . . . . . . . . . . . . . . . . . . . . . . . . . 17
Adjusting the Paper-Thickness Setting . . . . . . . . . . . . . . . . . . . . . . . 18
Loading Continuous Paper with the Front Push Tractor . . . . . . . . 19
Loading Continuous Paper with the Rear Push Tractor . . . . . . . . . 21
Loading Continuous Paper with the Pull Tractor . . . . . . . . . . . . . . 23
Removing paper from the pull tractor . . . . . . . . . . . . . . . . . . . 26
Loading Single Sheets with the Paper Guide . . . . . . . . . . . . . . . . . . 26
Loading Special Papers. . . . . . . . . . . . . . . . . . . . . . . . . . . . . . . . . . . . . 28
Continuous multipart forms. . . . . . . . . . . . . . . . . . . . . . . . . . . . 28
Single-sheet multipart forms . . . . . . . . . . . . . . . . . . . . . . . . . . . 28
Labels . . . . . . . . . . . . . . . . . . . . . . . . . . . . . . . . . . . . . . . . . . . . . . . 28
Envelopes. . . . . . . . . . . . . . . . . . . . . . . . . . . . . . . . . . . . . . . . . . . . 30
Postcards . . . . . . . . . . . . . . . . . . . . . . . . . . . . . . . . . . . . . . . . . . . . 30
Using the Micro Adjust Function . . . . . . . . . . . . . . . . . . . . . . . . . . . . 31
Adjusting the tear-off position . . . . . . . . . . . . . . . . . . . . . . . . . . 31
Adjusting the top-of-form position . . . . . . . . . . . . . . . . . . . . . . 33
4
Chapter 3 - Using the Control Panel
Buttons and Lights . . . . . . . . . . . . . . . . . . . . . . . . . . . . . . . . . . . . . . . . . 35
Selecting a Font and Pitch . . . . . . . . . . . . . . . . . . . . . . . . . . . . . . . . . . . 37
Changing the Printer’s Default Settings . . . . . . . . . . . . . . . . . . . . . . . 38
Default-setting mode . . . . . . . . . . . . . . . . . . . . . . . . . . . . . . . . . . 39
Chapter 4 -
Troubleshooting
Using the Error Indicators. . . . . . . . . . . . . . . . . . . . . . . . . . . . . . . . . . . 41
Clearing Paper Jams. . . . . . . . . . . . . . . . . . . . . . . . . . . . . . . . . . . . . . . . 42
Printing a Self Test . . . . . . . . . . . . . . . . . . . . . . . . . . . . . . . . . . . . . . . . . 43
Where To Get Help . . . . . . . . . . . . . . . . . . . . . . . . . . . . . . . . . . . . . . . . 44
Chapter 5 -
Product Information
Safety Instructions . . . . . . . . . . . . . . . . . . . . . . . . . . . . . . . . . . . . . . . . . 45
Hot Parts Caution Symbol . . . . . . . . . . . . . . . . . . . . . . . . . . . . . . 45
Important Safety Instructions . . . . . . . . . . . . . . . . . . . . . . . . . . . 45
ENERGY STAR Compliance. . . . . . . . . . . . . . . . . . . . . . . . . . . . . . . . . 46
FCC Compliance Statement for United States Users . . . . . . . . . . . . 46
WARNING . . . . . . . . . . . . . . . . . . . . . . . . . . . . . . . . . . . . . . . . . . . 46
For Canadian users . . . . . . . . . . . . . . . . . . . . . . . . . . . . . . . . . . . . 46
Declaration of Conformity . . . . . . . . . . . . . . . . . . . . . . . . . . . . . . . . . . 47
EPSON AMERICA, INC., LIMITED WARRANTY. . . . . . . . . . . . . . 47
Introduction 5
Introduction
This manual covers the following basic information to get you started
using your Epson
®
printer:
Setting Up the Printer
Paper Handling
Using the Control Panel
Troubleshooting
Product Information
Although most of the illustrations in this manual show the LQ-590, the
instructions apply to both the LQ-590 and the LQ-2090.
w
Warnings must be followed carefully to avoid bodily injury.
c
Cautions must be observed to prevent damaging your equipment.
Notes contain important information and useful tips about using your printer.
For detailed information about your printer, refer to the online
Reference Guide. It describes all the printer’s functions, optional products,
printer software, troubleshooting, and technical specifications. See
“Installing and Using the Online Reference Guide” on page 15.
If you have questions about using your printer software, you can use the
online help, which is installed automatically when you install the printer
software.
Options
By adding options such as a cut-sheet feeder or roll paper holder, you can
further expand your printer’s capabilities. Optional interface cards are
also available to supplement your printer’s built-in interfaces. (See the
Reference Guide for more information.)
You can purchase ribbon cartridges, paper, manuals, and accessories
from the Epson Store
SM
at (800) 873-7766, or visit www.epsonstore.com
(U.S. sales only). In Canada, please call (800) 463-7766 for dealer referral.
6 Introduction
Setting Up the Printer 7
Chapter 1
Setting Up the Printer
This chapter describes how to unpack and set up your printer.
Unpacking the Printer
Make sure you have the following items.
Follow the directions on the Notice Sheet to remove the protective
materials before you turn on the printer. Save all packing and protective
materials in case you need to ship the printer in the future.
Choosing a Place for the Printer
Place the printer on a flat, stable surface. The printer will not operate
properly if it is tilted or placed at an angle.
Avoid using or storing the printer in places subject to rapid changes
in temperature and humidity. Keep it away from direct sunlight,
strong light, heat sources, or excessive moisture or dust.
Printer
Paper guide
Power cord
Ribbon cartridge
Printer software
Front sheet
guide (LQ-590 only)
Front paper guide
(LQ-2090 only)
8 Setting Up the Printer
Place the printer near a wall outlet where you can easily unplug the
power cord. Position the power cord and interface cable so they do
not interfere with paper feeding.
Note for French-speaking users:
Placez l’imprimante près d’une prise de courant où la fiche peut être
débranchée facilement.
Avoid electrical outlets controlled by wall switches or automatic
timers. An interruption in power can erase information in the
memory of your printer or computer. Also avoid outlets on the same
circuit as large motors or other appliances that can cause voltage
fluctuations.
Use a grounded power outlet; do not use an adapter plug.
Assembling the Printer
1. Make sure the printer is turned off and unplugged. Then open the
printer cover and pull it up to remove it.
2. Remove the paper tension
unit by pressing the tabs
on each side and pulling it
up.
Setting Up the Printer 9
3. Use your hand to slide the
print head to the middle of
the printer.
4. Remove the new ribbon
cartridge from the package.
The black plastic ribbon guide
is held in place on top of the
cartridge with a small tab. To
release it, hold the sides of the
ribbon guide and gently
disconnect it. (Do not remove
the ribbon guide from the
ribbon, however.)
5. Hold the ribbon cartridge by its handle and insert it into the printer
at an angle, as shown below; then press down on both sides of the
cartridge to fit the plastic hooks into the printer slots. You should
hear it click into place.
Ribbon guide
10 Setting Up the Printer
6. Slide the ribbon
guide into the print
head until it clicks in
place. Be careful not
to twist or crease the
ribbon.
Turn the
ribbon-tightening
knob to help feed the
ribbon into place.
7. Reinstall the paper
tension unit by
lowering it onto the
printer’s mounting
pegs. Then press down
on both ends until it
clicks into place.
8. To replace the printer
cover, insert the front
tabs into the slots on
the printer and lower
the cover into place.
Then push it down
until it clicks.
9. Make sure the top part
of the cover is folded
forward, as shown.
Then attach the paper
guide.
Setting Up the Printer 11
Note:
When printing, you can use the paper guide only when the tractor is installed in
the front or rear push position.
Connecting the Printer to Your Computer
Your printer is equipped with both an IEEE-1284-compatible parallel
interface and a USB (Universal Serial Bus) interface. It also includes a
Type-B optional interface slot in case your computer requires a different
type of printer interface. (See the Reference Guide if you need to install an
interface card.)
Note:
You can connect cables to both interfaces; the printer switches automatically to
the appropriate interface when it receives data.
To connect your computer to your printer’s built-in parallel interface,
you need a shielded, twisted-pair parallel cable with a 36-pin Centronics
®
compatible connector for the printer. To connect the printer to a USB
port, you need a standard, shielded USB cable.
1. Make sure both the printer and computer are turned off, then
connect the parallel or USB cable to the printer.
2. Connect the other end to your computer.
Parallel USB
12 Setting Up the Printer
c
Caution:
There are several models of the printer designed for different voltages, and
it is not possible to adjust the printer for use with another voltage. If the
label on the back of the printer does not show the correct voltage for your
country, contact your dealer.
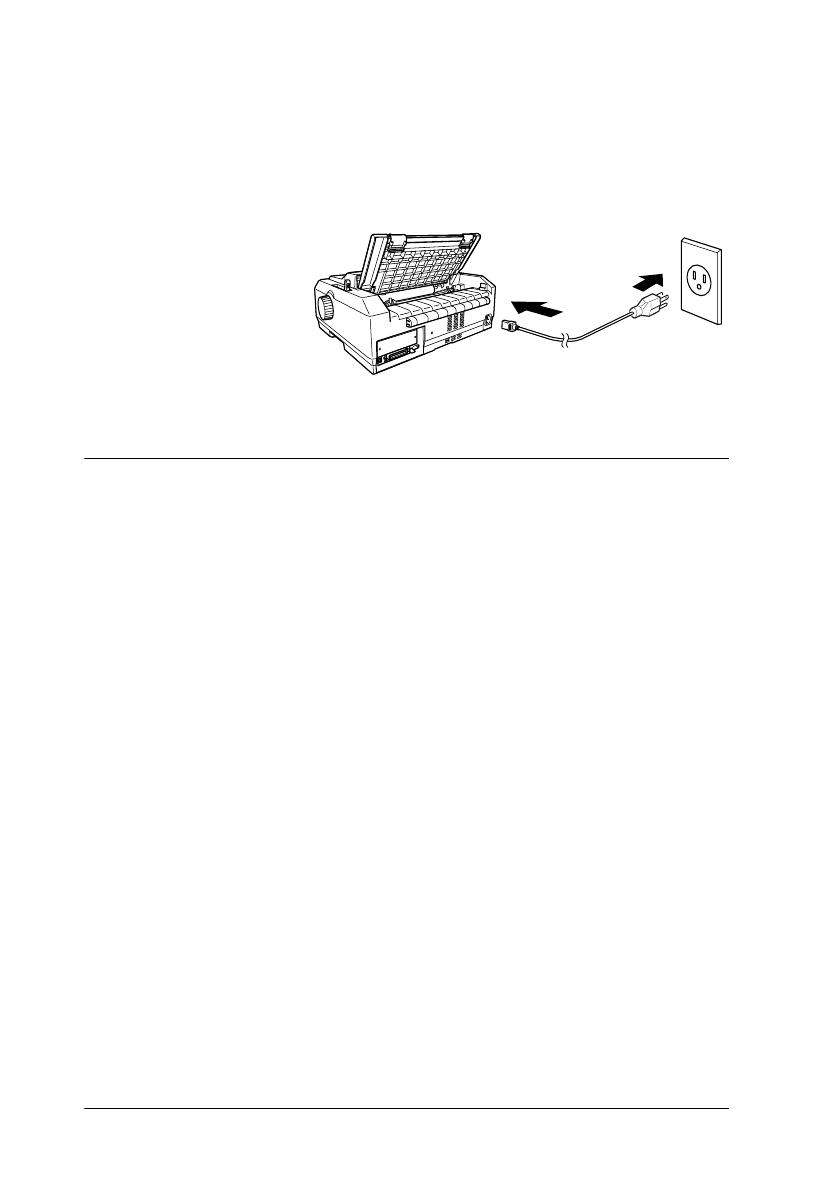
3. Plug the power
cord into the AC
inlet on the back
of the printer and
plug the other end
into a properly
grounded
electrical outlet.
Installing the Printer Software
After you connect the printer to your computer, you need to install the
Epson printer software on the CD-ROM shipped with your printer. The
printer driver is the software that runs, or “drives,” your printer. With it,
you can select printer settings such as print quality, resolution, and paper
size.
The printer software supports Windows
®
95, 98, Me, 2000, XP, or NT 4.0,
and includes Epson Status Monitor 3 (which displays printer status
information and notifies you of printer errors). See the Reference Guide for
more information.
Note:
Installing the printer software for Windows 2000, XP, or NT may require
administrator privileges. If you have problems, ask your administrator for
more information.
If the New Hardware Found screen or any other wizard appears when you
turn on your computer, click
Cancel.
If the Digital Signature Not Found screen appears, click
Yes. If you click
No, you must reinstall the printer driver.
The printer software CD-ROM also includes the Epson Remote
Configuration Manager, which lets you change the printer’s default
settings. See “Installing the Remote Configuration Manager” on page 15.
Setting Up the Printer 13
Follow these steps to install the printer software:
1. Make sure Windows is running and the printer is turned off.
2. Insert the printer software
CD-ROM into the CD-ROM or
DVD drive. After a moment
the Installation screen appears:
If it does not, double-click
Setup.exe on the CD-ROM.
3. Select your printer model
and click . You see this
window:
4. Select
Install Printer Software and
click . You see the software
license agreement.
5. Read the agreement and click
Accept. The installation starts
and you see this window:
14 Setting Up the Printer
6. Turn on your printer, then wait for the software to be installed. (This
may take a few minutes.)
If you are prompted to insert the Windows CD-ROM, go to step 7.
Otherwise, follow any instructions on the screen until the
installation is complete and you see the Installation screen again.
Then turn to page 15 and follow the instructions to install the
Reference Guide and the Remote Configuration Manager utility.
7. If the installation asks for the Windows CD-ROM, insert the disk in
the CD-ROM drive and click
OK. When the Windows installation
screen appears, close the screen to continue with the driver
installation.
Note:
If you see a message that the drive is not accessible, click
Cancel and try
again.
8. Click
Browse and select the path for the printer driver. Then click
OK and follow the on-screen instructions.
9. Select the appropriate file in the folder and click
OK.
10. When prompted, insert the printer software CD-ROM and click
Browse to select the correct path.
Note:
If you see a message that the drive is not accessible, click
Cancel and
try again.
If a “System Error” message appears, click
Cancel.
If you are using Windows NT, you do not need to specify a path.
If you are using Windows 98, the Printer Utility Setup may start. If it
does, follow the instructions on the screen.
11. When the installation is complete, see page 15 to install the
Reference Guide and the Remote Configuration Manager utility.
Setting Up the Printer 15
For DOS programs
To control the printer from DOS application programs, you need to select
the printer you are using or another available printer from the printer list
in your application. Choose the Epson printer at the appropriate step in
the installation or setup procedure. If the list in your application does not
include your printer, choose the first available printer from the following
list.
Installing and Using the Online Reference Guide
To install the Reference Guide on your hard disk, select Install Reference
Guide
on the Installation screen and click . The manual is copied and
an
LQ590-2090 Reference Guide icon appears on your desktop.
To open the Reference Guide, double-click the
LQ590-2090 Reference
Guide
icon on your desktop. You can also click Start > Programs
(or
All Programs) > EPSON > LQ590-2090 Reference Guide, and click
Reference Guide.
Installing the Remote Configuration Manager
The Epson Remote Configuration Manager provides an easy way to
change your printer’s default settings in Windows. Follow these steps to
install it on your computer in Windows 95, 98, Me, 2000, XP, or NT:
1. Select
Install EPSON Remote Configuration Manager on the
Installation screen and click .
For the LQ-590 For the LQ-2090
LQ-580 / LQ-570e LQ-200 LQ-2080 / 2180 LQ-200
LQ-300+ LQ-500 LQ-2070 / 2170 LQ-500
LQ-300 LQ-860+ LQ-1070 / 1070+ LQ-860+ / 1060+
LQ-870 LQ-2550 LQ-870 / 1170 LQ-2550
LQ-570 / 570+ LQ-2500 LQ-850+ / 1050+ LQ-2500
LQ-850+ LQ-800 LQ-850 / 1050 LQ-800 / 1000
LQ-850 LQ-1500 LQ-510 / 550 / 1010 LQ-1500
LQ-510 / 550
16 Setting Up the Printer
2. When you see the InstallShield window, click
Yes.
After a moment, you see
this screen:
3. Click
Next and follow
the instructions on the
screen.
4. When the installation is complete, click
Finish. (If a window remains
on the screen, close it so you can see the final installation screen.)
The Remote Configuration Manager is installed on the computer in its
own folder, along with an uninstall option and the online User’s Guide,
which describes how to use the program.
To start the program, select
Programs (or All Programs) > Epson Remote
Configuration Mgr
, and then click Epson Remote Configuration
Manager
.
To open the manual, select
Programs (or All Programs) > Epson Remote
Configuration Mgr
, and then click Epson Remote Configuration
Manager User’s Guide
.
Note:
If you are using Windows 2000 or XP and the printer is connected to the parallel
port, Remote Configuration Manager may not work. In this case, do one of the
following:
Before running the program, set the printer driver to the LPT2 port. Then
use Remote Configuration Manager to check or change the default settings
as desired. After you finish using the program, remember to return the
setting to LPT1.
Connect the printer to the USB port instead.
Paper Handling 17
Chapter 2
Paper Handling
This chapter covers some important instructions you need to load and
use paper in your printer. For complete paper handling information, see
the Reference Guide.
Setting the Paper Release Lever
Before you start printing,
be sure to set the paper
release lever to indicate
the paper source you
want to use, as described
in the table below.
Lever position Description
Single-sheet position
For loading single-sheet paper from the top or front slot.
Rear push tractor position
For loading continuous paper with the tractor installed in the
rear push position or when using the rear push and pull tractors
in combination.
Front push tractor position
For loading continuous paper with the tractor installed in the
front push position or when using the front push and pull tractors
in combination.
Pull tractor position
For loading continuous paper from the tractor installed on top
of the printer in the pull position. You can load paper in the
front, rear, or bottom slot.
18 Paper Handling
Adjusting the Paper-Thickness Setting
Before you start printing, make sure the paper-thickness setting is correct
for the type of paper you are using.
Turn the printer off and
open the printer cover.
The paper-thickness lever
is located on the left side of
the printer. The numbers
next to the lever indicate
the thickness setting.
Select the correct setting according to this table:
Note:
When the temperature is 41 °F (5 °C) or lower, or 95 °F (35 °C) or higher, set the
paper-thickness lever one position higher to improve print quality.
Paper type Lever position
Plain paper (single sheets or continuous paper) 0
Carbonless multipart forms with:
2 parts (original + 1 copy)
3 parts (original + 2 copies)
4 parts (original + 3 copies)
5 parts (original + 4 copies)
1
2
3
5
Continuous paper with labels 2
Postcards 2
Envelopes:
Airmail No.6
Airmail No.10
Plain
Bond 20 lb
Bond 24 lb
3
3
4
4
6
Paper Handling 19
Loading Continuous Paper with the
Front Push Tractor
1. Make sure the printer is
turned off. Then open the
front cover and make sure
the tractor is installed in the
front push position. (You
may need to move it from
the rear push or pull
position.)
2. If you have the LQ-2090,
remove the sub cover from
the front cover. (If it is
difficult to remove, you can
temporarily remove the front
cover and then separate the
sub cover from it.)
Be sure to reattach the sub
cover when you want to
print from a different paper
source.
3. Set the paper release lever to the front push tractor position.
Also set the paper-thickness lever to the proper position for
your paper’s thickness. See “Adjusting the Paper-Thickness
Setting” on page 18 for instructions.
4. Release the left and
right sprockets by
pushing the blue
lock levers
backward.
20 Paper Handling
5. Slide the left sprocket
approximately
0.5 inch (12 mm)
from the far left
position and pull the
blue lever forward to
lock it in place. Then
slide the right
sprocket to match the
width of your paper,
but do not lock it.
6. Remove the front cover by
pulling it straight down.
7. Make sure your paper has a clean, straight edge. Then open both
sprocket covers and fit the first four holes of the paper, with the
printable side up, over the tractor pins.
8. Close the sprocket covers.
9. Slide the right sprocket to remove any slack in the paper; then lock it
in place by pushing the sprocket lock down.
10
5
0
  • Page 1 1
  • Page 2 2
  • Page 3 3
  • Page 4 4
  • Page 5 5
  • Page 6 6
  • Page 7 7
  • Page 8 8
  • Page 9 9
  • Page 10 10
  • Page 11 11
  • Page 12 12
  • Page 13 13
  • Page 14 14
  • Page 15 15
  • Page 16 16
  • Page 17 17
  • Page 18 18
  • Page 19 19
  • Page 20 20
  • Page 21 21
  • Page 22 22
  • Page 23 23
  • Page 24 24
  • Page 25 25
  • Page 26 26
  • Page 27 27
  • Page 28 28
  • Page 29 29
  • Page 30 30
  • Page 31 31
  • Page 32 32
  • Page 33 33
  • Page 34 34
  • Page 35 35
  • Page 36 36
  • Page 37 37
  • Page 38 38
  • Page 39 39
  • Page 40 40
  • Page 41 41
  • Page 42 42
  • Page 43 43
  • Page 44 44
  • Page 45 45
  • Page 46 46
  • Page 47 47
  • Page 48 48

Epson 24-Pin User guide

Category
Print & Scan
Type
User guide
This manual is also suitable for

Ask a question and I''ll find the answer in the document

Finding information in a document is now easier with AI