Page is loading ...

INSTALLATION AND OPERATING INSTRUCTIONS ENGLISH
PK-93406-10-00-5AAR2243
(35I00-1)
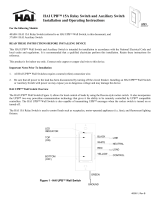
Figure 1 - Leviton UPB™ Wall Switch
WARNINGS AND CAUTIONS
• TO AVOID FIRE, SHOCK, OR DEATH; TURN OFF POWERatcircuitbreakerorfuseandtestthatpowerisoffbeforewiring!
• To beinstalledand/orusedinaccordancewithappropriateelectricalcodesandregulations.
• Ifyouareunsureaboutanypartoftheseinstructions,consultanelectrician.
• SAVETHESEINSTRUCTIONS.
WARNINGS AND CAUTIONS
• To reducetheriskofoverheatingandpossibledamagetootherequipment,whenconguredasdimming-capable,DONOT
installtocontrolareceptacle,amotor-operatedappliance,oratransformer-suppliedappliance.
• Usethisdevicewithcopper or copper-clad wire only.
• Forindooruseonly.
For the following Models:
35A00-1Leviton600WDimmerSwitch,35A00-1CFL600WCFL/LEDDimmer,35A00-3Leviton600WNon-Dimming
Switch(collectivelyreferredtoasLevitonUPB™WallSwitch,inthisdocument),and37A00-1LevitonAuxiliarySwitch
NOTE:AllLevitonUPB™WallSwitchesrequireaneutral(white)connectionwire.
Leviton UPB™ Wall Switch Overview
TheLevitonUPB™WallSwitch(Figure 1)allowsforlocalcontroloflightingbyusingtherockerswitch.Italso
incorporatestheUPB™two-waypowerlinecommunicationtechnologythatgivesittheabilitytoberemotelycontrolledby
UPB™compatiblecontrollers.TheLevitonUPB™WallSwitchisalsocapableoftransmittingUPB™messages(including
currentlightlevel)whentherockerswitchisturnedon,turnedoff,brightened,ordimmed.
Eachswitchcanbeconguredtocustomtanindividual’slifestyleanddesires.TheLevitonDimmerSwitchiscapableof
storingupto16presetlightlevelsandfaderatestocreatepowerfullightingscenes.TheLevitonNon-DimmingSwitchis
usedtocontrolsuchloadsasuorescentlightsandceilingfans.
Leviton Auxiliary Switch Overview
The37A00-1LevitonAuxiliarySwitch(Figure2)isanoptionalcompaniondeviceusedwiththeLevitonUPB™Wall
Switchformulti-waycircuits.TheLevitonAuxiliarySwitchhasarockerswitchthatcontrolsthelightingloadintheexact
samemannerastherockerswitchontheLevitonUPB™WallSwitch.
Figure 2 – Leviton Auxiliary Switch
Changing Switch Color
ThecoloroftheLevitonUPB™WallSwitchandAuxiliarySwitchmaybechangedtocomplementtheinteriordécor.The
LevitonUPB™WallSwitchandAuxiliarySwitchissuppliedwithawhiteswitchplate.Additionalcolorsareavailable;
contactyourLevitondistributorformoreinformation.Whenchangingtheswitchplate,makesurethattheswitchis
disconnectedfromallpower,andproceedasfollows:
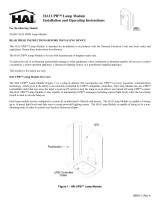
Figure 3 – Changing Switch Color
Figure 4 – Air-Gap Switch Lever
TheswitchplateattachestotheLevitonUPB™WallSwitchandAuxiliarySwitchwithtwolatchesontherightandtwoon
theleft.Usingasmall-bladedscrewdriver,gentlydepresstheupperandlowerlatchononesidewhileliftinguponthe
plate.Oncethelatchesarereleasedononeside,removetheswitchplatefromtheotherside.
1. Alignthelatchesofthenewswitchplatetotheopeningsonthemountingplateandgentlysnapintoplace.
INSTALLATION INSTRUCTIONS
TheLevitonUPB™WallSwitchiswireddirectlytothelightingcircuitandcanbecontrolledbyaddingoneormoreoptional
LevitonAuxiliarySwitchesproducingmulti-waycircuits.Multi-waycircuitsmakeitpossibleforagroupofswitchesto
controlthesamelightorsetoflights.Thissectionwillillustratehowtomaketheconnections.
NOTES:
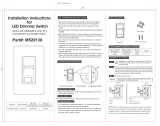
1. RefertoFigures 1 and 2todeterminethewirecolorsforeachconnection.
2. AllLevitonUPB™WallSwitchesrequireaneutral(white)connection.
3. TheLine(black)wiremustbeaccessiblefortheinstallationofallLevitonAuxiliarySwitches.Thiswiremaybe
connectedtoeitherphaseofthe120/240Vsupply.Theblueand/orgraywireontheLevitonAuxiliarySwitchcanbe
connectedtoeitherearthgroundorneutral.Theblueand/orgraywireisonlyusedtolighttheLEDontheswitch.This
LEDonlyindicatesthatpowerisappliedandservesasanight-light.ConnectthebluewireonlytolighttheLEDblue.
ConnectthegraywireonlytolighttheLEDred.ConnectboththebluewireandthegraywiretolighttheLEDmagenta.
Air-Gap Switch Lever
TheLevitonUPB™WallSwitchhasanair-gapswitchleverthatwillremoveallpowerfromtheloadforsafeswitch
installationandlightbulbreplacement.Toactivatetheair-gapswitch,usingyourngernail,pryopentheleveratthe
groove
(Figure 1).Swingtheleverfullyopensothatitisperpendiculartothebottomrim(Figure 4).Afterservicing,pushthe
leverfullyclosedsothatitisparalleltothebottomrim.Thelevermustbepushedfullyclosedfornormaloperation.
Installation Procedure
1. Besurethatallpowertotheloadhasbeendisconnectedbyturningoffthecircuitbreaker.
2.
Ifapplicable,removethefaceplatefromtheexistingwallswitch,removetheexistingwallswitchfromthewallbox,and
disconnectthewiresfromtheexistingwallswitch.Identifythe"Line","Neutral","Load"and"Traveler"(ifapplicable)wires.
3. Besurethattheair-gapswitchleverontheLevitonUPB™WallSwitchisfullyopen.
4. Remove3/4"ofinsulationfromeachofthewiresontheLevitonUPB™WallSwitch.InstalltheLevitonUPB™Wall
SwitchbyconnectingwiresperwiringcongurationshowninFigure 5.
5. InstallanyoptionalLevitonAuxiliarySwitchperwiringcongurationshowninFigure 5.
6. Afterallconnectionshavebeenmade,becertainthatallwireconnectorsarermlyattachedandthereisnoexposed
copper.
7. GentlyplacethewiresandLevitonUPB™WallSwitchintothewallboxwiththeLEDatthetopofdevice.Usingthe
suppliedscrews,attachtheLevitonUPB™WallSwitchtothewallbox.
8. Beforeinstallingthefaceplate,restorepowertothecircuit,andthenfullyclosetheair-gapswitchlever.
9. AftertestingtheLevitonUPB™WallSwitchandAuxiliarySwitchforproperlocaloperation(see Table 2 and Table 3),
installaDecora
®
faceplateovereachswitch.
(ON/BRIGHT)
LEVER GROOVE
AIR-GAP SWITCH
(OFF/DIM)
BOTTOM
LED
INDICATOR
TOP
GROUND
GREEN
RED
YELLOW
WHITE
LOAD
CONTROL
NEUTRAL
BLACK
LINE
YELLOW
BLUE
GRAY
CONTROL
*NEUTRAL
*NEUTRAL
BLACK
LINE
BOTTOM
(OFF/DIM)
(ON/BRIGHT)
TOP
(FOR RED INDICATOR)
(FOR BLUE INDICATOR)
INDICATOR
LED
Model Device Maximum Load Next to One Dimmer Next to Two Dimmers
35A00-1 600W 600W 500W
35A00-1CFL 600W 600W 500W
35A00-3 600W 600W 500W
Leviton UPB™ Wall Switch De-Rating
Intwo-ganginstallations,thereisnoneedtode-ratethe35A00-1,35A00-1CFL,or35A00-3.Inthree-ganginstallations,
eachswitchmustbede-ratedfrom600Wto500W.
Table 1 – Leviton Wall Switch De-Rating
Leviton DIMMER SWITCH OPERATION
TheLevitonDimmerSwitchhasmanycongurableitemsthatcanbesetusingtheUPB™UPStartcongurationsoftware.
ThefollowingdescribestheoperationoftheLevitonDimmerSwitchinitsfactorydefaultconguration.
Local Rocker Switch Operation
TheLevitonDimmerSwitchhasarockerswitchthatcanbeusedtocontrolthelightingloadasfollows.
Rocker Event Top Rocker Bottom Rocker
Single-Tap Brightensthelightto100%(on)at
defaultfaderateandrestartsauto
shut-offtimer(ifapplicable).
Fadethelightto0%(off)atdefault
faderate.
Double-Tap Snapsthelightto100%(on)and
overridesautoshut-off.
Snapsthelightto0%(off).
Hold Startsfading(brightening)thelight
towards100%atdefaultfaderate
andrestartsautoshut-offtimer(if
applicable).
Startsfading(dimming)thelight
towards0%atdefaultfaderate.
Release Stopsbrighteningthelightand
restartsautoshut-offtimer(if
applicable).
Stopsdimmingthelight.
Table 2 - Leviton UPB™ Dimmer Switch Local Operation
Leviton NON-DIMMING SWITCH OPERATION
TheLevitonNon-DimmingSwitchhasmanycongurableitemsthatcanbesetusingtheUPB™UPStartconguration
software.ThefollowingdescribestheoperationoftheLevitonNon-DimmingSwitchinitsfactorydefaultconguration.
Local Rocker Switch Operation
TheLevitonNon-DimmingSwitchhasarockerswitchthatcanbeusedtocontroltheloadasfollows.
Table 3 – Leviton Non-Dimming Switch Local Operation
RockerEvent To p Rocker BottomRocker
Single-Tap Turnstheloadonandstartsauto
shut-offtimer(ifapplicable).
Turnstheloadoff.
LEVITON UPB™ WALL SWITCH AND AUXILIARY SWITCH
Cat.No.35A00-1
Installation Instructions and User’s Guide
WEB VERSION

For Technical Assistance Call: 800-824-3005 - www.leviton.com
PK-93406-10-00-5AAR2243
(35I00-1)
© 2013 Leviton Mfg. Co., Inc.
LEVITON LIMITED WARRANTY
Leviton warrants to the original consumer purchaser and not for the benet of anyone else that products manufactured by Leviton under the Leviton brand name (“Product”) will be free from defects in material and workmanship for the time periods indicated below, whichever is shorter: • OmniPro II and Lumina Pro: three (3) years from installation or 42 months from manufacture date.
• OmniLT, Omni IIe, and Lumina: two (2) years from installation or 30 months from manufacture date. • Thermostats, Accessories: two (2) years from installation or 30 months from manufacture date. • Batteries: Rechargeable batteries in products are warranted for ninety (90) days from date of purchase. Note: Primary (non-rechargeable) batteries shipped in products are not warranted.
Products with Windows
®
Operating Systems:Duringthewarrantyperiod,Levitonwillrestorecorruptedoperatingsystemstofactorydefaultatnocharge,providedthattheproducthasbeenusedasoriginallyintended.Installationofnon-Levitonsoftwareormodicationoftheoperatingsystemvoidsthiswarranty.Leviton’sobligationunderthisLimitedWarrantyislimitedtotherepairorreplacement,atLeviton’soption,ofProductthatfailsduetodefectinmaterial
orworkmanship.LevitonreservestherighttoreplaceproductunderthisLimitedWarrantywithneworremanufacturedproduct.Leviton will not be responsible for labor costs of removal or reinstallation of Product.TherepairedorreplacedproductisthenwarrantedunderthetermsofthisLimitedWarrantyfortheremainderoftheLimitedWarrantytimeperiodorninety(90)days,whicheverislonger.ThisLimitedWarrantydoesnotcoverPC-basedsoftware
products.Leviton is not responsible for conditions or applications beyond Leviton’s control.Leviton is not responsible for issues related to improper installation, including failure to follow written Installation and operation instructions, normal wear and tear, catastrophe , fault or negligence of the user or other problems external to the Product.To viewcompletewarrantyandinstructionsforreturningproduct,pleasevisitusatwww.leviton.com.
FOR CANADA ONLY
Forwarrantyinformationand/orproductreturns,residentsofCanadashouldcontactLevitoninwritingatLeviton
Manufacturing of Canada Ltd to the attention of the Quality Assurance Department, 165 Hymus Blvd, Pointe-
Claire (Quebec), Canada H9R 1E9orbytelephoneat1 800 405-5320.
CFL = CompactFluorescentLamp
LED = SelfBallasted,Light-EmittingDiode
NOTE:Itisnormalforthisswitchtomakeaslightbuzzingsoundduringoperation.Itisalsonormalfortheswitchandwall
platetofeelwarmtothetouch.
LED Indicator
TheLevitonUPB™WallSwitchcomesequippedwithamulti-colorLEDindicatorthatisnormallylittobluewhentheload
isoff.TheLEDwillturnoffwhentheloadisturnedonorsettoanylevelabove0%.TheLEDwillashmagentawhilethe
autoshut-offtimerisrunning(iftheconguredLEDoptionisalwaysoff,theLEDwillremainoffduringthetimeoutperiod).
Ifused,theLEDintheLevitonAuxiliarySwitchisalwayslit.
Leviton AUXILIARY SWITCH OPERATION
TheLevitonUPB™WallSwitchcanbeconnectedtooneormoreLevitonAuxiliarySwitchesproducingmulti-waylighting
circuits.EachLevitonAuxiliarySwitchhasarockerswitchthatcontrolsthelightingloadintheexactsamemannerasthe
rockerswitchontheconnectedLevitonUPB™WallSwitch,aspreviouslydescribed.Whenconnected,theLEDremains
continuallyonatalltimeswhilepowerisapplied.
Setup Mode
To conguretheLevitonUPB™WallSwitchusinganLevitoncontrolleroraPCrunningtheUPB™UPStartconguration
software,itmustbeputintoSetupModeasfollows:
Table 4 – Leviton Wall Switch Setup
Step Operation
1 Ta p therockerswitchquickly5times
2 TheLevitonUPB™WallSwitchwillashthelightingloadonetimeandblinkitsLEDbluetoindicatethatitis
inSetupMode.Note:theswitchwillautomaticallyexitSetupmodeafter5minutes.
Step Operation
1 OntheLevitonUPB™WallSwitchthatyouwanttoresettofactorydefault,taptherockerswitchquickly5
times.
2 TheLevitonUPB™WallSwitchwillashthelightingloadonetimeandblinkitsLEDbluetoindicatethatitis
readytobereset.
3 Ta p therockerswitchquickly10timestoresettofactorydefaultsetting.
4 TheLevitonUPB™WallSwitchwillashthelightingloadonetimeandblinkitsLEDredtoindicatethatithas
beenreset.
5 Ta p therockerswitchoncemoretostoptheLEDfromblinking.
NOTE:
Setupmodeandblinkmodetakeprecedenceoverautoshut-off.Iftheautoshut-offtimerisrunning,andtheneithersetup
modeorblinkmodeoccurs,theautoshut-offtimerwillberesetanddisableduntilsetuporblinkmodeexpire.
Reset to Factory Default Settings
To resettheLevitonUPB™WallSwitchtofactorydefaultsettings:
SPECIFICATIONS
Model Number 35A00-1 35A00-1CFL 35A00-3
IncandescentLoads
Dimming
Ye s Ye s Ye s (congurable)
InductiveLoadsDimming Ye s Ye s Ye s (congurable)
FlorescentLoadsNon-
Dimming
Ye s (congurable) Ye s (congurable) Ye s
PowerMaximumDimming 600W/600VA 600W/600VA 600W/600VA
CurrentMaximumNon-
Dimming
5A 5A 5A
Connections 18GA 18GA 18GA
LEDIndicator Ye s Ye s Ye s
Dimensions 4.1x1.75x1.45 4.1x1.75x1.45 4.1x1.75x1.45
Weight 0.25lb. 0.25lb. 0.25lb.
Mounting StandardJBox StandardJBox StandardJBox
InputPower 120±12VAC 120±12VAC 120±12VAC
InputFrequency 60±3Hz 60±3Hz 60±3Hz
OperatingTemperature -40°Fto104°F -40°Fto104°F -40°Fto104°F
RefertothefollowingTableforspecicmanufacturesandmodelnumbersofdimmableCFLandLEDbulbsapprovedfor
usewiththesedimmers:
CFL/LED LampManufacturer LampModel LampWattage(W)
CFL EcoSmart 2R3015DIM 15
CFL EcoSmart ES5CCDF052 5
CFL EcoSmart ES5M10123 23
CFL EcoSmart ES5R315DIM35K 15
CFL EcoSmart ES5R315DIM50K 15
CFL Feit BPESL15T/DM 15
CFL Feit BPESL23T/DIM 23
CFL GE/EnergySmart FLE15/2/DV/R30 15
CFL GE/EnergySmart FLE15HT3/2/DV/SW 15
CFL GE/EnergySmart FLE26/2/DV/R40 26
CFL GE/EnergySmart FLE26HT3/2/DV 26
CFL Litetronics 16AE5L092725 27
CFL Litetronics 18185K085141 5
CFL Litetronics 18185K088141 8
CFL Litetronics 18505A10111 11
CFL Litetronics 18BR5E09152 15
CFL Litetronics/EarthMate E05129LW 5
CFL Litetronics/EarthMate E2752AJLW 27
CFL Neptun 61920-ADIM 20
CFL Neptun/EarthTronics CF24SW1BDIM 24
CFL Phillips EL/APAR38 20
CFL Phillips EL/AR30DIM 16
CFL Phillips EL/AR40DIM 20
CFL Sylvania CF5EL/A15/827/DIM/BL 5
CFL Sylvania CF5EL/B10/827/C/ADP/DIM/BL 5
CFL Sylvania CF14EL/R20/DIM 14
CFL Sylvania CF14EL/TWIST/DIM 14
CFL Sylvania CF19EL/BR40/DIM 19
CFL Sylvania CF24EL/TWIST/827/DIM/RP 24
CFL TCP 2R2014DIM 14
CFL TCP 40123 23
CFL TCP 4R3016TD 16
CFL TCP CCA05 5
CFL ULA SDR23W2P-R30DIM 23
LED CooperLighting-HALO ML706830 14
LED Cree CR6-0210E 12
LED Cree CR6-0323E 12
LED EcoSmart ECO-GU24-575L-YOW 12
LED EcoSmart G2510003-005 8
LED EcoSmart R2010010-013 8
LED LemnisLighting Pharox300 6
LED Phillips 12E26A60 12.5
LED Phillips 3E12B11-E 3
LED Phillips 6E26R20 6
LED Phillips 7E26PAR20-E 7
LED Phillips 8E26A60 8
LED Sylvania LED8PAR20/DIM/827/FL36 8
LED Sylvania LED8PAR20/DIM/827/NFL25 8
LED Sylvania LED8PAR20/DIM/830/NFL25/HVP 8
LED Sylvania LED10PAR30/DIM/SG830/WSP15 10
LED Sylvania LED11PAR30/DIM/SG/830/SP10 11
LED TCP LDA153WH30K 3
LED Toshiba 218-50053 7.8
LED Utilitech 0171150 2
LED Utilitech 0338802 7.5
LED Utilitech 0352280 3.5
LINE
NEUTRAL
37A00 (OPTIONAL)
AUXILIARY SWITCH
AUXILIARY SWITCH
37A00 (OPTIONAL)
35A00
HAI Wall Switch
BLACK BLACK
BLACK
REDWHITE
YELLOWYELLOW
*BLUE AND/OR GRAY*BLUE AND/OR GRAY
YELLOW
*CONNECTING THE BLUE AND/OR GRAY WIRE TO NEUTRAL SETS THE COLOR OF THE LED INDICATOR.
CONNECT BLUE FOR BLUE INDICATOR, GRAY FOR RED INDICATOR, OR BOTH FOR MAGENTA INDICATOR.
BLUE AND/OR GRAY WIRE MAY BE CONNECTED TO NEUTRAL OR EARTH GROUND. NEUTRAL IS RECOMMENDED.
GREEN
Line 120VAC, 60Hz
FCC Compliance
ThisequipmenthasbeentestedandfoundtocomplywiththelimitsforaClassBdigitaldevice,pursuanttopart15of
theFCCRules.Theselimitsaredesignedtoprovidereasonableprotectionagainstharmfulinterferenceinaresidential
installation.Thisequipmentgenerates,usesandcanradiateradiofrequencyenergyand,ifnotinstalledandusedin
accordancewiththeinstructions,maycauseharmfulinterferencetoradiocommunications.However,thereisnoguarantee
thatinterferencewillnotoccurinaparticularinstallation.Ifthisequipmentdoescauseharmfulinterferencetoradioor
televisionreception,whichcanbedeterminedbyturningtheequipmentoffandon,theuserisencouragedtotrytocorrect
theinterferencebyoneormoreofthefollowingmeasures:
• Reorientorrelocatethereceivingantenna.
• Increasetheseparationbetweentheequipmentandreceiver.
• Connecttheequipmentintoanoutletonacircuitdifferentfromthattowhichthereceiverisconnected.
• Consultthedealeroranexperiencedradio/TVtechnicianforhelp.
Usehereinofthirdpartytrademarks,servicemarks,tradenames,brandnamesand/orproductnamesarefor
informationalpurposesonly,are/maybethetrademarksoftheirrespectiveowners;suchuseisnotmeanttoimply
afliation,
sponsorship,orendorsement.
WEB VERSION
/