
Lexmark
™
Forms Printer 2500+ series
2580+, 2581+, 2590+, 2591+
• Table of contents
• Start diagnostics
• Safety and notices
• Trademarks
• Index
Lexmark and Lexmark with diamond design are
trademarks of Lexmark International, Inc., registered
in the United States and/or other countries.
Revision: April 3, 2012

Edition: April 3, 2012
The following paragraph does not apply to any country where such provisions are inconsistent with local law:
LEXMARK INTERNATIONAL, INC. PROVIDES THIS PUBLICATION “AS IS” WITHOUT WARRANTY OF ANY KIND,
EITHER EXPRESS OR IMPLIED, INCLUDING, BUT NOT LIMITED TO, THE IMPLIED WARRANTIES OF
MERCHANTABILITY OR FITNESS FOR A PARTICULAR PURPOSE. Some states do not allow disclaimer of express or
implied warranties in certain transactions; therefore, this statement may not apply to you.
This publication could include technical inaccuracies or typographical errors. Changes are periodically made to the
information herein; these changes will be incorporated in later editions. Improvements or changes in the products or the
programs described may be made at any time.
Comments may be addressed to Lexmark International, Inc., Department D22X/002-1, 740 West New Circle Road,
Lexington, Kentucky 40550, U.S.A or e-mail at ServiceInfoAndTraining@Lexmark.com. Lexmark may use or distribute any
of the information you supply in any way it believes appropriate without incurring any obligation to you.
References in this publication to products, programs, or services do not imply that the manufacturer intends to make these
available in all countries in which it operates. Any reference to a product, program, or service is not intended to state or
imply that only that product, program, or service may be used. Any functionally equivalent product, program, or service that
does not infringe any existing intellectual property right may be used instead. Evaluation and verification of operation in
conjunction with other products, programs, or services, except those expressly designated by the manufacturer, are the
user’s responsibility.
Lexmark, and Lexmark with diamond design are trademarks of Lexmark International, Inc., registered in the United States
and/or other countries.
Optra Forms and PrintCryption are trademarks of Lexmark International, Inc.
PCL® is a registered trademark of the Hewlett-Packard Company.
All other trademarks are the property of their respective owners.
© 2011 Lexmark International, Inc.
All rights reserved.
UNITED STATES GOVERNMENT RIGHTS
This software and any accompanying documentation provided under this agreement are commercial computer software
and documentation developed exclusively at private expense.
P/N 12G9774
2580+, 2581+, 2590+, 2591+

iii
2580+, 2581+, 2590+, 2591+
Go Back
Previous
Next
Table of contents
Safety information. . . . . . . . . . . . . . . . . . . . . . . . . . . . . . . . . . . . . . . . . . . . . . . . . . . . . . . . . . . . . . . . . . . . vii
Preface . . . . . . . . . . . . . . . . . . . . . . . . . . . . . . . . . . . . . . . . . . . . . . . . . . . . . . . . . . . . . . . x
Navigation buttons . . . . . . . . . . . . . . . . . . . . . . . . . . . . . . . . . . . . . . . . . . . . . . . . . . . . . . . . . . . . . . . . . . . . x
Conventions. . . . . . . . . . . . . . . . . . . . . . . . . . . . . . . . . . . . . . . . . . . . . . . . . . . . . . . . . . . . . . . . . . . . . . . . . . xi
General information . . . . . . . . . . . . . . . . . . . . . . . . . . . . . . . . . . . . . . . . . . . . . . . . . . . . . . . . . . . . . . . . . . . . 1-1
Printer description . . . . . . . . . . . . . . . . . . . . . . . . . . . . . . . . . . . . . . . . . . . . . . . . . . . . . . . . . . . . . . . . . . . 1-1
Printer specifications . . . . . . . . . . . . . . . . . . . . . . . . . . . . . . . . . . . . . . . . . . . . . . . . . . . . . . . . . . . . 1-1
Models . . . . . . . . . . . . . . . . . . . . . . . . . . . . . . . . . . . . . . . . . . . . . . . . . . . . . . . . . . . . . . . . . . . . . . . . 1-1
Memory . . . . . . . . . . . . . . . . . . . . . . . . . . . . . . . . . . . . . . . . . . . . . . . . . . . . . . . . . . . . . . . . . . . . . . . . 1-1
Options and features . . . . . . . . . . . . . . . . . . . . . . . . . . . . . . . . . . . . . . . . . . . . . . . . . . . . . . . . . . . . . . . . . 1-1
Tools required for service . . . . . . . . . . . . . . . . . . . . . . . . . . . . . . . . . . . . . . . . . . . . . . . . . . . . . . . . . . . . . 1-2
Acronyms . . . . . . . . . . . . . . . . . . . . . . . . . . . . . . . . . . . . . . . . . . . . . . . . . . . . . . . . . . . . . . . . . . . . . . . . . . 1-2
Diagnostic information. . . . . . . . . . . . . . . . . . . . . . . . . . . . . . . . . . . . . . . . . . . . . . . . . . . . . . . . . . . . . . . . . 2-1
Start . . . . . . . . . . . . . . . . . . . . . . . . . . . . . . . . . . . . . . . . . . . . . . . . . . . . . . . . . . . . . . . . . . . . . . . . . . . . . . . 2-1
Voltage, ground, and continuity readings . . . . . . . . . . . . . . . . . . . . . . . . . . . . . . . . . . . . . . . . . . . . . . . . 2-1
Voltage readings . . . . . . . . . . . . . . . . . . . . . . . . . . . . . . . . . . . . . . . . . . . . . . . . . . . . . . . . . . . . . . . . 2-1
Ground checks . . . . . . . . . . . . . . . . . . . . . . . . . . . . . . . . . . . . . . . . . . . . . . . . . . . . . . . . . . . . . . . . . . 2-1
Continuity readings . . . . . . . . . . . . . . . . . . . . . . . . . . . . . . . . . . . . . . . . . . . . . . . . . . . . . . . . . . . . . . 2-1
Error indication table . . . . . . . . . . . . . . . . . . . . . . . . . . . . . . . . . . . . . . . . . . . . . . . . . . . . . . . . . . . . . . . . . 2-2
Symptom check table . . . . . . . . . . . . . . . . . . . . . . . . . . . . . . . . . . . . . . . . . . . . . . . . . . . . . . . . . . . . . . . . 2-4
Abnormal indications . . . . . . . . . . . . . . . . . . . . . . . . . . . . . . . . . . . . . . . . . . . . . . . . . . . . . . . . . . . . 2-4
Abnormal noise problems . . . . . . . . . . . . . . . . . . . . . . . . . . . . . . . . . . . . . . . . . . . . . . . . . . . . . . . . 2-4
Abnormal print operation problems . . . . . . . . . . . . . . . . . . . . . . . . . . . . . . . . . . . . . . . . . . . . . . . . 2-4
Auto Sheet Feeder problems . . . . . . . . . . . . . . . . . . . . . . . . . . . . . . . . . . . . . . . . . . . . . . . . . . . . . . 2-4
Error indications . . . . . . . . . . . . . . . . . . . . . . . . . . . . . . . . . . . . . . . . . . . . . . . . . . . . . . . . . . . . . . . . 2-5
Operator panel problems . . . . . . . . . . . . . . . . . . . . . . . . . . . . . . . . . . . . . . . . . . . . . . . . . . . . . . . . . 2-5
Paper feed problems . . . . . . . . . . . . . . . . . . . . . . . . . . . . . . . . . . . . . . . . . . . . . . . . . . . . . . . . . . . . . 2-5
Power problems . . . . . . . . . . . . . . . . . . . . . . . . . . . . . . . . . . . . . . . . . . . . . . . . . . . . . . . . . . . . . . . . . 2-6
Print quality problems . . . . . . . . . . . . . . . . . . . . . . . . . . . . . . . . . . . . . . . . . . . . . . . . . . . . . . . . . . . . 2-6
Ribbon feed problems . . . . . . . . . . . . . . . . . . . . . . . . . . . . . . . . . . . . . . . . . . . . . . . . . . . . . . . . . . . . 2-7
Unable to print on network . . . . . . . . . . . . . . . . . . . . . . . . . . . . . . . . . . . . . . . . . . . . . . . . . . . . . . . . 2-7
Irrecoverable operator errors . . . . . . . . . . . . . . . . . . . . . . . . . . . . . . . . . . . . . . . . . . . . . . . . . . . . . . 2-7
Paper Present sensor . . . . . . . . . . . . . . . . . . . . . . . . . . . . . . . . . . . . . . . . . . . . . . . . . . . . . . . . . 2-7
Paper Select sensor . . . . . . . . . . . . . . . . . . . . . . . . . . . . . . . . . . . . . . . . . . . . . . . . . . . . . . . . . . 2-7
Service checks . . . . . . . . . . . . . . . . . . . . . . . . . . . . . . . . . . . . . . . . . . . . . . . . . . . . . . . . . . . . . . . . . . . . . . 2-9
Abnormal noise service check . . . . . . . . . . . . . . . . . . . . . . . . . . . . . . . . . . . . . . . . . . . . . . . . . . . . . 2-9
Auto Sheet Feeder (ASF) service check . . . . . . . . . . . . . . . . . . . . . . . . . . . . . . . . . . . . . . . . . . . . . 2-9
Auto Sheet Feeder principles of operation . . . . . . . . . . . . . . . . . . . . . . . . . . . . . . . . . . . . . . . . . 2-9
Carrier service check . . . . . . . . . . . . . . . . . . . . . . . . . . . . . . . . . . . . . . . . . . . . . . . . . . . . . . . . . . . 2-10
Intermittent problem service check . . . . . . . . . . . . . . . . . . . . . . . . . . . . . . . . . . . . . . . . . . . . . . . 2-11
No print or abnormal print service check . . . . . . . . . . . . . . . . . . . . . . . . . . . . . . . . . . . . . . . . . . . 2-12
Operator panel service check . . . . . . . . . . . . . . . . . . . . . . . . . . . . . . . . . . . . . . . . . . . . . . . . . . . . . 2-13
Paper Present sensor service check . . . . . . . . . . . . . . . . . . . . . . . . . . . . . . . . . . . . . . . . . . . . . . . 2-13
Paper feed service check . . . . . . . . . . . . . . . . . . . . . . . . . . . . . . . . . . . . . . . . . . . . . . . . . . . . . . . . 2-13
Paper Select sensor service check . . . . . . . . . . . . . . . . . . . . . . . . . . . . . . . . . . . . . . . . . . . . . . . . 2-15
POST service check . . . . . . . . . . . . . . . . . . . . . . . . . . . . . . . . . . . . . . . . . . . . . . . . . . . . . . . . . . . . 2-15
Power service check . . . . . . . . . . . . . . . . . . . . . . . . . . . . . . . . . . . . . . . . . . . . . . . . . . . . . . . . . . . . 2-16
Print speed service check . . . . . . . . . . . . . . . . . . . . . . . . . . . . . . . . . . . . . . . . . . . . . . . . . . . . . . . . 2-17
Printhead service check . . . . . . . . . . . . . . . . . . . . . . . . . . . . . . . . . . . . . . . . . . . . . . . . . . . . . . . . . 2-17
Pull Tractor sensor service check . . . . . . . . . . . . . . . . . . . . . . . . . . . . . . . . . . . . . . . . . . . . . . . . . 2-18
Top-of-forms service check . . . . . . . . . . . . . . . . . . . . . . . . . . . . . . . . . . . . . . . . . . . . . . . . . . . . . . 2-18
Tractor 2 service check . . . . . . . . . . . . . . . . . . . . . . . . . . . . . . . . . . . . . . . . . . . . . . . . . . . . . . . . . . 2-18

iv Service Manual
2580+, 2581+, 2590+, 2591+
Go Back
Previous
Next
10 beeps and blinking Ready, Paper, Font and Pitch LEDs . . . . . . . . . . . . . . . . . . . . . . . . . . .2-18
3 beeps and Tractor 2 LED blinks 3 times . . . . . . . . . . . . . . . . . . . . . . . . . . . . . . . . . . . . . . . . .2-19
Tractor 2 paper feed problems . . . . . . . . . . . . . . . . . . . . . . . . . . . . . . . . . . . . . . . . . . . . . . . . .2-20
Network service check . . . . . . . . . . . . . . . . . . . . . . . . . . . . . . . . . . . . . . . . . . . . . . . . . . . . . . . . . . .2-20
Diagnostic aids. . . . . . . . . . . . . . . . . . . . . . . . . . . . . . . . . . . . . . . . . . . . . . . . . . . . . . . . . . . . . . . . . . . . . . . . . 3-1
Power-On Self Test (POST) . . . . . . . . . . . . . . . . . . . . . . . . . . . . . . . . . . . . . . . . . . . . . . . . . . . . . . . . . . . .3-1
Print test . . . . . . . . . . . . . . . . . . . . . . . . . . . . . . . . . . . . . . . . . . . . . . . . . . . . . . . . . . . . . . . . . . . . . . . . . . . .3-2
Hex Trace mode . . . . . . . . . . . . . . . . . . . . . . . . . . . . . . . . . . . . . . . . . . . . . . . . . . . . . . . . . . . . . . . . . . . . . .3-2
Hex trace mode sample . . . . . . . . . . . . . . . . . . . . . . . . . . . . . . . . . . . . . . . . . . . . . . . . . . . . . . . .3-2
Printer default settings . . . . . . . . . . . . . . . . . . . . . . . . . . . . . . . . . . . . . . . . . . . . . . . . . . . . . . . . . . . . . . . .3-3
U.S. defaults . . . . . . . . . . . . . . . . . . . . . . . . . . . . . . . . . . . . . . . . . . . . . . . . . . . . . . . . . . . . . . . . . . . .3-3
World Trade defaults . . . . . . . . . . . . . . . . . . . . . . . . . . . . . . . . . . . . . . . . . . . . . . . . . . . . . . . . . . . . .3-3
Clearing paper jams . . . . . . . . . . . . . . . . . . . . . . . . . . . . . . . . . . . . . . . . . . . . . . . . . . . . . . . . . . . . . . . . . .3-4
Cut sheet jams . . . . . . . . . . . . . . . . . . . . . . . . . . . . . . . . . . . . . . . . . . . . . . . . . . . . . . . . . . . . . . . . . .3-4
Continuous forms jams . . . . . . . . . . . . . . . . . . . . . . . . . . . . . . . . . . . . . . . . . . . . . . . . . . . . . . . . . . .3-4
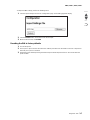
Web page at a glance . . . . . . . . . . . . . . . . . . . . . . . . . . . . . . . . . . . . . . . . . . . . . . . . . . . . . . . . . . . . . . . . .3-5
Device settings . . . . . . . . . . . . . . . . . . . . . . . . . . . . . . . . . . . . . . . . . . . . . . . . . . . . . . . . . . . . . . . . . .3-5
Configuration page . . . . . . . . . . . . . . . . . . . . . . . . . . . . . . . . . . . . . . . . . . . . . . . . . . . . . . . . . . . . . . .3-5
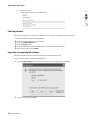
Changing a configuration setting: . . . . . . . . . . . . . . . . . . . . . . . . . . . . . . . . . . . . . . . . . . . . . . . . .3-5
Reports page . . . . . . . . . . . . . . . . . . . . . . . . . . . . . . . . . . . . . . . . . . . . . . . . . . . . . . . . . . . . . . . . . . . .3-5
Flashing firmware . . . . . . . . . . . . . . . . . . . . . . . . . . . . . . . . . . . . . . . . . . . . . . . . . . . . . . . . . . . . . . . .3-6
Importing and exporting INA settings . . . . . . . . . . . . . . . . . . . . . . . . . . . . . . . . . . . . . . . . . . . . . . . .3-6
Resetting the INA to factory defaults . . . . . . . . . . . . . . . . . . . . . . . . . . . . . . . . . . . . . . . . . . . . . . . .3-7
Setup mode . . . . . . . . . . . . . . . . . . . . . . . . . . . . . . . . . . . . . . . . . . . . . . . . . . . . . . . . . . . . . . . . . . . . . . . . .3-8
Entering Setup mode . . . . . . . . . . . . . . . . . . . . . . . . . . . . . . . . . . . . . . . . . . . . . . . . . . . . . . . . . . . . .3-8
Exiting Setup mode . . . . . . . . . . . . . . . . . . . . . . . . . . . . . . . . . . . . . . . . . . . . . . . . . . . . . . . . . . . . . .3-8
Setup menu options . . . . . . . . . . . . . . . . . . . . . . . . . . . . . . . . . . . . . . . . . . . . . . . . . . . . . . . . . . . . . .3-8
Interface menu options . . . . . . . . . . . . . . . . . . . . . . . . . . . . . . . . . . . . . . . . . . . . . . . . . . . . . . . . . . .3-8
Setting the tear off position . . . . . . . . . . . . . . . . . . . . . . . . . . . . . . . . . . . . . . . . . . . . . . . . . . . . . . .3-10
Setting Top-of-form (continuous-pull mode) . . . . . . . . . . . . . . . . . . . . . . . . . . . . . . . . . . . . . . . . .3-10
Setting Top-of-form (cut forms, envelopes) . . . . . . . . . . . . . . . . . . . . . . . . . . . . . . . . . . . . . . . . . .3-10
Printing a network setup page . . . . . . . . . . . . . . . . . . . . . . . . . . . . . . . . . . . . . . . . . . . . . . . . . . . . .3-11
Repair information . . . . . . . . . . . . . . . . . . . . . . . . . . . . . . . . . . . . . . . . . . . . . . . . . . . . . . . . . . . . . . . . . . . . . 4-1
Handling ESD-sensitive parts . . . . . . . . . . . . . . . . . . . . . . . . . . . . . . . . . . . . . . . . . . . . . . . . . . . . . . . . . .4-1
Removal procedures . . . . . . . . . . . . . . . . . . . . . . . . . . . . . . . . . . . . . . . . . . . . . . . . . . . . . . . . . . . . . . . . . .4-1
Adjustments . . . . . . . . . . . . . . . . . . . . . . . . . . . . . . . . . . . . . . . . . . . . . . . . . . . . . . . . . . . . . . . . . . . . . . . . .4-2
Printhead-to-platen gap adjustment . . . . . . . . . . . . . . . . . . . . . . . . . . . . . . . . . . . . . . . . . . . . . . . . .4-2
Bidirectional print adjustment . . . . . . . . . . . . . . . . . . . . . . . . . . . . . . . . . . . . . . . . . . . . . . . . . . . . . .4-3
Cover removals . . . . . . . . . . . . . . . . . . . . . . . . . . . . . . . . . . . . . . . . . . . . . . . . . . . . . . . . . . . . . . . . . . . . . .4-4
Covers, bottom removal . . . . . . . . . . . . . . . . . . . . . . . . . . . . . . . . . . . . . . . . . . . . . . . . . . . . . . . . . . .4-4
Covers, front removal . . . . . . . . . . . . . . . . . . . . . . . . . . . . . . . . . . . . . . . . . . . . . . . . . . . . . . . . . . . . .4-4
Covers, operator panel assembly removal . . . . . . . . . . . . . . . . . . . . . . . . . . . . . . . . . . . . . . . . . . . .4-4
Covers, rear removal . . . . . . . . . . . . . . . . . . . . . . . . . . . . . . . . . . . . . . . . . . . . . . . . . . . . . . . . . . . . .4-5
Covers, ribbon access removal . . . . . . . . . . . . . . . . . . . . . . . . . . . . . . . . . . . . . . . . . . . . . . . . . . . . .4-5
Covers, top removal . . . . . . . . . . . . . . . . . . . . . . . . . . . . . . . . . . . . . . . . . . . . . . . . . . . . . . . . . . . . . .4-5
Electronics removals . . . . . . . . . . . . . . . . . . . . . . . . . . . . . . . . . . . . . . . . . . . . . . . . . . . . . . . . . . . . . . . . .4-8
INA support frame removal . . . . . . . . . . . . . . . . . . . . . . . . . . . . . . . . . . . . . . . . . . . . . . . . . . . . . . . .4-8
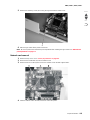
Logic board removal . . . . . . . . . . . . . . . . . . . . . . . . . . . . . . . . . . . . . . . . . . . . . . . . . . . . . . . . . . . . . .4-8
Network card removal . . . . . . . . . . . . . . . . . . . . . . . . . . . . . . . . . . . . . . . . . . . . . . . . . . . . . . . . . . . .4-9
Power supply removal . . . . . . . . . . . . . . . . . . . . . . . . . . . . . . . . . . . . . . . . . . . . . . . . . . . . . . . . . . .4-10
Power supply cable removal . . . . . . . . . . . . . . . . . . . . . . . . . . . . . . . . . . . . . . . . . . . . . . . . . . . . . .4-10
Carrier removals . . . . . . . . . . . . . . . . . . . . . . . . . . . . . . . . . . . . . . . . . . . . . . . . . . . . . . . . . . . . . . . . . . . .4-12
Carrier removal . . . . . . . . . . . . . . . . . . . . . . . . . . . . . . . . . . . . . . . . . . . . . . . . . . . . . . . . . . . . . . . . .4-12
Carrier fan removal . . . . . . . . . . . . . . . . . . . . . . . . . . . . . . . . . . . . . . . . . . . . . . . . . . . . . . . . . . . . . .4-15
Carrier motor assembly removal . . . . . . . . . . . . . . . . . . . . . . . . . . . . . . . . . . . . . . . . . . . . . . . . . . .4-16

v
2580+, 2581+, 2590+, 2591+
Go Back
Previous
Next
Paper handling removals . . . . . . . . . . . . . . . . . . . . . . . . . . . . . . . . . . . . . . . . . . . . . . . . . . . . . . . . . . . . . 4-19
Forms thickness lever removal . . . . . . . . . . . . . . . . . . . . . . . . . . . . . . . . . . . . . . . . . . . . . . . . . . . 4-19
Paper feed motor removal . . . . . . . . . . . . . . . . . . . . . . . . . . . . . . . . . . . . . . . . . . . . . . . . . . . . . . . 4-19
Paper select lever removal . . . . . . . . . . . . . . . . . . . . . . . . . . . . . . . . . . . . . . . . . . . . . . . . . . . . . . . 4-20
Print handling removals . . . . . . . . . . . . . . . . . . . . . . . . . . . . . . . . . . . . . . . . . . . . . . . . . . . . . . . . . . . . . 4-21
Platen removal . . . . . . . . . . . . . . . . . . . . . . . . . . . . . . . . . . . . . . . . . . . . . . . . . . . . . . . . . . . . . . . . . 4-21
Print unit removal . . . . . . . . . . . . . . . . . . . . . . . . . . . . . . . . . . . . . . . . . . . . . . . . . . . . . . . . . . . . . . 4-21
Printhead removal . . . . . . . . . . . . . . . . . . . . . . . . . . . . . . . . . . . . . . . . . . . . . . . . . . . . . . . . . . . . . . 4-24
Printhead cable removal . . . . . . . . . . . . . . . . . . . . . . . . . . . . . . . . . . . . . . . . . . . . . . . . . . . . . . . . . 4-25
Ribbon drive rack gear removal . . . . . . . . . . . . . . . . . . . . . . . . . . . . . . . . . . . . . . . . . . . . . . . . . . . 4-26
Gears removals . . . . . . . . . . . . . . . . . . . . . . . . . . . . . . . . . . . . . . . . . . . . . . . . . . . . . . . . . . . . . . . . . . . . 4-27
Left side gears removal . . . . . . . . . . . . . . . . . . . . . . . . . . . . . . . . . . . . . . . . . . . . . . . . . . . . . . . . . . 4-27
Right side gears, sub frame removal . . . . . . . . . . . . . . . . . . . . . . . . . . . . . . . . . . . . . . . . . . . . . . . 4-28
Rollers removals . . . . . . . . . . . . . . . . . . . . . . . . . . . . . . . . . . . . . . . . . . . . . . . . . . . . . . . . . . . . . . . . . . . 4-30
Roller, upper feed removal . . . . . . . . . . . . . . . . . . . . . . . . . . . . . . . . . . . . . . . . . . . . . . . . . . . . . . . 4-30
Roller, lower pinch removal . . . . . . . . . . . . . . . . . . . . . . . . . . . . . . . . . . . . . . . . . . . . . . . . . . . . . . 4-31
Roller, lower feed removal . . . . . . . . . . . . . . . . . . . . . . . . . . . . . . . . . . . . . . . . . . . . . . . . . . . . . . . 4-33
Sensor removals . . . . . . . . . . . . . . . . . . . . . . . . . . . . . . . . . . . . . . . . . . . . . . . . . . . . . . . . . . . . . . . . . . . 4-34
Flags, Paper Present/Top-of-form removal . . . . . . . . . . . . . . . . . . . . . . . . . . . . . . . . . . . . . . . . . . 4-34
Sensor (head gap and home position) . . . . . . . . . . . . . . . . . . . . . . . . . . . . . . . . . . . . . . . . . . . . . 4-34
Sensor (pull tractor and paper select) removal . . . . . . . . . . . . . . . . . . . . . . . . . . . . . . . . . . . . . . 4-35
Sensor (top-of-form and paper present) removal . . . . . . . . . . . . . . . . . . . . . . . . . . . . . . . . . . . . . 4-36
Options removals . . . . . . . . . . . . . . . . . . . . . . . . . . . . . . . . . . . . . . . . . . . . . . . . . . . . . . . . . . . . . . . . . . . 4-37
Auto Sheet Feeder gears removal . . . . . . . . . . . . . . . . . . . . . . . . . . . . . . . . . . . . . . . . . . . . . . . . . 4-37
Auto Sheet Feeder pick-up roller removal . . . . . . . . . . . . . . . . . . . . . . . . . . . . . . . . . . . . . . . . . . 4-38
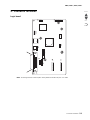
Connector locations. . . . . . . . . . . . . . . . . . . . . . . . . . . . . . . . . . . . . . . . . . . . . . . . . . . . . . . . . . . . . . . . . . . . 5-1
Logic board . . . . . . . . . . . . . . . . . . . . . . . . . . . . . . . . . . . . . . . . . . . . . . . . . . . . . . . . . . . . . . . . . . . . 5-1
Logic board connections . . . . . . . . . . . . . . . . . . . . . . . . . . . . . . . . . . . . . . . . . . . . . . . . . . . . . . . . . 5-2
Carrier fan outputs (9w and 24w) . . . . . . . . . . . . . . . . . . . . . . . . . . . . . . . . . . . . . . . . . . . . . . . . . . . 5-2
Carrier motor outputs (9w and 24w) . . . . . . . . . . . . . . . . . . . . . . . . . . . . . . . . . . . . . . . . . . . . . . . . 5-2
Dual tractor outputs (92 and 24w) . . . . . . . . . . . . . . . . . . . . . . . . . . . . . . . . . . . . . . . . . . . . . . . . . . 5-2
Operator panel outputs (9w and 24w) . . . . . . . . . . . . . . . . . . . . . . . . . . . . . . . . . . . . . . . . . . . . . . . 5-3
Paper feed motor outputs (9w and 24w) . . . . . . . . . . . . . . . . . . . . . . . . . . . . . . . . . . . . . . . . . . . . . 5-3
Parallel interface outputs (9w and 24w) at connector J11 . . . . . . . . . . . . . . . . . . . . . . . . . . . . . . . 5-4
Power supply outputs . . . . . . . . . . . . . . . . . . . . . . . . . . . . . . . . . . . . . . . . . . . . . . . . . . . . . . . . . . . . 5-4
Printhead outputs (24w) . . . . . . . . . . . . . . . . . . . . . . . . . . . . . . . . . . . . . . . . . . . . . . . . . . . . . . . . . . 5-5
Printhead outputs (9w) . . . . . . . . . . . . . . . . . . . . . . . . . . . . . . . . . . . . . . . . . . . . . . . . . . . . . . . . . . . 5-5
Sensor (head gap and home position) outputs (9w and 24w) . . . . . . . . . . . . . . . . . . . . . . . . . . . . 5-6
Sensor (pull tractor and paper select) outputs (9w and 24w) . . . . . . . . . . . . . . . . . . . . . . . . . . . . 5-6
Sensor (top-of-form and paper present) outputs (9w and 24w) . . . . . . . . . . . . . . . . . . . . . . . . . . 5-6
Serial board outputs (9w and 24w) . . . . . . . . . . . . . . . . . . . . . . . . . . . . . . . . . . . . . . . . . . . . . . . . . 5-7
USB outputs (9w and 24w) . . . . . . . . . . . . . . . . . . . . . . . . . . . . . . . . . . . . . . . . . . . . . . . . . . . . . . . . 5-7
Preventive maintenance. . . . . . . . . . . . . . . . . . . . . . . . . . . . . . . . . . . . . . . . . . . . . . . . . . . . . . . . . . . . . . . . 6-1
Lubrication . . . . . . . . . . . . . . . . . . . . . . . . . . . . . . . . . . . . . . . . . . . . . . . . . . . . . . . . . . . . . . . . . . . . . . . . . 6-1
Specified lubricants . . . . . . . . . . . . . . . . . . . . . . . . . . . . . . . . . . . . . . . . . . . . . . . . . . . . . . . . . . . . . . 6-1
Lubrication points . . . . . . . . . . . . . . . . . . . . . . . . . . . . . . . . . . . . . . . . . . . . . . . . . . . . . . . . . . . . . . . 6-1
Parts catalog . . . . . . . . . . . . . . . . . . . . . . . . . . . . . . . . . . . . . . . . . . . . . . . . . . . . . . . . . . . . . . . . . . . . . . . . . . . . 7-1
How to use this parts catalog . . . . . . . . . . . . . . . . . . . . . . . . . . . . . . . . . . . . . . . . . . . . . . . . . . . . . . . . . . 7-1
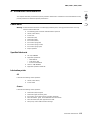
Assembly 1: Covers . . . . . . . . . . . . . . . . . . . . . . . . . . . . . . . . . . . . . . . . . . . . . . . . . . . . . . . . . . . . . . . . . 7-2
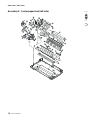
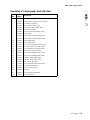
Assembly 2: Carrier/paper feed (right side). . . . . . . . . . . . . . . . . . . . . . . . . . . . . . . . . . . . . . . . . . . . . . 7-6
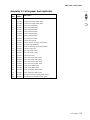
Assembly 3: Carrier/paper feed (left side) . . . . . . . . . . . . . . . . . . . . . . . . . . . . . . . . . . . . . . . . . . . . . . . 7-8
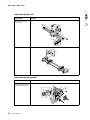
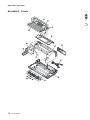
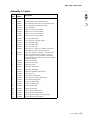
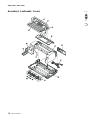
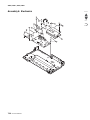
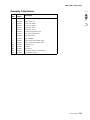
Assembly 4: Electronics . . . . . . . . . . . . . . . . . . . . . . . . . . . . . . . . . . . . . . . . . . . . . . . . . . . . . . . . . . . . 7-10
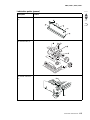
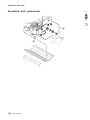
Assembly 5: ASF—Roller/support . . . . . . . . . . . . . . . . . . . . . . . . . . . . . . . . . . . . . . . . . . . . . . . . . . . . 7-12
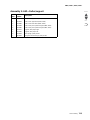
Assembly 6: ASF—gears/screws . . . . . . . . . . . . . . . . . . . . . . . . . . . . . . . . . . . . . . . . . . . . . . . . . . . . . 7-14
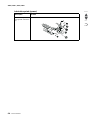
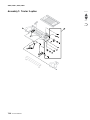
Assembly 7: Tractor 2 option . . . . . . . . . . . . . . . . . . . . . . . . . . . . . . . . . . . . . . . . . . . . . . . . . . . . . . . . 7-16

vi
2580+, 2581+, 2590+, 2591+
Go Back
Previous
Next
Index . . . . . . . . . . . . . . . . . . . . . . . . . . . . . . . . . . . . . . . . . . . . . . . . . . . . . . . . . . . . . . . . I-1
Part number index . . . . . . . . . . . . . . . . . . . . . . . . . . . . . . . . . . . . . . . . . . . . . . . . . . . . . I-3

Safety information vii
2580+, 2581+, 2590+, 2591+
Go Back
Previous
Next
Safety information
• The safety of this product is based on testing and approvals of the original design and specific
components. The manufacturer is not responsible for safety in the event of use of unauthorized
replacement parts.
• The maintenance information for this product has been prepared for use by a professional service person
and is not intended to be used by others.
• There may be an increased risk of electric shock and personal injury during disassembly and servicing of
this product. Professional service personnel should understand this and take necessary precautions.
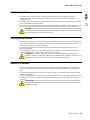
• CAUTION: When you see this symbol, there is a danger from hazardous voltage in the area of the
product where you are working. Unplug the product before you begin, or use caution if the product
must receive power in order to perform the task.
Consignes de sécurité
• La sécurité de ce produit repose sur des tests et des agréations portant sur sa conception d'origine et sur
des composants particuliers. Le fabricant n'assume aucune responsabilité concernant la sécurité en cas
d'utilisation de pièces de rechange non agréées.
• Les consignes d'entretien et de réparation de ce produit s'adressent uniquement à un personnel de
maintenance qualifié.
• Le démontage et l'entretien de ce produit pouvant présenter certains risques électriques, le personnel
d'entretien qualifié devra prendre toutes les précautions nécessaires.
• ATTENTION : Ce symbole indique la présence d'une tension dangereuse dans la partie du
produit sur laquelle vous travaillez. Débranchez le produit avant de commencer ou faites preuve
de vigilance si l'exécution de la tâche exige que le produit reste sous tension.
Norme di sicurezza
• La sicurezza del prodotto si basa sui test e sull'approvazione del progetto originale e dei componenti
specifici. Il produttore non è responsabile per la sicurezza in caso di sostituzione non autorizzata delle
parti.
• Le informazioni riguardanti la manutenzione di questo prodotto sono indirizzate soltanto al personale di
assistenza autorizzato.
• Durante lo smontaggio e la manutenzione di questo prodotto, il rischio di subire scosse elettriche e danni
alla persona è più elevato. Il personale di assistenza autorizzato deve, quindi, adottare le precauzioni
necessarie.
• ATTENZIONE: Questo simbolo indica la presenza di tensione pericolosa nell'area del prodotto.
Scollegare il prodotto prima di iniziare o usare cautela se il prodotto deve essere alimentato per
eseguire l'intervento.

viii Service Manual
2580+, 2581+, 2590+, 2591+
Go Back
Previous
Next
Sicherheitshinweise
• Die Sicherheit dieses Produkts basiert auf Tests und Zulassungen des ursprünglichen Modells und
bestimmter Bauteile. Bei Verwendung nicht genehmigter Ersatzteile wird vom Hersteller keine
Verantwortung oder Haftung für die Sicherheit übernommen.
• Die Wartungsinformationen für dieses Produkt sind ausschließlich für die Verwendung durch einen
Wartungsfachmann bestimmt.
• Während des Auseinandernehmens und der Wartung des Geräts besteht ein zusätzliches Risiko eines
elektrischen Schlags und körperlicher Verletzung. Das zuständige Fachpersonal sollte entsprechende
Vorsichtsmaßnahmen treffen.
• ACHTUNG: Dieses Symbol weist auf eine gefährliche elektrische Spannung hin, die in diesem
Bereich des Produkts auftreten kann. Ziehen Sie vor den Arbeiten am Gerät den Netzstecker des
Geräts, bzw. arbeiten Sie mit großer Vorsicht, wenn das Produkt für die Ausführung der Arbeiten
an den Strom angeschlossen sein muß.
Pautas de Seguridad
• La seguridad de este producto se basa en pruebas y aprobaciones del diseño original y componentes
específicos. El fabricante no es responsable de la seguridad en caso de uso de piezas de repuesto no
autorizadas.
• La información sobre el mantenimiento de este producto está dirigida exclusivamente al personal
cualificado de mantenimiento.
• Existe mayor riesgo de descarga eléctrica y de daños personales durante el desmontaje y la reparación de
la máquina. El personal cualificado debe ser consciente de este peligro y tomar las precauciones
necesarias.
• PRECAUCIÓN: este símbolo indica que el voltaje de la parte del equipo con la que está
trabajando es peligroso. Antes de empezar, desenchufe el equipo o tenga cuidado si, para
trabajar con él, debe conectarlo.
Informações de Segurança
• A segurança deste produto baseia-se em testes e aprovações do modelo original e de componentes
específicos. O fabricante não é responsável pela segunrança, no caso de uso de peças de substituição
não autorizadas.
• As informações de segurança relativas a este produto destinam-se a profissionais destes serviços e não
devem ser utilizadas por outras pessoas.
• Risco de choques eléctricos e ferimentos graves durante a desmontagem e manutenção deste produto.
Os profissionais destes serviços devem estar avisados deste facto e tomar os cuidados necessários.
• CUIDADO: Quando vir este símbolo, existe a possível presença de uma potencial tensão
perigosa na zona do produto em que está a trabalhar. Antes de começar, desligue o produto da
tomada eléctrica ou seja cuidadoso caso o produto tenha de estar ligado à corrente eléctrica para
realizar a tarefa necessária.

Safety information ix
2580+, 2581+, 2590+, 2591+
Go Back
Previous
Next
Informació de Seguretat
• La seguretat d'aquest producte es basa en l'avaluació i aprovació del disseny original i els components
específics. El fabricant no es fa responsable de les qüestions de seguretat si s'utilitzen peces de recanvi
no autoritzades.
• La informació pel manteniment d’aquest producte està orientada exclusivament a professionals i no està
destinada a ningú que no ho sigui.
• El risc de xoc elèctric i de danys personals pot augmentar durant el procés de desmuntatge i de servei
d’aquest producte. El personal professional ha d’estar-ne assabentat i prendre les mesures convenients.
• PRECAUCIÓ: aquest símbol indica que el voltatge de la part de l'equip amb la qual esteu
treballant és perillós. Abans de començar, desendolleu l'equip o extremeu les precaucions si, per
treballar amb l'equip, l'heu de connectar.

x Service Manual
2580+, 2581+, 2590+, 2591+
Go Back
Previous
Next
Preface
This manual contains maintenance procedures for service personnel. It is divided into the following chapters:
1. General information contains a general description of the printer and the maintenance approach used to
repair it. Special tools and test equipment, as well as general environmental and safety instructions, are
discussed.
2. Diagnostic information contains an error indicator table, symptom tables, and service checks used to
isolate failing field replaceable units (FRUs).
3. Diagnostic aids contains tests and checks used to locate or repeat symptoms of printer problems.
4. Repair information provides instructions for making printer adjustments and removing and installing
FRUs.
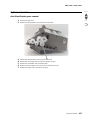
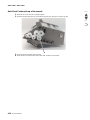
5. Locations uses illustrations to identify the connector locations and test points on the printer.
6. Preventive maintenance contains the lubrication specifications and recommendations to prevent
problems.
7. Parts catalog contains illustrations and part numbers for individual FRUs.
Appendix A contains service tips and information.
Appendix B contains representative print samples.
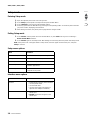
Navigation buttons
This manual contains navigation buttons in the right margin of each page, making it easier and quicker to
navigate.
Button Description
Previous
Click to move the document view backward by one page.
Next
Click to move the document view forward by one page.
Go Back
Click to return to the last page viewed.

Conventions xi
2580+, 2581+, 2590+, 2591+
Go Back
Previous
Next
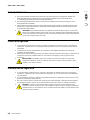
Conventions
Note: A note provides additional information.
Warning: A warning identifies something that might damage the product hardware or software.
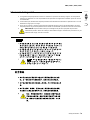
There are several types of caution statements:
CAUTION
A caution identifies something that might cause a servicer harm.
CAUTION
This type of caution indicates there is a danger from hazardous voltage in the area of the
product where you are working. Unplug the product before you begin, or use caution if the
product must receive power in order to perform the task.
CAUTION
This type of caution indicates a hot surface.
CAUTION
This type of caution indicates a tipping hazard.


General information 1-1
2580+, 2581+, 2590+, 2591+
Go Back
Previous
Next
1. General information
Printer description
The Lexmark™ Forms Printer 2500+ series printers are small, versatile tabletop printers suitable for use in the
home or small business. They are especially well-suited for applications that use continuous or multi-part forms.
Printer specifications
• Printhead life: 300 million characters
• Standard ribbon life: 4 million characters
• High-yield ribbon life: 8 million characters
• Printer life: 5 years
• Power consumption: 38 watts-maximum/9 watts idle
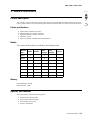
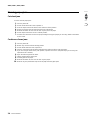
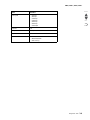
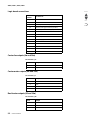
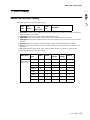
Models
The Lexmark 2500+ printers are available in the following models
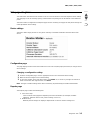
Memory
Standard DRAM—512 KB
Standard Flash—2 MB
Options and features
The 2500+ printers support the following options:
• Automatic Sheet Feeder (ASF)
• Internal serial interface (RS232)
• OKI emulation (9 wire only)
• Tractor 2 sheet feeder
Machine
type
9-Wire 24-Wire
Short
carriage
Long
carriage
Network
2580+ X X
2580n+ X X X
2581+ X X
2581n+ X X X
2590+ X X
2590n+ X X X
2591+ X X
2591n+ X X X

1-2 Service Manual
2580+, 2581+, 2590+, 2591+
Go Back
Previous
Next
Tools required for service
The basic tools necessary to service the 2500+ printers are:
• Basic CE tool kit
• #1 Phillips screwdriver
• #2 Phillips screwdriver
• Feeler gauges 0.33 mm (0.013 in.) and 0.37 mm (0.015 in.)
• Analog or digital volt-ohmmeter
Acronyms
AFE Analog front end
ASF Automatic sheet feeder
CPU Central processing unit
EPROM Erasable Programmable Read-Only Memory
ESD Electrostatic discharge
FRU Field replaceable unit
HTTP Hypertext transport protocol
HV High voltage
LED Light emitting diode
LV Low voltage
MFP Multifunction Printer
mm Millimeter
NIC Network interface card
NVRAM Nonvolatile Random Access Memory
POST Power-On Self Test
RAM Random access memory
ROM Read-only storage
TCP/IP Transport control protocol/Internet protocol
USB Universal Serial Bus
V ac Volts alternating current
V dc Volts direct current

Diagnostic information 2-1
2580+, 2581+, 2590+, 2591+
Go Back
Previous
Next
2. Diagnostic information
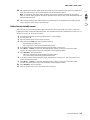
Start
Make a quick visual check for defects (loose or broken parts, unplugged connectors, paper jams, and so on).
To determine the corrective action necessary to repair a printer, look for the following information:
• For information regarding error indications, see “Error indication table” on page 2-2.
• For information regarding electrical connections, see “Connector locations” on page 5-1.
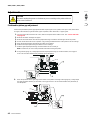
Voltage, ground, and continuity readings
Voltage readings
All DC voltages must be within +5% through -10% of the values to be considered correct. Unless stated
otherwise, all connectors should be connected normally when a voltage measurement is performed.
When a “line voltage” measurement is to be performed, the voltage on United States and Canada printers
should be between 100 V ac and 127 V ac. On World Trade printers, the voltage is according to each country’s
specification.
Ground checks
To check for a correct ground, measure the voltage between the ground and a known good voltage source. The
voltage measurement must be the same as the source voltage to consider that the ground is correct. Continuity
measurements may be used to check grounds; however, be sure to measure to a known good ground using the
lowest ohms scale and check for zero ohms.
Continuity readings
When measuring continuity, be sure no back circuits affect the measurement. If necessary, unplug connectors
to remove any back circuits. Zero the ohm range on the lowest scale (X1). An open circuit will read infinity. A
circuit with correct continuity will read zero ohms.
CAUTION
Unplug power cord from the electrical outlet before you connect or disconnect any cable or
electronic board or assembly for personal safety and to prevent damage to the printer.
Disconnect any connections between the printer and PCs/peripherals.
CAUTION
Always unplug the power cord before doing any continuity measurement.

2-2 Service Manual
2580+, 2581+, 2590+, 2591+
Go Back
Previous
Next
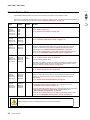
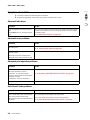
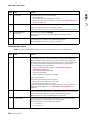
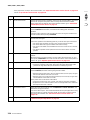
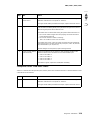
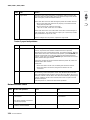
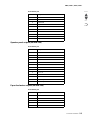
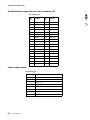
Error indication table
The following table describes the service check entries for the printer error indication codes.
When an error indication changes after you have entered a service check, you have an intermittent problem. If
this occurs, leave the service check and go to “Symptom check table” on page 2-4.
LED Status Alarm Action
Power
Ready
Tractor 2
Paper Out
Panel Lock
Font Lock
ON
ON
ON
ON
ON
ON
None POST
RAM, ROM Controller Error
Go to “POST service check” on page 2-15.
Power
Ready
Paper Out
Panel Lock
ON
Blinking
Blinking
Blinking
None Switch Scan Test Error
Go to “Operator panel service check” on page 2-13.
Power
Ready
Paper Out
Font Lock
ON
Blinking
Blinking
Blinking
None NVRAM Read/Write Error
Turn the printer off and then back on. If you get the same error during
power-up, replace the logic board and readjust the bidirectional print
adjustment. Go to “Bidirectional print adjustment” on page 4-3.
If the printer completes POST successfully and eventually gets the same
error, go to “Intermittent problem service check” on page 2-11.
Power
Ready
Paper Out
Panel Lock
Font Lock
ON
Blinking
Blinking
Blinking
Blinking
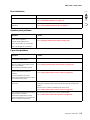
Beeps
10
times
Home Position Error
Go to “Carrier service check” on page 2-10.
Tractor 2 Home Position Error
If Tractor 2 is installed, remove it to determine whether the problem is with
the Carrier Home Position sensor or the Tractor 2 Home Position sensor.
See the “Tractor 2 service check” on page 2-18.
None Home Position Error Without Alarm
Go to “Power service check” on page 2-16.
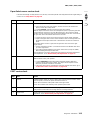
Power
Ready
Tractor 2
Paper Out
Font Lock
ON
Blinking
Blinking
Blinking
Blinking
None Timer Error
Turn the printer off and then back on. If you get the same error during
power-up, replace the logic board and readjust the bidirectional print
adjustment.
Go to “Bidirectional print adjustment” on page 4-3.
Power
Ready
Tractor 2
Paper Out
Font Lock
ON
Blinking
Blinking
Blinking
Blinking
None Hardware Drive Error
The printhead or the printhead cable(s) can cause this error. Go to
“Printhead service check” on page 2-17.
Turn the printer off and then back on. If you get the same error, replace the
logic board and readjust the bidirectional print adjustment. Go to
“Bidirectional print adjustment” on page 4-3.
If the printer completes POST successfully and eventually gets the same
error, go to “Intermittent problem service check” on page 2-11.
CAUTION
Always unplug the power cord before doing any continuity measurement.

Diagnostic information 2-3
2580+, 2581+, 2590+, 2591+
Go Back
Previous
Next
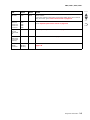
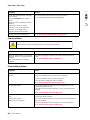
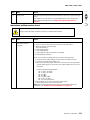
All LEDs OFF None Power Failure
Check the continuity of the power cord and the voltage of the user’s outlet. If
they are correct, go to “Power service check” on page 2-16.
Power
Tractor 2
Paper Out
Panel Lock
Font Lock
ON
OFF
OFF
OFF
OFF
None Operator Panel Failure
Go to “Operator panel service check” on page 2-13.
Any LED
on and
Power LED
off
None Go to “Operator panel service check” on page 2-13.
The Power
LED blinks
or changes
intensity.
None Go to “Power service check” on page 2-16.
Power
Ready
Font Lock
ON
Blinking
Blinking
None Ethernet option not installed. Go to “Network service check” on
page 2-20.
LED Status Alarm Action

2-4 Service Manual
2580+, 2581+, 2590+, 2591+
Go Back
Previous
Next
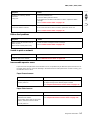
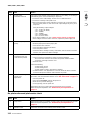
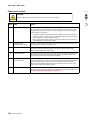
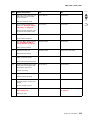
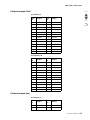
Symptom check table
1. Select the symptom that best describes the problem.
2. Perform the appropriate action before you go to the indicated service check.
Abnormal indications
Abnormal noise problems
Abnormal print operation problems
Auto Sheet Feeder problems
Symptom Action
7 or more lights turn on but do not turn
off.
The Power light is on, but POST will not
run.
Disconnect the interface cable from the printer and turn the printer off and
then back on. If POST now runs correctly, the problem is in the computer
or interface cable.
Go to “POST service check” on page 2-15.
Symptom Action
During POST, abnormal noise comes
from the carrier.
Check the ribbon cartridge for binds or damage.
Go to “Carrier service check” on page 2-10.
During idling, abnormal noise comes
from the printer.
Abnormal noise when feeding paper
Abnormal noise during printing or POST
Go to “Abnormal noise service check” on page 2-9.
Symptom Action
Printer will not print, or become ready.
Abnormal operation, incorrect
characters, or incorrect line width
Printer is ready but will not print from the
computer correctly.
Undefined or incorrect character(s)
Be sure the interface cable is connected properly.
Go to “No print or abnormal print service check” on page 2-12.
Slow printing speed Go to “Print speed service check” on page 2-17.
Symptom Action
Auto Sheet Feeder does not feed paper.
Auto Sheet Feeder double feeds.
Auto Sheet Feeder has intermittent feed
problems.
Be sure Sheet Feed is enabled in the Setup mode.
Be sure the Paper Select lever is in the cut sheet position.
Go to “Auto Sheet Feeder (ASF) service check” on page 2-9.

Diagnostic information 2-5
2580+, 2581+, 2590+, 2591+
Go Back
Previous
Next
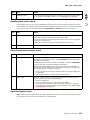
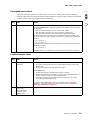
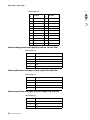
Error indications
Operator panel problems
Paper feed problems
Symptom Action
Ready and Paper Out lights blink. Turn the printer off and then back on.
Go to “Abnormal indications” on page 2-4.
Paper Out and Font
lights blink.
Turn the printer off and then back on.
Go to “Irrecoverable operator errors” on page 2-7.
Symptom Action
The Start/Stop button does not function,
but no error is indicated.
Only the Power light turns on.
One or more buttons do not function.
One or more lights do not function.
Turn the printer off and then back on.
Go to “Operator panel service check” on page 2-13.
Symptom Action
The Paper Out light is blinking when
there is paper in the printer.
Go to “Paper Present sensor service check” on page 2-13.
The Paper Out light does not blink when
there is no paper in the printer and the
ASF is not installed.
Print operation starts without paper.
Be sure the paper present sensor is not blocked.
Go to “Paper Present sensor service check” on page 2-13.
The Load/Unload button does not
function when the push tractor is
installed.
Form feed length is not correct.
The Load/Unload button functions when
cut sheets are being used.
Be sure the Paper Select lever is in the correct position.
Go to “Paper Select sensor service check” on page 2-15.
Continuous forms feed, but cut sheets
fail to load.
Be sure the Paper Select lever is in the cut sheet position.
Verify that continuous forms have been parked using the Load/Unload
button.
Be sure Auto Cut Sheet is enabled in the Setup mode.
Go to “Paper Select sensor service check” on page 2-15.
The Load/Unload button functions when
the pull tractor is installed.
The Paper Out light blinks, and the
FormFeed button does not operate until
paper is located at first print line.
Be sure the Paper Select lever is in the tractor position.
Go to “Pull Tractor sensor service check” on page 2-18.

2-6 Service Manual
2580+, 2581+, 2590+, 2591+
Go Back
Previous
Next
Power problems
Print quality problems
Lower feed roll shaft rotates, but paper
does not feed.
Pressing FormFeed does not feed
paper.
Abnormal noise created while printer is
feeding.
Paper jams, skews, or creases.
Incorrect or no line spacing: wider,
narrower, or overlapping lines.
Push/Pull Tractor does not work.
Be sure the Paper Select lever is in the correct position.
Go to “Paper feed service check” on page 2-13.
Incorrect Top-of- form positioning. Go to “Top-of-forms service check” on page 2-18.
Symptom Action
When the power switch is on, the Power
light does not turn on or the printer does
not start.
The Power light blinks or changes
intensity.
Check the continuity of the power cord and the voltage of the user’s
outlet.
Go to “Power service check” on page 2-16.
Symptom Action
No print, but the carrier moves as if
printing.
Adjust the Forms Thickness lever to a lower number.
Be sure the printhead cables are not loose or damaged.
Be sure the interface cable is connected properly.
Check the ribbon cartridge for binds or damage.
Go to “Print speed service check” on page 2-17.
Print density is light. Turn the ribbon advance knob on the print cartridge from 1 to 2 to
increase the darkness of print.
If the ribbon has reached its end of life or is worn, replace the ribbon
cartridge.
Go to “Carrier service check” on page 2-10.
Uneven print density across the print
line
Specific dots missing
Extra dots or lines printing
Turn the ribbon advance knob on the print cartridge from 1 to 2 to
increase the darkness of print.
Be sure the printhead cables are connected correctly to the printhead.
Clean the printhead.
Set the Forms Thickness lever to position 1, and run the print test.
Go to “Carrier service check” on page 2-10.
Symptom Action
CAUTION
Always unplug the power cord before doing any continuity measurement.
Page is loading ...
Page is loading ...
Page is loading ...
Page is loading ...
Page is loading ...
Page is loading ...
Page is loading ...
Page is loading ...
Page is loading ...
Page is loading ...
Page is loading ...
Page is loading ...
Page is loading ...
Page is loading ...
Page is loading ...
Page is loading ...
Page is loading ...
Page is loading ...
Page is loading ...
Page is loading ...
Page is loading ...
Page is loading ...
Page is loading ...
Page is loading ...
Page is loading ...
Page is loading ...
Page is loading ...
Page is loading ...
Page is loading ...
Page is loading ...
Page is loading ...
Page is loading ...
Page is loading ...
Page is loading ...
Page is loading ...
Page is loading ...
Page is loading ...
Page is loading ...
Page is loading ...
Page is loading ...
Page is loading ...
Page is loading ...
Page is loading ...
Page is loading ...
Page is loading ...
Page is loading ...
Page is loading ...
Page is loading ...
Page is loading ...
Page is loading ...
Page is loading ...
Page is loading ...
Page is loading ...
Page is loading ...
Page is loading ...
Page is loading ...
Page is loading ...
Page is loading ...
Page is loading ...
Page is loading ...
Page is loading ...
Page is loading ...
Page is loading ...
Page is loading ...
Page is loading ...
Page is loading ...
Page is loading ...
Page is loading ...
Page is loading ...
Page is loading ...
Page is loading ...
Page is loading ...
Page is loading ...
Page is loading ...
Page is loading ...
Page is loading ...
Page is loading ...
Page is loading ...
Page is loading ...
Page is loading ...
Page is loading ...
Page is loading ...
Page is loading ...
Page is loading ...
Page is loading ...
Page is loading ...
Page is loading ...
Page is loading ...
Page is loading ...
Page is loading ...
Page is loading ...
Page is loading ...
Page is loading ...
Page is loading ...
Page is loading ...
Page is loading ...
Page is loading ...
Page is loading ...
Page is loading ...
Page is loading ...
Page is loading ...
Page is loading ...
-
 1
1
-
 2
2
-
 3
3
-
 4
4
-
 5
5
-
 6
6
-
 7
7
-
 8
8
-
 9
9
-
 10
10
-
 11
11
-
 12
12
-
 13
13
-
 14
14
-
 15
15
-
 16
16
-
 17
17
-
 18
18
-
 19
19
-
 20
20
-
 21
21
-
 22
22
-
 23
23
-
 24
24
-
 25
25
-
 26
26
-
 27
27
-
 28
28
-
 29
29
-
 30
30
-
 31
31
-
 32
32
-
 33
33
-
 34
34
-
 35
35
-
 36
36
-
 37
37
-
 38
38
-
 39
39
-
 40
40
-
 41
41
-
 42
42
-
 43
43
-
 44
44
-
 45
45
-
 46
46
-
 47
47
-
 48
48
-
 49
49
-
 50
50
-
 51
51
-
 52
52
-
 53
53
-
 54
54
-
 55
55
-
 56
56
-
 57
57
-
 58
58
-
 59
59
-
 60
60
-
 61
61
-
 62
62
-
 63
63
-
 64
64
-
 65
65
-
 66
66
-
 67
67
-
 68
68
-
 69
69
-
 70
70
-
 71
71
-
 72
72
-
 73
73
-
 74
74
-
 75
75
-
 76
76
-
 77
77
-
 78
78
-
 79
79
-
 80
80
-
 81
81
-
 82
82
-
 83
83
-
 84
84
-
 85
85
-
 86
86
-
 87
87
-
 88
88
-
 89
89
-
 90
90
-
 91
91
-
 92
92
-
 93
93
-
 94
94
-
 95
95
-
 96
96
-
 97
97
-
 98
98
-
 99
99
-
 100
100
-
 101
101
-
 102
102
-
 103
103
-
 104
104
-
 105
105
-
 106
106
-
 107
107
-
 108
108
-
 109
109
-
 110
110
-
 111
111
-
 112
112
-
 113
113
-
 114
114
-
 115
115
-
 116
116
-
 117
117
-
 118
118
-
 119
119
-
 120
120
-
 121
121
-
 122
122


Lexmark 2580+ User manual
- Type
- User manual
Ask a question and I''ll find the answer in the document
Finding information in a document is now easier with AI
Related papers
-
Lexmark 25XX-100 User manual
-
Lexmark 3000 Color Jetprinter User manual
-
Lexmark 2580+ User manual
-
-
Lexmark 2500 SERIES User manual
-
-
-
-
Lexmark 2491 - Forms Printer B/W Dot-matrix Reference guide
-
Other documents
-
CAB A Series User manual
-
Lorenzi MILANO Pocket Flint Lighter Operating instructions
-
 Lorenzi MILANO Oval Shaped Flint Desk Lighter Operating instructions
-
 Minka-Aire F899L-ORB User manual
-
 Tally Genicom 2900 User manual
-
Compuprint 4247X03 4247X03plus Quick start guide
-
AMT Datasouth Performax User manual
-
-
National Instruments NI 2590/2591 User manual
-
Star Micronics SP500 Series Technical Manual


