Page is loading ...

DOC ID - 1563 • Rev 09 1 / 17
Clare Video Doorbell Quick Start Guide
Content
Introduction...1
Included...2
Clare Video Doorbell power requirements...2
Wi-Fi signal strength requirements...3
Installation...3
(Optional) Installing the resistor and power booster...6
Creating a ClareVision Plus account...7
Setting up the doorbell in the ClareVision Plus app...12
Understanding the ClareVision Plus app icons...13
Configuring the motion detection area...13
Troubleshooting and light status...16
Warranty Information...17
Support...17
Last modified: 01/23/19
Introduction
Thank you for choosing Clare Controls. In today’s competitive market place, we
can appreciate that you have many choices for your home automation needs.
This document is intended as a quick-start guide, not a full product guide. For
more information, view the full ClareVision Plus Camera User Guide (DOC ID
1430 Rev 02).
Figure 1: Clare Video Doorbell

DOC ID - 1563 • Rev 09 2 / 17
Included
The below items are included with the Clare Video Doorbell.
Clare Video Doorbell power requirements
The Clare Video Doorbell only works with mechanical doorbells that use 16-
24VAC power.
Note: To learn your current doorbell’s voltage, consult the original doorbell
packaging or a licensed electrician.
Mechanical versus digital doorbells
Listen to the tone the doorbell makes when ringing it, the tone determines if your
doorbell mechanical or digital. If it makes the standard ding-dong sound, it is
most likely a mechanical doorbell. If your doorbell plays a different tone or
melody, it’s most likely a digital doorbell. Digital doorbells are not currently
supported.

DOC ID - 1563 • Rev 09 3 / 17
Figure 2: Mechanical versus digital doorbell
Wi-Fi signal strength requirements
The Clare Video Doorbell must be connected to a 2.4GHz network and requires
a minimum -60dBm Wi-Fi signal strength at the installation location.
We recommend downloading a Wi-Fi analysis tool for your phone or tablet to
check signal strength. Stand at the doorbell installation location and test the Wi-
Fi strength. If a -60dBM signal or better is not achievable, we recommend
installation of a Wi-Fi range extender or Wireless Access Point (WAP) to ensure
proper video and audio streaming.
For a list of recommended Wi-Fi signal strength apps and tools, see Clare Video
Doorbell: Wi-Fi Signal Strength Apps and Tools Tech Bulletin (DOC ID 1608 Rev
02).
Installation
Before starting installation, make sure to shut off the doorbell’s power supply at
the breaker panel.
To install the Clare Video Doorbell:
1. Remove the existing doorbell and disconnect the wires connected to the
screws on the back.
2. Remove the Clare Video Doorbell’s faceplate by firmly holding the doorbell
and gently pressing down on the doorbell button and edge of the camera lens
bare.

DOC ID - 1563 • Rev 09 4 / 17
3. Mount the supplied spacer or wedge plate to the doorbell location using the
supplied wedge/space screws.
Note: The angled wedge plate can be used to change the viewing angle of
the doorbell.
Make sure to pull the doorbell wires through the center of the wedge
plate/spacer.
4. Connect the existing doorbell wires to the leads on the back panel of the
doorbell.

DOC ID - 1563 • Rev 09 5 / 17
If the existing wiring is not long enough, follow the instructions below to
extend the wiring.
a. Insert the wires into the provided connectors.
b. Use pliers to snap the button into place.
Notes
• Do not strip the wires, the connectors pierce the insulation.
• The 2 wires used to power the doorbell can be connected to either
terminal.
5. Install the doorbell using the supplied mounting screws.
6. Restore power at the breaker, and then follow the instructions to setup the
doorbell in the ClareVision Plus app.

DOC ID - 1563 • Rev 09 6 / 17
(Optional) Installing the resistor and power booster
The resistor can be installed when using a mechanical chime to eliminate
potential doorbell buzzing, and the power booster improves doorbell sound.
To install the resistor:
1. Wrap the ends of the supplied resistor around the terminals on the doorbell.
2. Verify proper installation by ringing the doorbell.
Note: Connecting the resistor in the wrong direction does not harm either
device, but results in the doorbell not ringing correctly. To correct this
mistake, reverse the direction of the resistor.
Figure 3: Resistor installation
To install the supplied power booster:
1. Using a small flat head screwdriver, loosen the set screws on the supplied
screw terminal.
2. Connect end C of the black and red wires to the screw terminal, then connect
end A of each wire to the provided power booster then re-tighten set screws
on the screw terminal.

DOC ID - 1563 • Rev 09 7 / 17
3. Remove the cover from your mechanical chime and then connect end B of
the Red wire to the TRANS terminal and end B of the Black wire to the
FRONT terminal on the mechanical chime.
4. Remove the paper backing and adhere the power booster and screw terminal
to the mechanical chime. Replace the cover on the mechanical chime.
Creating a ClareVision Plus account
To access live doorbell video and recorded footage from anywhere in the world,
you must first setup a ClareVision Plus account.
To setup the ClareVision Plus account using an iOS device:
1. Download and install the ClareVision Plus app.
ClareVision Plus for Android – Google Play
ClareVision Plus for iOS - iTunes
2. Launch the app, and then tap My Devices.
3. Tap Login.
4. Enter the homeowner’s credentials.
– or –
Tap Register. Follow the registration steps below.
Note: The ClareVision Plus account used must be that of the homeowner.

DOC ID - 1563 • Rev 09 8 / 17
a. Tap Mobile or Email (preferred), and then read and select the
checkbox for the Terms of Service.
b. Select the country, and then tap Finish in the top-right.
Email
i. Enter the customer’s email address, and then tap Next.
ii. Retrieve the code from the email and enter it into the Security
Code field.
iii. Tap Next
Mobile
i. Enter the customer’s mobile number, and then tap in the
Mobile Phone Number field.
ii. Tap Get Security Code.
iii. Retrieve and copy the code from the text message, and then
paste in into the Security Code field.
Note: If the code is not sent correctly or the timer expires, tap
Get Again.
iv. Tap Next.
c. Enter your preferred username and password, confirm the password,
and then tap Finish.
Note: the username cannot contain spaces.

DOC ID - 1563 • Rev 09 9 / 17
To setup the ClareVision Plus account using an Android device:
1. Download and install the ClareVision Plus app.
ClareVision Plus for Android – Google Play
ClareVision Plus for iOS - iTunes
2. Launch the app, select your country/region, and then tap the Checkmark icon
in the top-right corner.
3. Tap Login, and then tap Register.
Follow the registration steps below.

DOC ID - 1563 • Rev 09 10 / 17
Note: The ClareVision Plus account used must be that of the homeowner.
a. Read the Privacy Policy, and then tap Agree.
b. The Mobile Phone Number option is selected by default. Enter the
mobile device’s number.
– or –
Tap Register by Email Address at the bottom of the screen, and then
enter your email address.
c. Tap Get Verification Code.
A verification code is sent to the email/phone.

DOC ID - 1563 • Rev 09 11 / 17
d. Check the SMS or email message for the verification code, copy the
code, and then return to the ClareVision Plus app.
e. Enter the verification code into the field, and then tap Next.
f. Enter your preferred username and password, confirm the password,
and then tap Finish.
4. Tap Login, and then enter your set credentials.
Note: Android users with a device that supports fingerprint authentication are
presented with a fingerprint authentication pop-up. If desired enable the
fingerprint usage.
a. Tap Settings.
The CVP Account Management settings display.
b. Tap the Fingerprint Authentication slider to enable the feature.
c. Follow the displayed instructions, pressing the desired finger over the
fingerprint reader on the mobile device.
Note: Once finished, Fingerprint Authentication is required to access
the app.

DOC ID - 1563 • Rev 09 12 / 17
5. Add your doorbell.
Setting up the doorbell in the ClareVision Plus app
Once the camera is installed, follow the steps below to complete doorbell setup
and final installation.
To setup the doorbell in the ClareVision Plus app:
1. Once the LED on the front of the doorbell is solid red, configure the camera.
For troubleshooting and LED status see Troubleshooting and light status
below.
2. Tap in the bottom menu, and then tap in the top-right corner to add the
doorbell.
3. Scan the QR code, and then select Video Doorbell from the menu screen.
Note: Ensure that your mobile device is connected to a 2.4 GHz network.
4. Tap the Connect to a Network button. Ensure that the encryption listed is
WPA/WPA2, enter the password for your Wi-Fi network, and tap Generate.
5. Tap on the generated QR code to enlarge it, and then hold your mobile
device 4-6 inches from the lens of the doorbell.
The doorbell beeps when it recognizes the QR code. Once connected to the
Wi-Fi network the camera says, “The Wi-Fi is connected”.
Note: If the doorbell says, “The Wi-Fi is not connected,” tap back and re-enter
the Wi-Fi password to try again.
6. Enter a password for the doorbell and tap Activate.
7. Once activation is completed, tap in the top-right corner to complete the
setup process.
You can now view live and recorded footage from your new Clare Video
Doorbell. Finish installation.

DOC ID - 1563 • Rev 09 13 / 17
To install complete final installation:
1. Place the doorbell faceplate on the device, and then gently press the
faceplate into place.
2. Install the security screws, 1 at the top and 1 at the bottom.
Understanding the ClareVision Plus app icons
The below icon guide helps navigate and configure settings in the ClareVision
Plus app.
Table 1: Live and recorded video settings
Icon
Icon description
2-way audio
This icon enables 2-way audio.
Take photo
This icon saves a snapshot to the apps pictures and videos section.
Record video
This icon saves a recorded video the apps gallery.
HD/Basic video
This icon switches between 480p and 1080p video.
Start/pause footage
This icon plays/pauses the current footage stream.

DOC ID - 1563 • Rev 09 14 / 17
Volume control
This icon adjusts the volume of the selected stream.
Camera view (1 monitor)
This icon allows the user to view multiple streams as once.
Zoom
This icon zooms in on the stream.
Back
This icon brings the user back to the previous screen.
Settings
This icon allows the user to access the device’s settings.
Add device
This icon allows the user to add a new device.
Playback
This icon allows the user to play back footage from the stream.
Configuring the motion detection area
By default, the Clare Video Doorbell is set to record the full field-of-view of the
camera. Some objects may trigger an undesired amount of notifications. Follow
the below steps to adjust the motion detection area of the doorbell.
Only receive notifications if an object enters the view of the camera that is
highlighted. Adjust the motion detection area by selecting desired grey boxes.
To configure the motion detection area:
1. View the doorbell’s live view, and then tap in the top-right corner.
2. Tap the Settings icon.

DOC ID - 1563 • Rev 09 15 / 17
3. Select Alarm Notifications and verify that they are enabled.
4. Tap Draw Motion Detection Area, and then tap the Edit icon.
5. Select desired motion area.
6. Tap to save your changes.
Motion detection sensitivity
You can adjust how sensitive the doorbell detect motion by changing the
sensitivity settings under the Alarm Notifications meu.
Table 2: Motion sensitivity options
Icon
Sensitivity level
Low sensitivity: Notifications are only sent when the doorbell
encounters people or large moving objects.
Medium sensitivity: Notifications are sent when pets or medium
sized objects move.
Note: Medium sensitivity also includes items from the low
sensitivity category.
High sensitivity: Notifications are sent when insects or small
sized objects move.
Note: High sensitivity also includes items from the low and
medium sensitivity categories.
To adjust the motion detection sensitivity:
1. View the doorbell’s live view, and then tap in the top-left corner.
2. Tap the Settings icon.
3. Tap Alarm Notifications to verify that they are enabled.
4. Tap Motion Detection Sensitivity.
5. Select the desired sensitivity level.
Note: Alarm notifications must be enabled to edit the motion detection
sensitivity.

DOC ID - 1563 • Rev 09 16 / 17
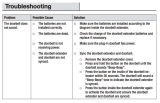
Troubleshooting and light status
Use the information below to troubleshoot the Clare Video Doorbell.
To factory reset the doorbell:
1. Press and hold the Mode button for 15 seconds, or until the device says,
“Your device is rebooting”.
This factory resets the Clare Video Doorbell.
Note: You can only factory reset the doorbell after it has been connected to a
Wi-Fi network.
Updating Doorbell Firmware
If new firmware is available, the camera that needs to be updated will have a
blue dot appear next to the name of the device. Follow the blue dot in the app
until you are given the option to update the firmware.
Light status
The LED on the doorbell displays differently based on the device’s state.
Table 3: Doorbell LED status
Status before camera registration
Status after the camera registration
Flashing red: Camera is booting
Solid blue: Normal operation
Solid red: Booted, but not
connected to the Wi-Fi
Flashing blue: Doorbell is calling
the mobile app
Flashing red and blue: Wi-Fi
pairing mode
Flashing red: Firmware is
updating
Flashing blue: Connected to Wi-
Fi but not registered
Wi-Fi issues
If the doorbell drops Wi-Fi, verify the Wi-Fi signal strength. See, “Wi-Fi signal
strength requirements” on page 3.

DOC ID - 1563 • Rev 09 17 / 17
Chime related issues
If your doorbell chime is constantly ringing, verify that the supplied power voltage
is a constant 16VAC or higher.
If your doorbell chime is buzzing, install the provided resistor across chime
terminals. See, “(Optional) Installing the resistor and power booster” on page 6.
If your doorbell chime is not sounding, or only making a “ding” sound instead of
the complete “ding-dong” sound, then the supplied power booster is required.
Follow the steps below. See, “(Optional) Installing the resistor and power
booster” on page 6.
Frequently asked questions
Q: What is the operating Voltage of the doorbell?
A: The doorbell has an operating voltage range of 15.5VAC to 28.5VAC and
has a max power draw of 12 watts (.7 amps at 15.5VAC).
Q: How do I increase the volume of the microphone and speaker?
A: You can adjust these settings under the device settings in the App under
loudspeaker volume and microphone volume.
Q: Can I view my doorbell camera on multiple devices?
A: In order to share a doorbell camera with multiple mobile devices, all users
must all be logged into the same ClareVision Plus account. You can have up
to 8 devices viewing the camera simultaneously.
Q: Can the doorbell camera get wet?
A: The ClareVideo Doorbell is IP54 rated for direct rain and water. It is not
recommended to pressure wash the doorbell.
Warranty Information
Clare Controls offers a three (3) year limited warranty on original Clare Controls
components, from the date of shipment form Clare Controls. To view complete
limited warranty details, including limitations and exclusions, see
www.clarecontrols.com/warranty.
Support
Dealer Support – contact Clare Technical Services at:
Homeowner Support – contact ClareCare
/