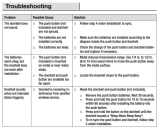
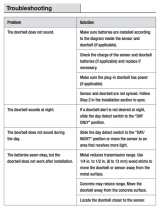
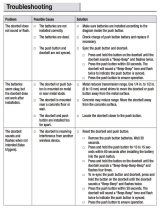
Page is loading ...

DOC ID - 1890 • Rev 03 1 / 59
Clare Video Doorbell v3
Installation and User Guide
Model CVP-B3DB50-ODIW
Last modified: 01/11/21

DOC ID - 1890 • Rev 03 2 / 59
Copyright
© 10DEC19 Clare Controls. All rights reserved.
This document may not be copied in whole or in
part or otherwise reproduced without prior written
consent from Clare Controls, LLC., except where
specifically permitted under US and international
copyright law.
Trademarks
and patents
The Clare Video Doorbell v3 name is a trademark
of Clare Controls, LLC
Other trade names used in this document may be
trademarks or registered trademarks of the
manufacturers or vendors of the respective
products.
Manufacturer
Clare Controls, LLC.
7519 Pennsylvania Ave., Suite 104, Sarasota, FL
34243, USA

DOC ID - 1890 • Rev 03 3 / 59
Content
Wi-Fi signal strength requirements...6
Power kit installation...7
Clare Video Doorbell (CVD) installation...9
Doorbell camera name...28
Time Zone...29
DST...30
Date Format...30
Receive Call from Doorbell...32
Chime Type...32
Indicator...34
Alarm Notifications...35
Record Audio...46
Network Signal...46
Configure Network...47
Storage Status...49
Device Version...51
Image and Video Encryption...51
Change Verification Code...52
IR Light...55
Delete Device...56
Basics...57
SD card management...57
Frequently asked questions...58
Warranty information...59
Support...59

DOC ID - 1890 • Rev 03 4 / 59
Introduction
Thank you for choosing Clare Controls. In today’s competitive marketplace, we
can appreciate that you have many choices for your home automation needs.
This document is intended as a quick-start guide, not a full product guide. For
more information, view the full ClareVision Plus Camera User Guide (DOC ID
1430).
Figure 1: Clare Video Doorbell (CVP-B3DB50-ODIW)

DOC ID - 1890 • Rev 03 5 / 59
Package contents
The below items are included with the Clare Video Doorbell v3.

DOC ID - 1890 • Rev 03 6 / 59
Mechanical versus digital doorbells
Listen to the tone the doorbell makes when ringing it, the tone determines if your
doorbell mechanical or digital. If it makes the standard ding-dong sound, it is
most likely a mechanical doorbell. If your doorbell plays a different tone or
melody, it’s most likely a digital doorbell. Digital chimes work only with the v3
Clare Video Doorbell.
Figure 2: Mechanical versus digital doorbell
Wi-Fi signal strength requirements
The Clare Video Doorbell v3 can be connected to either a 2.4GHz or 5GHz Wi-Fi
network and requires a minimum -60dBm Wi-Fi signal strength at the installation
location.
We recommend downloading a Wi-Fi analysis tool for your phone or tablet to
check signal strength. Stand at the doorbell installation location and test the Wi-
Fi strength. If a -60dBM signal or better is not achievable, we recommend
installation of a Wi-Fi range extender or Wireless Access Point (WAP) to ensure
proper video and audio streaming.
For a list of recommended Wi-Fi signal strength apps and tools, see Clare Video
Doorbell: Wi-Fi Signal Strength Apps and Tools Tech Bulletin (DOC ID 1608).

DOC ID - 1890 • Rev 03 7 / 59
Installation
Before starting installation, make sure to shut off the doorbell’s power supply at
the breaker panel.
Installation notes
• You may need a pencil and power drill.
• Install the Power Kit on the chime. All chimes require power kit installation.
If no chime is installed, skip power kit installation and install the doorbell
following option B on page 9.
• Required operating voltage range is 10 to 24VAC.
• Mechanical chimes may not operate correctly when operating voltage is
less than 15VAC.
Power kit installation
Follow these instructions to ensure that the power kit is installed correctly.
Serious injury or death may occur if any of the warnings are ignored. Injury or
equipment damage may occur if any of the cautions are neglected.
Note: The power kit must be on every chime, digital and mechanical.
Figure 3: Wiring overview
To install the power kit:
1. Shut off the electricity at the doorbell’s circuit breaker.

DOC ID - 1890 • Rev 03 8 / 59
2. Insert one end of the wire harness into the power kit.
3. Remove the mechanical chime’s cover.
4. Remove the existing chime wires from the terminals labeled TRANS and
FRONT.
5. Connect the wire harness to the chime’s terminals labeled TRANS and
FRONT.

DOC ID - 1890 • Rev 03 9 / 59
6. Insert the existing chime wire and the other end of the wire harness into
the wire connector and twist it tightly. Repeat this step for the other chime
wire.
7. Mount the power kit to the side of the chime.
8. Replace the chime cover.
Clare Video Doorbell (CVD) installation
Follow these instructions to ensure that the doorbell is installed correctly. Serious
injury or death may occur if any of the warnings are ignored. Injury or equipment
damage may occur if any of the cautions are neglected.
To install the doorbell:
1. Shut off the electricity at the doorbell’s circuit breaker.

DOC ID - 1890 • Rev 03 10 / 59
2. Remove the existing doorbell and disconnect the wires to the screws on
the back.
3. (Optional) If the wall is uneven, paste the foam plate to the mounting plate.
4. Insert the mini-level into the mounting plate, and then mark the drill points
when the level’s bubble stays in the center.
Note: Remove the mini-level after marking the drill points.
5. Drill holes according to the drill points, and then insert the anchors.

DOC ID - 1890 • Rev 03 11 / 59
6. Fix the mounting plate to the wall.
Make sure to pull the doorbell wires through the center of the wedge.
7. Remove the doorbell’s faceplate by firmly holding the doorbell and gently
pressing down on the doorbell button and edge of the camera lens.
8. If you have a chime installed follow option A; if not, follow option B.
Option A
Connect the doorbell wires to the leads on the back panel of the doorbell.
Option B
Connect the doorbell wires to the fuse wires, and then connect the fuse
wires to the leads on the back panel of the doorbell.

DOC ID - 1890 • Rev 03 12 / 59
9. Use the doorbell screws to affix the doorbell to the mounting plate.
10. Restore the electricity at the breaker, and then follow the instructions to
setup the doorbell in the ClareVision Plus app.
Note: Do not replace the faceplate until after you have added to the
doorbell to the ClareVision Plus (CVP) app.
Notes
• The doorbell is ready to be configured when the doorbell light ring
flashes blue.
• Verify all power connection if the doorbell ring fails to illuminate.
• The v3 doorbell contains an internal battery which maintains power
while activating the chime. The battery may take up to 3 hours to
charge. During this time, the chime may not activate when the doorbell
button is pressed.

DOC ID - 1890 • Rev 03 13 / 59
Creating a ClareVision Plus account
To access live doorbell video and recorded footage from anywhere in the world,
you must first create a CVP account for the customer on their phone. Use their
phone and account to complete the activation process.
To setup the ClareVision Plus account using an iOS device:
1. Download and install the ClareVision Plus app.
ClareVision Plus for iOS - iTunes
2. Launch the app, and then tap My Devices.
3. Tap Login.
4. Enter the homeowner’s credentials.
– or –
Tap Register. Follow the registration steps below.
Note: The ClareVision Plus account used must be that of the homeowner.
a. Tap Mobile or Email (preferred), and then read and select the
checkbox for the Terms of Service.
b. Select the country, and then tap Finish in the top-right.
Email
i. Enter the customer’s email address, and then tap Next.
ii. Retrieve the code from the email and enter it into the Security
Code field.
iii. Tap Next.
Mobile
i. Enter the customer’s mobile number, and then tap in the
Mobile Phone Number field.
ii. Tap Get Security Code.
iii. Retrieve and copy the code from the text message, and then
paste in into the Security Code field.
Note: If the code is not sent correctly or the timer expires, tap
Get Again.
iv. Tap Next.
c. Enter your preferred username and password, confirm the password,
and then tap Finish.
Note: the username cannot contain spaces.


DOC ID - 1890 • Rev 03 15 / 59
4. Select your country/region, and then tap the Checkmark icon in the top-right
corner.
5. Tap Login.

DOC ID - 1890 • Rev 03 16 / 59
6. Tap Register.
Follow the registration steps below.
Note: The ClareVision Plus account used must be that of the homeowner.
a. Read the Privacy Policy, and then tap Agree.
b. The Mobile Phone Number option is selected by default. Enter the
mobile device’s number.

DOC ID - 1890 • Rev 03 17 / 59
– or –
Tap Register by Email Address at the bottom of the screen, and then
enter your email address.
c. Tap Get Verification Code.
A verification code is sent to the email/phone.
d. Check the SMS or email message for the verification code, copy the
code, and then return to the ClareVision Plus app.
e. Enter the verification code into the field, and then tap Next.
f. Enter your preferred username and password, confirm the password,
and then tap Finish.

DOC ID - 1890 • Rev 03 18 / 59
7. Tap Login, and then enter your set credentials.
Note: Android users with a device that supports fingerprint authentication are
presented with a fingerprint authentication pop-up. If desired enable the
fingerprint usage.
a. Tap Settings.
The CVP Account Management settings display.
b. Tap the Fingerprint Authentication slider to enable the feature.

DOC ID - 1890 • Rev 03 19 / 59
c. Follow the displayed instructions, pressing the desired finger over the
fingerprint reader on the mobile device.
Note: Once finished, Fingerprint Authentication is required to access
the app.
8. Battery optimization pop-up displays.
Android may attempt to restrict notifications to allow phone battery
optimization.
9. Tap Stop optimizing battery usage, and then tap Allow.
10. Add your doorbell.

DOC ID - 1890 • Rev 03 20 / 59
Configuring the doorbell in the CVP app
Once the camera is installed, follow the steps below to complete doorbell setup
and final installation.
Note: When adding a Clare Video Doorbell v3, we recommend turning off the
phone’s cellular data before initiating the add doorbell process. Turning off the
cellular ensures that the phone properly switches networks. See the device’s
documentation for instructions on turning the cellular data off. Be sure to turn the
data back on after adding the doorbell.
To setup the doorbell in the CVP app:
1. Connect your smartphone to target Wi-Fi network.
2. Open the CVP app, and then tap +.
3. Tap Scan QR Code.
4. Scan QR code from doorbell button or from the back of the documentation
insert included with the doorbell.
5. Tap Connect to Network.
6. Tap the Next button if CVD is flashing blue.
– or –
If the doorbell is not flashing blue, reset the doorbell by pressing and holding
the reset button until the voice prompt states, “Reset Successfully”.
7. Enter network password and tap Next.
Note: If the smartphone is not already connected to the target network, tap
Change Network, and then follow the onscreen prompts to connect to the
target network.
8. The app connects to the CVD AP network.
If it fails, tap Cancel and then tap Configure Wi-Fi.
a. Find the associated AP network SSID ClareCVD_serialnumber and
forget the network.
b. When the network reappears in SSID list, tap on it and enter the network
password ClareCVD_verificationcode, the verification code is located on
the label affixed to the front of this quick stat guide. It is 6 uppercase alpha
characters.
c. After connecting to the AP network, wait for app device to prompt you to
allow network connection without internet.
Note: UI and messages for this differ from phone to phone.
If not accepted, the app device will not stay connected to the AP network
and CVD configuration does not complete.
If this occurs, forget the network and rejoin according to steps b and c
above.
/