Page is loading ...

Installation Instructions for
Avani Natural Fold
Congratulations on
the purchase of your new
Avani Natural Fold
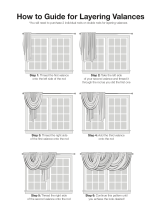
Step 4: Install the track underneath the valance.
NOW tighten the screws to secure the track.
IM INSTALL IS NOW COMPLETE.
Follow steps 2 through 4 for Inside Mount
with valance, mounting your IM bracket into the
top of the window/soft or ceiling.
IM INSTALL IS NOW COMPLETE.
Your Avani Natural Fold™ is designed to open
both
ways. IF one way only operation is
preferred follow the steps below:
Step 1: When sliding the round
carrier wheels into the track,
slide an End Stop between the
rst and second carrier wheel.
Step 2: Slide the rst carrier and the End Stop all
the way to the end of the track and then tighten
the end stop in place so that the rst carrier
wheel does not slide.
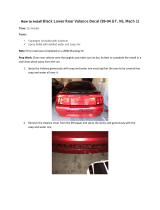
Splicers can be used with ceiling or wall mount
applications and with all types of brackets.
Prepare the two pieces of track, snap the splice
onto one half then snap the
other half into place (tip: place
track face up, so you can use
your body weight to snap the
track in place). Make sure that
there are brackets close to the
splice (2”- 4” on each side).
This splice is NOT a bracket.
Note: The hole in the splice is
not for ceiling mount. It was used
during the powder coating process.
WindowFashionsofAmerica.com warrants
that our products when properly installed in a
residential dwelling will be free from defects
in materials and workmanship for as long as
the original purchaser owns the product. All
fabric colors tend to lose their original
intensity over time, and pull cords eventually
wear out. This is considered normal wear and
tear and is not covered by this warranty.
Abuse and misuse are not covered. Color lots
vary and may not exactly mach a previously
ordered product. Repair is the purchaser’s
sole remedy under this guarantee. This
warranty does not cover incidental or
consequential damages, installation or
service calls.
Warranty
Inside or Celing Mount Without Valance
Care and CleaningInside or Ceiling Mount & Valance (cont’d)
Splicer
Splicing Rails (Optional)
Tighten Screw
End Stop Installation (Optional)
End Stop

Step 4: Set the valance board on top of the now
hanging brackets, all the way back, ush with the
wall.
Step 5: Use a 5/8” self tapping screw at each
bracket, up from underneath into the headboard
of the valance.
Step 6: The valance returns attach to the ends of
the valance board with velcro.
Step 1: Firmly attach
the OM brackets to
the wall. The two
end brackets should
be within 3” of the end
of the track. Space
any additional
brackets evenly.
Care should be taken
to ensure all brackets are level.
Step 2: Attach an
end cap on one
end of the track.
Install the track
into the brackets
and tighten
the screw.
Step 3: From the
open end of the
track, slide the
round carrier
wheels
into the track.
Once all the carriers
are in the track,
attach the track’s
end cap.
Step 1: If you ordered a valance with your
folding
door, it is
installed
rst. Install
the valance
inside the
window
opening,
and screw up
through the
board into the
top of the
window/soft or ceiling. It is okay if the front of
the valance projects out from the opening.
Step 2: Attach the IM brackets to the underside of
the valance board. It
should be positioned
so that the rail will
be in the center of
the board.
DO NOT tighten
the screw all the
way.
Step 3: From the
open end of the
track, slide the
round carrier
wheels into the
track. Once all the
carriers are in the
track, attach the
track’s end cap.
Inside or Ceiling Mount and ValanceOutside Mount Outside Mount with Valance
If you ordered a valance with
your Avani
™
Natural Fold,
continue. Otherwise, the
installation is complete.
OM installation is
now complete.
Continue
/