Page is loading ...

Installation & Assembly Instructions
Please contact our Customer Service Division with any questions at:
30700 D Carter Street ∙ Solon, OH 44139 ∙ (P) 440.248.5480 ∙ support@tritonproducts.com
For a full line of products visit www.tritonproducts.com 1
Read all instructions completely before installing. Should you have any questions about your
installation, please call Customer Service at 440-248-5480
NOTE: All systems must be secured to structurally sound, flat walls
Step 1. Remove all parts from carton and inventory all components.
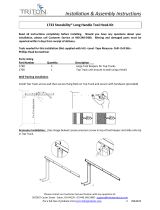
Parts Inventory
(2)Panel frame section 24”W x 48”H black (31” Wide @ arm extensions)
(4) Sheets of ¼” tempered pegboard with 1” on center (O.C.) hole spacing
(4) Wall mount angle plates 3” x 3” x 4” long.
(8) ¼” x 1-3/4” Phillips flat head masonry screws (for wall mounting angle attachments)
(4) 3/8”-16 x 2-1/4” Hex head bolt (pivoting pins)
(8) 3/8” Flat washers (for pivoting pins)
(8) 3/8”-16 Hex head nuts (for pivoting pins)
(4) 3/8” Lock washer (for pivoting pins)
(56) 3/4” Self tapping truss screws with #2 Phillips head (for tempered pegboard
attachment)
(4) Plastic end caps
Step 2. Pivoting bolt attachment to arm assemblies: (Refer to figure1-2 close-up.) Using 3/8”-16 x 2-1/4”
hex bolts, slide (1) 3/8” washer onto bolt and then insert bolt with washer through hole in arm
assembly. Once through arm assembly, install another flat washer and secure using (1) 3/8” hex nut and
hand tighten. Repeat step for second arm.
Step 3. Attaching tempered pegboard to each side of frame: (Refer to Figure 1-1) Using the existing
holes in pegboard and #10-3/4” self-tapping screws, square up outer edge of pegboard with the outside
edge of your frame section. Using an electric drill with a high performance #1 or #2 Phillips bit, install
self-tapping screws into each of the corners’ opposite arm assemblies; complete installation using
(figure 1-1 for tap screw layout.) Repeat step for other side. To help expedite installation of pegboard:
Use a center punch or pre-drill where tap screws are to be installed using a 1/8”drill bit.
Step 4. Plastic end caps. Insert plastic end caps into the remaining open ends of you tubular frame.
(Caps do not install on the open ends of the extension arms.)
Note: Before starting Step 5, it will be necessary to determine if your walls are plumb and structurally
sound. It may be necessary to install some type of shim system or header for either or both, top and
bottom wall brackets. (For 2” x 4” studded walls refer to figure 1-4 for header installation.)
B1-2 - (2) 24x48 XtraWall® Swing Pegboards

Installation & Assembly Instructions
Please contact our Customer Service Division with any questions at:
30700 D Carter Street ∙ Solon, OH 44139 ∙ (P) 440.248.5480 ∙ support@tritonproducts.com
For a full line of products visit www.tritonproducts.com 2
Step 5. Wall Mount Angle Bracket Installation for concrete walls (refer to figure 1-1 & 1-2): Each angle
bracket has a single pre-drilled hole for swing panel attachment. You will be installing your bottom
bracket first. A) Determine the appropriate height you want to install off the floor or work surface. B)
Using one angle bracket as your template, with surface having only one hole on top and flat surface with
two holes against the wall at the desired height. (Avoid mortar joints between concrete blocks.) C)
Making sure wall mount bracket is level; mark both hole locations on the wall. D) Using 3/16” masonry
bit and hole location markings on the wall, drill two holes 1-1/4” in depth. Do Not Ream Out or Oversize
the holes E) Align bracket back over holes drilled and using a #2 Phillips head bit and electric drill set at
medium speed, install (2) ¼” x 1-1/4” masonry screws. . WARNING: Over tightening could cause holes
to become oversized. If holes become enlarged: You must properly repair and re-drill, relocate
mounting brackets or install a wood header. For 2x4”studded walls refer to figure 1-4 for installation.
Step 6: Installation of top wall bracket: (Refer to Figure 1-1 and 1-2) top surface of this bracket will be
placed 47” from the TOP of your mounted bottom bracket and aligned vertically with it (Plumb). Repeat
step 5 for proper installation of top bracket.
Step 7: Attaching panels to wall mount brackets. (Refer to figure 1-1 & 1-2) Align panels pivoting bolts
with holes in the top surface of each bracket and insert through. Install 3/8” lock washer and 3/8”-16
hex head nuts on both pins and tighten thoroughly. Make sure that the bottom 3/8” hex head nut
attached to each arm comes in contact with the top each wall bracket. If one of the hex head nuts still
does not make contact, uninstall panel from brackets and insert 1-2 Maximum 3/8” flat washers
between the pivoting arm and its bottom 3/8” hex head nut. (Additional washers not included.)
Step 8: Side by side panel installations. (Figure 1-3) Panels should be mounted 16” to 18” (On Center)
O.C. to prevent tools from coming in contact with each other. Repeat steps 2-7.
Installing to other than concrete walls
When installing a system to other types of wall structures it is recommended that a 2” x 6” header be
securely installed to multiple studs and that 1/4” lag bolts be used in place of the supplied masonry bolts
to attach wall brackets. (Refer to Figure 1-4 for header installation)
Swing tension adjustment
Due to unevenness of walls or mounting brackets installation, it is sometimes necessary to increase the
tension on the pivoting arms. First try tightening the 3/8” hex head nut mounted on the underneath side
of your mount brackets. If this does not work then loosen nut below bracket and tighten nut above
bracket counter clockwise against arm assemblies and then re-tighten nut below mount brackets.

Installation & Assembly Instructions
Please contact our Customer Service Division with any questions at:
30700 D Carter Street ∙ Solon, OH 44139 ∙ (P) 440.248.5480 ∙ support@tritonproducts.com
For a full line of products visit www.tritonproducts.com 3

Installation & Assembly Instructions
Please contact our Customer Service Division with any questions at:
30700 D Carter Street ∙ Solon, OH 44139 ∙ (P) 440.248.5480 ∙ support@tritonproducts.com
For a full line of products visit www.tritonproducts.com 4
/