Page is loading ...

Installation & Assembly Instructions
Please contact our Customer Service Division with any questions at:
30700 D Carter Street ∙ Solon, OH 44139 ∙ (P) 440.248.5480 ∙ support@tritonproducts.com
For a full line of products visit www.tritonproducts.com 1 INLBD2116
Read all instructions completely before installing. Should you have any questions about your installation, please
call Customer Service at 440-248-5480
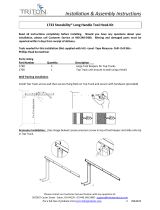
Inventory and inspect all components before starting assembly (Use figure 1-1 page 3)
Report Any Missing Parts and/or Damaged Goods within 5 Days from Receipt
QTY Description
(1) Stainless Steel Bottom Tray
(2) Left Hand Stainless Steel Corner Angle brackets
(1) Right Hand Stainless Steel Corner Angle Bracket with 4 holes for handle attachment
(1) Right Hand Stainless Steel Corner Angle Bracket without holes for handle attachment
(2) Rail End Brackets interchangeable (Triangular with 4 preinstalled threaded fasteners)
(1) Top Rail (48” Long)
(1) Cart Handle
(2) Fixed Casters
(2) Swivel Casters
(4) Stainless Steel LocBoard® Pegboard w/ square holes 24” X 42.5”
(66) Assortment of Stainless Steel LocHook® Pegboard Hooks
(6) Medium 7-38”Lx4-1/8”Wx3”H Bins
(24) 1/4"-20 X 3/4” Truss Head Bolts
(8) 1/4"-20 x 3/8" Phillips Flat head w/ Under-Cut Head. (For attachment of corner angle brackets to
FRONT of bottom tray.)
(4) 1/4"-20 x 1/2" Tapered Phillips flat head screws. (For Handle Attachment.)
(16) 12-24X 3/4" Socket Head Cap Screws (For Attachment of LocBoards.)
(16) Flat Washers for Casters
(16) ¼” Locknut
Note: While attaching components it’s important to remember not to fully tighten any bolt until system is fully
assembled. Freedom of movement will allow for proper alignment between bolts and their associated preinstalled
threaded fasteners. Tapered Flat head screws with under-cut head used for attachment of corner angle brackets on
the FRONT edge will be tightened just before installation of LocBoards®. For assembly purposes the END will always be
the narrowest dimension of cart.
Assembly:
1. Locate the (4) corner angle brackets. Using Parts Call-Out figure 1-1 page 3, identify the left from the right
brackets and their top edge from their bottom edge. The top’s edge can be identified by the angle cut into
each bracket and its 2-top bolt mounting holes when looking from the END view.
2. Position the bottom tray with the lip facing up and one end facing you. Special Note: the end of the bottom
tray with caster mounting holes pattern running parallel to the end lip will be the end that you will mount
swivel casters and right-hand angle bracket with pull handle.
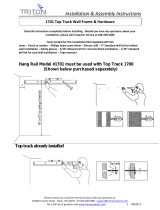
3. (Refer to Figure 2-1, 2-2 and 2-3) Note: All corner angle brackets will install outside of the bottom tray lip.
Starting with a left corner angle bracket and using 1/4"-20 X 3/4” Truss Head Bolts align bottom bolt hole in
angle bracket with pre-installed threaded fastener on the left end of bottom tray and insert bolt with hand
tighten (Do Not Tighten All The Way). From the front edge of the same angle bracket install a 1/4"-20 x 1/2"
Tapered Phillips flat head screw. (Repeat step #3 for each corner bracket.)
LBC-4SSH - Stainless Steel 48” L x 46” H x 26-5/8” W LocBoard® Tool Cart with Stainless
Steel Frame, 66 Hooks, 6 Bins

Installation & Assembly Instructions
Please contact our Customer Service Division with any questions at:
30700 D Carter Street ∙ Solon, OH 44139 ∙ (P) 440.248.5480 ∙ support@tritonproducts.com
For a full line of products visit www.tritonproducts.com 2 INLBD2116
4. (Refer to Figure 1-1, 2-1 and 2-4) Installing Top Rail: Top rail will be positioned inside both sets of installed
corner angle brackets at each end. From the front edge install 1/4"-20 x 1/2" Tapered Phillips flat head screws
through top counter sunk holes on front side of each corner angle bracket and into preinstalled threaded
inserts in the top rail and tighten. (Repeat step #4 for all top corners angle attachments to top rail.)
5. (Refer to Figure 1-1 and 2-4) Attaching rail end bracket to top rail and corner angle brackets; Position end
bracket with taper facing up and preinstalled fasteners facing inward (flat surface of end bracket with the flat
inside surface of angle brackets.) Slide end bracket in and behind both right and left corner angle brackets.
Align the four bolt holes of each corner angle bracket with the preinstalled fasteners on rail end bracket. Install
(4) 1/4"-20 X 3/4” Truss Head Bolts and tighten partially. (Repeat step #5 for opposite end.)
6. (Figure 2-1 and 2-3) Tighten all (8) 1/4"-20 x 1/2" Tapered Phillips flat head screws on the front side used to
attach corner angle brackets to top rail and bottom tray. (These will be the only screws tightened at this time.
All end bolts must remain loose.)
7. (Figure 2-1) Pull handle installation: Locate the right corner angle bracket with the 4 extra fastener holes at the
top. Install pull handle using 1/4"-20 x 1/2" Tapered Phillips flat head screws. (Note: Handle will be positioned
at end of tool cart that swivel casters will be installed on.)
8. (Figure 1-2 and 2-1) Installation of Casters: (Note: Bottom tray has two different bolt patterns for casters.)
Swivel casters will be installed on the end of tool cart with handle and bolt patterns that are slightly inset and
parallels the END section of the cart. With end of cart raised or laying on its side insert 1/4"-20 X 3/4” truss
head bolts with flat washer through bottom side of caster mount plate and through holes in bottom tray, install
flat washer and secure in place using ¼” lock nut. Tighten securely after all 4 bolts have been installed. (Repeat
for each caster.)
9. (Figure 2-1, 2-4, 2- and 2-7) Installation of LocBoard: Before attaching LocBoards tighten the 1/4"-20 X 3/4”
Truss Head Bolts in all 4 corner angle brackets on both sides of the cart. Mounting holes will be accessed from
the front side through the square holes in each board. (Using figure 2-4, 2-6 & 2-7) Identify the top of the
pegboard from its bottom. From the front of the tool cart with smooth surface of LocBoard facing you, align
the outside 4th hole down on the pegboard with the corresponding hole on the angle bracket. Using an Allen
wrench, insert 12-24 X 1/4” socket head cap screw. (Make sure fasteners go in straight and turn without
restriction. Avoid stripping while installing. You may have to move board slightly to allow screws to turn freely.)
Tighten until screw head is just below surface of the board. Align the 3rd hole down from the inside top corner
of the pegboard with the corresponding hole on the top rail. Using an Allen wrench, insert 12-24 X 1/4” socket
head cap screw. (Make sure fasteners go in straight and turn without restriction. Avoid stripping while
installing. You may have to move board slightly to allow screws to turn freely.) Install the socket head cap
screws in the outside 3rd hole from the bottom corner and 2nd hole up from the bottom inside corner of the
pegboard into the bottom tray in the same manner as the top. Install the socket head cap screws in the outside
11th hole down from the top of the pegboard and 10th hole up from the bottom of the pegboard into the
angle bracket in the same manner as the outside four. (Keep all screws loose until finished installing all (4)
LocBoards.)
10. Once finished installing all (4) LocBoards, finish assembly by securely tightening all fasteners throughout
assembled cart.
Warranty information: Triton Products warrants to the original owner that this product is free from defects in
material and workmanship for a period of two years from the date of the original purchase. If this product is
defective when used as intended under normal household conditions within the specified period, Triton will replace
the product, send a replacement part or issue a refund (at our option) when the consumer provides a proof of
purchase (either a bill of sale, receipted invoice or other proof that the product is within the warranty period), along
with a full description of the defect.
Liability: Triton Products and/or its Reseller’s liability are limited to 100% of the purchase price of the product.

Installation & Assembly Instructions
Please contact our Customer Service Division with any questions at:
30700 D Carter Street ∙ Solon, OH 44139 ∙ (P) 440.248.5480 ∙ support@tritonproducts.com
For a full line of products visit www.tritonproducts.com 3 INLBD2116
Stainless Steel
LocBoard
Stainles Steel
LocBoard
Lock Nut
Truss Head Bolt
LBC-4SSH Tool Cart

Installation & Assembly Instructions
Please contact our Customer Service Division with any questions at:
30700 D Carter Street ∙ Solon, OH 44139 ∙ (P) 440.248.5480 ∙ support@tritonproducts.com
For a full line of products visit www.tritonproducts.com 4 INLBD2116
LBC-4SSH Tool Cart Assembly View
1/4"-20 x 1/2" Tapered
Phillips flat head screws
/