◈ Self-test
Run the self-test when first setting the printer or when encountering a problem, and check the
following.
• Control Circuit, Mechanisms, Print Quality, ROM Version, and Memory Switch Settings
If no issue is found with the printer after running the self-test, examine the other devices or
peripherals and software. This function is independent of such other devices and software.
• Self-Test Instructions
1) Turn the printer power off and close the printer paper cover.
2) Pressing the paper feed button and power button simultaneously turns the printer on.
3) After printing begins, please release the two buttons.
4) To add a printout of the ASCII pattern, press the paper feed button once more.
5) After the ASCII pattern is printed out, the self-test is automatically terminated.
◈ Product Specifications
Item Description
Printing
Printing Method Thermal printing
Printing Speed
100 mm/sec (Receipt Paper)
80 mm/sec (Linerless Paper)
Resolution 203 DPI
Paper Supply Mode Easy paper loading
Character Size
Font A: 12 × 24
Font B: 9 × 17
Font C: 9 × 24
Characters Per Line Font A: 32 Font B/C: 42
Character Set
English: 95
Expanded Graphics: 128 × 33 pages
International: 32
Barcode
1 Dimension: UPC A, UPC E, CODE 39, CODE 93,
Code 128, EAN 8, EAN 13, ITF, Codabar
2 Dimension: PDF417, DATAMATRIX, MAXI,
QR Code, GS1 DataBar, Aztec
Emulation BXL/POS
Driver
Windows XP(32/64bit) / WEPOS /
2003 Server(32/64bit) / VISTA(32/64bit) /
2008 Server(32/64bit) / 7(32/64bit) / 8(32/64bit)
SDK
Windows XP / WEPOS / 2003 Server /
VISTA / 2008 Server / 7 / 8 / CE 3.0 and later
Sensor Paper End, Paper Cover Open
Cutter Type Tear-Bar
Language User language supported
Paper
Paper Form Receipt Linerless
Paper Type Thermal paper Thermal paper
Diameter Max. ø40 mm (1.57”) Max. ø39 mm (1.54”)
Width
57.5 ± 0.5 mm
(2.26” ± 0.2”)
57.5 ± 0.5 mm
(2.26” ± 0.2”)
Thickness 0.07 ± 0.003 mm 0.08 ± 0.008mm
※ Note
1) This equipment is indooruse and all the communication hiring are limited to inside of the
building.
2) The switch is the disconnecting device. Turn off switch from any hazard.
◈ Label Printing Function
1. Label Function Setting
Label paper and black mark paper available at the label mode.
• Setting Operations
1) Turn on the printer power.
2) Open the paper cover and press and hold down the paper feed button for longer than two
seconds.
3) After the buzzer tone is emitted, insert paper and close the cover.
4) Repeat the steps above to return to receipt mode.
• Setting Via Memory Switch
1) Please refer to the memory switch changing section of the Commands Manual.
2. Auto Calibration Function
The label printing function requires the recognition of label paper gaps and black mark
paper black bar in order to print.
If label paper gaps are not properly recognized, use the auto calibration function.
• Auto Calibration Instructions
1) Turn the printer power off while in label print mode.
2) Press and hold down the paper feed button and then press the power button.
3) After the following printout is outputted, press the power button to perform auto
calibration.
Select the mode
Auto Calibration: Power Button
Self Test: Feed Button
4) Three pages of label paper are outputted when performing auto calibration.
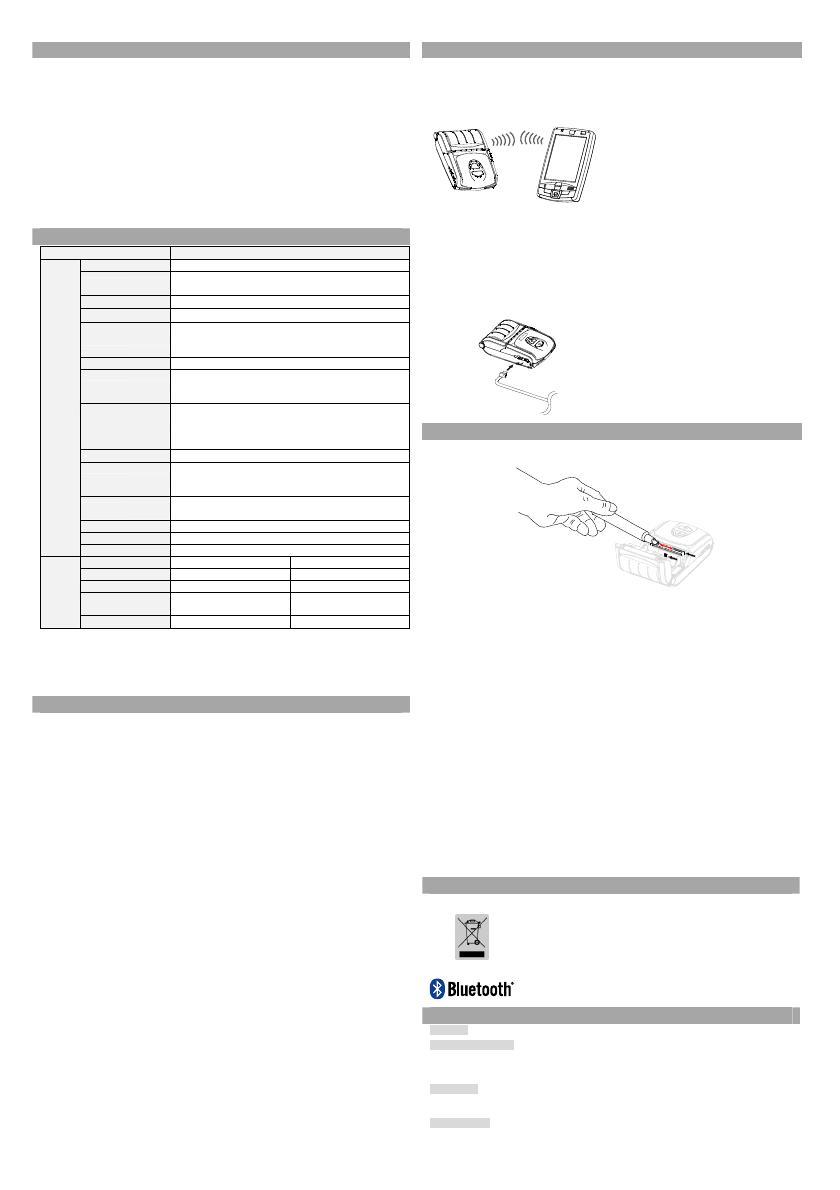
◈ Peripherals Connection
1. Bluetooth & Wireless LAN Connection
1) The printer can be connected to devices
equipped with Bluetooth communication
capacity (PDAs, PCs, etc.).
2) Use the Bluetooth connection function
supported by the device to connect to the
printer. The NFC tag built into the printer
enables automatic pairing with devices.
※ Note
The device must support NFC Auto Pairing.
It may display a message that the device cannot
be connecteREVd as NFC Auto Pairing is
supported upto the B/T pairing and the devices
must connected manually, but this is normal.
3) The printer can be connected to other
stations, such as PDAs and PCs supporting
wireless LAN communication in Ad-hoc
mode and AP in Infrastructure mode.
※ Note
Refer to the Bluetooth Wireless LAN Manual for detailed information on its connection.
You can check the Bluetooth environment (authentication, encryption, connection mode) and
the wireless LAN environment (IP, SSID, authentication, encryption) via the self-test page.
2. Interface Cable Connection
1) Open the Interface Cap
2) Connect the interface cable (optional) to the
cable connector of the printer.
◈ Printer Cleaning
If the interior of the printer is dusty, print quality can decline.
In such a case, follow the instructions below to clean the printer.
1) Open the paper cover and remove the paper if there is any.
Apply the cleaning pen from the center to the edge over the printer head for cleaning.
2) Clean the printer head using the cleaning pen.
3) Remove paper dust from the paper detection sensor using the cleaning pen.
4) Do not use the printer for one to two minutes after cleaning the printer head until
the cleaning agent of the cleaning pen has completely evaporated and dried.
5) Mount the paper and close the printer cover.
• Caution
1) Make sure the printer power is turned off before cleaning.
2) Wait for two to three minutes after power-off before head cleaning because the head
part may become very hot during printer operation.
3) Take care not to touch the heating region of the head with your hand while cleaning
the head part.
→ The printer head may be damaged by static electricity.
4) Take care to avoid scratching the head.
5) Clean the printer head periodically if linerless paper is used. Recommended cleaning
period is after consuming ten rolls of linerless paper (100 meters), or more than once
a week. Printing quality may be degraded or printer life may be shortened if the head is
not cleaned periodically.
• Warning
1) Use only the linerless paper that is provided by BIXOLON. Use of other paper voids
product warranty.
2) Use only the cleaning pen (PCP-R200II) provided by BIXOLON for cleaning.
◈ Certification
This marking shown on the product or its literature, indicates that it should not be disposed
of with other household wastes at the end of its working life. To prevent possible harm to
the environment or people from uncontrolled waste disposal, please separate this from othe
types of wastes and recycle it responsibly to promote the sustainable reuse of material
resources. Household users should contact either the retailer where they purchased this
product, or their local government office, for details of where and how they can take this
item for environmentally safe recycling. Business users should contact their supplier and
check the terms and conditions of the purchase contract. This product should not be mixed
with other commercial wastes for disposal.
The following Bluetooth mark and ID D022644 is only applicable to models with the
Bluetooth SIG qualification.
☎ BIXOLON Co., Ltd.
● Website http://www.bixolon.com
● Korea Headquarters
(Add) 7~8F, (Sampyeong-dong), 20, Pangyoyeok-ro241beon-gil,
Bundang-gu, Seongnam-si, Gyeonggi-do, 13494, Korea (ROK)
(Tel.) +82-31-218-5500
● U.S. Office
(Add) BIXOLON America Inc., 3171 Fujita St, Torrance, CA 90505
(Tel.) +1-858 764 4580
● Europe Office
(Add) BIXOLON Europe GmbH, Tiefenbroicher Weg 35 40472 Düsseldorf
(Tel.) +49 (0)211 68 78 54 0


