Page is loading ...

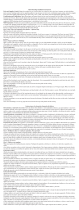
IMPORTANT WARNING!
This product will expand and contract.
Loosely fit individual boards together to
allow for expansion. DO
NOT tightly press
individual boards together. They WILL buckle
when expansion occurs. Leave a minimum
of 1/8" at the edge of first/last board and
corner. Best installed in a climate-controlled
environment. Allow ample time for product to
acclimate to room temperature.
INSTALLATION INSTRUCTIONS
HF1540
©2010
HOF#72 Inst. R 6/10
MDF
Wainscot
32" Overlapping Assembly
House of Fara • LaPorte, IN • www.houseoffara.com
PRIOR TO INSTALLATION:
• To minimize expansion or
contraction of the product,
open all packages. Place the
pieces flat with space between
each for air to circulate. Allow
72 hours for pieces to adjust
to the temperature and humidi-
ty of the room in which they
will be installed – not in a
damp or unheated area.
• Your MDF has a primer only
finish. It will require a finish-
ing coat of paint. MDF can be
painted
either before or after
installation. If installing in
a high moisture area, we
recommend that you paint
the back side prior to installing.
Expansion and contraction are
inherent characteristics of MDF
products due to humidity. The
manufacturer cannot be held
liable for contraction and
expansion of planks.
WALL PREPARATION:
• If walls are cracked, uneven or
extremely rough, planks should
be glued and/or nail
ed to a
frame work of 2" x 4", 1" x 3"
or 1" x 4" strips of kiln-dried
wood.
• If walls are in good condition,
glue or nail wainscot directly
on existing drywall, plywood
or paneling.
• Note: In rooms with
extremely high moisture
(e.g., saunas, bathrooms or
laundry areas), apply a vapor
barrier, like 4 mil polyethylene,
between the studs and wainscot.
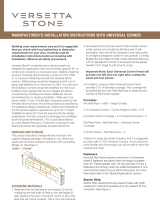
INSTALLATION
Installing planking with House of Fara
Wainscot Base Trim:
• Glue or nail wainscot base trim to wall –
with grooved end up.
PLANKING:
• Start with top lap edge toward corner.
• Leave about 1/8"
space between your
first piece and
corner, allowing
for expansion.
• Make sure first
piece is plumb.
Secure first piece by
nailing close to the
overlapping edge
with 1" finishing
nails. (Contractor’s
glue
can also be
used.)
• Continue to nail
additional pieces,
leaving approxi-
mately 1/32"
between pieces to
allow for expansion
/contraction. (See
diagram for nail
location)
• As you are working, check frequently for plumb
with level or tape measure.
• When you come to a corner, rip the piece to
proper width. Finish corner with corner
round, cove or square stock.
• Secure with glue or 1" finishing nails.
TIPS
• Nailing: Use nail gun for fastest,
easiest application. Putty nail holes before
painting.
• Your MDF has a primer only finish, it will
require a finishing coat of paint. MDF can be
painted either before or after installation.
• Check frequently for plumb with level or
tape measure.
• Gluing: Use quality panel glue to secure.
• To maintain House of Fara MDF products,
simply wipe with damp cloth.
• An oil b
ased paint will offer more moisture resist-
ance than a water based paint.
PRIMED – READY TO PAINT
wainscot base
with
grooved
end up
vertical application
using grooved
Wainscot Base Trim
End View
nail location nail location
Nail Location
36"
3"
2
3
⁄4"
32"
2"
2"
Wainscot Chair Rail
Wainscot
Base
32" Wainscot
5
⁄16"
29370 HOUFAR-1540:Wainscot Label 5/27/10 9:35 AM Page 2
IMPORTANT WARNING!
This product will expand and contract.
Loosely fit individual boards together to
allow for expansion. DO NOT tightly press
individual boards together. They WILL buckle
when expansion occurs. Leave a minimum
of 1/8" at the edge of first/last board and
corner. Best installed in a climate-controlled
environment. Allow ample time for product to
acclimate to room temperature.
INSTALLATION
INSTRUCTIONS
HF1540
©2010
HOF#72 Inst. R 6/10
MDF
Wainscot
32" Overlapping Assembly
House of Fara • LaPorte, IN • www.houseoffara.com
PRIOR TO INSTALLATION:
• To minimize expansion or
contraction of the product,
open all packages. Place the
pieces flat with space between
each for air to circulate. Allow
72 hours for pieces to adjust
to the temperature and humidi-
ty of the room in which they
will be installed – not in a
damp or unheated area.
• Your MDF has a primer only
finish. It will require a finish-
ing coat of paint. MDF can be
painted
either before or after
installation. If installing in
a high moisture area, we
recommend that you paint
the back side prior to installing.
Expansion and contraction are
inherent characteristics of MDF
products due to humidity. The
manufacturer cannot be held
liable for contraction and
expansion of planks.
WALL PREPARATION:
• If walls are cracked, uneven or
extremely rough, planks should
be glued and/or nail
ed to a
frame work of 2" x 4", 1" x 3"
or 1" x 4" strips of kiln-dried
wood.
• If walls are in good condition,
glue or nail wainscot directly
on existing drywall, plywood
or paneling.
• Note: In rooms with
extremely high moisture
(e.g., saunas, bathrooms or
laundry areas), apply a vapor
barrier, like 4 mil polyethylene,
between the studs and wainscot.
INSTALLATION
Installing planking with House of Fara
Wainscot Base Trim:
• Glue or nail wainscot base trim to wall –
with grooved end up.
PLANKING:
• Start with top lap edge toward corner.
• Leave about 1/8"
space between your
first piece and
corner, allowing
for expansion.
• Make sure first
piece is plumb.
Secure first piece by
nailing close to the
overlapping edge
with 1" finishing
nails. (Contractor’s
glue
can also be
used.)
• Continue to nail
additional pieces,
leaving approxi-
mately 1/32"
between pieces to
allow for expansion
/contraction. (See
diagram for nail
location)
• As you are working, check frequently for plumb
with level or tape measure.
• When you come to a corner, rip the piece to
proper width. Finish corner with corner
round, cove or square stock.
• Secure with glue or 1" finishing nails.
TIPS
• Nailing: Use nail gun for fastest,
easiest application. Putty nail holes before
painting.
• Your MDF has a primer only finish, it will
require a finishing coat of paint. MDF can be
painted either before or after installation.
• Check frequently for plumb with level or
tape measure.
• Gluing: Use quality panel glue to secure.
• To maintain House of Fara MDF products,
simply wipe with damp cloth.
• An oil b
ased paint will offer more moisture resist-
ance than a water based paint.
PRIMED – READY TO PAINT
wainscot base
with
grooved
end up
vertical application
using grooved
Wainscot Base Trim
End View
nail location nail location
Nail Location
36"
3"
2
3
⁄4"
32"
2"
2"
Wainscot Chair Rail
Wainscot
Base
32" Wainscot
5
⁄16"
29370 HOUFAR-1540:Wainscot Label 5/27/10 9:35 AM Page 2
PRIMED – READY
TO PAINT
/