


1
GB
IE
Dear customer.
Thank you for buying one of our latest series of Gorenje cookers. We wish that our product would do you a good turn. We recommend you to study these
instructions and to operate this product according to instructions.
IMPORTANT INFORMATION, BINDING INSTRUCTIONS AND RECOMMENDATIONS
Verify whether data on the nominal supply voltage, indicated on a type plate, agree with the voltage of your mains.
The cooker is coupled to mains according to the connection diagram .
Solely authorised persons may perform installations, repairs, adjustments, interventions into the appliance.
An omni - polar curcuit - breaker must be installed before the appliance, with a between - contact spacing of 3 mm or more.
The cooker must not be used for any other purpose than solely for thermal food preparation. In the case of using the appliance for another purpose
there is a risk of malfunction due to its excessive heat load. The warranty does not apply to faults due to incorrect usage of a cooker.
Make sure connecting cords of other appliances can not come into contact with the cooking plate or other hot parts of the cooker
It is unallowable to put any combustible matters near the oven cooking plates, oven heaters or in the cooker compartment.
If the cooker is not in service, see that all of its switches are off.
In cleaning or repairs, the main electric power switch must be off.
We recommend you to turn once every two years to an authorised repair shop in order to check on the cooker function and to make a professional
maintenance. Thus you prevent contingent troubles and prolong the cooker service life.
When detecting a flaw on the appliance compartment, do not repair it by yourself but put the appliance out of operation and ask an authorised person
to make the repair.
The maker bears no responsibility for contingent damages caused by violating the binding instructions and recommendations set forth in these
instructions.
Do not use any appurtenances whose surface finish is damaged or otherwise defective due to wear or handling.
This appliance can be used by children aged from 8 years and above and persons with reduced physical, sensory or mental capabilities or lack of
experience and knowledge if they have been given supervision or instruction concerning use of the appliance in a safe way and understand the
hazards involved. Children shall not play with the appliance. Cleaning and user maintenance shall not be made by children without supervision.
The appliance was designed and made in accordance with the European standards listed below:
EN 60 335-1 and EN 60 335-2-6 (electrical) plus relative amendments
The appliance complies with the prescriptions of the European Directives as below:
73/23 + 93/68 EC concerning electrical safety (BT).
89/336 + 92/31 + 93/68 EC concerning electromagnetic compatibility (EMC)
Oven accessories that could come into contact with foodstuffs are made with materials that comply with the provisions of the 89/109 EC
directive dated 21/12/88.

2
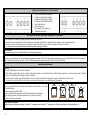
CONTROL ELEMENTS OF THE COOKER
1. Control knob of the left front hotplate
2. Control knob of the left rear hotplate
3. Control knob of the right rear hotplate
4. Control knob of the right front hotplate
5. Oven thermostat knob
6. Oven function knob
7. Thermostat function signal lamp
8. “Power ON” control lamp
INSTRUCTIONS FOR THE FIRST USAGE OF A COOKER
Prior to usage it is necessary to remove any packing material from the cooker.
Various parts and components of the cooker and package are recyclable. Handle them in compliance with the valid instructions and national decrees.
Before firs usage we must clear the cooker and accessories. When all surfaces are dry, switch on the cooker and follow next instruction.
It is not allowed clean and disassemble other parts than described in paragraph “cleaning”.
HOT PLATES
Set hot plate knobs to position „6“ and také them on for 5 minutes without pans.
OVEN
Turn the oven function knob in the "top and bottom heating element" position. Set 250 °C on the thermostat and leave the oven in operation with the shut door for a period of 1
hour. Provide for proper airing of the room. This process will remove preserving agents and odours of the oven prior to first baking.
COOKER OPERATION
NOTICE:
Remove all split liquids on the lid, before its opening.
Solely adults may operate the cooker in accordance with these instructions. It is impermissible to leave children without supervision in a room where the cooker is installed.
A cooker is an appliance whose operation requires surveillance.
Make sure that connecting cords of other appliances can not come into contact with the cooking plate, oven door or other hot parts of the cooker.
The maker bears no responsibility for injury to persons or damages due to improper or unsuitable usage of the appliance.
RECOMENDATION FOR USING OF ELECTRIC HOT PLATES
use the pots with flat base of a diameter at least equal to that of hot plate, so you reach
maximum efficiency
when cooking cover pots if possible
use accumulated heat in the plate, switch it off some time before end of cooking
use cooking procedures with smaal quantity of water ( presure pot, stewing)
never use hot plates without pots
ELECTRIC HOT PLATES
Cooking plates has 6 step power regulation. At position “6” is maximum power, at position “1” minimum power. Power on signal lamp is on when any plate is on.

3
RAPIDE HOT PLATES
First they are used for quick cooking and roasting.
OVEN
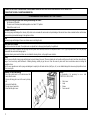
OVEN INSIDE
Oven with embossed side walls with three slots for shelf position.
There are in the oven top and grilling element at the seling of cavity, bottom heating element is hidden under bottom.
OVEN SWITCHING ON AND OFF
Select the desired function of the oven by the oven function knob. The knob can be turned in both directions. Set the temperature for food preparation by the thermostat knob
within 50 °C - 250 °C.
You must turn right by the thermostat knob - setting higher temperature. Turning back, the set temperature is reduced.
Forcible overturning of the zero position will lead to the thermostat damage!
NOTE:
Slide in baking tray can be loaded up to 3 kg as maximum. The shelf with a located pan or baking plate can be loaded up to 7 kg as maximum.
The baking plates and pans are not designed for a long-term storage of foodstuffs (longer than 48 hours). For longer storage, displace the food in a convenient dish.
WARNING!
Do not cover oven bottom with aluminum foil, place on bottom oven tray, baking pan, container, food or food products. Coverage causes local overheating of the bottom
surface of the bottom of the furnace and the furnace can be irreparably damaged by this behavior.
INSERTING OF GRID IN THE OVEN
OVEN FUNCTIONS AND APPLICATIONS

4
Oven illumination being on in setting up all the oven functions
Grilling by infrared radiation. The temperature selector is set to the maximum position.
Oven is heat by top and bottom heating element. The thermostat can be set to a temperature within 50 °C - 250 °C.
Oven is heat only by bottom heating lelment. Distribution of heat by covection, thermostat can be set to a temperature within 50 °C - 250 °C.
Recommendation: The function is suitable for finishing of food that need higher temperature from the bottom.
Oven is heat only by top heating lelment. Distribution of heat by covection, thermostat can be set to a temperature within 50 °C - 250 °C.
Recommendation: The function is suitable for finishing of food that need higher temperature from the top or making a crust.
Setting of thermostat to position and oven function switch to the position can be used for slow drying or defrosting of food.
RECOMMENDATIONS AND ADVISES
For your guide we give the recommended temperatures of the oven space for typical food preparation.
50 – 70° C - drying
150 - 170° C - preservation
220 - 250° C - meat roasting
130 - 150° C - stewing
180 - 220° C - baking of daught
It is necessary to try out a precise temperature value for every sort of food and the baking or roasting method. Before putting the food in, it is necessary to preheat the oven in
some instances. If the selected temperature is not reached, the thermostat signal light is on. If the selected temperature is exceeded, the thermostat signal light goes out.
Slide best the oven shelf, on which a baking plate or pan is laid down, into the second groove from below on sides of the oven. If possible, do not open the oven door in the
process of baking. The thermal regime of an oven will thus be disturbed, the baking time prolonged and the food can be burnt.
GRILLING
Turn the top oven/grill function selector (2) to the symbol, and turn the thermostat (1) to 250º to preheat, before reducing to desired cooking temperature. The complete
top element will come on and radiate heat directly onto the food. Allow the grill to preheat for approximately 5 minutes before starting to cook.
The shelf can be used in any one of the oven shelf runner positions. In addition to this the grill pan grid is designed with legs of unequal length, to further increase the variation
of grilling positions available. The grill pan is placed centrally on the shelf, beneath the grill element.
Leave the control at 250º for toast, and for sealing and fast cooking of foods. For thicker foods requiring longer cooking, turn the thermostat to a lower setting after the initial
sealing on both sides at 250º. The thicker the food, the lower the control should be set.
Food which requires browning only should be placed under the hot grill on the second runner from the top. After use, always return controls to their off positions
WARNING:
DURING USE THE APPLIANCE BECOMES HOT. CARE SHOULD BE TAKEN TO AVOID TOUCHING HEATING ELEMENTS INSIDE THE OVEN.
IMPORTANT!
GRILLING MUST ALWAYS BE CARRIED OUT WITH THE OVEN DOOR CLOSED

5
NEVER ALLOW YOUNG CHILDREN NEAR THE APPLIANCE WHEN THE GRILL IS IN USE AS THE SURFACES GET EXTREMELY HOT.
DO NOT LINE THE GRILL PAN WITH ALUMINIUM FOIL.
CLEANING AND MAINTENANCE OF THE COOKER
Keep to the following principles while cleaning or maintaining the cooker:
1. Set all knobs in off position.
2. The main curcuit - breaker placed before appliance must be in OFF position.
3. Wait until the cooker is cool.
COOKER SURFACE
Use a damp sponge with detergent for cleaning. Fatty stains can be removed with warm water and special detergent for enamel. Never clean enamelled surfaces with abrasive
means producing irremovable damage to the appliance surface.
HOB
Use damp sponge with detergent. Never use abrasive means scratching the hob.
ELECTRIC HOT PLATES
If possible avoid contact with water. Clean plates when are dryand time to time apply small quantity of vegitable oil..
Hotplate rims are made of stainless steel and might assume yellow colour with time, because of the temperature effect. This is a physical phenomenon, and it may be partly
removed with the usual metal cleaning agents.
Aggressive cleaning accessories for dishes are not suitable for cleaning of rims, as they might cause scratches.
OVEN
Clean the oven walls with a damp sponge with detergent or special cleaner for ovens. If there are baked ends on the wall, water them,use the bursh and then clean with damp
sponge. Do not use sharp, metal instruments. Following cleaning, carefully dry up the oven. Clean the oven only when cold. Never use abrasive means scratching the
enamelled surface.
Wash the oven appurtenances with a sponge and detergent or employ the dish wash machine (shelf, pan, etc.) or use suitable detergent to remove rough impurities or burns
as the case may be.
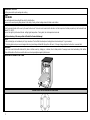
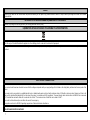
CHANGE OF AN OVEN LAMP
Set all the control knobs to "off" and disconnect the
cooker from the mains
Unscrew the lamp glass cover in the oven by turning
left
Unscrew the faulty bulb
Put and screw a new bulb in
Mount the bulb glass cover.
NOTE:
For illumination it is necessary to use a bulb
T 300° C, E14, 230 V, 25 W.
1. Glass cover
2. Lamp
3. Sleeve
4. Oven rear wall

6
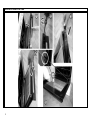
INSERTING OF GRID IN THE OVEN

7
CLAIM
If there is any defect on the cooker within the period of warranty, do not repair it by yourself. Make a claim at a shop in which you bought the cooker or at service
representatives.
METHODS OF UTILISATION AND LIQUIDATION OF PACKAGES
Collection of packages at collecting places in your locality guarantees their recycling.
LIQUIDATION OF AN APPLIANCE FOLLOWING ITS LIFE EXPIRATION
This appliance is marked in accordance with Directive 2012/19/EU on waste electrical and electronic equipment - WEEE.
After the expiry of its useful life deliver the appliance to the collecting place for used electric and electronic equipment.
The appliance contains valuable materials which ought to be reused or recycled, so once your appliance is of no use to you deliver it to the authorized scrap dealer for further
treatment.
ELECTRICAL CONNECTION
CONNECTION OF AN APPLIANCE TO MAINS
Your cooker should have been checked to ensure that the voltage corresponds with your supply voltage, this is stated on the rating label, positioned on the rear panel of the
cooker.
The cooker must be connected by a qualified electrician to a suitable double pole control unit with a minimum rating of 32A with a minimum contact clearance of 3mm in all
poles, which should be fitted adjacent to (but not above) the cooker, in accordance with IEE regulations. The power supply cable should conform to BS6004. We recommend
P.V.C insulated twin and earth cable with a conductor size of 4mm2. The maximum size of cable that can be used is 10mm2.
The control unit should be easily accessible in the event of an emergency.
The appliance conforms to EN55014 regarding suppression of radio and television interference.
WARNING!
THIS APPLIANCE MUST BE EARTHED!

8
INSTALLATION OF AN ELECTRIC COOKER
CONNECTION
Using a screwdriver open the connector cover at the rear of the appliance. The cover is released by releasing the two locks located at either side of the connector bottom.
Pass the supply cable through the cable clamp and connect to the appropriate terminals shown in the diagram below. Ensure all terminal screws are tight.
Tighten the screws on the cable clamp and replace the cover.
IMPORTANT NOTICE
At any electric cooker disassembly or assembly besides its current use it is necessary to disconnect the appliance from mains and to keep it out of service.
IN INSTALLATION OF THE APPLIANCE, IT IS NECESSARY TO DO IN THE LIGHT OF ITS DUTY CHIEFLY THE FOLLOWING:
Verification of the correctness of mains connection,
A check on the duty of heaters, control and governing elements,
Presentation to the client of all functions of the appliance and familiarisation with its service and maintenance.
NOTICE:
The electric cooker is a Class I appliance according to the electric current injury prevention degree and must be interconnected with the mains protective conductor.
The cooker must be installed in accordance with the regulations in force.
It is essential that this appliance is earthed.

9
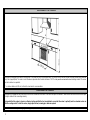
LOCATION OF THE COOKER
The appliance is designed for location in the kitchen line. The cooker can be set in the normal areas. The cooker can from the point of view of thermal resistance be positioned
on any floor (support plate). The cooker can be fit between cupboards with a thermal resistance of 100 °C or they must be covered with a heat-insulating material. The cooker
must not be located on a pedestal.
"X" - a minimum distance of 650 mm, further to the hood maker's recommendation
LEVELLING THE COOKER
The appliance is supplied with four plastic feet, which must be screwed into the corners of the oven base prior to installation. These feet are used to level the oven and adjust
its height in relation to the surrounding cabinetry.
It is important that the cooker is placed on a firm level surface and that the feet, are adjusted to ensure that the cooker is perfectly level. An unleveled cooker can
affect the cooking results. To level the cooker, simply adjust the feet, screwing up or down as required.
WARNING!! In order to prevent tipping of the appliance, this stabilizing means must be installed.

10
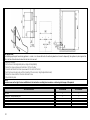
INSTALLATION:
The stabilizing agent against overturning appliances - console - is as shown attached to the wall using dowels and screws. Subsequently, the appliance is placed against the
wall so that the attached bracket inserted into the hole in the rear wall.
Installation procedure:
Set the stove to the designated place, or align with adjustability
Pull out the stove and measure the distance "A" from the floor
Screw the wall bracket as shown (one screw into the center of the slot)
Push the stove into place and verify functionality of the console (or height-adjustable bracket)
Pull out the stove and attach the second bracket screw
Stove slide into place
NOTE:
The maker reserves the right of minor modifications in the instructions resulting from innovations or technological changes of the product.
ACCESSORIES
E52108AW
E52108GW
Wire shelf
+
+
Backing pan – deep enameled pan
+
+
Multipurpose grid
+
+
Pan handle
+
+
Set of adjustable feets
+
+

11
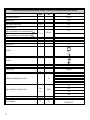
FICHE, REGULATION (EU) NO 65/2014 AND PRODUCT INFORMATION REGULATION (EU) NO 66/2014
Symbol
Unit
Value
Supplier’s name or trade mark
GORENJE
Model identification
E52108
Energy Efficiency Index per cavity
EEIcavity
119,1
Energy efficiency class
B
Energy consumption during a cycle in conventional mode
EC electric cavity
kWh/cycle
0,92
Energy consumption during a cycle in fan-forced mode
-
Number of cavities
1
Heat source per cavity
Electricity
Volume per cavity
V
l
53
Type of oven
Type of hob
Number of cooking zones and/or areas
4
Heating technology
EE electric
burner
solid plates
The diameters of cooking zones and / or areas
cm
18,0
14,5
18,0
14,5
Energy consumption per cooking zone or area
ECelectric
cooking
Wh/kg
191,4
208,3
210,9
208,3
Energy consumption for the hob
EE electric hob
Wh/kg
204,7
Mass of the appliance
M
kg
E52108AW – 38,0
E52108GW – 36,5

12
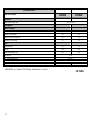
TECHNICAL DATA
ELECTRIC COOKER
E52108AW
E52108GW
Dimensions
Height / Depth / Weight (mm)
900 / 500 / 605
Cooking plate
Electric hot plates
Left rear Ø 145 mm (kW)
1,0
1,0
Left front Ø 180 mm (kW)
1,5
1,5
Right rear Ø 180 mm (rapid) (kW)
2,0
2,0
Right front Ø 145 mm (kW)
1,0
1,0
Oven
Top heating (kW)
0,75
0,75
Grill (kW)
1,85
1,85
Bottom heating element (kW)
1,10
1,10
Oven light (W)
25 W
Min. / max temperature oven
50 / 250° C
Nominal power supply voltage
230 – 240 V AC, 50 Hz
Total power of the appliance (kW)
7,40
7,40
MORA MORAVIA, s.r.o., Nádražní 50, 783 66 Hlubočky – Mariánské Údolí, Czech republic SAP 254454


-
 1
1
-
 2
2
-
 3
3
-
 4
4
-
 5
5
-
 6
6
-
 7
7
-
 8
8
-
 9
9
-
 10
10
-
 11
11
-
 12
12
-
 13
13
-
 14
14
-
 15
15
-
 16
16


Ask a question and I''ll find the answer in the document
Finding information in a document is now easier with AI
Other documents
-
SMANIA Multifunctional Electric Cooker Hotpot User manual
-
Glen E297 Owner's manual
-
999 CKE5015W User manual
-
Electrolux CKE5015W User manual
-
Zanussi ZCE560NW1 User manual
-
-
Novamatic FH66-412K User manual
-
-
-