Page is loading ...

Product Mounting Disclaimer
Gamber-Johnson is not liable under any theory of contract or tort law for any loss, damage, personal injury, special, incidental or consequential damages for personal injury or other damage
of any nature arising directly or indirectly as a result of the improper installation or use of its products in vehicle or any other application. In order to safely install and use Gamber-Johnson
products full consideration of vehicle occupants, vehicle systems (i.e., the location of fuel lines, brakes lines, electrical, drive train or other systems), air-bags and other safety equipment is
required. Gamber-Johnson specifically disclaims any responsibility for the improper use or installation of its products not consistent with the original vehicle manufactures specifications
and recommendations, Gamber-Johnson product instruction sheets, or workmanship standards as endorsed through the Gamber-Johnson Certified Installer Program.
INST-710
REV. C
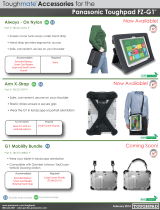
Vinyl Caps
(Optional)
Support Braces
L Clips
Alternate
Positioning
Locations
Lockable Latch
(Unlocked)
Retaining Clips
NOTE: L Clips can
be inverted to
accomodate
various tablet sizes.
#8 Mounting Hardware
This instruction sheet is for the following products:
ITEM NO. 7160-0774-STANDARD
ITEM NO. 7160-0774-01-SECURITY
INSTALLATION INSTRUCTIONS
Product
Revision
Form
If you need assistance or have questions, call Gamber-Johnson at 1-800-456-6868
Printing Spec:
PS-001
7160-0774-xx:
TabCruzer
®
Mini
Tabcruzer® Mini Universal Tablet Mount 7160-0774 will accomodate tablets 6.9" to 11.2" in width, 4.3" to 8.2" in
depth, and 0.2" to 0.7" thick.
The Tabcruzer® Mini hold-down clips and key lock are designed to securely hold the tablet in the mount and deter
theft, not prevent it. Gamber-Johnson recommends removing your tablet from the vehicle when not in use.
Hex (Allen) wrench is needed to adjust clip location and position. 1/4-20 mounting hardware provided is used to
attach the Tabcruzer® Mini to Gamber-Johnson Motion Attachments.
The retaining clips, vinyl caps, and support braces are all assembled using #8 flat washers and #8-32 socket head
nylon patch screws (or security screws).

Mounting:
The TabCruzer
®
Mini Universal Tablet Cradle is
designed to be used with Gamber-Johnson
motion attachments, poles, vehicle bases,
and forklift mounts.
Four 1/4" flat washers, 1/4" lock washers, and
1/4-20 hex head screws are supplied in the
hardware bag to secure the cradle to
Gamber-Johnson motion attachments, as
shown in Figure 1.
Figure 1
NOTE: Two additional retainer clips are provided
in the hardware bag to reduce the footprint of
the TabCruzer
®
Mini if a smaller tablet (4.3" to 6.2"
in depth) is being used.
Simply replace two support brace assemblies
and L clips with the additional retainer clips in an
inverted orientation as shown in Figure 2.
Adjust height of the inverted retainer clips so
they are flush with the top surface of the tablet.
Figure 2
Inverted
Retainer
Clips
Adjusting TabCruzer
®
Mini Universal Tablet Cradle
If the latch on the TabCruzer
®
Mini is locked, unlock the unit with the supplied keys. All
TabCruzer
®
Mini's are keyed alike. Unlatch by turning the lock body clockwise 90 degrees.
Pull the lock side of the TabCruzer
®
Mini to the right to open the deck.
Loosen adjustment screws securing retaining clips, and L clips enough to move them. Four
optional vinyl caps are included in the hardware bag to place over L clips to protect the
tablet.
Place the tablet on the TabCruzer
®
Mini deck. Slide the tablet tight against the retaining clips
opposite the lock. Center tablet on the deck and proceed to adjust bottom and top L clips
so the tablet fits evenly and snuggly between them. Tighten adjustment screws of the L clips
so they are snug.
Push the lock side of the deck until the retaining clips come in contact with the tablet. Lower
all retaining clips until they come in contact with the tablet and snuggly tighten adjustment
screws.
NOTE: Do not over tighten adjustment screws. Tighten adjustment screws so they are snug.
After all adjusments, push the unit together (compressing the computer between retaining
clips) turn the lock body 90 degrees counter-clockwise to secure the unit.
/