Page is loading ...

Operating and installation instructions
EWFS Piccolo FZL
Keep for future use!
Valid from 01 december 2017
816818_g•en•2017-12-01
We reserve the right to carry out improvements
1
General information
Fig. 1 EWFS Piccolo FZL
The Piccolo FZL EWFS radio receiver is an electronic
control device for the direct actuation of 230 V AC sun
shading drives. It can receive move commands from
EWFS-compatible transmitters. The switching contacts
are floating. The receiver is supplied with 24 V DC either
via an existing control line, a floor distribution control or a
power supply unit. The receiver can be operated by means
of an overriding sun shading control system. Because of
its compact design, the receiver can be installed in a flush-
mounted junction box.
Intended use
The Piccolo FZL EWFS radio receiver was developed to
control sun shading systems. The approval of the manu-
facturer must be obtained for uses outside of the purpos-
es listed in these instructions.
Safety instructions
ARNINGW
The electrical installation must be per-
formed by a certified electrician in
accordance with the electrical installation
regulations published by the Associa-
tion of German Electrical Engineers (VDE
0100) or the standards and regulations of
the country in which the device is being
installed. The electrician must observe the
installation instructions included with the
electrical device.
ARNINGW
If hazard-free operation cannot be assumed,
the device may not be started or must be deac-
tivated. This is the case if
the housing or the supply lines show
signs of damage
the device is no longer working.
AUTIONC
Never activate buttons on your transmitter
arbitrarily without visual contact to the sun
shading product. Children may not play with
this product - Remote controls or transmit-
ters may not get into the hands of children!
The radio control range is limited by legal regulations for
radio systems and by structural factors. Adequate radio
reception must be ensured when planning the project.
This applies especially if the radio signal must penetrate
through walls and ceilings. The control unit should not be
installed in the immediate vicinity of metal components
(steel beams, steel-reinforced concrete, fire door).
Therefore, check that the receiver is functioning prop-
erly before the final installation.
Strong local transmitter systems (e.g. baby monitors or
neighbouring transmitters) can interfere with the reception.
Function
RTL (radio time mode):
This mode is useful for slat products: By briefly activat-
ing (approx.0.6seconds) the "Up" or "Down" button on
the transmitter, you can adjust the sun shading product in
small steps. This function can be used with slat products
to tilt the slats. If the button continues to be activated, the
radio time mode switches to the lock mode. The button
may then be released. The sun shading system moves
until the fixed run time of three minutes has expired. To
release the lock and stop the motor, the button for the op-
posite direction of movement or the stop button must be
pressed briefly.
Central operation
The local operation is blocked for the duration of a central
command; any current move commands are deleted.

816818_g•en•2017-12-01We reserve the right to carry out improvements
2
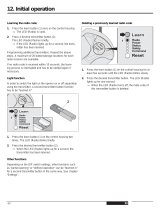
Symbols used
When the receiver is delivered, it does not "know" any
transmitters initially and first needs to learn to which
transmitters it should respond. We refer to this process as
"learning".
Explanation of symbols
Power-up: For the learning procedure, you must
electrically isolate a receiver or a group of re-
ceivers, either at the in-line circuit breaker or at
the associated plug-in connector, and then re-
connect it again after approx. 5 seconds. (Pow-
er-up procedure). Always carry out a power-up
procedure when you see the symbol of the cir-
cuit breaker.
The receiver is now in learn mode for approx.
one minute. The learn button on the transmitter
must be pushed within this period or the learn-
ing mode is closed. Push the learn button on
your transmitter whenever you see the symbol of
the learn button.
Wave: After the learn button on the transmitter
is activated, the connected sun shading system
carries out several movements. In these instruc-
tion, we use the adjacent symbol for waving.
Waving once: Press the learn button on the
transmitter, wait until the connected sun shading
system moves and then release the button im-
mediately.
Learning in the master channel
You can either learn in a 1-channel transmitter or one
channel of an 8-channel transmitter in a receiver as master
channel. With an 8-channel transmitter, you only need to
make sure that you first select the desired channel, as the
following example shows.
How to learn channel 1 of an 8-channel hand-
held transmitter into a receiver:
Place the receiver into
learn mode: Perform the
power-up procedure on the
receiver.
Learn in the transmitter:
Take the transmitter, select
channel 1, push and hold
the learn button, the sun
shading waves once, re-
lease the button.
Result: You can now operate the receiver with channel 1
of the transmitter.
1
Ι
Forming a group
To operate two external venetian blinds with an 8-channel
hand-held transmitter (I) as follows:
Channel1 controls external venetian blind1 (master
channel)
Channel2 controls external venetian blind2 (master
channel)
Channel3 controls both external venetian blinds to-
gether (auxiliary channel)
1
1
2
ΙΙ Ι
2
3
12
= Master channel = Auxiliary channel
Fig. 2 Building a group
1st step: Learn in the master channel
One master channel must be learned into each receiver
before you can form a group. As described in the section
"Learning in the master channel", learn channel 1 into re-
ceiver 1 as a master channel and channel 2 into receiver
2 as a master channel.
OTICEN If this is not possible because the power-up
procedure cannot be performed separately for
the receivers, the master channels must be
learned in by means of "patent learning". Infor-
mation on this procedure can be found in the
"Application brochure" at http://www.warema.
de→Produkte→Steuerungssysteme→
Funksysteme.
2nd step: Learn in the auxiliary channel
You can now operate the external venetian blinds sepa-
rately, and each learned channel is a master channel in
the respective receiver. If the learn button is pushed with
this master channel, the learn mode can be started and
an auxiliary channel can be learned into the respective
receiver even without the power-up procedure. If the same
auxiliary channel, e.g. channel 3, is now learned into
each receiver, both external venetian blinds can later be
operated as a group with channel 3 but they can still be
operated separately via the master channels 1 and 2. The
next step is to learn in the auxiliary channels:

3
816818_g•en•2017-12-01 We reserve the right to carry out improvements
Learning channel 3 into external venetian blind 1
Place receiver1 into
learn mode: Select chan-
nel1, press and hold the
learn button, external vene-
tian blind1 waves once,
release the button.
Learn channel3 as an
auxiliary channel: Select
channel3. Press and
hold the learn button,
external venetian blind1
waves once, release the
button. Channel3 is now
an auxiliary channel for
external venetian blind1.
End the learn mode: Se-
lect channel1 and press
the "Up" or "Down" button.
Result: External venetian blind1 now can also be oper-
ated with channel3.
Learning channel 3 into external venetian blind 2
Place receiver2 into
learn mode: Select chan-
nel2, press and hold the
learn button, external vene-
tian blind 2 waves once,
release the button.
Learn channel3 as an
auxiliary channel: Select
channel3, press and
hold the learn button,
external venetian blind2
waves once, release the
button. Channel3 is now
an auxiliary channel for
external venetian blind2.
End the learn mode: Se-
lect channel2 and press
the "Up" or "Down" button.
Result: External venetian blind2 now can also be oper-
ated with channel3.
1
Ι
3
Ι
1
Ι
2
Ι
3
Ι
2
Ι
Delete auxiliary channel
You can delete all auxiliary channels learned into the
receiver if you have committed an error and you want to
start over again. Note the following example:
1
1
2
ΙΙ Ι
2
3
12
= Master channel = Auxiliary channel
Fig. 3 Auxiliary channels in receiver 1 and 2 are to be deleted.
Carry out the following operation steps consecutively
with the respective master channel:
Delete all auxiliary chan-
nels in receiver 1: Select
master channel 1, push
the learn button and hold
it for at least 20 seconds
until the external venetian
blind no longer carries out
any movement!
End the procedure: Se-
lect channel1 and press
the "Up" or "Down" button.
Delete all auxiliary chan-
nels in receiver 2: Select
channel 2, push the learn
button and hold it for at
least 20 seconds until the
external venetian blind
no longer carries out any
movement!
End the procedure: Se-
lect master channel 2 and
push the "Up" or "Down"
button.
Result: All auxiliary channels in receiver 1 and receiver 2
were deleted.
OTICEN Only one master channel and 15 auxiliary
channels can be learned into each receiver.
The master channel cannot be deleted but only
be overwritten with a new channel. The auxiliary
channels are not deleted when you learn in a
new master channel. The weather station can
be learned in as an auxiliary channel.
1
Ι
1
Ι
2
Ι
2
Ι

816818_g•en•2017-12-01We reserve the right to carry out improvements
4
Heartbeat function
When a weather station is learned into the device, the
heartbeat function becomes active. The weather station cy-
clically sends a so-called "heartbeat pulse" to all receivers
into which the weather station was learned. If the power
supply of the weather station fails, for example, the station
does not send a heartbeat. The receiver may also fail to
receive a heartbeat pulse from a learned weather station
when the installation situation is unfavourable. If a heart-
beat signal does fail to arrive for 24 h, this is considered
by the receiver to be a weather station failure and the sun
shading system is raised for safety reasons. In this phase,
the sun shading system cannot be operated as usual:
When it is lowered manually, the movement is stopped
automatically after approx. 5seconds. Pressing the button
again causes the same reaction. The sun shading system
can be raised as usual. This is a safety function and not
an error.
AUTIONC
If you force the sun shading system to move
down by repeatedly activating the DOWN
button when the weather station has failed,
the safety functions are not active. The sun
shading system may become damaged (e.g.
due to high winds).
Special functions
Manifold special functions are additionally possible in
WAREMA EWFS. Should you wish further information, your
specialist dealer will be pleased to give you the applica-
tion brochure.
The "A", "B" and "C" function buttons
Function button "A" of the transmitter can be used to
switched off the sun control temporarily if you additionally
use the EWFS Weather station in your system.
Temporary deactivation of the sun control:
Press the "A" button of the transmitter and hold until
the sun shading system stops moving. Release the but-
ton again. The sun control is now switched off for 12
hours. After this period, the sun control is reactivated
again automatically.
Activate the sun control again:
Press and hold the "A" button of the transmitter. Re-
lease the button again when the sun shading system
waves. The sun control is active again. If the automatic
system was already active, nothing changes.
The "A", "B" and "C" buttons of this transmitter have no
function.
Installation
The receiver is designed for installation in a flush-mounted
junction box 80 x 80 mm. Only lines used for the wiring
of the receiver should be routed into this box. The unit is
electrically connected according to the wiring diagram on
the reverse. The lines are connected via spring terminals.
Electrical installation
An on-site overload current disconnecting and isolating
switch to switch off the entire system must be provided.
Commissioning
Films on commissioning can be found at:
http://www.warema.de/Produkte/Steue-
rungssysteme/Funksysteme/
Complete the installation and apply the supply voltage.
The device is operational.
Maintenance
There are no parts within the device that require mainte-
nance.
Liability
Failure to comply with the product information in these
instructions and use of the device in a manner that con-
travenes its intended use and purpose may result in the
manufacture refusing to honour warranty claims for prod-
uct damage. In this case, liability for consequential harm
to persons or damage to property will also be excluded.
Follow also the instructions in the operating manual of
your sun shading system. The automatic or manual opera-
tion of the sun shading system when iced over as well as
using the sun shading system during severe weather may
cause damage and must be prevented by the user by tak-
ing suitable precautions.
Disposal
After its use, the device must be disposed of according to
legal regulations or returned to your local recycling centre!
User information
The device is approved for use in the following countries:
A, B, D, DK, E, F, FIN, GB, GR, I, IRL, L, NL, P, S, CH, IS, N

5
816818_g•en•2017-12-01 We reserve the right to carry out improvements
Troubleshooting
EWFS
Piccolo FZL
Help with malfunctions
Type of malfunc-
tion
Possible cause
Remedy
Transmission
LED of the trans-
mitter does not
light up
Battery inserted
with wrong polari-
ty or depleted
Insert batteries
correctly, read
the operating in-
structions, insert
new batteries
Move commands
of the transmitter
are not executed
Transmitter has
not been learned
in
Learn the trans-
mitter as de-
scribed in the in-
structions
The wrong chan-
nel was selected
Select the correct
channel and then
repeat the move
command
Interfering ambi-
ent influences
Reduce the trans-
mitter-receiver dis-
tance
Receiver is not
supplied with line
voltage
Switch on the
power supply
Move commands
are executed only
sporadically
Interference
through external
transmitter
Switch off external
transmitter (e.g.
Babyphone)
There are rein-
forced concrete
covers or walls lo-
cated between the
transmitter and re-
ceiver
Reduce the dis-
tance to the re-
ceiver
Sun shading sys-
tem moves up au-
tomatically.
The sun shad-
ing system stops
after 5 seconds
when moving
DOWN.
Active heartbeat:
No communica-
tion with a lear-
ned-in weather
station for 24 h.
Check that the
weather station is
functioning cor-
rectly
Technical data
EWFS Piccolo FZL Min. typ. Max. Unit
24 V DC supply
Operating voltage 20 24 30 V DC
Current consumption 10 29 mA
Floating output
Switching capacity at
230 V AC / cosϕ = 0.6
700 VA
Input control
Central voltage active 8 24 38 V DC
Central current active 0.5 1 1.5 mA
Central voltage inactive -0.5 0 3 V DC
HF receiver
Receiving frequency
ASK (OOK)
433.92 MHz
Range
(environment without in-
terference)
30 m
Ambient conditions
Operating temperature -20 60 °C
Storage temperature -20 60 °C
Humidity
(non-condensing)
10 85 %RH
Enclosure
Dimensions in mm
(W x H x D)
48.5 x 30 x 48.5
Degree of protection/
safety class
IP20/II
Miscellaneous
Automatic operation Type 1
Software class A
Location of use Clean ambient conditions
Conformity declaration
Available at www.warema.de
The device meets the EMC guidelines for use in residen-
tial and commercial areas.
Article numbers
EWFS Piccolo FZL 1002 626
WAREMA Renkhoff SE
Hans-Wilhelm-Renkhoff-Strasse 2
D-97828 Marktheidenfeld
Deutschland

816818_g•en•2017-12-01We reserve the right to carry out improvements
6
UP
DOWN
Central down
Central up
+ 24 V DC
+24 V DC
0 V
0 V
PE
L1
N
PE
L2
N
Power line
230 V AC
to next
EWFS Piccolo PL/FZL
to next
EWFS Piccolo PL/FZL
Motor 1
1
1
2
2
3
3
1
2
3
M 1~
Terminal
Plug and socket connection
Motor 2
1
1
2
2
3
3
1
2
3
M 1~
Plug and socket connection
Motor 3
1
1
2
2
3
3
1
2
3
M 1~
Plug and socket connection
PPCC
X1
C
0
0
+
+
Motor
230V~
X2
X4
Zentral
24V=
Netz
230V~
Funk-Empfänger
EWFS Piccolo PL/FZL
F
L2
PE
N
Power line (2. Phase)
230 V AC 50 Hz / 6 A
bl
gnyl
br
bk
bl
gnyl
br
bk
bl
gnyl
br
bk
F
PPCC
X1
C
0
0
+
+
Motor
230V~
X2
X4
Zentral
24V=
Netz
230V~
Funk-Empfänger
EWFS Piccolo PL/FZL
PPCC
X1
C
0
0
+
+
Motor
230V~
X2
X4
Zentral
24V=
Netz
230V~
Funk-Empfänger
EWFS Piccolo PL/FZL
The "C" terminals
are bypassed internally
Important instructions:
When using multiple radio receivers, the distance between the receivers
must be at least 0.5m! For optimal reception, the device must be
installed such that the connection terminals are visible.
Max. 5 drives with a rated motor current of 1 A can be connected
to a B6A in-line circuit breaker.
When switching outputs are connected with 230 V AC:
When using control line type YR or JY (St) Y or
lines that are subject to VDE 0815, the enclosed silicon tubes must be
pulled over the wires of the 24 V control line.
Power line
230 V AC 50 Hz / 6 A
0 V
Additional wiring variants
can be found in the wiring
diagram document,
art. no. 816 345
Attention!
Only one drive may be
connected per MSE.
10
11
12
13
14
15
16
DOWN
UP
0 V
24 V DC
P
0
Control
E
Floor distribution control (GA)
standard/run time
Connection to:
Floating contacts of the
sun shading control system /
floor distribution control
(GA) Compact
24 V DC
230 V AC
24 V DC
DOWN
UP
E
P/C
Legend:
4 x 2 x 0,8 mm ∅ shielded, single-wire
2 x 2 x 0,8 mm ∅ shielded, single-wire
H05RR-F4G 0,75 bk, Type WAREMA
3 x 1,5 mm
2
UP
DOWN
Attention!
The supply voltage of 24 V DC
must be SELV voltage in
accordance with VDE 0700-1
or EN 60335-1.
Fig. 4 Wiring diagram
/