
Congratulations, you and your Mac mini
were made for each other.

Say hello to your Mac mini.
www.apple.com/macmini
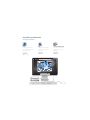
finder
Finder
Browse your files like
you browse your music
with Cover Flow.
Mac Help
Mail
Manage all your email
accounts in one place.
Mac Help
mail
iCal and Address Book
Keep your schedule and
your contacts in sync.
Mac Help
isync

iLife
www.apple.com/ilife
Time Machine
Automatically
back up and
restore your files.
Mac Help
Spotlight
Find anything
on your Mac.
Mac Help
time machine
spotlight
Safari
Experience the web
with the fastest
browser in the world.
Mac Help
safari
Quick Look
Instantly preview
your files.
Mac Help
quick look
iPhoto
Organize and
search your
photos by faces,
places, or events.
iPhoto Help
photos
iMovie
Make a great-
looking movie in
minutes or edit
your masterpiece.
iMovie Help
movie
GarageBand
Learn to play.
Start a jam session.
Record and mix
your own song.
GarageBand Help
record
iWeb
Create custom
websites and publish
them anywhere with
a click.
iWeb Help
website
Mac OS X Snow Leopard
www.apple.com/macosx


Contents
5
Contents
Chapter 1: Ready, Set Up, Go
10
What’s in the Box
11
Setting Up Your Mac mini
17
Setting Up DVD or CD Sharing
18
Migrating Information to Your Mac mini
21
Getting Additional Information onto Your Mac mini
24
Putting Your Mac mini to Sleep or Shutting It Down
Chapter 2: Life with Your Mac mini
28
What’s on the Front of Your Mac mini
30
What’s on the Back of Your Mac mini
32
Using the Apple Remote
33
Getting Answers
Chapter 3: Problem, Meet Solution
40
Problems That Prevent You from Using Your Mac mini
42
Reinstalling the Software That Came with Your Mac mini
43
Reinstalling Software Using Remote Install Mac OS X
46
Other Problems
47
Using Apple Hardware Test

6
Contents
48
Problems with Your Internet Connection
51
Problems with AirPort Extreme Wireless Communication
52
Keeping Your Software Up to Date
52
Learning More, Service, and Support
54
Locating Your Product Serial Number
Chapter 4: Last, but Not Least
57
Important Safety Information
60
Important Handling Information
62
Understanding Ergonomics
64
Apple and the Environment
65
Regulatory Compliance Information
Looking for Something?
70
Index

1
1
Ready, Set Up, Go
www.apple.com/macmini
Mac Help Migration Assistant


Chapter 1
Ready, Set Up, Go
9
Your Mac mini is designed so that you can easily set it up and start using it right away.
If you’ve never used a Mac mini or are new to Mac computers, read this section for
instructions about getting started.
Important:
Read all the installation instructions and the safety information starting on
page 57 before you plug your Mac mini into a power outlet.
If you’re an experienced user, you may already know enough to get started. Be sure to
look over the information in Chapter 2, “Life with Your Mac mini,” to find out about the
features of your Mac mini.
Answers to many questions can be found on your Mac mini in Mac Help. For
information about Mac Help, see “Getting Answers” on page 33.

10 Chapter 1
Ready, Set Up, Go
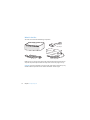
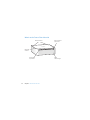
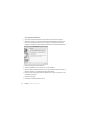
What’s in the Box
Your Mac mini comes with the following components:
Before you set up your Mac mini, remove the protective film from the outside of your
computer and power adapter. Follow the steps on the next several pages to set up.
Important:
Don’t place anything on top of your Mac mini. Objects placed on top may
interfere with the optical drive or the AirPort or Bluetooth
®
wireless signal.
Mini-DVI to
DVI Adapter
Power adapter
AC cord

Chapter 1
Ready, Set Up, Go
11
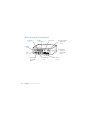
Setting Up Your Mac mini
Position your Mac mini so that it’s right side up or on its side, but not upside down. Use
the power adapter that came with your Mac mini; other power adapters may not work.
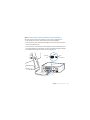
Step 1: Plug the AC cord into the power adapter, plug the cord from the power
adapter into your Mac mini, and then plug the power adapter into a grounded
power outlet.
®

12 Chapter 1
Ready, Set Up, Go
Step 2: To access the Internet or a network, connect one end of an Ethernet cable
to your Mac mini and the other end to a cable modem, DSL modem, or network.
Your Mac mini comes with AirPort Extreme technology for wireless networking.
For information about setting up a wireless connection, choose Help > Mac Help,
and search for “AirPort.”
®

Chapter 1
Ready, Set Up, Go
13
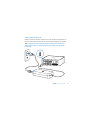
Step 3: Connect the USB cable from your keyboard and mouse.
Your Mac mini doesn’t come with a keyboard or a mouse, but you can use almost
any USB keyboard and mouse. If your keyboard has a USB (d
) port, plug your mouse
into the USB port on the keyboard. If it doesn’t, plug the mouse into a USB (d
) port on
the back of your Mac mini.
®

14 Chapter 1
Ready, Set Up, Go
You can use Keyboard preferences to change the behavior of the Caps Lock, Control,
Option, and Command (x
) modifier keys. To open Keyboard preferences, choose
Apple (
) > System Preferences, click Keyboard, then click Modifier Keys and follow
the onscreen instructions.
If you use a USB keyboard that isn’t specifically designed for the Mac OS, it may not
have a Command (x
) or Option modifier key, which are standard on Apple keyboards.
If you have a keyboard from another manufacturer:
Â
The Windows key (the icon on the key looks like a Windows logo) is equivalent to the
Command (x
) modifier key on an Apple keyboard.
Â
The Alt key is equivalent to the Option modifier key on an Apple keyboard.
Using a USB mouse or keyboard from another manufacturer may require software
drivers. Check the manufacturer’s website for the latest software drivers.
Using a Wireless Keyboard or Mouse
If you purchased an Apple Wireless Keyboard or Mouse with your Mac mini, follow the
instructions that came with the keyboard and mouse to set them up with your
Mac mini.

Chapter 1
Ready, Set Up, Go
15
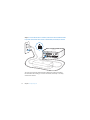
Step 4: Connect a display cable to the Mini-DVI port or Mini DisplayPort.
Your Mac mini doesn’t come with a display. You can connect a display that has:
Â
A Mini DisplayPort connector. Connect directly to the Mini DisplayPort.
Â
A DVI connector. Use the Mini-DVI to DVI Adapter that came with your Mac mini to
connect to the Mini-DVI port.
Â
A VGA connector. Use the Mini-DVI to VGA Adapter to connect to the Mini-DVI port
or the Mini DisplayPort to VGA Adapter to connect to the Mini DisplayPort. Adapters
are available at www.apple.com/store or your local Apple Store.
®
Mini-DVI
port
Mini
DisplayPort

16 Chapter 1
Ready, Set Up, Go
Step 5: Press the power (®
) button on the back to turn on your Mac mini.
Step 6: Configure your Mac mini with Setup Assistant.
The first time you turn on your Mac mini, Setup Assistant starts. Setup Assistant helps
you enter your Internet and email information and set up a user account on your
Mac mini. If you already have a Mac, Setup Assistant can help you automatically
transfer user accounts, files, applications, and other information from your previous
Mac using an Ethernet, FireWire, or a wireless connection.
®
®

Chapter 1
Ready, Set Up, Go
17
If you don’t intend to keep or use your other Mac, it’s best to deauthorize it from
playing music, videos, or audiobooks that you’ve purchased from the iTunes Store.
Deauthorizing a computer prevents any songs, videos, or audiobooks you’ve purchased
from being played by someone else, and frees up another authorization for use. For
information about deauthorizing, choose iTunes Help from the Help menu in iTunes.
If you don’t use Setup Assistant to transfer information when you first start up, you can
do it later using Migration Assistant. Go to the Applications folder, open Utilities, and
double-click Migration Assistant.
Step 7: Customize your desktop and set your preferences.
You can easily make your desktop look the way you want using System Preferences,
your command center for most settings on your Mac mini. Choose Apple (
) > System
Preferences from the menu bar, or click the System Preferences icon in the Dock. For
more information, open Mac Help and search for “System Preferences” or for the
specific preference you want to change.
Setting Up DVD or CD Sharing
If your ordered your Mac mini without the optional SuperDrive, you can use DVD or CD
sharing to partner with another Mac or Windows computer that has an optical disc
drive and is on the same wired or wireless network. Use this other computer to:
Â
Migrate information to your Mac mini, if the other computer is a Mac (see “Migrating
Information to Your Mac mini” on page 18)
Â
Share the contents of DVDs or CDs or install applications (see “Sharing Discs with
DVD or CD Sharing” on page 21)

18 Chapter 1
Ready, Set Up, Go
Â
Remotely install Mac OS X (see “Reinstalling Software Using Remote Install Mac OS X”
on page 43) or use Disk Utility (see “Using Disk Utility” on page 46)
The computer with the optical drive can be a Mac with Mac OS X v10.4.11 or later, or a
Windows XP or Windows Vista computer. If the Mac has Mac OS X v10.5.5 or later, DVD
or CD Sharing is already installed. You can partner with more than one other computer.
If the other computer is a Windows computer or a Mac with a Mac OS X version earlier
than 10.5.5, insert the
Mac OS X Install DVD
that came with your Mac mini to install the
DVD or CD Sharing Setup, which includes software for DVD or CD Sharing, Migration
Assistant, and Remote Install Mac OS X:
Â
If the other computer is a Windows computer, choose “DVD or CD Sharing” from the
Install Assistant that starts automatically.
Â
If the other computer is a Mac, double-click the DVD or CD Sharing Setup package on
the
Mac OS X Install DVD
.
Important:
After you install the DVD or CD Sharing Setup package on your other Mac,
make sure you have the latest software by choosing Apple (
) > Software Update.
Install any available Mac OS X updates.
Migrating Information to Your Mac mini
You can migrate existing user accounts, files, applications, and other information from
another Mac computer.
To migrate information to your Mac mini:
1
Configure the other Mac (see page 17), and then make sure that it is turned on and
that it is on the same wired or wireless network as your Mac mini.

Chapter 1
Ready, Set Up, Go
19
Check the AirPort (Z
) status icon in the menu bar at the top of the other Mac screen
to see what wireless network you’re connected to. Choose the same network for your
Mac mini during setup.
2
On your Mac mini, follow the Setup Assistant onscreen instructions until you get to the
“Do You Already Own a Mac?” screen. Select “from another Mac” as the source of the
information you want to transfer. On the next screen, choose your wireless network,
and then click Continue.
3
When you see the Connect To Your Other Mac screen with a passcode displayed, do
the remaining steps on the other Mac. You will enter the passcode in Migration
Assistant on the other Mac.

20 Chapter 1
Ready, Set Up, Go
4
On the other Mac, open Migration Assistant (located in /Applications/Utilities/), and
then click Continue.
5
When you are prompted for a migration method, select “To another Mac”, and then
click Continue.
6
On the other Mac, quit any other open applications and then click Continue.
7
On the other Mac, enter the six-digit passcode displayed in Setup Assistant on your
Mac mini.
You can choose the items (user accounts, documents, movies, music, photos, and so
on) that you want to migrate to your Mac mini.
8
Click Continue to start the migration.
Important:
Don’t use the other Mac for anything else until the migration is complete.
If the connection is terminated during migration, you can resume the migration at a
later time using Migration Assistant on your Mac mini and your other Mac.
Page is loading ...
Page is loading ...
Page is loading ...
Page is loading ...
Page is loading ...
Page is loading ...
Page is loading ...
Page is loading ...
Page is loading ...
Page is loading ...
Page is loading ...
Page is loading ...
Page is loading ...
Page is loading ...
Page is loading ...
Page is loading ...
Page is loading ...
Page is loading ...
Page is loading ...
Page is loading ...
Page is loading ...
Page is loading ...
Page is loading ...
Page is loading ...
Page is loading ...
Page is loading ...
Page is loading ...
Page is loading ...
Page is loading ...
Page is loading ...
Page is loading ...
Page is loading ...
Page is loading ...
Page is loading ...
Page is loading ...
Page is loading ...
Page is loading ...
Page is loading ...
Page is loading ...
Page is loading ...
Page is loading ...
Page is loading ...
Page is loading ...
Page is loading ...
Page is loading ...
Page is loading ...
Page is loading ...
Page is loading ...
Page is loading ...
Page is loading ...
Page is loading ...
Page is loading ...
Page is loading ...
Page is loading ...
Page is loading ...
Page is loading ...
-
 1
1
-
 2
2
-
 3
3
-
 4
4
-
 5
5
-
 6
6
-
 7
7
-
 8
8
-
 9
9
-
 10
10
-
 11
11
-
 12
12
-
 13
13
-
 14
14
-
 15
15
-
 16
16
-
 17
17
-
 18
18
-
 19
19
-
 20
20
-
 21
21
-
 22
22
-
 23
23
-
 24
24
-
 25
25
-
 26
26
-
 27
27
-
 28
28
-
 29
29
-
 30
30
-
 31
31
-
 32
32
-
 33
33
-
 34
34
-
 35
35
-
 36
36
-
 37
37
-
 38
38
-
 39
39
-
 40
40
-
 41
41
-
 42
42
-
 43
43
-
 44
44
-
 45
45
-
 46
46
-
 47
47
-
 48
48
-
 49
49
-
 50
50
-
 51
51
-
 52
52
-
 53
53
-
 54
54
-
 55
55
-
 56
56
-
 57
57
-
 58
58
-
 59
59
-
 60
60
-
 61
61
-
 62
62
-
 63
63
-
 64
64
-
 65
65
-
 66
66
-
 67
67
-
 68
68
-
 69
69
-
 70
70
-
 71
71
-
 72
72
-
 73
73
-
 74
74
-
 75
75
-
 76
76


Ask a question and I''ll find the answer in the document
Finding information in a document is now easier with AI
Related papers
-
Apple Mac Mini 19 User manual
-
Apple MAC MINI SERVER Owner's manual
-
Apple Mac Pro Product information
-
-
Apple AirPort Networks User manual
-
-
Apple Network Router MD031 User manual
-
Apple MacBook Pro Owner's manual
-
-
Other documents
-
 Wiley 978-0-7645-8971-3 Datasheet
-
Asus MA356*/A User manual
-
 Cideko AVK-02 Datasheet
-
 Wiley 978-0-470-76918-8 Datasheet
-
 Wiley 978-0-470-63788-3 Datasheet
-
Insignia NS-PNM6103-BK-C User guide
-
 Wiley 978-0-470-60737-4 Datasheet
-
Blackmagic DaVinci Resolve 12 Configuration Guide
-
-


