Page is loading ...

INSTALLATION INSTRUCTIONS
MAKE: Jeep
MODEL: Wrangler Unlimited (JKU)
YEAR: 2012-2014
ENGINE: V6-3.6L
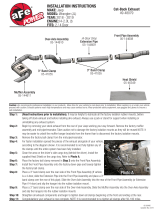
Y-Pipe
48-46207 (409 SS)
“Manual Trans”
48-46208 (409 SS)
“Automatic Trans”
1. Support the vehicle on jack stands and disconnect the negative battery terminal from battery.
2. Remove muffler and exhaust pipe section.
3. Remove the bracket under the stock Y-Pipe in front of the lower cross member.
4. Remove the stock Y-Pipe.
5. Remove the skid plate behind the lower cross member.
6. Slide the supplied band clamp over the notched section of the left side aFe Y-Pipe section.
7. Slip the left and right side of the aFe Y-Pipe at the slip joint but do not tighten the band clamp.
8. Using the original bolts, secure the aFe Y-Pipe to the catalytic converters but do not tighten.
Note: The aFe Y-Pipe is relocated behind the lower cross member to accept lift kits to clear the front drive shaft.
9. Install the exhaust pipe and muffler section to the rubber hangers and ensure that all pipe clamps are tight.
10. Now go back and tighten the original Y-Pipe bolts from step 7.
11. Go Back and tighten the band clamp from step 6.
12. Install the skid plate.
13. Install the bracket from step 3.
14. Using the supplied 6”x6” heat shield adhesive, remove the backing and apply to the front left corner of the gas tank. This will keep the heat coming
from the Y-Pipe away from the gas tank.
15. Using one of the supplied 6”x3” heat shield adhesive, wrap one of the plastic lines above the Y-Pipe (Passenger Side) in front of the gas tank.
16. Using the other supplied 6”x3” heat shield adhesive, wrap the other plastic line above the Y-Pipe (Passenger Side) also in front of the gas tank.
17. RE-CHECK ALL YOUR WORK.
18. Remove vehicle off the jack stands and re-connect negative battery terminal.
Tools Needed:
• 15mm Wrench
• 13mm & 18mm Socket
• 3/8” Ratchet
Parts Included:
• Left Assembly (05-44524)
• Right Assembly, Automatic
Transmission (05-44525)
• Right Assembly, Manual
Transmission (05-44756)
• 6”x6” Heat Sheild Adhesive
(05-40110)
• 6”x3” Heat Shield Adhesive x2
(05-40111)
• 2” Band Clamp (05-41235)
CAUTION: Allow time for your vehicle to cool down prior to installation. When working on or under your vehicle proceed with caution. Exhaust systems
reach high temperatures and may cause serious burns. Wear protective safety equipment; eye goggles and gloves to ensure a safe installation. aFe
recommends professional installation on our products.
06-85536
Updated:May 2015
/


