Page is loading ...

Page 1 of 2
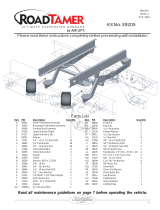
11504.15
97-06 TJ Wrangler Solid Rocker Panels
2. Carefully hold a rocker panel up to the vehicle
and position it by pushing it upward as far as it will
go. It should fit snugly between the factory fender
flares. If the fit is too tight, loosen the flares. After-
market flares may also require loosening to ensure a
proper fit. Once positioned, mark the five side holes
using the rocker panel as a guide. Before drilling,
check inside the vehicle and move any wires that
may be in the way. For 03’-06’ TJ’s, see step 3
before proceeding. Center punch and Drill the five
side holes to 7/16”. Clean any metal chips off the
side of the vehicle. NOTE: to prevent corosion, use
factory touch up paint to cover exposed metal from
drilling.
1. Read all instructions before starting installation. Remove any side steps or panels before getting started.
Also, clean thoroughly any surfaces that will be covered by the rocker panels.
3. For TJ’s 03’-06’, the rear most mounting hole
cannot be reached from inside the vehicle. For these
models use the supplied (2) 10mm rivet nuts. Drill the
rear most holes on each side to 9/16” and Insert the
rivet nut into the hole. Use the supplied rivet bolt tool to
pass through the clearance nut tool and tighten into the
rivet nut. For the rivet nut to collapse use a wrench and
a ratchet placing one on the clearance nut tool to keep it
from spinning and one on the rivet bolt tool. Tighten
until the rivet nut has fully collapsed, remove the rivet
bolt tool and the clearance nut tool and insert a button
head bolt. This bolt will not require a flat washer, lock
washer, or standard nut.
Contents:
1. TJ Solid Rocker Panel (2)
2. 10mm button head bolt (short) (10)
3. 10mm hex head bolt (medium) (4)
4. 10mm hex head bolt (long) (2)
5. 10mm lock washer (10)
6. 10mm flat washer (40)
7. 10mm standard nut (10)
8. 10mm nylock nut (6)
9. 25mm spacer (4)
10. 45mm spacer (2)
11. 10mm rivet nut (2)
12. clearance nut tool (1)
13. rivet bolt tool (1)

Page 2 of 2
4. After drilling the side holes, Place the rocker panel against the side of the vehicle and use the 10mm
black button head bolts with at washers, and standard nuts on the inside of the vehicle. Do not use the lock
washers yet as the rocker panel will be removed after marking the bottom holes. Hand tighten bolts evenly to
secure the rocker panel in position.
5. To mark the three bottom holes, stick a black marker through each hole and mark the vehicle making
sure the mark is aligned vertically with the hole. Remove the rocker panels after the three bottom holes are
marked. Use a center punch to mark each bottom hole so that from inside the vehicle, you can tell where the
hole will be located. Before drilling, pull carpeting back and remove anything that might get in the way of the
drill. Drill the three bottom holes to 7/16” .
6. Re-install the rocker panel by using the 10mm button head bolts with at washers, lock washers, and
standard nuts for the side mounting holes. For the bottom three mounting holes, use the three hex head
bolts with washers, spacers and nylock nuts. The long bolt goes in the bottom center hole with the 45mm
spacer and the 2 medium bolts go in the front and rear bottom mounting holes with the 25mm spacer.
Rugged Ridge Limited Warranty
Applies to Rugged Ridge Products by OMIX-ADA Inc.
Please find warranty card supplied with product for more information. Warranty card
should be filled out and returned to address listed below.
OMIX-ADA Inc.
460 Horizon Dr. Suite 400
Suwanee, Georgia 30024
TM
/