Gemini Cutting Manager User manual

Type
User manual

Gemini Cutting Manager is a software that allows you to control and adjust all functions and parameters for the digital cutting process, helping you cut lines or paths of a PDF vector graphics. With its user-friendly interface, you can easily import PDF files, set cutting parameters, and control the cutting process. Gemini Cutting Manager also offers advanced features such as curve approximation, rotation adjustment, and overcut settings, giving you precise control over the cutting results.

Gemini Cutting Manager is a software that allows you to control and adjust all functions and parameters for the digital cutting process, helping you cut lines or paths of a PDF vector graphics. With its user-friendly interface, you can easily import PDF files, set cutting parameters, and control the cutting process. Gemini Cutting Manager also offers advanced features such as curve approximation, rotation adjustment, and overcut settings, giving you precise control over the cutting results.

USER MANUAL
Gemini cutting manager
(GEMINI CM)
CUTTING MANAGER SOFTWARE
OVERVIEW OF CUTTING MANAGER SOFTWARE PANEL LAYOUT
The Cutting Manager software allows you to adjust and control all the functions and parameters for
the digital cutting process.
The cutting manager allows you to cut lines or paths of a pdf vector graphics.
DEVICE SELECTOR
Whenever you plug two or more units to the same pc, the device selector window will show up, and
it will allow you to select which machine run.
WHILE WORKING WITH MORE UNITS AT THE SAME TIME, PLEASE USE A USB 3.0 HUB
(ALSO PLUGGED TO A USB 3.0 PORT)
1
2
2
3
4 5
6
7
9
10
8
12
13
16
14
15
11
1. This area displays a preview of your PDF cut le
2. The osets allow the user to align the cut to the artwork
3.Open PDF” and “Open last job” buttons permit the user to choose a le
Open last job” opens the last le used on the cutting manager
4. Operation buttons to help control the cutting series
5.Cut test” launches a single cut
6. Control to assist in the alignment of the camera and the pinch rollers
7. In this area the user chooses the number of copies per job run
8 - 9. Working perspective controls and preview
10.Job Library
You can use these two buttons to import or export a whole set of parameters
(cut force, speed, creasing parameters, sheet size, stretch/compress,...)
11. Sheet settings
12. Magenta lines settings (for boxes)
13. Border lines settings
14. Label’s or Pack’s mode switch
15. Mark mode allows you to choose how many marks you want the plotter to check.
You can choose to check no marks, 2 marks or 4 marks. The more marks are
checked the more cutting precision you will have.
16. Advanced options
ADVANCED OPTIONS (16)
17
18
19
20
21
17. Settings
18. Report
19. Set the language interface
20. Restore of plotter settings
21. Shows the software version
Settings (17)
1. Saved alignment oset values. Every time a cutting series is launched, the oset values are
added to the delta.
2. When you launch a cut, if you need to scan marks, after the plotter recieves the sheet from the
feeder, the plotter moves on the rst mark to start the scanning process. Sometimes the plotter’s
head may not move always on the mark during the mark scan.
To solve this you can:
- Place the pinch rollers close to the mark edge
- Set the head start scanning position with the mark constant.
According to the graphic’s axis orientation, set a positive or negative value on x or y,
in order to have the plotter’s pen inside the mark area as in the next image.
The check button allows you to check the head position at the start of the mark scan
(check this positioning with the
cutting pen in the kiss cut position)
1
2
3
4
6
7
5
910
8
CUTTING
DIRECTION
The check button allows you to check the head position at the start of the mark scan. The cutting
pen should be inside the area as shown in the following picture (check this positioning with the
cutting pen in the kiss cut position)
cutting
direction
CUTTING
DIRECTION
RIGHT POSITION WRONG POSITION
3. Curve approximation determines the resolution of the curves in your le during the cut. If your
curves seems too “sharp-cornered” during the job, reduce the curve approximation to low or
minimum.
However, if you reduce the curve approximation too much, it will decrease your cutting speed, so
choose the most proper value.
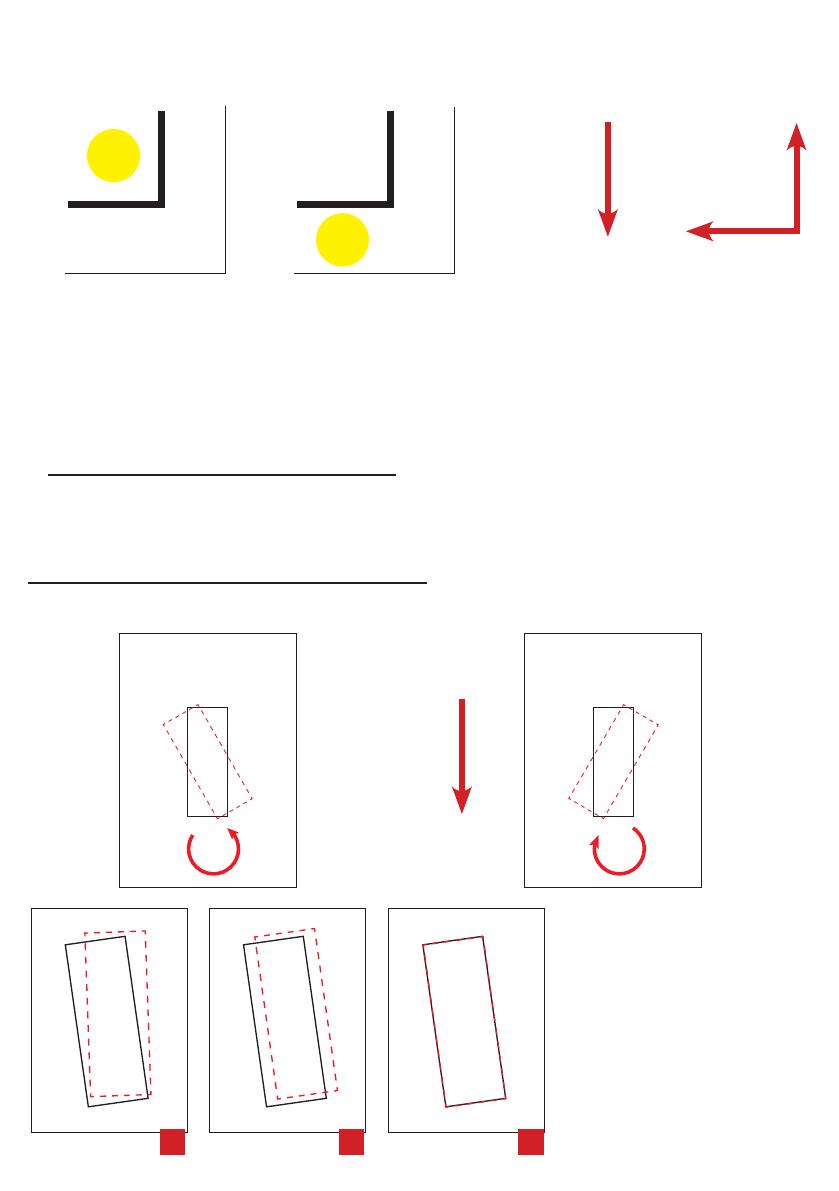
4. Your artwork may be not printed straight.
When this happens, the cutting lines will have a dierent grade from your artwork. To x this you
can rotate your cut.
The arrow near the textbox shows you towards which direction will be rotated your cut.
Usually the artwork should not be too much rotated. When you check the cutting rotation we suggest
you to change by 0.1 degrees with the arrows your value, and then proceed with a cut test.
CUTTING
DIRECTION
CUTTING
DIRECTION
CUTTING
DIRECTION
cutting
direction
STEP
1. Check the match between the
cut with the print.
2. Rotate the die-cut to nd the
correct inclination (until the cut
lines and the printed lines are
parallel).
3. Adjust the osets to match the
cut lines to the printed lines
1 2 3
+x
+y
5. Set the plotter’s speed during the removing of the sheet from the feeder’s roller.
6. Your artwork may be printed with a distortion. In that case it will look more stretched or
compressed than it should be. So your cut will look to don’t have the same position on all the labels.
To x this you have to enable the stretch/compress tool. Once you have done it, add a positive
value to correction x/y will stretch your cut on x/y, otherwise a negative value will compress the cut
on the x/y.
cutting
direction
X axis
CUTTING
DIRECTION
-
-
CUTTING
DIRECTION
+
+
STEP 1
VERIFY THE
CORRESPONDENCE OF
THE CUT WITH THE PRINT
STEP 2
AT THE POINT INDICATED,
ADJUST OFFSET TO ALIGN
THE CUT WITH THE PRINT
STEP 3
INCREASE OR DECREASE
THE “STRETCH”
PARAMETER (X)
CUTTING
DIRECTION
+
+
CUTTING
DIRECTION
-
-
cutting
direction
Y axis
STEP 1
VERIFY THE
CORRESPONDENCE OF THE
CUT WITH THE PRINT
STEP 2
AT THE POINT INDICATED,
ADJUST OFFSET TO ALIGN
THE CUT WITH THE PRINT
STEP 3
INCREASE OR DECREASE
THE “COMPRESSION”
PARAMETER (Y)
7. When you cut on very thin materials, your contours may not be closed completely.
To x that, enable the overcut and add on “start length” how much you want the plotters blade to
start cut before the rst label’s point.
Instead, add on end length how much you want the plotter’s blade to delay the end of your cut after
the last label’s point.
You can add for both “start length” and “end length” up to 0.9mm, allowing you to close incompleted
contours with a gap up to 1.8mm.
To get more accurate result on the corners, use the overcut feature during cross cutting.
Report (16)
When you complete a cutting series, you can nd its report in this menu. If you press “Save as” you
can save where you prefer the report of all the cuts done during the last session.
If you go at the “C:\Gemini Cutting Manager\Reportfolder, you can nd the “CutHistory.txt” that
contains the report of all the cuts done since the software installation.
Language (17)
You can switch between the english and italian language in this menu. If you would like to have
another language pack for the cutting manager, contact us.
Init cutter (18)
The init cutter loads the plotter settings necessary to the graphtec. This procedure has to be done
whenever the plotter has been reset.
About (19)
The “About” button shows you the current software version, and other additional information.
8. DataMatrix.
9. Conrms all the changes made to the settings with the save button. Otherwise, if you click cancel
or close the window, everything changed will be undone.
10. With the reset button you can restore all the settings values to default.
  • Page 1 1
  • Page 2 2
  • Page 3 3
  • Page 4 4
  • Page 5 5
  • Page 6 6
  • Page 7 7
  • Page 8 8

Gemini Cutting Manager User manual

Type
User manual

Gemini Cutting Manager is a software that allows you to control and adjust all functions and parameters for the digital cutting process, helping you cut lines or paths of a PDF vector graphics. With its user-friendly interface, you can easily import PDF files, set cutting parameters, and control the cutting process. Gemini Cutting Manager also offers advanced features such as curve approximation, rotation adjustment, and overcut settings, giving you precise control over the cutting results.

Ask a question and I''ll find the answer in the document

Finding information in a document is now easier with AI