Page is loading ...


Rugged USB 3.0 Thunderbolt™ Series User Manual 2
INTRODUCTION
Welcome to the User Manual for the LaCie USB 3.0 Rugged
Thunderbolt™ Series. Your drive features two cutting-edge interfaces,
SuperSpeed USB 3.0 and Thunderbolt. Not only does your drive let you
transfer huge amounts of data much faster than before, it's also
compatible with the widely available USB 2.0 for universal connectivity.
LaCie's exciting new line of storage devices is ideal for videographers,
photographers, and heavy data users that demand extraordinary
performance both in the office and the field.
These pages will guide you through the process of connecting your LaCie product and will explain its features. If
this manual doesn't answer your questions or if you are having trouble, consult the Getting Help page.
BOX CONTENT
LaCie Rugged USB 3.0 Thunderbolt Series
■
USB 3.0 cable (USB 2.0-compatible)
■
Thunderbolt cable
■
Quick Install Guide
■
Complete software suite
■
Important info: Please save your packaging. In the event that the drive should need to be repaired or
serviced, it must be returned in its original packaging.
MINIMUM SYSTEM REQUIREMENTS
Your system must meet certain requirements in order for your LaCie product to function properly. For a list of
these requirements, please refer to the product packaging or consult the product support web page at
www.lacie.com/support/.
Note: For optimal performance through the USB connection, the drive must be connected to a USB 3.0 host
port. Many laptops or desktop computers do not feature USB 3.0 ports. You can purchase a USB 3.0 PCI
Express Card (for desktop computers) or a USB 3.0 ExpressCard 34 (for laptops) that will permit the
maximum transfer speeds for which your LaCie USB 3.0 hard drive is capable.


Rugged USB 3.0 Thunderbolt™ Series User Manual 4
CABLES AND CONNECTORS
THUNDERBOLT
Your LaCie product features Thunderbolt technology, the most flexible interface ever created. This exciting new
high-speed cable technology connects your computers and electronic devices together like never before.
Thunderbolt technology supports two 10Gb/s bi-directional channels from a single port, the fastest data
connection available on a personal computer. At 10Gb/s, a full-length HD movie can be transferred in less than
30 seconds.
Thanks to support for both data streams and mini DisplayPort video, you can connect either a storage peripheral
or a display to a Thunderbolt port. However, it's not possible to use a mini DisplayPort cable to connect a
storage peripheral to a Thunderbolt port. You must use a Thunderbolt cable.
For more information, see www.lacie.com
Connector Face
(to computer)
Cable End
(to computer)
Cable End
(to product)
Connector Face
(to product)
Important Info: Windows users must first connect the product via USB (see Getting Connected) and install
drivers (see Install Drivers (Windows Only) in order for the Thunderbolt connection to work. After drivers are
installed, you can disconnect the USB cable and connect the Thunderbolt one.

Rugged USB 3.0 Thunderbolt™ Series User Manual 5
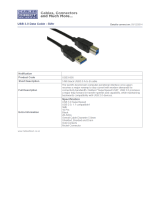
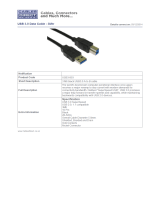
USB 3.0
USB is a serial input/output technology for connecting peripheral devices to a computer. SuperSpeed USB 3.0 is
the latest implementation of this standard, and it provides higher bandwidth and new power management
features.
Transfer rates can attain up to 5 Gbits/s as opposed to USB 2.0's 480 Mbits/s. This means USB 3.0 is
theoretically up to ten times faster than its predecessor.
Your LaCie drive is shipped with a SuperSpeed USB 3.0 cable to ensure maximum data transfer performance
when connected to a compatible USB 3.0 port. The cable will also work when connected to a USB 2.0 or 1.1 port,
but drive performance will be limited to their respective transfer rates.
Connector Face
(to Computer)
Cable End
(to Computer)
Cable End
(to Hard Drive)
Connector Face
(to Hard Drive)

Rugged USB 3.0 Thunderbolt™ Series User Manual 6
GETTING CONNECTED
Installing your LaCie hard drive is easy for all users thanks to LaCie Setup Assistant. Please follow the setup
steps in the order they are given to ensure that your LaCie hard drive's volume mounts correctly on your
computer.
Important Info for PC users: If you wish to use the Thunderbolt connection, you must first connect the
product to a host computer via USB as described below, then install Thunderbolt drivers. To install drivers,
visit Install Drivers (Windows Only). Once the Thunderbolt drivers have been installed, you can disconnect
the USB cable and connect the Thunderbolt one.
STEP 1 - CONNECT THE INTERFACE CABLE
Connect either the Thunderbolt or USB 3.0 cable from the drive to your computer.1.
The drive will mount in My Computer (Windows XP), Computer (Vista or Windows 7) or on your desktop (Mac).2.
Note: If the drive does not mount on your computer, see troubleshooting topics at Getting Help.

Rugged USB 3.0 Thunderbolt™ Series User Manual 7
STEP 2 - LAUNCH LACIE SETUP ASSISTANT
Important Info for PC users: LSA only works through the USB connection. If you wish to use the
Thunderbolt interface, first connect via USB in order to run LSA. Then install Thunderbolt drivers (see Install
Drivers (Windows Only).
LaCie Setup Assistant (LSA) must be launched before using your drive. It will allow you to:
Easily format the hard drive according to your needs
■
Copy the User Manual to your computer
■
Install software for added features
■
Register your LaCie device
■
Important info: If you do not launch LSA or if you quit it after the formatting has begun, your drive will not
be ready to use and will require manual formatting. The User Manual and utilities will not be available and
will have to be downloaded from the LaCie website: www.lacie.com/support/.
Launch LaCie Setup Assistant
Windows users
AutoPlay: Windows AutoPlay may detect your LaCie hard drive as soon as it is connected to your computer. If
the AutoPlay window appears, choose Open folder to view files using Windows Explorer and double-click
LaCie Setup.


Rugged USB 3.0 Thunderbolt™ Series User Manual 9
Setup
LaCie Setup Assistant does not prevent you from using your computer's native disk utility program to format or
partition your LaCie drive. Simply follow the Setup Assistant through completion, then use Disk Management for
Windows or Disk Utility for Mac to reformat your drive.
Important info for Windows users: While running LaCie Setup Assistant, generic pop-up windows may
ask if you wish to change your computer's settings. This is a normal request when formatting a disk or
installing certain software, such as Genie Timeline. To successfully complete LaCie Setup Assistant, LaCie
recommends that you agree to change the settings.
Important info for Mac users: You may be prompted to enter your computer password to continue with
LaCie Setup Assistant.
Follow the on-screen instructions as listed below to format your drive and install software utilities:
Select your language.1.
Read the license agreement before choosing Next. Selecting Next confirms that you accept the license2.
agreement.

Rugged USB 3.0 Thunderbolt™ Series User Manual 10
Use the slider to partition your LaCie hard drive. Moving the slider to the left will reduce the size of the3.
Compatible volume (called LaCie Share on some products) (for Windows and Mac). If you do not want the
Compatible / LaCie Share volume, move the slider all the way to the left. The LaCie volume will be
formatted for your operating system, NTFS for Windows and HFS+ for Mac. Once you have made your
selection, choose Next to begin the format.
Windows


Rugged USB 3.0 Thunderbolt™ Series User Manual 12
Existing Account
Choose the software utilities that you want to install. Certain software utilities may begin to install before7.
LaCie Setup Assistant has finished. Follow the software utility installer before completing LaCie Setup
Assistant.
Choose Next to continue.8.
LaCie Setup Assistant provides a summary of the installation. Choose Finish to close the program. Your9.
LaCie hard drive is now ready for use.
Software will be installed on the product's storage, not on your computer. It will be located on the volume
entitled “Compatible” or “LaCie Share” if it exists, otherwise on “LaCie”.
LaCie software utilities may be installed at any time. Once the format is complete, the LaCie Setup Assistant
application will be available on:
LaCie: if you created one partition
■
Compatible/LaCie Share: if you created two partitions
■
To install the software utilities, simply launch LaCie Setup Assistant and follow the steps listed above.

Rugged USB 3.0 Thunderbolt™ Series User Manual 13
INSTALL DRIVERS (WINDOWS ONLY)
Windows users must install drivers on their computer in order to use the Thunderbolt connection. Before
following the steps below, follow the steps to connect the product to a host computer via USB as described in
Getting Connected. Once the drivers have been installed, you can disconnect the USB cable and connect the
Thunderbolt one.
Click this link to download drivers: http://www.lacie.com/support/drivers/driver.htm?id=102781.
Unzip the file.2.
Double-click Setup.exe.3.
Follow the steps to complete the wizard.4.
When prompted, restart your computer.5.


Rugged USB 3.0 Thunderbolt™ Series User Manual 15
UNMOUNTING YOUR DRIVE
USB, FireWire, Thunderbolt, and eSATA external devices feature “plug & play” connectivity, which means that
your LaCie storage can be connected and disconnected while the computer is running. To prevent failures,
however, it is important to follow these steps when disconnecting your device.
WINDOWS XP USERS
From the System Tray (located in the lower right-hand side of your screen), click the Eject icon (a small green
arrow over a hardware image). A message will appear, listing the devices the Eject icon controls (it should say,
“Safely remove…”). Click on the LaCie storage device in this prompt.
This message will appear: “Safe to Remove Hardware” (or similar). It is now safe to disconnect the device.
WINDOWS VISTA & WINDOWS 7 USERS
From the System Tray (located in the lower right-hand side of your screen) click on the plug icon (note the white
check mark inside a green circle).
A message will appear, detailing the devices that may be safely unmounted.
Select Eject for the device you wish to unmount. A message will appear notifying you that it is safe to remove it.

Rugged USB 3.0 Thunderbolt™ Series User Manual 16
MAC USERS
Drag the storage device icon to the Trash. (The icon pictured below is a generic USB device icon. Your LaCie
storage may be represented by an icon that looks like the device itself.)
When the icon disappears from the desktop, the storage device can be disconnected.

Rugged USB 3.0 Thunderbolt™ Series User Manual 17
OPTIONAL FORMATTING AND PARTITIONING
Standard LaCie storage devices will prompt you to run LaCie Setup Assistant when they are first connected to a
computer (Windows or Mac). LaCie Setup Assistant helps you to quickly format the storage device according to
your needs.
Please read the information below carefully if you:
Abort LaCie Setup Assistant while it is formatting.
■
Wish to reformat your storage device after LaCie Setup Assistant has successfully completed.
■
Own a LaCie storage device that does not feature Setup Assistant (for example, select LaCie USB Keys).
■
ABOUT FILE SYSTEM FORMATS
Windows Users
FAT 32: FAT is an acronym for File Allocation Table, which dates back to the beginnings of DOS programming.
Originally, FAT was only 16 bits, but after the second release of Windows 95 it was upgraded to 32 bits, hence
the name FAT 32. In theory, FAT 32 volume sizes can range from less than 1MB all the way to 2TB.
It is the native file system of Windows 98 and Windows Me, and is supported by Windows 2000, Windows XP,
Windows Vista, and Windows 7. When FAT 32 is used with Windows 2000, Windows XP, Windows Vista, and
Windows 7 however, volume size is limited to 32GB (by the Windows partition utility, i.e. Disk Manager), and the
individual file size is limited to 4GB.
NTFS: This acronym stands for New Technology File System, and it is the native file system for Windows NT,
2000, XP, Vista, and 7. NTFS offers several features that are not available with FAT 32: file compression,
encryption, permissions, auditing, and mirroring drives. The minimum supported volume size for NTFS is 10MB
with a maximum of 2TB when initialized in the MBR format. The more recent GPT format does not assign limits
to file or partition sizes. Volumes created in NTFS are native read and write for Windows NT, 2000, XP, Vista, and
7. Earlier versions of Windows and Mac OS X 10.5 or higher may read and write to the NTFS partitions with the
help of third-party drivers.
See the table below for a comparison of NTFS and FAT 32.
Windows File System Formats
Use NTFS if:
…you will be using the storage device only with Windows XP, Vista, and 7 since performance will be enhances
when compared to FAT 32. This file system is compatible in read-only mode with Mac OS 10.3 and higher.
Use FAT32 if:
…you will be using your storage device with both Windows and Mac computers. Maximum single file size is
limited to 4GB.

Rugged USB 3.0 Thunderbolt™ Series User Manual 18
Mac Users
You may customize the storage device by reformatting and/or partitioning it with separate file system formats.
For optimal performance in Mac OS environments, format and partition the storage device as one large Mac OS
Extended volume.
Mac OS Extended (HFS+): Mac OS Extended refers to the file system used by Mac OS X. HFS+ represents an
optimization of the older HFS file system by using hard disk space more efficiently. With HFS+, you are no
longer limited by block size.
MS-DOS File System (FAT 32): This is the Microsoft file system, more typically known as FAT 32. Use FAT 32
if you are going to be sharing your LaCie storage device between Mac and Window computers.
See the table below for a comparison between HFS+ and FAT 32 (MS-DOS).
Mac File System Formats
Use HFS+ if:
…you will be using the storage device on Macs only. Performance will be enhances when compared to FAT 32.
HFS+ is NOT compatible with Windows OS.
Use FAT32 if:
…you will be using your storage device with both Windows and Mac computers. Maximum single file size is
limited to 4GB.
FORMATTING INSTRUCTIONS
The steps listed below will help you to format and partition a storage device. For more information on choosing
the optimal file format, refer to About File System Formats.
Caution: Formatting will erase everything on the storage device. LaCie highly recommends that you
back up all data on your storage device before performing the steps below. LaCie is not
responsible for any data lost due to formatting, partitioning, or using a LaCie storage device.
Important Info: Formatting the LaCie partition will delete the included User Manual and utilities. Please
copy all data, including documentation and software from LaCie, before formatting your storage device. User
Manuals and select software may also be downloaded from www.lacie.com/support/.
Note: Refer to your operating system's documentation for more information on reformatting and
partitioning your storage device.

Rugged USB 3.0 Thunderbolt™ Series User Manual 19
Windows Users
Technical Note on volumes larger than 2TB: Windows XP 32-bit - This version of Windows will not
recognize volumes larger than 2TB; Windows XP x64, Vista and 7 - All of these versions of Windows can
recognize volumes greater than 2TB. However, disks must be converted to the GPT file system before
partitions greater than 2TB can be created. To do this, go to Windows Disk Management and right-click on
the disk. Select Convert to GPT. You may now create partitions greater than 2TB.
Make sure the storage device is connected to and mounted on the computer.1.
Right-click on Computer and choose Manage. From the Manage window select Disk Management.2.
From the list of storage devices in the middle of the Disk Management window, locate your LaCie device.3.
By default, a partition is already created on the device with LaCie software utilities. Follow your operating4.
system instructions to reset the existing partition.
To create a new partition, select New Simple Volume. Follow the on-screen instructions when the New5.
Simple Volume Wizard appears.
Mac Users
Make sure the storage device is connected to and mounted on the computer.1.
Select Utilities from the Go menu in the Finder menu bar.2.
In the Utilities folder, double-click Disk Utility.3.
Disk Utility will display the message Select a disk, volume, or image. All connected storage devices,
partitions, or disk images will be displayed in this column. Storage devices in this column may have multiple
listings. The top name is the name of the physical device's manufacturer, and includes the formatted
capacity.
Select the storage device in the left-hand column.4.
Click the Erase tab.5.
Choose a format from the drop-down window. See About File System Formats for more information on6.
choosing a file format.
Give the volume a name.7.
Click Erase… and confirm your selection in the popup window.8.

Rugged USB 3.0 Thunderbolt™ Series User Manual 20
GETTING HELP
If you are having problems with your LaCie product, consult the table below for a list of available resources.
Order Source Description Location
1
Quick
Install
Guide
Concise steps to
follow for getting your
product up and
running
Either a printed leaflet or accessory box and included in the
product box, or download PDF from the product page
2
Support
Pages
Includes interactive
troubleshooting
topics for most
common problems
www.lacie.com/support/, select your product, then click the
“Troubleshooting” tab
3
User
Manual
Includes common
troubleshooting
topics
See Troubleshooting Topics below
4
Customer
Support
Create an account on
lacie.com, register
your product, and fill
out a support ticket
Create an account here:
www.lacie.com/us/mystuff/login.htm?logout&rtn=mystuff
Note: LaCie is dedicated to providing high quality products that enrich the lives of our customers. To help
LaCie offer the best customer support, we encourage you to create an account and register your product at
www.lacie.com/us/mystuff/login.htm? logout&rtn=mystuff. You can give us important feedback as well as
receive updated information on your LaCie device.
/
