Page is loading ...

WARNING: NO PORTION OF THIS MANUAL MAY BE REPRODUCED IN ANY SHAPE
OR FORM WITHOUT THE WRITTEN APPROVAL OF GRIZZLY INDUSTRIAL, INC.
MODEL T21888 2.5 HP,
6.3 GALLON COMPRESSOR
INSTRUCTION MANUAL

This manual provides critical safety instructions on the proper setup,
operation, maintenance and service of this machine/equipment.
Failure to read, understand and follow the instructions given in this
manual may result in serious personal injury, including amputation,
electrocution or death.
The owner of this machine/equipment is solely responsible for its
safe use. This responsibility includes but is not limited to proper
installation in a safe environment, personnel training and usage
authorization, proper inspection and maintenance, manual availability
and comprehension, application of safety devices, blade/cutter integ-
rity, and the usage of personal protective equipment.
The manufacturer will not be held liable for injury or property damage
from negligence, improper training, machine modifications or misuse.
Some dust created by power sanding, sawing, grinding, drilling, and
other construction activities contains chemicals known to the State
of California to cause cancer, birth defects or other reproductive
harm. Some examples of these chemicals are:
• Lead from lead-based paints.
• Crystalline silica from bricks, cement and other masonry products.
• Arsenic and chromium from chemically-treated lumber.
Your risk from these exposures varies, depending on how often you
do this type of work. To reduce your exposure to these chemicals:
Work in a well ventilated area, and work with approved safety equip-
ment, such as those dust masks that are specially designed to filter
out microscopic particles.

Table of Contents
INTRODUCTION .....................................................................................2
SECTION 1: CIRCUIT REQUIREMENTS ..............................................6
SECTION 2: SET UP ..............................................................................8
SECTION 3: OPERATIONS .................................................................10
SECTION 4: MAINTENANCE ...............................................................13
SECTION 5: SERVICE .........................................................................15

INTRODUCTION
No list of safety guidelines is com-
plete, because every work environ-
ment is different. Always consider
safety first and use common sense.
Failure to use this tool with caution
and respect could result in serious
personal injury.
SpecificationsForeword

Safety Instructions for Pneumatic Tools
1. READ THIS MANUAL.
2. WEAR EYE PROTECTION.
3. WEAR A RESPIRATOR.
For Your Own Safety Read Instruction Manual
Before Operating This Equipment
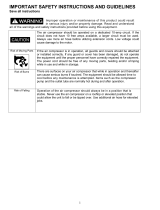
The purpose of safety symbols is to attract your attention to possible hazard-
ous conditions. This manual uses a series of symbols and signal words which
are intended to convey the level of importance of the safety messages. The
progression of symbols is described below. Remember that safety messages by
themselves do not eliminate danger and are not a substitute for proper accident
prevention measures.
Indicates a potentially hazardous situation which, if
not avoided, MAY result in minor or moderate injury.
It may also be used to alert against unsafe practices.
Indicates a potentially hazardous situation which, if
not avoided, COULD result in death or serious injury.
Indicates an imminently hazardous situation which,
if not avoided, WILL result in death or serious injury.
This symbol is used to alert the user to useful informa-
tion about proper operation of the equipment.
SAFETY
NOTICE
4. WEAR HEARING PROTECTION.
5. MAINTAIN SAFETY GUARDS.
6. KEEP CHILDREN AWAY.

7. AVOID ENTANGLEMENTS.
8. USE CORRECT AIR PRESSURE.
9. DISCONNECT AIR PRESSURE
10. SECURE TOOLING.
11. SHARP SURFACES.
12. REMOVE ADJUSTING KEYS AND
WRENCHES AFTER USE.
13. AVOID FLAMMABLES
14. SECURE WORK.
15. MAINTAIN TOOLS WITH CARE.
16. DO NOT FORCE TOOL.
17. CHECK FOR DAMAGED PARTS
BEFORE USING.
18. USE GOOD LIGHTING.
19. AVOID UNIN TENTIONA L
OPERATION.
20. USE THE RECOMMENDED
ACCESSORIES.
21. NEVER ALLOW UNTRAINED
USERS TO USE THIS TOOL WHILE
UNSUPERVISED.
22. IF YOU ARE UNSURE OF THE
INTENDED OPERATION, STOP
USING TOOL.
23. BE AWARE OF HOSE LOCATION.
24. DO NOT USE UNDER THE
INFLUENCE OF DRUGS OR
ALCOHOL, OR WHEN TIRED.

Additional Safety Instructions
for Air Compressors
No list of safety guidelines can
be complete. Every environment is
different. Always consider safety
first, as it applies to your individ-
ual working conditions. Use this
and other machinery with caution
and respect. Failure to do so could
result in serious personal injury,
damage to equipment or poor work
results.
1. TANK SAFETY.
2. COMPRESSED AIR USE.
3. AVOID BURNS.
4. AIR LINE AND POWER CORD
SAFETY.
5. AIR NOZZLE.
6. UNPLUG COMPRESSOR.
There is danger associated with the
use of air compressors. Accidents
are frequently caused by lack of
familiarity or failure to pay atten-
tion. Use this air compressor with
respect and caution to lessen the
possibility of operator injury. If nor-
mal safety precautions are over-
looked or ignored, serious personal
injury may occur.

SECTION 1: CIRCUIT
REQUIREMENTS
Serious personal injury could occur
if you connect the machine to the
power source before you have com-
pleted the set up process. DO NOT
connect the machine to the power
source until instructed to do so.
110V Operation
Amperage Draw
Circuit Requirements
Figure 1.
Grounding Prong is
Longest of the Three
Prongs
Current
Carrying Prongs
Grounded
Outlet
Plug/Receptacle Type
Figure 1
Electrocution or fire
could result if this
machine is not ground-
ed correctly or if your
electrical configura-
tion does not comply
with local and state
codes. Ensure compli-
ance by checking with
a qualified electrician!

This machine must have a ground
prong in the plug to help ensure
that it is grounded. DO NOT remove
ground prong from plug to fit into a
two-pronged outlet! If the plug will
not fit the outlet, have the proper
outlet installed by a qualified electri-
cian.
Grounding
Extension Cords

Unpacking
SECTION 2: SET UP
please immediately
call Customer Service at (570) 546-9663
for advice.
Assembly
To assemble the air compressor:
1.
2.
Figure 2
3. Figure 3
Figure 3.
Placement
The contacts of the compressor pres-
sure switch spark when cycling the
compressor motor ON and OFF. If any
flammable gases are near the switch,
ignition and explosion may occur,
resulting in severe burns or death.
NEVER place the compressor next
to flammable liquids, gases, or in a
paint spraying or gluing booth.
Figure 2.

Test Run &
Break In
To test run and break in the air com-
pressor:
1.
2. ON/OFF
OFF
Figure 4
6.
Figure 6
OFF
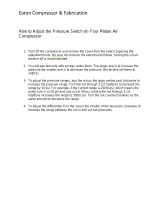
Note If the compressor reaches 115-
120 PSI, and does not automatically
shut OFF, lift the ON/OFF lever up to
shut the motor OFF before the pressure
climbs any higher. Adjust the pressure
switch as outlined on Page 20.
3.
4.
5. Figure 5
ON
Figure4
Figure 5.
Figure 6.
7.
Pressure Relief Valve Test Page
14
8.
Changing OilPage 18

SECTION 3: OPERATIONS
Read the manual before operation.
Become familiar with this tool, its
safety instructions, and its operation
before beginning any work. Serious
personal injury may result if safety or
operational information is not under-
stood or followed.
Figure 6
To control the air supply to your tool:
1.
Figure 7
Pressure
Regulator Use
ACCIDENTAL
START HAZARD!
Disconnect before
service or tool
changes.
AIR PRESSURE
HAZARD!
Never exceed max
PSI rating for tool.
EYE/EAR INJURY
HAZARD!
Wear protective
equipment when
using this tool.
Figure 7.
2. Figure 7
Draining the air from the tank will be
extremely loud and debris may be
blown into your eyes from the floor.
Wear safety glasses and ear protec-
tion when draining the tank.

Operation
Figure 8
Figure 8.
To use your air compressor:
1.
2.
OFF
Figure 9
Figure9
3.
4.
Figure 10
Figure 10.
5.
6.
Leaving a compressor while it is
plugged in can cause fire. If a leak
develops, the compressor may run
continuously until it overheats and
catches fire. When not in use, always
disconnect the compressor from
power, and drain the air tank.

Figure 13.
H7274—Campbell Hausfeld™ Pressure
Regulator
Figure 11.
G6261—Campbell Hausfeld™ Water
Filter
G8114 —
3
⁄8" x 25 Ft. Air Hose
G8115 —
3
⁄8" x 50 Ft. Air Hose
G8116 —
3
⁄8" x 100 Ft. Air Hose
Figure 12.
Figure 14.
H3275—
1
⁄4" NPT x 25' Recoil Hose
H3276—
1
⁄4" NPT x 50' Recoil Hose
Accessories

SECTION 4: MAINTENANCE
Schedule
Daily
Daily before use, perform the following
checks:
1.
2.
3.
Draining
TankPage 14
4.
Operating this equipment has the
potential to cause eye injury and
hearing loss. Always wear eye and
ear protection when operating an air
compressor. Be certain the safety
protection you wear meet the appro-
priate standards of the American
National Standards Institute (ANSI).
Weekly
If used daily, perform the following com-
pressor checks each week, otherwise
check these items once a month:
1.
Figure 15
The air compressor will turn ON auto-
matically when it is set on AUTO.
When performing maintenance make
sure the AUTO/OFF lever is in the
OFF position, the compressor is
unplugged, and the air pressure has
been bled out of the tank.
2.
3.
4.
5.
Draining TankPage 14
Figure 15.

Quarterly
After every approximately 300 run-time
hours, or 3 months, perform the follow-
ing maintenance:
1.
Changing Oil
Page 18
2.
3.
Pressure Relief
Valve Test
Figure 17.
Draining Tank
Figure 16.
Draining the air from the tank will be
extremely loud and debris may be
blown into your eyes from the floor.
Wear safety glasses and ear protec-
tion when draining the tank.
To drain water from the tank:
1.
2.
Figure 16
Unseating the pressure relief valve
will be extremely loud and debris
may be blown into your eyes from the
floor or the valve. Wear safety glass-
es and ear protection when draining
the tank.
To check the pressure relief valve:
1.
Figure 17
2.

SECTION 5: SERVICE
Symptom Possible Cause Possible Solution
Page
20
OFF
Page 20
Troubleshooting

Symptom Possible Cause Possible Solution
Page 18
OFF
OFF
Page 20
Page 18
Page 20
OFF
Page 20

Symptom Possible Cause Possible Solution
Page 14
Page 8
Page 14
Page 18

5.
Figure 18
6.
Changing Oil
To change the oil:
1.
2.
Check Valve
To fix the check valve:
1.
2.
Figure 19
Figure 19.
NOTICE
The oil fill cap releases crankcase
pressure through a small hole in
the top of the cap. Keep this hole
unclogged, or the crankcase may
pressurize, causing seals and gas-
kets to leak leading to compressor
bearing failure.
4.
Hot crankcase oil can scald your
hands or fingers. Before draining the
oil, allow the compressor to cool 15
minutes before removing the drain
plug.
3.
Figure 18
Figure 18.
/