Sony HDR-AS50 User manual

Category
Action sports cameras
Type
User manual
Digital HD Video Camera Recorder HDR-AS50
Read This First
Identifying the parts [1]
Screen display [2]
Getting Started
Checking the bundled items [3]
Inserting the battery pack [4]
Charging the battery pack [5]
Inserting a memory card
Inserting a memory card [6]
The memory cards that can be used with the camera [7]
Setting the date and time [8]
Using the Underwater Housing
Identifying the parts (Underwater Housing) [9]
Using the Underwater Housing [10]
On waterproof performance of the Underwater Housing [11]
Notes on use for the Underwater Housing [12]
Water leakage [13]
Waterproof packing [14]
How to check for water leaks [15]
Maintenance [16]
Using accessories
Using the attachment buckle [17]
Notes on using the adhesive mount (sold separately) [18]
Shooting
Shooting movies and still images
Shooting movies (Movie mode) [19]
Shooting still images (Photo mode) [20]
Loop recording mode [21]
Time-lapse capture mode [22]
Using the zoom [23]
Notes on long-time recording [24]
Changing the Settings
List of setting items
List of setting items [25]
How to set the setting items [26]
Shooting settings
Image quality setting [27]
Movie format [28]
Time-lapse capture image size [29]
Loop recording time [30]
Still image mode switching [31]
Still image shooting interval [32]
Self-timer [33]
Time-lapse shooting interval [34]
Time-lapse shot number [35]
SteadyShot [36]
Angle setting [37]
Zoom setting [38]
Flip [39]
AE shift [40]
Time-lapse AE mode [41]
Scene [42]
White balance [43]
Color mode [44]
Audio recording setting [45]
Wind noise reduction [46]
Camera settings
Airplane mode [47]
Wi-Fi connection setting [48]
Wi-Fi Hi power setting [49]
Bluetooth setting [50]
Bluetooth remote controller power setting [51]
Format [52]
USB power supply [53]
Beep [54]
Beep volume [55]
Lamp setting [56]
One touch recording [57]
Auto power off [58]
Switching NTSC/PAL [59]
Date & time setting [60]
Area setting [61]
Daylight Saving Time (Summer time) setting [62]
Version [63]
Resetting the settings [64]
Viewing
Viewing using the Live-View Remote [65]
Delete [66]
Create your movie
Highlight Movie Maker
Creating the highlight movie [67]
Importing the BGM [68]
Stream real-time movie to a movie streaming site
Live Streaming with your camera (Real time movie streaming)
Live Streaming [69]
Preparing for Live Streaming [70]
Performing Live Streaming [71]
Restrictions [72]
Using the camera connected to other devices via Wi-Fi
Connecting to your smartphone
Preparation for connecting to your smartphone [73]
Sample smartphone screen display [74]
Connecting a smartphone to Wi-Fi via QR Code (Android device) [75]
Performing the Wi-Fi setting on a smartphone via QR Code (iPhone/iPad) [76]
Connecting to a smartphone using ID/password (Android device) [77]
Connecting to a smartphone using ID/password (iPhone/iPad) [78]
Connecting to the Live-View Remote
Connecting a single camera to Live-View Remote (Single connection) [79]
Connecting multiple cameras to Live-View Remote (Multi connection) [80]
Connecting to Handycam
Connecting a single camera to Handycam (Single connection) [81]
Connecting multiple cameras to Handycam (Multi connection) [82]
Editing images imported to your computer
Using the Action Cam Movie Creator
Useful functions of Action Cam Movie Creator [83]
Installing Action Cam Movie Creator on your computer [84]
Editing images imported to your smartphone/tablet
Using the Action Cam App
Useful functions of Action Cam App [85]
Installing Action Cam App [86]
Information
Recordable time
Estimated duration of recording and playback for supplied battery pack [87]
Estimated recording time of movies [88]
Estimated number of recordable still images [89]
Battery pack
On charging the battery pack [90]
Effective use of the battery pack [91]
About the remaining battery charge [92]
How to store the battery pack [93]
On battery pack life [94]
To reduce the battery consumption [95]
Using the camera abroad
Countries and regions where NTSC TV is used [96]
Countries and regions where PAL TV is used [97]
The list of time differences for world capitals [98]
Precautions
Do not use/store the camera in the following places [99]
On carrying [100]
Care and storage of the lens [101]
On cleaning [102]
On operating temperatures [103]
On moisture condensation [104]
Notes on optional accessories [105]
Note on disposal/transfer of the memory card [106]
Specifications [107]
Trademarks [108]
Notes on License
On GNU GPL/LGPL applied software [109]
List of Default Setting [110]
Troubleshooting
Troubleshooting [111]
Battery pack and power
Cannot turn on the camera. [112]
The power turns off suddenly. [113]
Battery life is short. [114]
Cannot charge the camera. [115]
The remaining charge indicator is incorrect. [116]
Memory card
Operations using the memory card cannot be performed. [117]
Shooting images
Cannot record images. [118]
Cannot insert dates on images. [119]
Viewing images
Cannot playback images. [120]
Computers
Your computer does not recognize the camera. [121]
Cannot import images. [122]
Action Cam Movie Creator cannot be installed. [123]
Action Cam Movie Creator does not work correctly. [124]
Cannot play back images on your computer. [125]
Wi-Fi
It takes too much time to transfer an image. [126]
Others
The lens gets fogged. [127]
The camera becomes warm when you use it for a long time. [128]
The date or time is incorrect. [129]
Warning indicators and error messages [130]
[1] Read This First
Identifying the parts
(on/standby) button
1.
MENU button
2.
Display panel
3.
UP button/DOWN button
4.
REC lamp
5.
REC (Movie/still image) button/ENTER (Menu execute) button
6.
REC/LIVE lamp
7.
Lens
8.
Speaker
9.
Microphones
10
.
Multi/Micro USB terminal
11
.
CHG (Charge) lamp
12
.
Battery cover
13
.
Battery housing
14
.
Battery ejection lever
15
.
Connector cover (Multi/Micro USB terminal)
16
.
REC lamp
17
[2] Read This First
Screen display
The indicators described below are displayed on the camera. This screen display is an example of when
shooting movies.
Display icon at 1
: Wi-Fi connection setting (single connection)
: Wi-Fi connection setting (multi connection)
: Bluetooth is connected
: Temperature of the camera is increased
: Battery level indicator of camera
: Airplane mode enabled
Display icon and value at 2
: Movie format
: Frame rate during movie shooting
: SteadyShot
: Time-lapse shot number
: Streaming viewers
Numbers of streaming viewers
: Still picture mode
: Self-timer
Display items at 3
: Audio recording is set to OFF
Recordable time, recording time, loop recording time
Number of recordable still images, time-lapse shot number
ON AIR: Streaming start
Warning/Error message
Display icons at 4
: Movie mode
.
Lock lever
18
.
Screw hole for tripod
*
19
.
Access lamp
20
.
Memory card insertion slot
21
.
Memory card cover
22
.
The length of the corresponding tripod screw should be less than 5.5 mm (7/32 in.).
*
: Photo mode
: Time-lapse capture mode
: Live streaming mode
: Loop recording mode
: Angle setting
: Zoom ratio
: UP button/DOWN button operation guide (zoom switching, shooting mode switching, invalid
operation)
[3] Getting Started
Checking the bundled items
Make sure that you have following bundled items.
The number in parentheses indicates the quantity of that item bundled.
Camera (1)
The camera is set in the Underwater Housing. Open the cover of the case as illustrated below.
Micro USB cable (1)
Rechargeable battery pack (NP-BX1) (1)
Underwater Housing (1)
Attachment Buckle (1)
Startup Guide (1)
Reference Guide (1)
[4] Getting Started
Inserting the battery pack
To remove the battery pack
Slide down the lock lever to open the battery cover.
1
Insert the battery pack.
Align the direction of the arrow on the camera and the battery pack.
2
Close the battery cover and slide the lock lever up to lock.
Confirm that the yellow mark on the lock lever is not visible.
3
Open the cover and slide the battery ejection lever, then remove the battery pack.
To set auto power off function
It is recommended that you set the camera to turn off automatically, in order to decrease the battery
consumption.
Press the MENU button, then press the UP button or DOWN button to select the
(camera
settings) -
(auto power off) - time until the power is turned off, then press the REC/ENTER
button.
The default
setting is
(60 seconds). Change the setting as necessary. For details, see “Auto
power off”.
[5] Getting Started
Charging the battery pack
The time takes for charging
Turn off the power of the camera.
Charging is not possible when the camera is turned on.
1
Open the connector cover, connect the camera to an activated computer with the
micro USB cable (supplied).
The CHG (Charge) lamp lights in amber.
: Connector cover
: Micro USB cable
: CHG (Charge) lamp
2
When charging is finished, disconnect the micro USB cable between the camera and
the computer.
Charging is complete when the CHG (Charge) lamp turns off (full charge).
3
Supplied battery pack (NP-BX1)
Via a computer: Approx. 265 minutes
Checking the remaining battery charge
A remaining charge indicator appears on the upper right of the display panel.
The displayed remaining charge indicator may not be correct under certain circumstances.
It takes about one minute until the correct remaining charge indicator appears.
Note
You can use only type X battery with this camera.
Turn off the camera while charging the battery. The charging stops when you turn on the camera while
charging.
Do not apply force to the camera when you connect the camera to a computer. This may cause damage to
the camera or the computer.
When you connect the camera to a notebook computer that is not connected to an AC power source, the
battery of the notebook computer may be depleted rapidly. Do not leave the camera connected to the
computer for a long time.
Charging the battery pack or the connection with customized or hand-built computers is not guaranteed.
Depending on the type of USB device used, charging may not function properly.
Operation with all computers is not assured.
If you do not intend to use the camera for an extended period, charge the camera once every 6 to 12 months
or remove the battery pack from the camera to maintain battery performance.
Rapid charging is possible by using the AC adaptor (sold separately). To connect the AC adaptor, use the
micro USB cable (supplied).
[6] Getting Started Inserting a memory card
Inserting a memory card
Time required to charge a fully depleted battery pack at a temperature of 25°C (77°F). Charging may take longer under
certain circumstances or conditions.
*
Open the memory card cover.
1
Insert the memory card until it clicks.
microSD card microSDHC card/microSDXC card: Insert in the direction of
.
Memory Stick Micro (M2) media: Insert in the direction of
.
2
To eject the memory card
Open the cover, then lightly push the memory card once.
Note
Insert the memory card properly, confirming each side is facing the correct direction.
Confirm the direction of the memory card. If you forcibly insert the memory card in the wrong direction, the
memory card, memory card slot, or image data may be damaged.
Format the memory card in the camera before use.
Save important data on the memory card on other media such as a computer, before formatting the memory
card.
Do not insert anything other than the compliant size of memory card into the memory card slot. Otherwise, a
malfunction may result.
When inserting or ejecting the memory card, be careful to prevent the memory card from popping out and
dropping.
[7] Getting Started Inserting a memory card
The memory cards that can be used with the camera
The memory cards that can be used with the camera are listed below.
: Printed side
: Terminal side
Close the memory card cover.
3
Note
When you shoot long time with XAVC S or MP4 to the SDHC memory card, the file will be divided into 4 GB
files. By using the Action Cam Movie Creator, you can unify the data and treat as 1 file.
Operation with all memory cards is not assured. For details about memory cards other than cards
manufactured by Sony, contact the individual makers.
Confirm the direction of the memory card. If you forcibly insert the memory card in the wrong direction, the
memory card, memory card slot, or image data maybe damaged.
Format the memory card with the camera before use.
Confirm that the connector cover and the battery pack/memory card cover are securely closed and any foreign
matter is not stuck in the cover before use.
[8] Getting Started
Setting the date and time
Press the (on/standby) button to turn on the camera for the first time, the setting for area/summer
time/date and time will be displayed on the screen. Use the camera after setting the date and time.
Memory card MP4 XAVC S
Memory stick micro (M2) (Mark2 only)
microSD memory card
*1
microSDHC memory card
*1
*2
microSDXC memory card
*1
*2
SD speed class4:
or faster, or UHS speed class1: or faster.
*1
Memory card that satisfies all the conditions below.
4 GB or more capacity.
SD speed class10:
or faster, or UHS speed class1 : or faster.
*2
Press the UP button or DOWN button to select the setting, then press the REC/ENTER
button.
The following items are displayed on the screen in order.
: Area setting
: Daylight Saving Time (Summer Time) setting
Year/Month/Day
Time setting
1
When the date and time/area confirmation screen is displayed, press the REC/ENTER
button.
2
Hint
The area is determined by the time difference in your area and Greenwich Mean Time (GMT). For the time
difference, see “List of time differences for world capitals”.
These settings can be performed on the camera settings. See “Date and time setting”, “Area setting” and
“Daytime Saving Time (Summer Time) setting”.
[9] Getting Started Using the Underwater Housing
Identifying the parts (Underwater Housing)
(on/standby) button
1.
Case body
2.
Leash attachment hole
3.
(on/standby)/REC HOLD switch
4.
REC (movie/still image) button/ENTER (menu execute) button
5.
Case cover
6.
[10] Getting Started Using the Underwater Housing
Using the Underwater Housing
By inserting the camera in the Underwater Housing, you can shoot images underwater up to a depth of
60 m (197 feet) for 30 minutes continuously.
MENU button
7.
Tripod screw hole
8.
UP button
9.
DOWN button
10
.
Buckle lock
11
.
Buckle
12
.
Lead
13
.
Adaptor
14
.
Waterproof packing
15
.
Slide the buckle lock in the direction of and hold it, then hold the circled parts and
swing out the buckle in the direction of .
1
Open the case cover.
2
Insert the camera in the case body.
3
Insert the tab of the case body into the slot of the case cover.
4
Hook the buckle over the tab on the lower part of the case cover , then close the
buckle in the direction of .
Make sure the buckle and buckle lock are firmly locked. (If you do not lock it securely, water
may leak, or the camera may fall out.)
5
Note
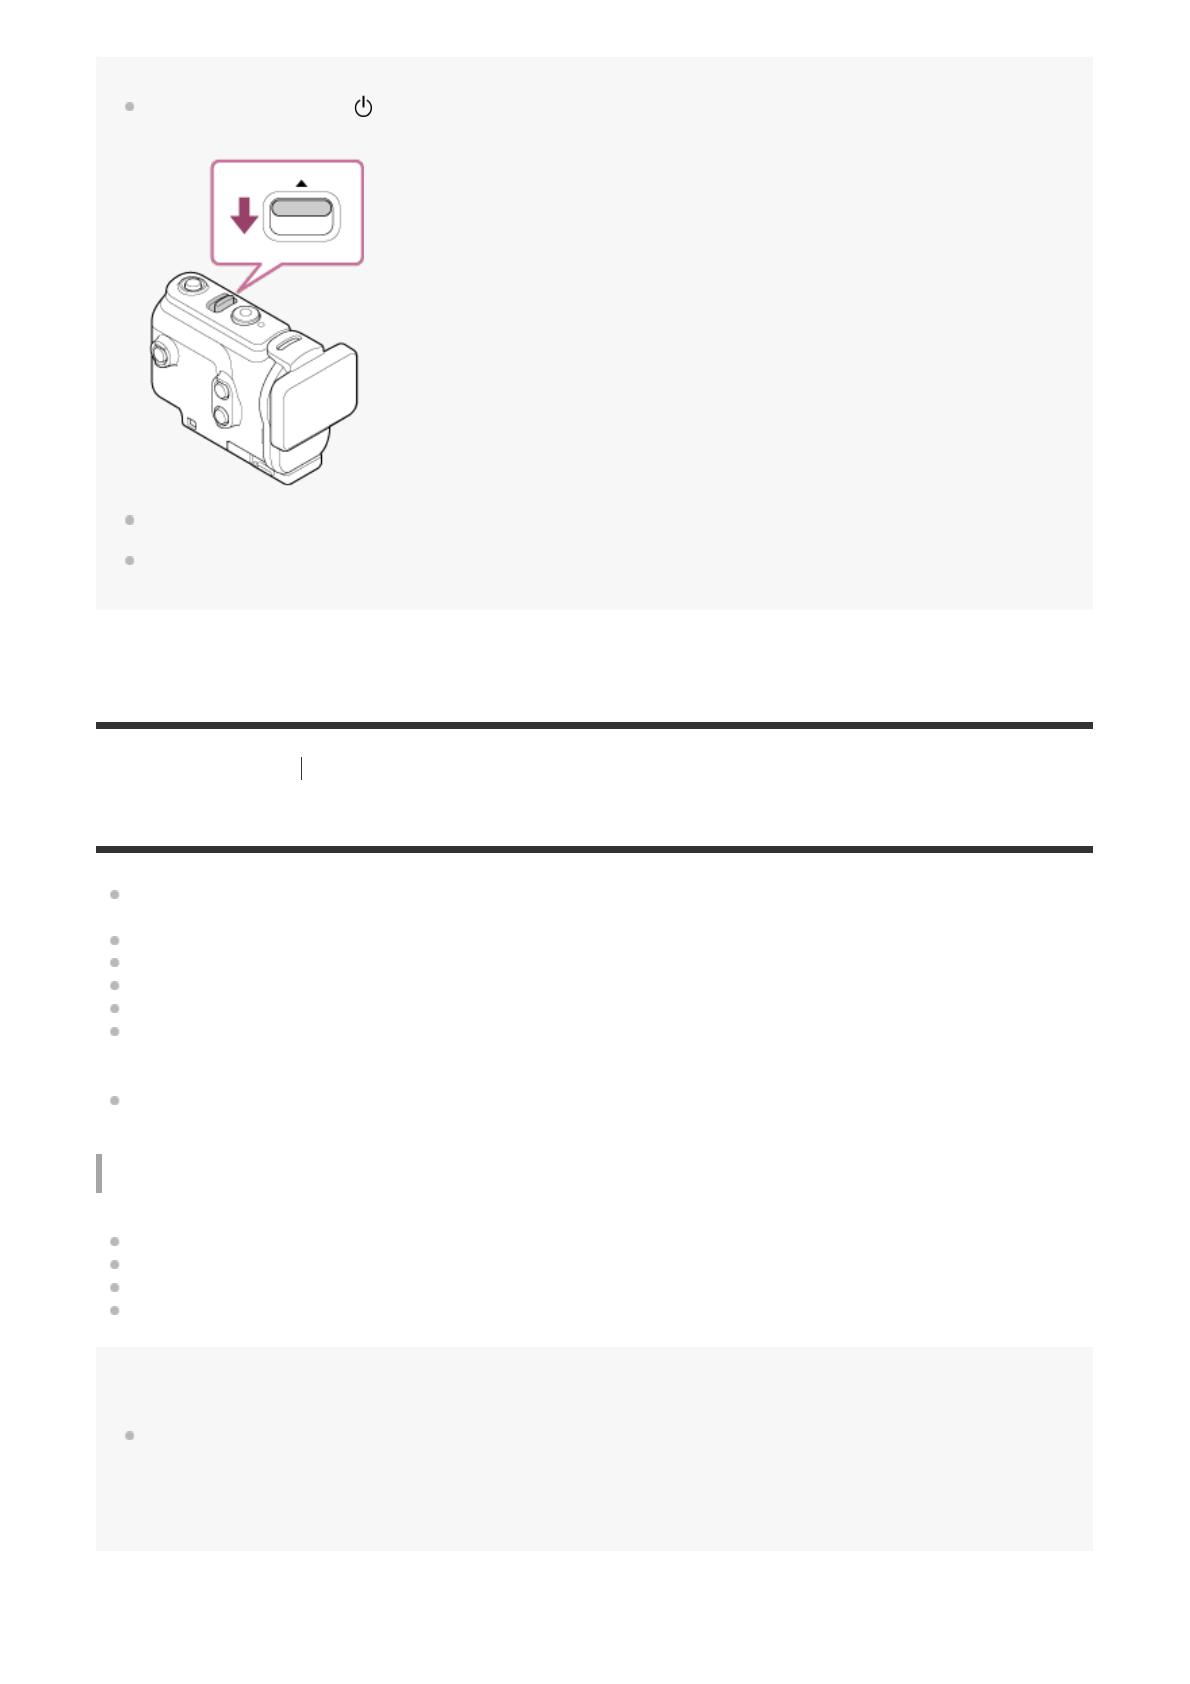
You cannot operate the (on/standby) button and REC/ENTER button when the REC HOLD switch is set to
the lock position. Release the lock in the direction of the arrow below, before operation.
You can record audio while the camera is in the Underwater Housing, but the sound level is reduced.
Thread a suitable cord through the leash attachment hole of the Underwater Housing, then attach the cord to
an item you intend to use with the camera.
[11] Getting Started Using the Underwater Housing
On waterproof performance of the Underwater Housing
When the camera is inserted in the supplied Underwater Housing, the camera can shoot up to a
water depth of 60 m (197 feet) for 30 minutes continuously.
The waterproof performance is based on the testing standards of our company.
Do not subject the Underwater Housing to pressurized water, such as from a tap.
Do not use the Underwater Housing in hot springs.
Use the Underwater Housing in water that is less than 40°C (194°F).
Sometimes waterproof performance is lost if the Underwater Housing is subjected to a strong shock
such as from being dropped. We recommend the Underwater Housing be inspected at an
authorized repair shop (chargeable).
Waterproof performance in all situations is not guaranteed.
Anti-fog sheet (AKA-AF1 (sold separately))
Insert the anti-fog sheet indoors with low humidity.
Insert the anti-fog sheet in the camera a couple of hours before shooting.
If you do not use the anti-fog sheet, place it in a bag and keep the top sealed.
By drying the anti-fog sheet sufficiently, you can use it approximately 200 times repeatedly.
Note
When inserting the anti-fog sheet (AKA-AF1), place the camera into the Underwater Housing, then place the
anti-fog sheet in the gap on the bottom of the camera and the Underwater Housing.
If you place the anti-fog sheet before placing the camera, the anti-fog sheet may be sandwiched and make it
difficult to take out the camera.
: Anti-fog sheet
[12] Getting Started Using the Underwater Housing
Notes on use for the Underwater Housing
Do not throw the Underwater Housing into the water.
Avoid using the Underwater Housing under the following situations. In these situations moisture
condensation or water leakage may occur and damage the camera.
In a very hot or humid place
In water hotter than +40°C (104°F)
At temperatures lower than –10°C (14°F)
Do not leave the Underwater Housing under direct sunlight or in a very hot and humid place for a
long period of time. If you cannot avoid leaving the Underwater Housing under direct sunlight, be
sure to cover the Underwater Housing with a towel or other protection.
When the camera overheats, it may be automatically turned off or recording may malfunction. To
use the camera again, leave it in the cool place for a while to cool down.
If sun oil is on the Underwater Housing, be sure to wash it off thoroughly using lukewarm water. If
the Underwater Housing is left with sun oil on its body, the surface of the Underwater Housing may
become discolored or damaged (such as cracks on the surface).
[13] Getting Started
Using the Underwater Housing
Water leakage
In the unlikely event that a malfunction of the Underwater Housing causes damage due to water
leakage, Sony does not guarantee against damages to the equipment contained in it (camera, battery
pack, etc.) and the recorded contents, nor expenses entailed in the photography.
[14] Getting Started
Using the Underwater Housing
Waterproof packing
  • Page 1 1
  • Page 2 2
  • Page 3 3
  • Page 4 4
  • Page 5 5
  • Page 6 6
  • Page 7 7
  • Page 8 8
  • Page 9 9
  • Page 10 10
  • Page 11 11
  • Page 12 12
  • Page 13 13
  • Page 14 14
  • Page 15 15
  • Page 16 16
  • Page 17 17
  • Page 18 18
  • Page 19 19
  • Page 20 20
  • Page 21 21
  • Page 22 22
  • Page 23 23
  • Page 24 24
  • Page 25 25
  • Page 26 26
  • Page 27 27
  • Page 28 28
  • Page 29 29
  • Page 30 30
  • Page 31 31
  • Page 32 32
  • Page 33 33
  • Page 34 34
  • Page 35 35
  • Page 36 36
  • Page 37 37
  • Page 38 38
  • Page 39 39
  • Page 40 40
  • Page 41 41
  • Page 42 42
  • Page 43 43
  • Page 44 44
  • Page 45 45
  • Page 46 46
  • Page 47 47
  • Page 48 48
  • Page 49 49
  • Page 50 50
  • Page 51 51
  • Page 52 52
  • Page 53 53
  • Page 54 54
  • Page 55 55
  • Page 56 56
  • Page 57 57
  • Page 58 58
  • Page 59 59
  • Page 60 60
  • Page 61 61
  • Page 62 62
  • Page 63 63
  • Page 64 64
  • Page 65 65
  • Page 66 66
  • Page 67 67
  • Page 68 68
  • Page 69 69
  • Page 70 70
  • Page 71 71
  • Page 72 72
  • Page 73 73
  • Page 74 74
  • Page 75 75
  • Page 76 76
  • Page 77 77
  • Page 78 78
  • Page 79 79
  • Page 80 80
  • Page 81 81
  • Page 82 82
  • Page 83 83
  • Page 84 84
  • Page 85 85
  • Page 86 86
  • Page 87 87
  • Page 88 88
  • Page 89 89
  • Page 90 90
  • Page 91 91
  • Page 92 92
  • Page 93 93
  • Page 94 94
  • Page 95 95
  • Page 96 96
  • Page 97 97
  • Page 98 98
  • Page 99 99

Sony HDR-AS50 User manual

Category
Action sports cameras
Type
User manual

Ask a question and I''ll find the answer in the document

Finding information in a document is now easier with AI