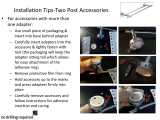
Kodak PixPro SP1 User manual

Category
Action sports cameras
Type
User manual
Digital Action Cam
SP1
User Manual
1
Declaration of Conformity
Responsible Party: JK Imaging Ltd.
Address: 17239 So. Main Street, Gardena, CA 90248 USA
JK Imaging Europe, 71 Clarendon Road, Watford, WD17 1DS, UK
Company Website: http://kodakpixpro.com
For Customers in Canada
This device complies with Industry Canada license-exempt RSS standard(s). Operation is
subject to the following two conditions: (1) This device may not cause interference, and (2)
this device must accept any interference, including interference that may cause undesired
operation of the device.
For Customers in Europe
"CE" mark indicates that this product complies with the European requirements for
safety, health, environment and customer protection. "CE" marked products are intended
for sales in Europe.
This symbol [crossed-out wheeled bin WEEE Annex IV] indicates separate collection
of electrical waste and electronic equipment in the European countries. Please do not
throw the equipment into domestic refuse. Please use the return and collection systems
available in your country for proper, safe disposal of this product.
Before You Start
2
For Customers in the U.S.A.
This equipment has been tested and found to comply with the limits for a Class B digital
device, pursuant to Part 15 of the FCC Rules. These limits are designed to provide reasonable
protection against harmful interference in a residential installation. This equipment generates,
uses and can radiate radio frequency energy and, if not installed and used in accordance with
the instructions, may cause harmful interference to radio communications. However, there is
no guarantee that interference will not occur in a particular installation. If this equipment does
cause harmful interference to radio or television reception, which can be determined by turning
the equipment off and on, the user is encouraged to try to correct the interference by one or
more of the following measures:
-- Reorient or relocate the receiving antenna.
-- Increase the separation between the equipment and receiver.
-- Connect the equipment into an outlet on a circuit different from that to which the receiver is
connected.
-- Consult the dealer or an experienced radio / TV technician for help.
This device complies with part 15 of the FCC Rules. Operation is subject to the following two
conditions:
(1) This device may not cause harmful interference, and (2) this device must accept any
interference received, including interference that may cause undesired operation.
Changes or modications not expressly approved by the party responsible for compliance
could void the user's authority to operate the equipment.
3
About this Manual
Thank you for purchasing this product. Please read this manual carefully and keep it in a safe
place for future reference.
JK Imaging Ltd. reserves all rights to this manual. No part of this published manual may
be reproduced, transmitted, transcribed, stored in a retrieval system or translated into
any language or computer language, in any form, by any means, without the prior written
permission of JK Imaging Ltd. .
All trademarks mentioned in this manual are used for identication purposes only and are
properties of their respective owners.
This manual provides you with instructions on how to use your new KODAK PIXPRO
Digital Action Cam. Every effort has been made to ensure that the contents of this manual
are accurate. However, JK Imaging Ltd. reserves the right to make changes without notice.
Throughout this manual, the following symbols are used to help you locate information
quickly and easily:
Indicates useful information.
Indicates precautions are to be taken while operating the product.
Indicates long pressing a certain point.
Indicates tap a certain point.
In this manual, digital action cam is referred to as action cam.
4
Safety Notes
Waterproof / Dustproof / Shockproof
/ Freeze-proof
JIS / IEC waterproof grade 8 (IPX8).
JIS / IEC dustproof grade 6 (IP6X).
Height for shockproof rating is 2.0m.
Suitable temperature range for freeze
proof capability is -10°C and above.
Product Notes:
Do not disassemble or repair the product
by yourself.
Do not heavily drop or knock this product.
Improper handling may damage this
product.
Avoid touching the lens cover and
lens element please use professional
lens cleaning paper together with lens
cleaning agents to wipe the lens and
keep the lens clean.
Do not use corrosive, alcoholic or
organic-solvent-containing cleaners to
wipe this product.
Do not use or store this product in high
temperature environment.
Do not expose the lens to strong light
sources (e.g. Daylight, etc.) for extended
periods of time.
Do not use or store the product in strong
magnetic eld environment.
If the product is quickly transferred from
a low temperature environment to a
high temperature environment, water
condensation may occur in the product
due to physical changes. In this case, it
is recommended to wait until the product
returns to room temperature before you
turn it on.
If a photo or video cannot be played back
due to human-caused improper operation,
the Company shall assume no liability or
responsibility for compensation.
Store the product in a dry and clean
environment when you are going to store
the product for a long period of time.
5
If there is dust, sand or other foreign
materials on the waterproof rubber of the
rear cover and its contact surface, please
wipe it with a clean, dry and lint free cloth
as soon as possible.
Before using the product underwater,
make sure that there is no damage to or
foreign debris on the waterproof rubber
gasket. Then close the rear cover tightly
to ensure the waterproof capability of the
product.
Waterproof rubber with scratches and
cracks will allow water to penetrate into
the product. Contact customer service
immediately for maintenance with
replacement of new waterproof rubber.
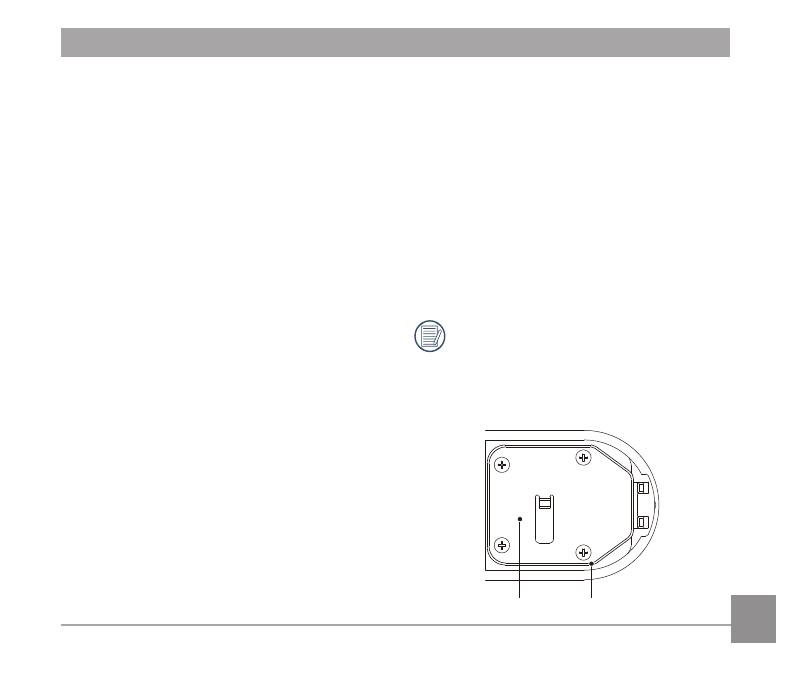
Rear Cover Waterproof Rubber
Waterproong Notes:
Do not use the product below 10 meters
(32.8 feet) underwater. The product will
remain waterproof for one hour at the
depth of 10m (32.8 feet).
Do not use this product in a geothermal
spring or in water at a temperature
greater than 40 °C.
Please do not open the rear cover
underwater.
If water accidentally comes in contact
with the product, please do not open the
rear cover immediately. Turn the product
off, and dry it with a clean, dry and lint
free cloth. Then open the rear cover, and
remove the battery and the memory card.
When opening the rear cover, if there
are water drops on the contact surface
between the inside of the rear cover and
the body, please dry the water drops.
After using the product in water or near
sand, mud or other foreign materials,
please rinse it with clean water (close the
rear cover when cleaning). After cleaning,
dry the product with a clean, dry and lint
free cloth.
6
Battery Notes:
Use only the battery specied for this
product.
If the battery overheats during charging
or use, stop charging or use immediately.
Turn off the product, remove the battery
carefully, and wait until it cools down.
Please keep the battery contacts clean
and dry.
Please install the battery according to the
positive and negative markings on the
battery compartment. Never force it into
the battery compartment.
If battery uid leaks into the product,
please contact your retailer. If battery
uid leaks onto your skin, rinse your skin
immediately with clean water and seek
for medical attention.
To prevent the battery from being
damaged, do not drop the battery, impact
it with heavy objects or scratch it with
sharp objects.
Do not let the battery come in contact
with metal objects (including coins)
to avoid short circuiting, discharging,
excessive heat, or possible leakage.
Do not heat the battery or throw it into a
re to avoid a possible explosion.
When the product is stored for a long
period of time, please remove the battery.
Do not store the battery in a hot
environment.
In colder environments, the performance
of the battery may be noticeably reduced.
Do not attempt to disassemble the
battery.
Disposal of used batteries should be
carried out in accordance with the local
(national or regional) regulations.
7
Memory Card Notes:
The memory card referred to in this
manual is Micro SD Card or Micro SDHC
card.
Please buy a genuine memory card of a
well-known brand.
Please keep the memory card clean and
dry.
When inserting a memory card, make
sure the notch direction of the card
matches the notch direction of the
memory card mark near the card slot. Do
not force the memory card into the card
slot.
Before using a brand new memory card,
please format the memory card rst.
A photo or video taken with the product
will be stored in the folder that is
automatically generated on the memory
card. Do not store photos or videos that
are not taken using the product in these
folders in case that the les cannot be
normally recognized in playback.
Do not directly edit the data on the
memory card. Copy the data to your
computer disk before editing.
Do not modify the names of the les or
folders on the memory card using your
PC. Modifying the name of the les or
folders may cause the les to not be
recognized by the product or possibly an
error may occur.
Please turn the product off before
removing the memory card. Otherwise,
the memory card could be damaged.
When the product is stored for a long
period of time, please backup the data
on the memory card and remove the
memory card for storage.
8
Other Notes:
Do not disconnect the power or turn the
product off during the update process.
Doing so may cause incorrect data to be
written and the product may not power on
later.
When using your product on an airplane,
observe the relevant rules specied by
the airline.
Due to the limitations of manufacturing
technology, the LCD screen may have a
few dead or bright pixels. These pixels
do no effect the quality of the photos or
video.
If the LCD screen is damaged, pay
particular attention to the liquid crystal
in the screen. If any of the following
situations arise, take the recommended
immediate action indicated below:
1. If liquid crystal comes in contact with
your skin, please wipe with a dry cloth,
wash thoroughly with soap, and rinse
with plenty of clean water.
2. If liquid crystal gets into your eye, ush
the eye immediately with plenty of
clean water for at least 15 minutes and
then seek for medical assistance.
3. If liquid crystal is swallowed,
immediately ush your mouth
thoroughly with clean water and induce
vomiting. Seek for medical assistance.
9
Contents
Before You Start ....................................................................1
Safety Notes .......................................................................... 4
Contents ................................................................................9
Getting Ready........................................................................13
Accessories Included ........................................................................................ 13
Part Names ....................................................................................................... 15
Installing and Dismantling the Lens Cover .......................................................18
Installing Battery and Memory Card .................................................................20
Charging ...........................................................................................................22
Introduction to Various Button Functions ..........................................................23
10
Operation Method ..................................................................25
Turn On / Off .....................................................................................................25
Set your Language, Date and Time after the rst power-on ............................. 26
LCD Screen Display .........................................................................................27
Introduction to Basic Operation of Recording and Shooting ............................. 28
LCD Screen Display under Playback Status ....................................................30
Introduction to Basic Operation of Playback ..................................................... 31
Introduction to the Setting Mode of Menu Options ...........................................36
Menu Introduction .............................................................................................37
Introduction to General Settings .......................................................................38
11
Introduction to Mode Settings ...........................................................................43
Movie Settings Introduction ..............................................................................44
Still Settings Introduction ..................................................................................51
AP Settings Introduction ...................................................................................54
Connecting the Camera with the Smart Device.....................57
Download and Install App .................................................................................57
Establish a Connection .....................................................................................58
Smart Device APP Operating Method ...................................59
Position Service Function .................................................................................59
Remote Viewnder............................................................................................59
12
Playback ...........................................................................................................67
Connection Port Introduction ................................................. 82
Connect a Computer .........................................................................................82
HDMI Connected TV Output .............................................................................84
Appendices ............................................................................85
Specications ....................................................................................................85
Prompts and Warning Messages ......................................................................88
Trouble Shooting ...............................................................................................92
Special Accessories...............................................................93
13
Getting Ready
Your product box should contain the product you purchased along with the following
accessories. If anything is missing or appears to be damaged, please contact your retailer.
(Based on sales in different countries or regions, the shape of the AC adapter will vary. The
actual product will prevail.)
Accessories Included
USB Cable
CD-ROMWarranty Card
AC Adapter
Quick Start Guide
Quick Start Guide
STOP
Service Card
Rechargeable
Li-ion Battery
14
Standard Lens Cover Underwater Lens Cover
Standard Lens Cover has been installed on the product when leaving factory.
15
1 Alignment Point
2 Standard Lens Cover
3 Microphone
4 Speaker
5 Lens Cover Ring
6 LCD Screen
1
3
2
6
5 4
Part Names
16
7
Video Recording Button /
Shooting Button
8 Status Indicator
9
Menu Button /
Direction Button (Upper)
10
Power Button / Delete Button
11 Lens Cover Buckle
12
OK Button
13
Playback Button /
Direction Button (Lower)
14 Tripod Socket
15 Location Hole
7 9 10 118
13
12
15 14
17
16 Rear Cover Open Switch
17 Rear Cover
18 Rear Cover Lock
19 Battery Lock
20 Battery Compartment
21 HDMI Port
22 Micro SD Card Slot
23 USB Port
17
16
18
19
20
21
22
23
Rear Cover Open Status
18
Installing and Dismantling the Lens Cover
Two types of replaceable lens covers are
provided for the product.
Standard Lens Cover:
Applicable for general use. Do not use
underwater.
Visual angle in the air is about 160°. Will not
focus underwater.
Underwater Lens Cover:
Applicable for use in water.
Visual angle in the air is about 130°, and
visual angle in water is about 90°.
Steps for dismantling the lens cover:
1. Hold the product with your left hand, and
pull the lens buckle with your nger to the
left end as illustrated in the picture. Hold
the lens cover ring with your right hand
and rotate to the OPEN arrow direction.
2. When three alignment points are in a
straight line, loose your left hand from the
lens buckle, and remove the lens cover
from the right with your right hand.
Alignment Points
19
Please select appropriate lens cover
when taking videos and pictures,
otherwise it will affect the image effect.
When the product is exposed
to uctuations in temperature,
condensation may form on the inside
surface of the lens cover. If this
happens, remove the lens cover, clean
it with a soft, dry, lint-free cloth, and
then reinstall the lens.
Steps for installing the lens cover:
1. Hold the product with your left hand, and
pull the lens buckle with your nger to the
left end as illustrated in the photo, hold
the lens cover ring with your right hand.
2. When three alignment points are in a
straight line, buckle the lens cover to the
lens, and rotate against the OPEN arrow
direction.
3. When the notch of the lens cover ring
is aligned with the lens buckle, loose
your left hand from the lens buckle, and
remove your right hand from the lens
cover.
1 / 1

Ask a question and I''ll find the answer in the document

Finding information in a document is now easier with AI

Ask the document