DEAR ARG CUSTOMER,
Congratulations and thank you for purchasing ARG’s 900MHz stationary transmitter. This device is
easy to mount, convenient to operate with clear display and provides high-fidelity audio
enjoyment. All of ARG’s high quality products are designed to provide many years of reliable
service; they are uncomplicated to use so anyone can operate them with ease and confidence. I
am certain that after using your newly purchased product you will join ARG’s long list of satisfied
customers.
This manual contains basic product infor mation to ensure trouble free operation, so please take
time to read through this manual thoroughly before using. If for any reason you have additional
questions you can call our headquarters toll-free at (888)-468-4552 and talk to one of our
professional sales team members who will be happy to help you Monday through Friday between
the hours of 8:00AM and 5:00PM Central Standard Time; you can also email ARG at
info@argaudio.com or visit our website at www.argaudio.com for additional resources and
product options.
Everyone at ARG is firmly c ommitted to our motto, which isn’t just a tagline, it’s our a ssurance
that ARG’s high quality products will meet your expectations for many years to come.
Every word...every sound…HEARD, UNDERSTOOD.
Again, on behalf of everyone at ARG, Thank you!
Rick Allerdings, President

This device complies with Part 15 of the FCC Rules. Operation is subject to the
following two conditions: (1) this device may not cause harmful interference, and (2)
this device must accept any interference received, including interference that may
cause undesired operation.
FCC Compliance Statement
Changes or modifications not expressly approved by the party responsible for
compliance could void the user’s authority to operate the equipment.
This equipment has been tested and found to comply with the limits for a Class B
digital device, pursuant to Part 15 of the FCC Rules. These limits are designed to
provide reasonable protection against harmful interference in a residential
installation. This equipment generates, uses and can radiate radio frequency energy
and, if not installed and used in accordance with the instructions, may cause harmful
interference to radio communications. However, there is no guarantee that
interference will not occur in a particular installation.
If this equipment does cause harmful interference to ra dio or television reception,
which can be determined by turning the equipment off and on, the user is
encouraged to try to correct the interference by one or more of the following
measures:
-- Reorient or relocate the receiving antenna.
-- Increase the separation between the equipment and receiver.
-- Connect the equipment into an outlet on a circuit different from that to which the
receiver is connected.
-- Consult the dealer or an experienced radio/TV technician for help.
This equipment complies with FCC radiation exposure limits set forth for an
uncontrolled environment. End user must follow the specific operating instructions
for satisfying RF exposure compliance. This transmitter must not be co-located or
operati ng in conjunction with any other antenna or transmitter.

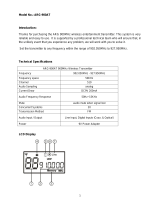
900MHz Stationary Transmitter
It allows the user to transmit the audio wirelessly in a certain range. Connect the audio source to
the bal./unbal. Input on the back of the transmitter. Hook up the antenna to the front antenna
jack or rear antenna jack and match the antenna selection switch. You can monitor the audio via
the headphone jack in front of the panel. In unlock status, set the channel number by pressing
Channel UP or Channe l DOWN buttons. And adjust the gain output by pressing Gain UP or Gain
DOWN buttons.
Lock/Unlock
Unlock the transmitter by pressing the LOCK button for a second and the lock icon disappears
from the display. Press it again to unlock.
Channel setting (1-25)
In unlock status, press the Channel + or Channel – button to scroll up or dow n the channel
numbers
Gain setting (1-7)
In unloc k status, press the Gain + or Gain – button to adjust the gain
MUTE
Press the Gain + or Gain – button for a second to mute the transmitter and the signal strength
disappears. Press one of it again to unmute.
Monitoring
Plug in the headphone to the headphone output jack, turn the volume knob to adjust the
monitoring volume
Sampling Rate Switch
On OFF position, press and hold the Gain + and Gain - buttons and turn the transmitter to ON

position. When there is digit “16” flash once on the display, it means that the device sampling
rate is set at 16KHz; When it is digit “8” flash once on the display, it means that it is set at 8KHz.
INPUT SOURCE
XLR or 1/4” bal./unbal. input
RF output le vel
Set the RF output via RF POWER LEVEL switch at the rear panel.
12dBm
Technical Specifications
Frequency Range: 903MHz – 927MHz
RF Output: 15dBm
Modulation: QPSK
Audio sampling: 8bit @8KHz; 8bit @ 16KHz
Power consumption: 60mAH
Dynamic range: >80Db
SNR: >78dB
THD at 1KHz: <1%
Channels: 25
Channel spacing: 1MHz
Transmitter Troubles
Make sure the power outlet is working and the 9V power adapter is connected correctly into a
grounded outlet
Independent data streams are sent to each transmit antenna, so it belong to completely
uncorrelated signals.
No Audio Heard in Headphone OUTPUT
a. Check to see if there is a signal coming from the audio source. Correct it if necessary.
b. Check to see if there is an incorrect or defective connection from the audio source.
Noise in Audio
a. Check to see if there is noise in source audio. Disconnect the audio cable to find it
out. If the noise disappears, the noise problem is from the source. Correct or repair
the audio source.
b. Check to see if the source level is too low. Adjust the source audio level or reset
audio select switch to match the existing source level.
c. Make sure there are no major internal obstructions, such as metal support posts,
between antenna and receiver.

Distorted Audio
a. Check to see if the source audio is distorted source. Correct or repair the audio
source if necessary.
b. Reset the Audio Select Switch to match the source.
c. Reset the HI-Pass Filter to adjust the frequency response.
Reception Troubles
No Reception
a. Make sure the transmitter channel matches the receiver channel. Reset the
frequency following the channel setting in programming procedures.
b. Check to see if the antenna is disconnected. Make sure the antenna switch selection
matches the antenna installed.
c. Reset the transmitter output to see if there is a change.
d. Turn the volume c ontrols up.
Insufficient Range, Poor Reception
a. Check to see if the transmitter antenna is installed incorrectly. Correct or replace the
antenna
b. Make sure the antenna is not near other transmitting antennas or metal objects. Be
sure to route cabling and power cords away from t he antenna, so they don’t cause
interference.
c. Check to see if any outside sources are using the same frequency as the transmitter.
Either locate and remove the outside interference, or set the transmitter to a
different channel to avoid that freque ncy.
d. Try changing the transmitter to a different frequency to see if the sound quality
improves. Some will be received better than others.
Defective Audio
e. Check to see if there is defective audio at the transmitter. If so, check to see if
there is defection audio source.
f. Check to see if there is a strong interfering signal by listening to the receiver with the
transmitter off.
In case the problem persists, the unit needs to be serviced. Do not try to service the unit
yourself. Please consult your dealer or ARG directly.
Repairs
In the event that there is need for a repair, please contact your dealer or ARG for a Return
Authorization.
/