Page is loading ...

Page
23
I
N
S
T
AL
L
A
T
I
O
N:
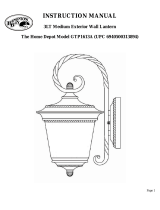
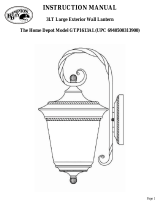
Page 2
T
h
a
nk
y
ou
f
o
r
pu
r
c
h
a
s
i
ng
t
h
i
s
H
a
m
p
t
on
B
a
y
e
x
t
e
ri
o
r
w
a
l
l
l
a
n
t
e
r
n
.
T
h
i
s
producthasbeenmanufacturedwiththehigheststandardsof safetyand
quality.The finishofthislanternisweatherresistant butover timewill
naturallyweatherandfade.Thisfixtureisequippedwithanenergy saving
dusk-to-dawnphotocell.If thepowerisleft on,thefixturewillautomatically
turn on at duskand offatdawn.
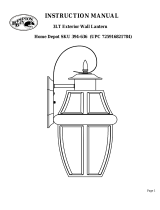
FEATURES:
1. Energy savingfixtureconservesenergybyautomaticallyturninglightonat
duskand offatdawn.
2. Thisfixturehasbeenengineeredto safelyuse up toa100wattmedium
baseincandescentlight bulb(do notexceed100watts)(notincluded)or
equivalentstandardbasecompactfluorescentlight bulb (notincluded).
3. The dusk-to-dawnfeatureautomaticallyilluminatesyour homeatnightfor
addedsecurity.
QUESTIONS,PROBLEMS,MISSINGPARTS:
BeforereturningtoyourlocalHomeDepot,please call ourCustomerService
Teamat1-877-527-0313 orvisit www.homedepot.com.Pleasereferenceyour
SKU (240-336 blackfixture,240-339 whitefixture, 433-659 bronze fixture)
orUPC (725916814205 black fixture, 725916814212 white fixture,
6940500311234 bronze fixture)

Page
3
CAU
T
I
O
N:
1. Beforestarting installationofthisfixtureorremovalofapreviousfixture,
disconnectthepowerbyturning offthecircuit breakerorbyremoving the
fuseat thefusebox.
2. CONSULTAQUALIFIED ELECTRICIAN IF YOU HAVE ANY
ELECTRICAL QUESTIONS.
3. Ifyou haveany non-electricalquestionsaboutthisfixture,pleasecontact
our Customer Service Team at 1-877-527-0313 or visit
www.homedepot.com.PleasereferenceyourSKU (240-336 blackfixture,
240-339 whitefixture, 433-659bronzefixture)orUPC(725916814205
blackfixture,725916814212 whitefixture, 6940500311234 bronze
fixture).
4. Keepyour receiptand these InstructionsforProofofPurchase.
TOOLSREQUIREDFORASSEMBLY & INSTALLATION
(not included):
LightBulb Safetygoggles Ladder Gloves Wirestrippers
(100 wattmaximum)
(orCFLequivalent)
Flatheadscrewdriver Phillipsscrewdriver Electricaltape Wirecutters SiliconRubberSealant
forexterioruse
Page 22
P
I
E
C
E
S
I
N
C
L
U
S
E
S
P
OUR
L
'
I
N
S
T
A
LL
A
T
I
ON
(
l
e
s
pi
c
e
s
n
e
s
o
n
t
p
a
s
l'
c
h
e
ll
e
):
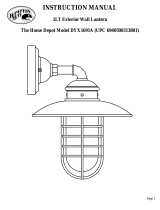
1x VisTerre (#11) 2xVis Bo te deSortie (#12) 2xVisdeMontage(#13)
1x Entretoise(#14) 2x Serre-Fils (#15) 2x crou deVerrouillage (#18)
INSTRUCTIONSD'INSTALLATION:
1. VisserlesdeuxVisdeMontage(#13)surlaEntretoise(#14).FixerlaEntretoise(#14)sur
la Bo tedeSortie(#16) gr ceauxdeuxVisde Bo tedeSortie(#12).[S'assurerquele
filetagedesVisdeMontage(#13)faitface l'ext rieurquandlaEntretoise(#14)est
attach e la Bo tedeSortie(#16).]
2. Enroulerle c ble lectriquedeterreduluminaireautourdelaVisdeTerre(#11) pr sente
surlaSangledeMontage(#14),et puisconnecterle c ble lectriquedeterredu luminaire
celui dela Bo tedeSortie(#16). Connecterle c blesansmarque crite(avecdes
nervuresenrelief)duluminaireau c ble blancdela Bo tedeSortie(#16).Connecterle
c bleavec unemarque critedu luminaireau c blenoirdela Bo tedeSortie(#16).
Couvrirlesconnecteurs gr ceauxSerre-Fils(#15). Envelopperlesconnexionsdes c bles
avec du rubanadh sifisolant pourunemeilleureconnexion.Placerles c bles l'int rieur
dela Bo tedeSortie(#16). Note:Sivousavezdesquestionsrelatives l' lectricit ,
consultezvotrecode lectrique localconcernant les m thodesdemise terreenvigueur.
3. Installerlecorpsdu luminaireaumurenfaisantpassercompl tement lesVisdeMontage
(#13)protub rantesparlestrousdelaPlaquedeMur(#9).Ve illez nepaspincerles
c blessitu sentrele luminaireetla Bo tedeSortie(#16).Bienfixerleluminaireau mur
envissantlesdeuxEcrousdeBlocage(#7)surlesdeuxVisdeMontage(#13).
4.Unefoisle luminaire install surlemur,colmater l'espaceentrelemuretles3/4sup rieurs
delaPlaqueMurale(#9) pouremp cherl'eaudefiltrerdansla Bo tedeSortie(#16).
Laisserle1/4inf rieurnoncolmat pour pouvoir vacuer touteeauayantpu p n trerdans
le bo tier.
5. L'installationestachev e.Remettrelecourantau disjoncteur ou la bo te fusible.
Appuyezsurl'interrupteurdelumi repourallumerle luminaire.
6. L'ampoulenes'allumerapass'ilfait jour.Pourtesterleluminaire,recouvrirlaCellule
Photo(#10)avecdurubanisolantafin d'allumerl'ampoule.Enleverlerubanisolant apr s
s' treassur que l'ampoules'allume.

Page
21
A
SS
E
M
B
LA
G
E:
Page 4
P
A
R
T
S
I
NCL
UD
ED
F
O
R
A
SS
E
M
B
L
Y
(
p
ar
t
s
a
r
e
n
o
t t
o
s
c
a
l
e
):
1eaFinial (#1) 1ea LockWasher(#2) 1ea TopCover (#3)
1ea Nipple(#4) 2eaLockNuts(#7)
1ea HexNut (#5)
1eaHarp(#6)
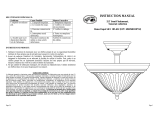
ASSEMBLYINSTRUCTIONS:
1. Carefully unpack thefixture.Lay outallpartsonacleansurface.
2. Installuptoa100 watt incandescentLightBulb(#8)(notincluded)or
ListedSBCFL(Self-BallastedCompactFluorescentLamp)(notincluded)
inthesocketintheFixtureFrame(#17).Do notexceeda100 watt
incandescent light bulb,ora32 watt SBCFL.
3. PlacetheNipple(#4) ontotheHarp(#6)by screwing theHexNut(#5)into
position.AttachtheHarp(#6)andtheNipple(#4)tothefixtureby
screwing thetwoLock Nuts (#7) intoplace.
4. PlacetheTop Cover(#3)and thentheLockWasher(#2) overtheNipple
(#4).SecuretheTop Cover(#3)by screwing theFinial(#1)totheend of
theNipple (#4).

Page
19
A
V
E
R
T
I
S
S
E
M
EN
T:
1. Avantdecommencer installerceluminaire ou d'enleverl'ancienluminaire,
d connectezlecouranten teignantledisjoncteurouenenlevantlefusible
correspondant du coffret fusibles.
2.
CONSULTER UN ELECTRICIEN QUALIFIE POUR TOUTE
QUESTION RELATIVEAL'ELECTRICITE.
3.
En cas dequestions non relatives l' lectricit proposde ce luminaire,
veuillezcontacter notre centredeService laClient leau1-877-527-0313
ou visiter www.homedepot.com.Veuillez indiquer votre
UGS
(240-336
blackfixture,240-339 whitefixture, 433-659 bronze fixture) ou UPC
(725916814205 Luminaire noir, 725916814212 Luminaire blanc,
6940500311234 Luminairebronze).
4.
Conserver votre re uetces InstructionscommePreuved'Achat.
OUTILS REQUISPOUR L'ASSEMBLAGE& L'INSTALLATION
(non inclus):
Ampoule LunettesdeProtection Echelle Gants D nudeurde c bles
(100wattsmaxima) lectriques
(ou quivalentLFC)
Tournevis t te plate Tournevis croisillon Rubanadh sif Pincepour JointenCaoutchoucSilicone
isolant c bles lectriques pourunusageext rieur
Page 6
P
A
R
T
S
I
NC
L
U
D
E
D
F
OR
I
N
S
T
A
LL
A
T
I
ON
(
p
a
r
t
s
a
r
e
n
o
t
t
o
s
c
al
e
):
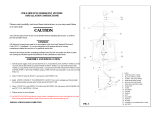
1ea GroundScrew(#11) 2ea Outlet BoxScrews (#12) 2ea MountingScrews(#13)
1ea Cross Bar (#14) 2ea WireConnectors(#15) 2ea LockNuts (#18)
INSTALLATION INSTRUCTIONS:
1. Screw thetwoMountingScrews(#13)into theCrossBar(#14). MounttheCross Bar (#14)
tothe OutletBox (#16)usingthe two OutletBoxScrews(#12).[Makesure the threadsof
theMountingScrews(#13)arefacing outside when theCrossBar(#14)isattached to the
OutletBox (#16).]
2. Wrap thegroundwirefromthefixturearoundtheGroundScrew(#11) on theCross Bar
(#14), andthenconnectthegroundwire from thefixturetothegroundwire fromthe
OutletBox (#16). Connectthewhite wirefromthefixture tothewhitewire(neutralwire)
from theOutletBox (#16),and the blackwirefrom thefixturetothe black wire (livewire)
fromthe OutletBox(#16). Coverthetwowireconnectionsusing the two Wire
Connectors(#15). Wrap thetwo wireconnections withelectricaltapeforamoresecure
connection.PositionthewiresbackinsidetheOutletBox(#16). Note:Ifyouhave
electrical questions, consult yourlocalelectricalcodeforapprovedgroundingmethods.
3. Mount thebody of thefixtureon thewall byaligningtheprotrudingMounting Screws
(#13)all theway throughthe holesontheWall Plate(#9).Becareful nottopinchany of
thewiresbetweenthefixtureandtheOutletBox(#16). Tighten thefixture tothewallby
screwing the twoLockNuts(#18) ontothetwoprotruding MountingScrews(#13).
4.Once thefixtureismountedonthewall, caulkthespacebetweenthewall and the upper
3/4 areaoftheWall Plate(#9)topreventwaterseepingintotheOutletBox(#16). Leave
the bottom1/4areauncaulkedfordrainageofanywater whichmight leak intothe
enclosure.
5. Installationiscomplete.Turnon the poweratthecircuitbreakerorfusebox.Turnthe
lightswitchon to activatethefixture.
6. If it isdaylight, thelightbulbwillnot illuminate.Totestthefixture,cover thePhotocell
(#10) withelectricaltapeto illuminate thelight bulb. Once youconfirm thelightbulb
illuminates, removetheelectricaltape.

Page
17
M
A
NU
E
L
D
'
I
N
S
T
R
U
C
T
I
O
NS
LanterneMuraled'Ext rieur1LM avec CellulePhoto
HomeDepotSKU 240-336 (UGS 725916814205) (Luminairenoir)
HomeDepotSKU 240-339 (UGS 725916814212) (Luminaireblanc)
HomeDepotSKU 433-659 (UGS 6940500311234) (Luminairebronze)
Page 8
T
R
O
U
BLE
S
H
O
O
TI
N
G:
PRODUCTMAINTENANCE:
1. Tocleanthe outsideof thefixture,useadryorslightlydampenedcleancloth(useclean
water,neverasolvent)towipetheglassandsurfaceofthefixture.
2. Toclean theinsideofthefixture,first disconnect powertothefixture byturning off the
circuitbreakerorbyremovingthefuseatthefusebox.Next,useadryorslightly
dampenedcleancloth (usecleanwater,neverasolvent)towipetheinside glassand
interiorsurfaceof thefixture.
3.Do notuseanycleaners withchemicals,solventsorharshabrasives.Useonlyadrysoft
cloth todustorwipecarefully.
LIMITEDWARRANTY
Themanufacturerwarrantsthis lightingfixturetobefreefromdefectsinmaterialsandworkmanship for aperiod
ofthree(3)yearsfromdate of purchase.This warrantyappliesonlytothe originalconsumer purchaserandonly
toproductsusedinnormaluseand service. If this product is found tobedefective,themanufacturer sonly
obligation,andyour exclusiveremedy,istherepair or replacement of the product at themanufacturer s
discretion, providedthat the producthas notbeendamagedthrough misuse,abuse, accident,modifications,
alterations,neglect or mishandling.This warrantyshall notapplytoanyproduct thatisfoundtohavebeen
improperlyinstalled,set-up, or usedinany waynotin accordancewiththeinstructionssupplied withthe product.
This warrantyshall notapplytoafailure of the productasaresult ofan accident,misuse,abuse,negligence,
alteration, or faultyinstallation, or any otherfailurenotrelatingtofaultymaterialor workmanship.This
warrantyshallnotapplytothefinishonany portion of the product,suchassurfaceand/orweathering,asthisis
considered normal wearand tear. The manufacturerdoesnot warrantandspeciallydisclaimsanywarranty,
whetherexpressorimplied, of fitness foraparticularpurpose, otherthanthewarranty contained herein.
Themanufacturerspecificallydisclaimsanyliability and shallnotbeliable foranyconsequentialor
incidentalloss ordamage,includingbutnotlimited toanylabor/expensecostsinvolved inthe
replacementorrepair of saidproduct.
Problem PossibleCause CorrectiveAction
1.Lightbulbis burned out. 1.Replacelight bulb.
2.Powerisoff. 2.Makesure power
supplyis on.
3.Faultywireconnection. 3.Checkwiring.
4.Faultyswitch. 4.Testor replaceswitch.
Lightbulb willnot
illuminate.
5.Photocell. 5.Ifdaylight,cover
photocell withhandor
electricaltape.
Fuse blowsorcircuit
breakertripswhen light
bulb isilluminated.
Crossedwiresor powerwire
isgrounding out.
Check wireconnections.
/