Page is loading ...

Page
23
I
N
S
T
AL
L
A
T
IO
N:
Page 2
T
h
a
nk
y
ou
f
o
r
pu
r
c
h
a
s
i
ng
t
h
i
s
H
a
m
p
t
on
B
ay
e
x
t
e
ri
o
r
w
a
l
l
l
a
n
t
e
rn
.
T
h
i
s
product
h
asbeenmanufacturedwiththehigheststandardsof safetyand
quality.The finishofthislanternisweatherresistant butover timewill
naturallyweatherand fade.
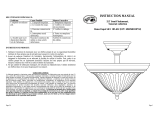
FEATURES:
1. One-lightexteriorwall lanterninblack finish(800-429)orwhitefinish
(803-729)and clearbeveledglass.
2. Thisfixturehas beenengineeredto safelyuse a60wattmediumbase
incandescent light bulb (donotexceed 60 watts) (not included).
3. Forenergysavings,thisfixturehas beenengineeredtosafelyusea
standardbasecompactfluorescentlight bulb(do notexceed15watts)(not
included).
QUESTIONS,PROBLEMS,MISSINGPARTS:
BeforereturningtoyourlocalTheHomeDepot,pleasecall ourCustomer
Service Teamat1-877-527-0313 orvisit www.homedepot.com.Please
referenceyourSKU (800-429 blackfixture, 803-729 white fixture)orUPC
(6940500312798 blackfixture,6940500312804 whitefixture)

Page
3
CAU
T
I
O
N:
1. Beforestartinginstallationofthisfixtureorremovalofapreviousfixture,
disconnectthepowerbyturningoffthecircuitbreakerorbyremoving the
fuseat thefusebox.
2. CONSULT AQUALIFIED ELECTRICIAN IF YOU HAVE ANY
ELECTRICAL QUESTIONS.
3. Ifyou haveany non-electricalquestionsaboutthisfixture,pleasecontact
our Customer Service Team at 1-877-527-0313 or visit
www.homedepot.com.PleasereferenceyourSKU (800-429 blackfixture,
803-729 white fixture) or UPC (6940500312798 black fixture,
6940500312804 whitefixture)
4. Keepyour receiptand these InstructionsforProofofPurchase.
TOOLSREQUIREDFORASSEMBLY & INSTALLATION
(not included):
LightBulb Safetygoggles Ladder Gloves Wirestrippers
(60 watt maximum)
(orCFLequivalent)
Flatheadscrewdriver Phillipsscrewdriver Electrical tape Wirecutters Silicon RubberSealant
forexterioruse
Page 22
P
I
E
C
E
S
I
N
C
L
U
S
E
S
P
OUR
L
'
I
N
S
T
A
LL
A
T
I
ON
(
l
e
s
pi
c
e
s
n
e
s
o
n
t
p
a
s
l'
c
h
e
ll
e
):
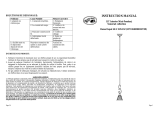
2x crousdeVe rrouillage(#2) 3xSerre-Fils (#10) 1x Entretoise (#11)
1x VisdeTerre(#12) 2x Visdela Bo te deSortie (#13) 2x Visde Montage(#14) 2xRondelles (#15)
INSTRUCTIONSD'INSTALLATION:
1. Visserlesdeux VisdeMontage(#14)surlaEntretoise(#11). FixerlaEntretoise(#11)sur
la Bo tedeSortie(#9) gr ceauxdeuxVisde Bo tedeSortie(#13).[S'assurerquele
filetagedesVisdeMontage(#14)faitface l'ext rieurquandlaEntretoise(#11)est
attach e la Bo tedeSortie(#9).]
2. Enroulerle c ble lectriquedeterredu luminaireautourdelaVisdeTerre(#12) pr sente
surl'Entretoise(#11),etpuisconnecterle c ble lectriquedeterreduluminaire celui de
la Bo tedeSortie(#9).Connecterle c ble blanc du luminaireau c ble blanc (c bleneutre)
dela Bo tedeSortie(#9). Connecterle c ble noir duluminaireau c ble noir (c blesous
tension)dela Bo tedeSortie(#9).Couvrirlesconnecteurs gr ceauxSerre-Fils(#10).
Envelopperlesconnexionsdes c blesavec du rubanadh sifisolantpourunemeilleure
connexion.Placerles c bles l'int rieurdela Bo tedeSortie(#9). Note:Sivousavezdes
questionsrelatives l' lectricit ,consultezvotrecode lectrique local concernantles
m thodesdemise terreenvigueur.
3. Placerlecorps du luminairesurlemurenalignantlesVisdeMontageprotub rantes(#14)
autraversdestrouscorrespondantssurlaPlaqueMurale(#1). Maintenirleluminaireau
murenpla ant d abordlesdeuxRondelles(#15)eten vissant ensuitelesdeuxEcrousde
Verrouillage(#2)surlesVisdeMontageprotub rantes(#14).
4.Unefoisle luminaire install surlemur,colmater l'espaceentrelemuretles3/4sup rieurs
delaPlaqueMurale (#1)pouremp cherl'eaudefiltrerdansla Bo tedeSortie(#9). Laisser
le 1/4 inf rieurnoncolmat pourpouvoir vacuertouteeauayantpu p n trerdansle
bo tier.
5. L'installationestachev e.Remettrelecourantau disjoncteur ou la bo te fusible.
Appuyezsurl'interrupteurdelumi repourallumerle luminaire.

Page
21
A
SS
E
M
B
LA
G
E:
Page 4
P
A
R
T
S
I
NCL
UD
ED
F
O
R
A
SS
E
M
B
L
Y
(
p
a
r
t
s
a
r
e
n
o
t t
o
s
c
a
l
e
):
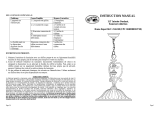
1ea TopCover (#3) 2ea LockNuts(#6)
2ea Screws (#4)
ASSEMBLYINSTRUCTIONS:
1. Carefully unpack thefixture.Lay outallpartsonacleansurface.
2. Install a60wattmediumbase incandescent lightBulb(#5)(notincluded)
oranequivalentstandardbase compact fluorescentlightbulb(notincluded)
in theSocket (#8) intheFixtureFrame(#7).
3. Place theTopCover(#3) ontothetop oftheFixtureFrame(#7). Align the
Screws(#4)toprotrudethroughthe holes onthetopoftheFixtureFrame
(#7).SecuretheTop Cover(#3)intoplace byscrewing thetwoLockNuts
(#6) ontothe twoprotruding Screws (#4).

Page
19
A
V
E
R
T
I
S
S
E
M
EN
T:
1. Avantdecommencer installerceluminaire ou d'enleverl'ancienluminaire,
d connectezlecouranten teignantledisjoncteurouenenlevantlefusible
correspondant du coffret fusibles.
2.
CONSULTER UN ELECTRICIEN QUALIFIE POUR TOUTE
QUESTION RELATIVEAL'ELECTRICITE.
3.
En cas de questions non relatives l' lectricit proposde ce luminaire,
veuillezcontacter notre centredeService laClient leau1-877-527-0313
ou visiter www.homedepot.com.
Veuillezindiquer votre UGS
(800-
429Luminairenoir, 803-729 Luminaireblanc)orUPC (6940500312798
Luminaire noir, 6940500312804 Luminaireblanc).
4.
Conserver votre re uetces InstructionscommePreuved'Achat.
OUTILS REQUISPOUR L'ASSEMBLAGE& L'INSTALLATION
(non inclus):
Ampoule LunettesdeProtection Echelle Gants D nudeurde c bles lectriques
(60 wattsmaxima)
(ou quivalentLFC)
Tournevis t te plateTournevis croisillon Rubanadh sifisolant Pince pourJointenCaoutchouc Silicon
e
c bles lectriques pour un usageext rieur
Page 6
P
A
R
T
S
I
NCL
UD
ED
F
O
R
I
N
S
T
ALL
A
T
I
O
N
(
p
a
r
t
s
a
r
e
n
o
t
t
o
s
c
a
l
e
):
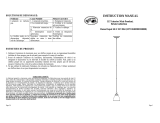
2ea LockNuts (#2) 3ea WireConnectors (#10) 1eaCrossBar (#11)
1eaGround Screw (#12) 2eaOutlet Box Screws (#13) 2ea MountingScrews(#14) 2eaWashers(#15)
INSTALLATIONINSTRUCTIONS:
1. Screw thetwoMountingScrews(#14)intotheCrossBar(#11).Mount theCross Bar (#11)
to the OutletBox(#9)usingthetwo OutletBox Screws(#13).[Makesurethethreadsof
theMounting Screws(#14)arefacing outsidewhentheCrossBar(#11)isattached to the
OutletBox (#9).]
2. Wrap theground wirefromthefixturearound theGround Screw(#12) ontheCrossBar
(#11),andthenconnect theground wirefrom thefixtureto thegroundwire fromthe Outlet
Box (#9). Connectthe white wirefrom thefixture tothewhite wire(neutral wire)from the
OutletBox(#9).Connect the black wirefromthefixture to theblackwire(live wire)from
theOutletBox(#9).CovertheconnectionsusingtheWireConnectors(#10).Wrapthe
wireconnectionswithelectricaltapeforamoresecureconnection.Position the wiresback
insidetheOutletBox (#9). Note:Ifyou haveelectricalquestions, consultyourlocal
electrical codeforapprovedgrounding methods.
3. Placethefixture body onthewallby aligning theprotrudingMounting Screws(#14)
through theappropriateholesontheWall Plate(#1). Tighten thefixturetothewallby
placingthetwoWashers(#15)andthenscrewing the twoLock Nuts(#2)ontothe two
protrudingMounting Screws (#14).
4.Once thefixtureismountedonthewall,caulk thespacebetween thewall and theupper
3/4 areaoftheWallPlate(#1)topreventwaterseepinginto theOutletBox(#9). Leave the
bottom1/4 areauncaulkedfordrainageofanywater whichmight leak intotheenclosure.
5. Installation iscomplete.Turn on thepoweratthecircuitbreakerorfuse box.Turn the light
switchontoactivate thefixture.

Page
17
M
A
N
U
E
L
D
'
I
N
S
T
R
U
C
T
I
ONS
LanterneMuraled'Ext rieur1LP
HomeDepotUGS 800-429 (UPC 6940500312798) (noir)
HomeDepotUGS 803-729 (UPC 6940500312804)(blanc)
Page 8
T
R
O
U
BLE
S
H
O
O
TI
N
G:
PRODUCTMAINTENANCE:
1. Tocleanthe outsideof thefixture,useadryorslightlydampenedcleancloth(useclean
water,neverasolvent)towipetheglassandsurfaceofthefixture.
2. Toclean theinsideofthefixture,first disconnect powertothefixture byturning off the
circuit breakerorbyremoving thefuseat thefuse box.Next,useadryorslightly
dampenedcleancloth (usecleanwater,neverasolvent)towipetheinside glassand
interiorsurfaceof thefixture.
3.Do notuseanycleaners withchemicals,solventsorharshabrasives.Useonlyadrysoft
cloth todustorwipecarefully.
LIMITEDWARRANTY
Themanufacturerwarrantsthis lightingfixturetobefreefromdefectsinmaterialsandworkmanship for aperiod
ofthree(3)yearsfromdate of purchase.This warrantyappliesonlytothe originalconsumerpurchaserand only
toproductsusedinnormaluseand service. If this product is found tobedefective,themanufacturer sonly
obligation,andyour exclusiveremedy,istherepair or replacement of the product at themanufacturer s
discretion, providedthat the producthas notbeendamagedthrough misuse,abuse, accident, modifications,
alterations,neglect or mishandling.This warrantyshall notapplytoanyproduct thatisfoundtohavebeen
improperlyinstalled,set-up, or usedinany waynotin accordancewiththeinstructionssuppliedwiththeproduct.
This warrantyshall notapplytoafailure of the productasaresult ofan accident,misuse,abuse,negligence,
alteration, or faultyinstallation, or any otherfailurenotrelatingtofaultymaterial orworkmanship.This
warrantyshallnotapplytothefinishonany portion of the product,suchassurfaceand/orweathering,asthisis
considered normal wearand tear. The manufacturerdoesnot warrantandspecially disclaimsanywarranty,
whetherexpressorimplied, of fitness foraparticularpurpose, otherthanthewarranty contained herein.
Themanufacturerspecificallydisclaimsanyliability and shallnotbeliable foranyconsequentialor
incidentalloss ordamage,includingbutnotlimited toanylabor/expensecostsinvolved inthe
replacementorrepair of saidproduct.
Problem PossibleCause CorrectiveAction
1.Lightbulbis burned out. 1.Replacelight bulb.
2.Powerisoff. 2.Makesurepower
supplyis on.
3.Faultywireconnection. 3.Checkwiring.
Lightbulbwill not
illuminate.
4.Faultyswitch. 4.Testor replaceswitch.
Fuseblowsorcircuit
breakertrips when light
bulb isilluminated.
Crossedwiresorpower wire
isgrounding out.
Check wireconnections.
/