
1
BRUGERMANUAL
BEDIENUNGSANLEITUNG
USER MANUAL
MANUEL D’UTILISATEUR
BRUKERVEILEDNING
BRUKSANVISNING
KÄYTTÖOHJE
GEBRUIKERSHANDLEIDING
RAIS Q-Tee
RAIS Q-Tee Wall
RAIS Q-Tee Insert

BRUGERMANUAL
BEDIENUNGSANLEITUNG
USER MANUAL
MANUEL D’UTILISATEUR
BRUKERVEILEDNING
BRUKSANVISNING
KÄYTTÖOHJE
GEBRUIKERSHANDLEIDING
RAIS Q-Tee
RAIS Q-Tee Wall
RAIS Q-Tee Insert
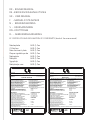
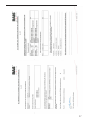
Mærkeplade RAIS Q-Tee
CE Zeichen RAIS Q-Tee
Manufacturer’s plate RAIS Q-Tee
Plaque signalétique de RAIS Q-Tee
Merkeplate RAIS Q-Tee
Märkplät RAIS Q-Tee
Tyyppikilpi RAIS Q-Tee
Merkplaatje voor RAIS Q-Tee
DK - BRUGER MANUAL
DE - BEDIENUNGSANLEITUNG
UK - USER MANUAL
F - MANUEL D’UTILISATEUR
N - BRUKERVEILEDNING
S - BRUKSANVISNING
FIN - KÄYTTÖOHJE
FL - GEBRUIKERSHANDLEIDING
EC CERTIFICATE AND DECLARATION OF CONFORMITY (back of the user manual)
EN 13240:2001+A2:2004
Raumheizer für feste Brennstoffe
Appliance fired by wood
Poêle pour combustibles solides
Produced at:
RAIS A/S, Industrivej 20, 9900 Frederikshavn, Danmark
Certification
110-0368/TG20195
VKF-NR:
XXXXX
Bauart: 2
15a B-VG
EC.NO: 835
AFSTAND TIL BRÆNDBART, BAGVÆG
ABSTAND ZU BRENNBAREN BAUTEILEN, HINTEN
DISTANCE TO COMBUSTIBLE BACK WALL
DIST. ENTRE COMPOSANTS COMBUSTIBLES, ARRIÈR
E
AFSTAND TIL BRÆNDBART, SIDEVÆG
ABSTAND ZU BRENNBAREN BAUTEILEN, SEITE
DISTANCE TO COMBUSTIBLE SIDE WALL
DISTANCE ENTRE COMPOSANTS COMBUSTIBLES, COTÉ
AFSTAND TIL BRÆNDBART, MØBLERING
ABSTAND VORNE ZU BRENNBAREN MÖBELN
DISTANCE TO FURNITURE AT THE FRONT
DISTANCE ENTRE COMPOSANTS COMBUSTIBLES, DEVANT
CO EMISSION
CO EMISSION IN DEN VERBRENNUNGSPRODUKTEN
EMISSION OF CO IN COMBUSTION PRODUCTS
EMISSION CO DANS LES
PRODUITS COMBUSTIBLES
NOMINEL EFFEKT / HEIZLEISTUNG /
THERMAL OUTPUT / PUISSANCE CALORIFIQUE:
RØGGASTEMPERATUR / ABGASTEMPERATUR /
FLUE GAS TEMPERATURE / TEMPÉRATURE DES GAZ DE FUMÉE:
VIRKNINGSGRAD / ENERGIEEFFIZIENZ /
ENERGY EFFIENCY /EFFICACITÉ ÉNERGÉTIQUE:
DK: Brug kun anbefalede brændsler. Følg instrukserne i brugermanualen.
Anordningen er egnet til røggassamleledning og intervalfyring.
DE: Lesen un
d befolgen Sie die Bedienungsanleitung.
Zeitbrandfeuerstätte. Nur empfohlene Brennstoffe einsetzen.
UK: Fuel types (only recommended). Follow the installation and
operating instruction manual. Intermittent operation.
F: Veuillez lire et observer les instructions du mode d'emploi.
Foyer à durèe de combustion limitèe, homologué pour cheminée à
connexions multiples. Utiliser seulement les combustible
s recommandés.
Hergestellt für /Produced for:
ATTIKA FEUER AG, Brunnmatt 16, CH-6330 Cham / RAIS A/S, Industrivej 20, DK-9900 Frederikshavn
STØV / STAUB /
DUST / POUSSIÈRES:
DK: 20 mg/Nm³ / DE: 20 mg/Nm³
UK: 20 mg/Nm³ / FR: 20 mg/Nm³
DK: 283°C / DE: 283°C
UK: 283°C / FR: 283°C
DK: 4,1 kW / DE: 4,1 kW
UK: 4,7 kW / FR: 4,1 kW
DK: 80% / DE: 80%
UK: 80% / FR: 80%
DK: BRÆNDE
DE: HOLZ
UK: WOOD
FR: BOIS
DK:350 mm/
SE BRUGERVEJLEDNING
DE:350 mm/SIEHE BEDIENUNGSANLEITUNG
UK:350 mm/SEE USER MANUAL
FR:350 mm/CONSULTEZ LE GUIDE DE L'UTILISATEUR
DK:275 mm/SE BRUGERVEJLEDNING
DE:275 mm/SIEHE BEDIENUNGSANLEITUNG
UK:275 mm/SEE USER MANUAL
FR:275 mm/CONSULTEZ LE GUIDE DE L'UTILISATEUR
DK:650 mm/SE BRUGERVEJLEDNING
DE:650 mm/SIEHE BEDIENUNGSANLEITUNG
UK:650 mm/SEE USER MANUAL
FR:650 mm/CONSULTEZ LE GUIDE DE L'UTILISATEUR
DK: 0,1%
DE: 0,1% / 1250 mg/Nm³
UK: 0,1%
FR: 0,1%
CE-LABEL
Q-Tee 57
Q-Tee 65
15
Q-Tee 57 / Q-Tee 65
EN 13229:2001+A2:2004
Raumheizer für feste Brennstoffe
Appliance fired by wood
Poêle pour combustibles solides
Produced at:
RAIS A/S, Industrivej 20, 9900 Frederikshavn, Danmark
Certification
110-0368/TG20195
VKF-NR:
XXXXX
Bauart: 2
15a B-VG
EC.NO: 836
Anordningen må kun installeres i forbindelse med ubrændbart materiale.
AFSTAND TIL BRÆNDBART, BAGVÆG
ABSTAND ZU BRENNBAREN BAUTEILEN, HINTEN
DISTANCE TO COMBUSTIBLE BACK WALL
DIST.
ENTRE COMPOSANTS COMBUSTIBLES, ARRIÈRE
AFSTAND TIL BRÆNDBART, SIDEVÆG
ABSTAND ZU BRENNBAREN BAUTEILEN, SEITE
DISTANCE TO COMBUSTIBLE SIDE WALL
DISTANCE ENTRE COMPOSANTS COMBUSTIBLES, COTÉ
AFSTAND TIL BRÆNDBART, MØBLERING
ABSTAND VORNE ZU BRENNBAREN MÖBELN
DISTANCE TO FURNITURE AT THE FRONT
DISTANCE ENTRE COMPOSANTS COMBUSTIBLES, DEVANT
CO EMISSION
CO EMISSION IN DEN VERBRENNUNGSPRODUKTEN
EMISSION OF CO IN CO
MBUSTION PRODUCTS
EMISSION CO DANS LES PRODUITS COMBUSTIBLES
NOMINEL EFFEKT / HEIZLEISTUNG /
THERMAL OUTPUT / PUISSANCE CALORIFIQUE:
RØGGASTEMPERATUR / ABGASTEMPERATUR /
FLUE GAS TEMPERATURE / TEMPÉRATURE DES GAZ DE FUMÉE:
VIRKNINGSGRAD / ENERGIEEFFIZIENZ /
ENERGY EFFIENCY /EFFICACITÉ ÉNERGÉTIQUE:
DK: Brug kun anbefalede brændsler. Følg instrukserne i brugermanualen.
Anordningen er egnet til røggassamlele
dning og intervalfyring.
DE: Lesen und befolgen Sie die Bedienungsanleitung.
Zeitbrandfeuerstätte. Nur empfohlene Brennstoffe einsetzen.
UK: Fuel types (only recommended). Follow the installation and
operating instruction manual. Intermittent operation.
F: Veuillez lire et observer les instructions du mode d'emploi.
Foyer à durèe de combustion limitèe, homologué pour cheminée à
connexions multiple
s. Utiliser seulement les combustibles recommandés.
Hergestellt für /Produced for:
ATTIKA FEUER AG, Brunnmatt 16, CH-6330 Cham / RAIS A/S, Industrivej 20, DK-9900 Frederikshavn
STØV / STAUB /
DUST / POUSSIÈRES:
DK: 20 mg/Nm³ / DE: 20 mg/Nm³
UK: 20 mg/Nm³ / FR: 20 mg/Nm³
DK: 283°C / DE: 283°C
UK: 283°C / FR: 283°C
DK: 4,1 kW / DE: 4,1 kW
UK: 4,7 kW / FR: 4,1 kW
DK: 80% / DE: 80%
UK: 80% / FR: 80%
DK: BR
ÆNDE
DE: HOLZ
UK: WOOD
FR: BOIS
DK: SE BRUGERVEJLEDNING
DE: SIEHE BEDIENUNGSANLEITUNG
UK: SEE USER MANUAL
FR: CONSULTEZ LE GUIDE DE L'UTILISATEUR
DK: SE BRUGERVEJLEDNING
DE: SIEHE BEDIENUNGSANLEITUNG
UK: SEE USER MANUAL
FR: CONSULTEZ LE GUIDE DE L'UTILISATEUR
DK:650 mm/SE BRUGERVEJLEDNING
DE:650 mm/SIEHE BEDIENUNGSANLEITUNG
UK:650 mm/SEE USER MANUAL
FR:650 mm/CONSULTEZ LE GUIDE DE L'UTILISATEUR
DK: 0,1%
DE: 0,1% /
1250 mg/Nm³
UK: 0,1%
FR: 0,1%
CE-LABEL
Q-Tee Insert
15
Q-Tee Insert

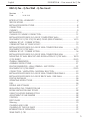
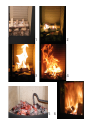
Brug af brændeovn / Using the wood burning stove / Bruk av peisovn
Använda kaminen / Tulisijan käyttäminen / Utilisation du poêle / Gebruik van de kachel
Position 1
Posisjon 1
Asento 1
Stand 1
Position 2
Posisjon 2
Asento 2
Stand 2
Position 3
Posisjon 3
Asento 3
Stand 3

The oven is wrapped in packaging that is recyclable. This must
be disposed of according to national rules regarding the dis-
posal of waste.
The glass can not be reused.
The glass should be discarded along with the residual waste
from
ceramics and porcelain.
Pyrex glass has a higher melting temperature and therefore can
not be reused.
If discarded you make an important positive contribution to
the environment.
FIRE ENVIRONMENTALLY FRIENDLY!
5 Eco-friendly advices for sensible heating
- common sense both environmentally and economically.
1. Effective lighting. Use dry brushwood, kindling and possible a piece of news
paper. Open the air damper, so plenty of air is fed to the stove and the gases
from the heated wood can burn rapidly.
2. Light the fire with only little wood at a time - this gives the best combustion.
Remember plenty of air for every time new wood is added.
3. When the flames are diminished, adjust the air damper so that the air supply
is reduced
4. When only glowing embers remain, air flow can be reduced further, so heat-
ing demand is just covered. With a lower air supply the charcoal will burn
slower and the heat loss through the chimney is reduced.
5. Use only dry wood - ie wood with a humidity of 15 to 22 percent.
We cannot be held responsible for any misprints.
English RAIS/
attika
- U
ser manual for Q-Tee

5
: 4
: 10-06-2016
RAIS Q-Tee - Q-Tee Wall - Q-Tee Insert
Revision :
Date :
INTRODUCTION - WARRANTY...............................................................................6
SPECIFICATIONS ...................................................................................................7
INSTALLATION INSTRUCTIONS ...............................................................................8
CONVECTION .......................................................................................................9
CHIMNEY ............................................................................................................9
INSTALLATION .....................................................................................................11
CHANGE OF CHIMNEY CONNECTION .................................................................12
INSTALLATION DISTANCE IN CASE OF COMBUSTIBLE WALL ................................13
PLACEMENT OF Q-TEE 57/Q-TEE 65/Q-TEE 85 (FREE-STANDING) ................... 14-15
NORMAL SET-UP - CORNER SETTING ...................................................................14
CORNER SETTING 45° FIXED SOCKET..................................................................15
INSTALLATION DISTANCE IN CASE OF NON-COMBUSTIBLE WALL ......................15
PLACEMENT OF Q-TEE WALL ....................................................................... 16-17
NORMAL SET-UP - CORNER SETTING ...................................................................16
INSTALLATION DISTANCE IN CASE OF NON-COMBUSTIBLE WALL ......................17
MOUNTING OF WALL BRACKET AND INSTALLATION OF Q-TEE WALL ........... 18-19
Q-TEE INSERT ................................................................................................ 20-25
OVERALL DIMENSIONS .......................................................................................20
ASSEMBLY INSTRUCTIONS ..................................................................................21
BUILT-IN DIMENSIONS - WALL OPENING - AIR SYSTEM ........................................22
PLACEMENT OF Q-TEE INSERT ...................................................................... 23-25
CONVECTION - VENTILATION - MATERIAL SELECTION .........................................23
INSTALLATION DISTANCE IN CASE OF NON-COMBUSTIBLE PANELS .....................24
INSTALLATION DISTANCE IN CASE OF BRICK WALL / FIRE WALL ..........................25
FOR THE INSTALLER ............................................................................................26
OPERATING INSTRUCTIONS .................................................................................26
FUEL ..................................................................................................................26
DRYING AND STORAGE .....................................................................................27
REGULATING THE COMBUSTION AIR .................................................................27
ROOM VENTILATION AND STOVES .....................................................................28
USING THE WOOD BURNING STOVE .................................................................28
ADJUSTMENT OF AIR DAMPER ..........................................................................28
CONTROL ..........................................................................................................28
FIRST USAGE .....................................................................................................29
Warning .............................................................................................................30
CLEANING AND CARE ......................................................................................31
CLEANING OF THE FLUE WAYS ...........................................................................32
INTERRUPTION OF OPERATION ..........................................................................33
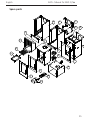
SPARE PARTS Q-TEE ...........................................................................................34
English RAIS/
attika
- U
ser manual for Q-Tee

6
Introduction
Thank you for purchasing a RAIS wood burning stove.
These appliances have been approved by SCA/HETAS Ltd as an
intermittent operating appliances for burning wood logs only.
A RAIS wood burning stove is more than just a heat source: it
also shows that you care about design and quality in your home.
To make the most of your wood burning stove it is important that you read the manual
thoroughly, before installing and using it.
In the case of warranty coverage, and for general queries regarding your wood burning
stove, it is important that you know the stove’s production number. We therefore recom-
mend that you note down the number in the table below. The production number is
located on the back of the stove at the bottom.
Warranty
Your RAIS wood burning stove comes with a 5 year warranty. The warranty, however,
does not cover heat-insulating materials, glass and seals.
Any alterations made to the stove will void the warranty.
English RAIS - Manual for RAIS Q-Tee
Date: Distributor:

7
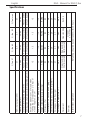
Specifications
Q-Tee 57 Q-Tee 65 Q-Tee 85 Q-Tee Insert
Nominal output (kW) 4.7 4.7 4.7 4.7
Heating area (m
2
) 30-90 30-90 30-90 30-90
Stove’s width/depth/height (mm) 425x372x570 425x372x650 425x372x850 463x375x603
Combustion chamber’s width/depth/height (mm) 317x270x270 317x270x270 317x270x270 317x270x270
Recommended amount of wood when
fuelling (kg). Distributed on 2-3 logs of
wood of approx. 25 cm
1.5 1.5 1.5 1.5
Min. uptake / Min. draught (Pascal) -12 -12 -12 -12
Weight steeldoor/glassdoor (kg) 79/81 82/84 94/96 94/96
Efficiency (%) 80 80 80 80
Particles acc. to NS3058/3059 (g/kg) 0.8 0.8 0.8 0.8
Dust measured acc. to Din+ (mg/Nm³) 20 20 20 20
Smoke gas mass flow (g/s) 3.7 3.7 3.7 3.7
Smoke gas temperature (°C) 283 283 283 283
Placement
Free standing
Wallmounted
Free standing
Wallmounted
Free standing Build in
Remarks
Q-Tee 57
on socket
Intermittent operation Refuelling should be undertaken within 3 hours
English RAIS - Manual for RAIS Q-Tee

8
Installation instructions
The following pages give instructions for the safe and proper installation of this heat-
ing appliance in the UK. These instructions cover the basic principles of installation,
although detail may need slight modification to suit particular local site conditions. In
all cases the installation must comply with current UK Building Regulations, Local Au-
thority Byelaws and other specifications or regulations as they affect the installation of
the stove. Please note that it is a legal requirement under England and Wales Building
Regulations that the installation of the stove is either carried out under Local Author-
ity Building Control approval or is installed by a Competent Person registered with a
Government approved Competent Persons Scheme. HETAS Ltd operate such a Scheme
and a listing of their Registered Competent Persons can be found on their website at
www.hetas.co.uk.
It should be noted that the current Building Regulations requirements are given in
Approved Document J. These requirements may also be met by adopting the relevant
recommendations given in British Standards BS 8303 and BS EN 15287-1.
WARNING: Health and Safety Advice Notice
The installation of this heating appliance is governed by the Health and Safety at Work
Act 1974. It is the responsibility of the installer to ensure that all requirements of this
Act are met during the installation works. Attention is drawn in particular to the follow-
ing:
Handling:
The appliance is a heavy item and adequate facilities must be available for load-
ing, unloading and site handling.
Fire Cement:
Some types of fire cement are caustic and should not be allowed to come into
contact with the skin. Protective gloves should be worn when handling fire ce-
ment. In case of contact with the skin wash immediately with plenty of water.
Asbestos:
This stove contains no asbestos. If there is a possibility of disturbing any asbestos
in the course of installation then please seek specialist guidance and use appro-
priate protective equipment.
Metal Parts:
When installing or servicing this stove care should be taken to avoid the possibil-
ity of personal injury.
Important Warning –Preparatory Work and Safety Checks:
• This stove must not be installed into a chimney that serves any other heating appli-
ance.
• It’s recommendet not have an extractor fan fitted in the same room as the stove as
this can cause the stove to emit fumes into the room.
• If this appliance is installed into an existing chimney, the chimney must first be
swept and examined for soundness and suitability before the appliance is installed
(see also section headed “Chimney”).
English RAIS - Manual for RAIS Q-Tee

9
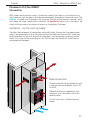
Convection
RAIS stoves are convection stoves. This means that the stove’s back and side panels are
not over-heated. Convection means that there is a circulation of air, which ensures that
the heat is distributed more evenly throughout the entire room. The cold air is sucked
in at the base of the stove up through the convection channel, which runs along the
stove’s combustion chamber. The heated air pours out at the top of the stove, which
ensures a circulation of warm air throughout the room.
Chimney
The chimney is the driving force which makes the stove function. In order for the stove
to perform satisfactorily the chimney height must be sufficient to ensure the correct
draught of 14 to 18 Pa so as to clear the products of combustion and prevent problems
of smoke emanating into the room when firing.
NOTE: A chimney height of not less than 4.5 metres measured vertically from the outlet
of the stove to the top of the chimney should be satisfactory. Alternatively the calcula-
tion procedure given in BS 5854:1980 may be used as the basis for deciding whether a
particular chimney design will provide sufficient draught.
The outlet from the chimney should be above the roof of the building in accordance
with the provisions of Building Regulations Approved Document J.
If installation is into an existing chimney then it must be sound and have no cracks or
other faults which might allow fumes into the house. Older properties, especially, may
have chimney faults or the cross section may be too large i.e. more than 230 mm x 230
mm. Remedial action should be taken, if required, seeking expert advice, if necessary. If
it is found necessary to line the chimney then a flue liner suitable for solid fuel must be
used in accordance with Building Regulations Approved Document J.
Any existing chimney must be clear of obstruction and have been swept clean immedi-
ately before installation of the stove. If the stove is fitted in place of an open fire then
the chimney should be swept one month after installation to clear any soot falls which
may have occurred due to the difference in combustion between the stove and the
open fire.
If there is no existing chimney then either a prefabricated block chimney in accordance
with Building Regulations Approved Document J or a twin walled insulated stainless
steel flue to BS 1856-1 can be used. These chimneys must be fitted in accordance with
the manufacturer’s instructions and Building Regulations.
English RAIS - Manual for RAIS Q-Tee

10
A single wall metal fluepipe is suitable for connecting the stove to the chimney but is
not suitable for using for the complete chimney. The chimney and connecting fluepipe
must have a minimum diameter of 125 mm. Any bend in the chimney or connecting
fluepipe should not exceed 45°. 90°bends should not be used.
Combustible material should not be located where the heat dissipating through the
walls of fireplaces or flues could ignite it. Therefore when installing the stove in the
presence of combustible materials due account must be taken of the guidance on the
separation of combustible material given in Building Regulations Approved Document J
and also in these stove instructions.
If it is found that there is excessive draught in the chimney then either an adjustable
flue damper or alternatively a draught stabiliser should be fitted. The adjustable flue
damper should not close off the flue entirely but should in its closed position leave a
minimum continuous opening free area of at least 20 % of the total cross sectional
area of the flue or fluepipe.
Adequate provision e.g. easily accessible soot door or doors must be provided for
sweeping the chimney and connecting fluepipe.
You should also familiarise yourself with the draught conditions for chimneys with 2
flues.
The flue outlet spigot is either 150 mm (6”) in diameter, or 129 mm (5”) in diameter.
For strong draughts, the chimney or flue should be fitted with a draught stabiliser. In
which case, it is important to ensure that there is a free flow-through area of mini-
mum 20 cm² when the regulating gate is shut. Otherwise, the fuel energy may not be
used optimally. If, at any time, you are unsure about the condition of the chimney, you
should contact a chimney sweep.
Remember that access to the access door should be kept clear.
English RAIS - Manual for RAIS Q-Tee

11
Installation
The stove can be free standing on the floor or hung on a non-combustible wall. In ad-
dition, it may be built into a wall (see specifications).
When installing the wood burning stove, there are some rules which MUST be fol-
lowed:
The stove must be set up and installed in accordance with all current national and local
rules and reulations. Local authorities and a chimney specialist should be contacted
prior to set up.
It is prohibited to carry out unauthorised alterations to the stove.
There must be plenty of fresh air in the room where the stove is being installed, in order
to ensure proper combustion. Note that any mechanical exhaust ventilation - e.g. an
extraction hood - may reduce the air supply. Any air grates must be placed in such a
manner, that the air supply is not blocked.
The floor structure must be able to carry the weight of the wood burning stove, as well
as the weight of a chimney, if necessary.
The stove is placed on fireproof material (for the freestanding model).
As for the wall-mounted version, the wall must be non-combustible, and must support
the weight of the oven as well as a possible chimney. The wall bracket (accessory) is
fitted with suitable bolts.
When you choose where to set up your RAIS wood burning stove, you should consider
the heat distribution to the other rooms. This will enable you to get the best use out of
your stove.
The stove should be set up at a safe distance from inflammable materials.
See the manufacturer’s plate on the wood burning stove.
Upon receiving the stove must be inspected for defects.
NOTE!!
RAIS A/S recommends that the stove is installed by a qualified/
competent Rais dealer or a fireplace fitter recommended by an
authorized RAIS dealer.
See www.rais.com for dealer list.
English RAIS - Manual for RAIS Q-Tee

12
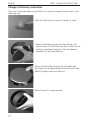
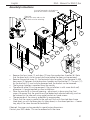
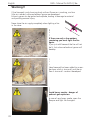
Change of chimney connection
The stove is delivered ready for top outlet, but may be changed to back outlet in the
following way:
Strike out the knock out plate at the rear of stove.
Remove the blanking plate and the packing, and
position them in the hovle at the top. Ensure that the
packing is positioned correctly. Screw all elements
together with the three M6 nuts.
Mount the flue collar (supplied by the dealer) and
the clamp for the upper smoke conductor with three
M6x20 cylinder screws and M6 nuts.
Mount the parts in reverse order.
English RAIS - Manual for RAIS Q-Tee

13
Installation distance in case of combustible wall
To find out whether the wall next to where the stove is going to be installed is flam-
mable, you should contact your building contractor or the local building authorities.
The hearth should be able to accommodate the weight of the stove. The chimney must
be independently supported by wall brackets or a ceiling support plate. The weight of
the stove is indicated in the brochure.
The stove should always be installed on a non-combustible hearth of a size and con-
struction that is in accordance with the provisions of the current UK Building Regula-
tions Approved Document J.
If the stove is to be installed on a wooden floor, it must be covered with a non-combus-
tible material at least 12 mm thick, in accordance with UK Building Regulations Ap-
proved Document J or local regulations, to at distance of 300 mm in front of the stove
and 150 mm to each side measuring from the door of the combustion chamber.
The clearance distances to combustible material beneath, surrounding or upon the
hearth and walls adjacent to the hearth should comply with the guidance on the sepa-
ration of combustible material given in UK Building Regulations Approved Document J
and also in these stove instructions.
English RAIS - Manual for RAIS Q-Tee

14
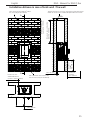
Placement of Q-Tee 57 / Q-Tee 65 / Q-Tee 85 (free-standing)
Installation distance in case of combustible wall
Normal set-up - corner setting
Uninsulated flue Insulated flue
A. Distance to furniture (min.) 650 mm 650 mm
Distance to flammable materials (min.):
B. in front (floor) 300 mm 300 mm
C. to the side (floor) 150 mm 150 mm
D. to the rear (wall) 350 mm 275 mm
E. to the side of the wall 275 mm 225 mm
English RAIS - Manual for RAIS Q-Tee

15
English RAIS - Manual for RAIS Q-Tee
Installation distance in case of non-combustible wall
Using non insulated smoke pipe, the minimum distance to combustible wall must be
225 mm from smoke pipe.
We recommend a minimum distance to non-combustible material of 50 mm (F) for
cleaning considerations.
It should always be possible to access the access door.
Corner setting 45° fixed socket
Uninsulated flue Insulated flue
A. Distance to furniture (min.) 650 mm 650 mm
Distance to flammable materials (min.)
B. in front (floor) 300 mm 300 mm
C. to the side (floor) 150 mm 150 mm
D. to the rear (wall) 225 mm 175 mm
E. to the side of the wall 275 mm 225 mm

16
G
E
English RAIS - Manual for RAIS Q-Tee
Placement of Q-Tee Wall
Installation distance in case of non-combustible back wall
and combustible side wall
If the stove is to be installed above a wooden floor, it must be covered with a non-com-
bustible material at a thickness and seize, which is in accordance with UK Building Regula-
tions.
Normal set-up - corner setting
Uninsulated flue Insulated flue
A. Distance to furniture (min.) 650 mm 650 mm
Distance to flammable materials (min.):
B. in front (floor) 300 mm 300 mm
C. to the side (floor) 150 mm 150 mm
E. to the side (combustable side wall) 275 mm 225 mm
G. to the ceiling 800 mm 800 mm

17
English RAIS - Manual for RAIS Q-Tee
Installation distance in case of non-combustible wall
We recommend a minimum distance to non-combustible material of 50 mm (F) for
cleaning considerations.
It should always be possible to access the access door.

18
34
2
1
English RAIS - Manual for RAIS Q-Tee
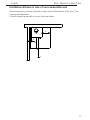
Mounting of wall bracket and installation of Q-Tee Wall
The stove can only be mounted on non-combustible walls without cracks. Contact the
chimney sweep or building expert regarding the wall’s suitability. RAIS recommends that
hanging and installation of RAIS Q-TEE WALL should only be done by authorized dealers.
The bracket is mounted with screws suitable
to the type of wall. The bracket’s upper edge
should be horizontal. Note that the screw
head is not higher than 11mm. Plastic plugs
are not permitted. Bolts and other fastening
material are not included in the delivery from
RAIS.
The holes are marked up through the holes
in the bracket. All holes are drilled, a mini-
mum of 2 holes must be in a brick.
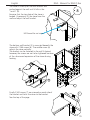
The flue (4) with the seal is mounted on the
back of the stove with 3 M6 screws instead
of the blanking plate.
The wall bracket (3) is centered in relation
to wall pipe in the wall or at the desired
distance above the floor.
Remove the knock-outs for the wall bracket (1) and
chimney (2) at rear of the stove (see section ‘Change
of chimney connection’). Remove he blanking plate
and the packing and mount them on the stove top
outlet - please ensure that the gasket is properly
seated. Parts are screwed together with 3 M6 bolts.
Distance from wall to center of chimney is 141.5mm.

19
5
5
6
7
8
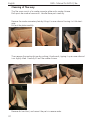
English RAIS - Manual for RAIS Q-Tee
The bottom wall bracket (5) is mounted beneath the
stove with 2 M6 screws (6). The middle screw (6)
adjusts the stove vertically.
The bracket can be fastened to the wall if desired,
however, the screws are not to be tightened because
of the downward expansion of the stoves during
heating.
Finally 2 M4 screws (7) are screwed on each side of
the bracket and locks the stove to the bracket.
See the top of the page.
Examine that the top plate of the stove is
leveled. If necessary, lift the stove from the
wall and adjust the wall bracket.
The stove is lifted up on the wall bracket and
pushed against the wall until it falls in the
“notch” (8).
M4 thread for set screws

20
A
A
English RAIS - Manual for RAIS Q-Tee
Q-Tee INSERT
Overall dimensions
Page is loading ...
Page is loading ...
Page is loading ...
Page is loading ...
Page is loading ...
Page is loading ...
Page is loading ...
Page is loading ...
Page is loading ...
Page is loading ...
Page is loading ...
Page is loading ...
Page is loading ...
Page is loading ...
Page is loading ...
Page is loading ...
Page is loading ...
Page is loading ...
Page is loading ...
-
 1
1
-
 2
2
-
 3
3
-
 4
4
-
 5
5
-
 6
6
-
 7
7
-
 8
8
-
 9
9
-
 10
10
-
 11
11
-
 12
12
-
 13
13
-
 14
14
-
 15
15
-
 16
16
-
 17
17
-
 18
18
-
 19
19
-
 20
20
-
 21
21
-
 22
22
-
 23
23
-
 24
24
-
 25
25
-
 26
26
-
 27
27
-
 28
28
-
 29
29
-
 30
30
-
 31
31
-
 32
32
-
 33
33
-
 34
34
-
 35
35
-
 36
36
-
 37
37
-
 38
38
-
 39
39


Ask a question and I''ll find the answer in the document
Finding information in a document is now easier with AI
in other languages
- dansk: RAIS Q-TEE Brugermanual
Related papers
-
RAIS 600 SERIES Manual Manual
-
-
-
-
-
-
-
-
-
Other documents
-
 IKL Mercury User manual
-
CDA dk750 User manual
-
SCAN 53 Assembly And Instruction Manual
-
RIKA IDEA Operating instructions
-
-
Heta Scan-Line 550 insert Operating instructions
-
Nordpeis Salzburg L Installation guide
-
-
-
 Efel KAMINA User manual

