Page is loading ...

VQT5B69
M0713KZ0
Basic Operating Instructions
Digital Camera
Model No. DMC-FZ72
Please read these instructions carefully before using this
product, and save this manual for future use.
More detailed instructions on the operation
of this camera are contained in “Operating
Instructions for advanced features (PDF format)”
in the supplied CD-ROM. Install it on your PC to
read it.
EB
Web Site: http://www.panasonic-europe.com
Model number suffix “EB” denotes UK model.

2 VQT5B69 (ENG)
Dear Customer,
We would like to take this opportunity to thank you for purchasing this Panasonic
Digital Camera. Please read these Operating Instructions carefully and keep
them handy for future reference. Please note that the actual controls and
components, menu items, etc. of your Digital Camera may look somewhat
different from those shown in the illustrations in these Operating Instructions.
Carefully observe copyright laws.
• Recording of pre-recorded tapes or discs or other published or broadcast
material for purposes other than your own private use may infringe copyright
laws. Even for the purpose of private use, recording of certain material may
be restricted.
Information for Your Safety
WARNING:
To reduce the risk of fire, electric shock or product damage,
•
Do not expose this unit to rain, moisture, dripping or splashing.
• Use only the recommended accessories.
• Do not remove covers.
• Do not repair this unit by yourself. Refer servicing to
qualified service personnel.
The socket outlet shall be installed near the equipment and shall be
easily accessible.
■
Product identification marking
Product Location
Digital camera Bottom
Battery charger Bottom
■
About the battery pack
CAUTION
• Danger of explosion if battery is incorrectly replaced. Replace
only with the type recommended by the manufacturer.
• When disposing the batteries, please contact your local
authorities or dealer and ask for the correct method of disposal.
• Do not heat or expose to flame.
• Do not leave the battery(ies) in a car exposed to direct sunlight for a
long period of time with doors and windows closed.

(ENG) VQT5B69 3
Warning
Risk of fire, explosion and burns. Do not disassemble, heat above
60 °C or incinerate.
■
About the battery charger
CAUTION!
To reduce the risk of fire, electric shock or product damage,
• Do not install or place this unit in a bookcase, built-in cabinet or in
another confined space. Ensure this unit is well ventilated.
• The battery charger is in the standby condition when the AC power supply
cord is connected. The primary circuit is always “live” as long as the power
cord is connected to an electrical outlet.
■
Cautions for Use
• When using an AC adaptor, use the AC Mains Lead supplied with the AC
adaptor.
• Do not use any other USB connection cables except the supplied one or a
genuine Panasonic USB connection cable (DMW-USBC1: optional).
• Use a “High Speed HDMI mini cable” with the HDMI logo.
Cables that do not comply with the HDMI standards will not work.
“High Speed HDMI mini cable” (Type C-Type A plug, up to 3 m (9.8 feet) long)
• Always use a genuine Panasonic AV cable (DMW-AVC1: optional).
Keep this unit as far away as possible from electromagnetic equipment
(such as microwave ovens, TVs, video games etc.).
• If you use this unit on top of or near a TV, the pictures and/or sound on this
unit may be disrupted by electromagnetic wave radiation.
• Do not use this unit near cell phones because doing so may result in noise
adversely affecting the pictures and/or sound.
• Recorded data may be damaged, or pictures may be distorted, by strong
magnetic fields created by speakers or large motors.
• Electromagnetic wave radiation generated by microprocessors may adversely
affect this unit, disturbing the pictures and/or sound.
• If this unit is adversely affected by electromagnetic equipment and stops
functioning properly, turn this unit off and remove the battery or disconnect
AC adaptor (DMW-AC8E: optional). Then reinsert the battery or reconnect AC
adaptor and turn this unit on.
Do not use this unit near radio transmitters or high-voltage lines.
• If you record near radio transmitters or high-voltage lines, the recorded
pictures and/or sound may be adversely affected.

4 VQT5B69 (ENG)
Caution for AC Mains Lead
For your safety, please read the following text carefully.
This appliance is supplied with a moulded three pin mains plug for your safety
and convenience.
A 5-ampere fuse is fitted in this plug.
Should the fuse need to be replaced please ensure that the replacement fuse
has a rating of 5-ampere and that it is approved by ASTA or BSI to BS1362.
Check for the ASTA mark
or the BSI mark on the body of the fuse.
If the plug contains a removable fuse cover you must ensure that it is refitted
when the fuse is replaced.
If you lose the fuse cover the plug must not be used until a replacement cover is
obtained.
A replacement fuse cover can be purchased from your local dealer.
■
Before use
Remove the connector cover.
■
How to replace the fuse
The location of the fuse differ according to the type of AC mains plug (figures A
and B). Confirm the AC mains plug fitted and follow the instructions below.
Illustrations may differ from actual AC mains plug.
1. Open the fuse cover with a screwdriver.
Figure A
Figure B
Fuse cover
2. Replace the fuse and close or attach the fuse cover.
Figure A
Fuse
(5 ampere)
Figure B
Fuse
(5 ampere)

(ENG) VQT5B69 5
Contents
Information for Your Safety .... 2
Care of the camera .................. 6
Standard accessories ............. 7
Names and Functions of
Main Parts ................................ 9
Attaching the lens cap/
shoulder strap........................ 11
Charging the battery ............. 12
Inserting and removing the
card (optional)/the battery .... 13
Sequence of operations ........ 14
Taking pictures with
automatic settings
[Intelligent Auto] Mode .......... 16
Taking Pictures with
different picture effects
[Creative Control] Mode ........ 18
Using the rear dial ................. 19
Setting the menu ................... 20
Reading the Operating
Instructions (PDF format) ..... 21
Keeping the pictures on
your PC ................................... 22
Specifications ........................ 24
These symbols indicate separate collection
of waste electrical and electronic equipment
or waste batteries.
More detailed information is contained
in “Operating Instructions for advanced
features (PDF format)”.

6 VQT5B69 (ENG)
Care of the camera
■
Camera handling
Keep the camera away from excessive vibration, force, or
pressure.
●
Avoid using the camera under the following conditions, which
may damage the lens, LCD monitor, viewfinder, or camera
body. This may also cause the camera to malfunction or
prevent recording.
• Dropping or hitting the camera against a hard surface
• Pushing with excessive force on the lens, LCD monitor, or
viewfinder
●
When camera is not in use or when using the playback
feature, ensure that the lens is in the stored position,
with lens cap on.
●
There are times when rattling sounds or vibrations will
come from the camera, but these are due to the motion of
the aperture, the zoom and the motor and do not indicate
a defect.
The camera is not dust resistant, splash resistant, or
waterproof.
Avoid using the camera in places with excessive dust
or sand, or where water can come into contact with the
camera.
●
Avoid using the camera under the following conditions, which
present a risk that sand, water, or foreign material may enter
the camera through the lens or openings around buttons. Be
especially careful because these conditions may damage the
camera, and such damage may not be repairable.
• In extremely dusty or sandy places
• In the rain or by the shore, where the camera may be
exposed to water
■
Condensation (When the lens, the LCD monitor, or viewfinder, is fogged up)
●
Condensation may occur when the camera is exposed to sudden changes
of temperature or humidity. Avoid these conditions, which may make the
lens, LCD monitor, or viewfinder, dirty, cause mould, or damage the camera.
●
If condensation does occur, turn off the camera and wait about two hours
before using it. Once the camera adjusts to the surrounding temperature,
the fogging will clear naturally.

(ENG) VQT5B69 7
Standard accessories
Check that all the accessories are supplied before using the camera. Part
numbers are as of July 2013. These may be subject to change.
Battery pack
DMW-BMB9E
• Charge the battery
before use.
Battery pack is indicated as
battery pack or battery in the text.
Battery Charger
DE-A84A
Battery charger is indicated as
battery charger or charger in the
text.
AC Mains Lead
K2CT3YY00034
Shoulder Strap
VFC4453
USB connection
cable
K1HY08YY0031
Lens Cap/
Lens Cap String
VYQ8752
CD-ROM
VFF1233
• Software:
Use it to install
the software on
your PC.
• Operating
Instructions
for advanced
features
• SD Memory Card, SDHC Memory Card and SDXC Memory Card are
indicated as card in the text.
• Cards are optional. You can record or play back pictures on the built-in
memory when you are not using a card.
• Consult the dealer or your nearest Service Centre if you lose the supplied
accessories. (You can purchase the accessories separately.)
• Please dispose of all packaging appropriately.
• Keep small parts in a safe place out of the reach of children.
• The illustrations and screens in this manual may differ from the actual product.
• A lens hood is not supplied with this unit.
• SILKYPIX Developer Studio is not provided on the supplied CD-ROM.
Download this software from the website and install it on your computer
to use. (→23)

8 VQT5B69 (ENG)
Standard accessories
■
Optional Accessories
Battery pack DMW-BMB9
DC coupler
*
1
DMW-DCC6
AC adaptor
*
1
DMW-AC8
Flash DMW-FL220, DMW-FL360, DMW-FL360L,
DMW-FL500
MC protector DMW-LMCH55
ND filter DMW-LNDH55
PL filter (Circular Type) DMW-LPL55
AV Cable DMW-AVC1
USB connection cable DMW-USBC1
Lens adaptor DMW-LA8
Tele Conversion Lens
*
2
DMW-LT55
Close-up Lens
*
2
DMW-LC55
*
1
The AC adaptor (optional) can only be used with the designated Panasonic DC coupler
(optional). The AC adaptor (optional) cannot be used by itself.
*
2
The lens adaptor (optional) is necessary to attach a tele conversion lens or close-up
lens.
• Some optional accessories may not be available in some countries.
Sales and Support Information
Customer Communications Centre
• For customers within the U.K.: 0844 844 3899
• For customers within Ireland: 01289 8333
• Monday - Friday 9:00am - 5:00pm (Excluding public holidays).
• For further support on your product, please visit our website:
www.panasonic.co.uk
Direct Sales at Panasonic U.K.
• Order accessory and consumable items for your product with ease and
confidence by phoning our Customer Communications Centre
Monday - Friday 9:00am - 5:00pm (Excluding public holidays).
• Or go on line through our Internet Accessory ordering application at
www.pas-europe.com.
• Most major credit and debit cards accepted.
• All enquiries transactions and distribution facilities are provided directly by
Panasonic U.K.
• It couldn’t be simpler!
• Also available through our Internet is direct shopping for a wide range of
finished products. Take a browse on our website for further details.

(ENG) VQT5B69 9
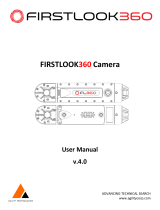
Names and Functions of Main Parts
1 2 3 4 5 6 7
8 9 10 11 12
13 14 15 16
17 18 19 20
21
23
22
24 25 26 27 28 29
3433323130

10 VQT5B69 (ENG)
Names and Functions of Main Parts
1 Power lamp
2 Camera [ON/OFF] switch
3 Mode dial
4 Flash
5 Speaker
• Be careful not to cover the
speaker with your finger. Doing
so may make sound difficult to
hear.
6 Lens barrel
7 Lens
8 Shoulder strap eyelet
9 [FOCUS] button
10
[
] (Burst Mode) button
11 Shutter button
12 Self-timer indicator/
AF Assist Lamp
13 Tripod mount
• Do not attach to a tripod with
a 5.5 mm (0.22 inch) or longer
screw. Doing so may damage
this unit.
14 Card/Battery door
15 Release lever
16 DC coupler cover
• When using an AC adaptor,
ensure that the Panasonic DC
coupler (DMW-DCC6: optional)
and AC adaptor (DMW-AC8E:
optional) are used.
• Always use a genuine
Panasonic AC adaptor
(DMW-AC8E: optional).
17 Hot shoe
• Do not attach other than the
external flash on the hot shoe.
18 Stereo microphone
19 Motion picture button
20 Zoom lever
21 LCD monitor
22 [HDMI] socket
23 [AV OUT/DIGITAL] socket
24 [
] (Flash open) button
25 Diopter adjustment dial
26 Viewfinder ([LVF])
• In this manual, “viewfinder” is
used to indicate the LVF.
27 [LVF] button
28 [AF/AE LOCK (Fn1)] button
29 Rear dial
30 [AF/AF
/MF] button
31 [
] (Playback) button
• Use this to select the recording
mode or playback mode.
32 [DISP.] button
33 [
( Q.MENU)]
(Delete/Cancel/Quick menu)
button
34 Cursor button / [MENU/SET]
button
• In this manual, the button that is
to be used is indicated by
.

(ENG) VQT5B69 11
Attaching the lens cap/shoulder strap
■
Attaching the Lens Cap
• When you turn the camera off or carry the camera, attach the lens cap to
protect the surface of the lens.
Pass the string through the hole on the camera
Pass the same string through the hole on the lens cap
• Pass the lens cap through the loop of the string and tighten it.
Attach the lens cap
■
Attaching the Shoulder Strap
• We recommend attaching the shoulder strap when using the camera to
prevent it from dropping.
Pass the shoulder strap through the hole at
the shoulder strap eyelet
• Attach the shoulder strap so that the “LUMIX” Logo
is on the outside.
Pass the shoulder strap through the
stopper and fasten the shoulder strap
Pull the shoulder strap 2 cm (0.066 feet) or more.
• Attach the shoulder strap to the other side of the
camera being careful not to twist it.
●
Make sure that the shoulder strap does not come loose.

12 VQT5B69 (ENG)
Charging the battery
• Use the dedicated charger and battery.
• The battery is not charged when the camera is shipped. Charge the
battery before use.
• We recommend charging in a location where the ambient temperature is
between 10 °C and 30 °C (50 °F to 86 °F).
Insert the battery terminals and attach the battery to the
charger
Ensure [LUMIX] faces outwards.
Connect the charger to the electrical outlet
Charging light ([CHARGE])
On: Charging in progress
(approx. 155 min. if fully depleted)
Off: Charging complete
If light is flashing:
• Charging may take longer than normal if
battery temperature is too high or too low
(charging may not be completed).
• Battery/charger connector is dirty. Clean
with a dry cloth.
●
The battery becomes warm after using it and during and after charging. The
camera also becomes warm during use. This is not a malfunction.
●
You cannot charge the battery of this unit using a USB connection cable.
■
About batteries that you can use with this unit
The battery that can be used with this unit is DMW-BMB9E.

(ENG) VQT5B69 13
Inserting and removing the card (optional)/
the battery
• Turn this unit off and confirm that the lens barrel is retracted.
Slide the release lever to the
[OPEN] position and open the
card/battery door
Do not touch
the terminals
on the back of
the card.
Lever
Battery:
Being careful about the battery
orientation, insert all the way
and then check that it is locked
by lever
• Pull the lever in the direction of the
arrow to remove the battery.
Card:
Push it securely all the way until
you hear a “click” while being
careful about the direction in
which you insert it
• To remove the card, push the card
until it clicks, then pull the card out
upright.
Close the card/battery door and
slide the release lever to the
[LOCK] position
●
Always use genuine Panasonic batteries (DMW-BMB9E).
●
If you use other batteries, we cannot guarantee the quality of this product.
●
Keep the Memory Card out of reach of children to prevent swallowing.
●
We recommend using a Panasonic card.

14 VQT5B69 (ENG)
Sequence of operations
Before using the camera, remove the lens cap.
Turn the camera on ( )
• The clock is not set when the camera is shipped.
Set the date and time before using the camera.
Motion picture button
Shutter button
Set to the desired recording mode
Rotate the mode dial slowly to select the desired
mode.
■
Recording mode
Take pictures with automatic settings.
Take pictures with automatic shutter speed and aperture value
settings.
Determine aperture, then record pictures.
Determine shutter speed, then record pictures.
Determine aperture and shutter speed, then record pictures.
Record motion picture with manual settings.
Record pictures using pre-registered settings.
Record panorama pictures.
Take pictures using Scene modes.
Take pictures by selecting your preferred picture effect.

(ENG) VQT5B69 15
Take pictures
■
Taking still pictures
(Shutter button)
Press halfway
(press lightly and
focus)
Press fully
(press the button all
the way to record)
■
Recording motion pictures
(Motion picture button)
Press
(Start recording)
Press
(End recording)
■
Use the zoom lever to adjust the range of the picture to be captured
Capture a wider area
(wide-angle)
Enlarge the subject
(telephoto)
■
Viewing your Pictures
Press the Playback button ( )
Press to select a picture to be displayed
• Ending Playback
Press the Playback button (
) or the motion picture button again, or press
the shutter button halfway.
■
Deleting Pictures
Press [ ( Q.MENU)] button to delete the displayed picture
• A confirmation screen is displayed. When you select [Yes], the selected
picture is deleted.
■
About recording motion pictures
●
You can continuously record a motion picture in [MP4] for up to 29 minutes
59 seconds or approx. 4 GB. (Since recording in [MP4] with [FHD] creates
larger files, the recording time for such motion pictures will be shorter than
29 minutes 59 seconds.)
●
You can continuously record [AVCHD] motion pictures for up to 29 minutes
59 seconds.
●
You can record a motion picture to the built-in memory only in [MP4] using
the [VGA] setting.

16 VQT5B69 (ENG)
Taking pictures with automatic settings
[Intelligent Auto] Mode
The camera will set the most appropriate settings to match the subject and the
recording conditions so we recommend this mode for beginners or those who
want to leave the settings to the camera and take pictures easily.
Set to [ ] ([Intelligent Auto] Mode)
Take a picture
Press halfway
(press lightly and focus)
Press fully
(press the button all the
way to record)
Focus display
( When focus is aligned: illuminated
When focus is not aligned: flashing)
AF area
• The AF area is displayed around the subject’s face by the Face Detection
function. In other cases, it is displayed at the point on the subject which
is in focus.
■
Defocusing the background
You can easily set the blurriness of the background while checking the screen.
Press the rear dial to display [ ]
Press or rotate the rear dial to adjust
• Press [ ( Q.MENU)] button to reset the setting
to the default state (AUTO).
• To adjust automatically, reset the setting to the
default state (AUTO).
Press [MENU/SET] or the rear dial to finalise the setting

(ENG) VQT5B69 17
Recording using [Intelligent Auto Plus] Mode
When [Intelligent Auto Plus] (iA+) mode is selected, you can easily adjust the
brightness and colouring, in addition to the background defocusing, without
compromising the user-friendly operation of the [Intelligent Auto] Mode.
Press [MENU/SET] when in [Intelligent Auto] Mode
Press to select [ ] and then press
[MENU/SET]
■
Adjusting brightness, colouring, and background defocusing
Press the rear dial to display the options
Press to select the item
[ ]: Adjust the brightness.
[
]: Adjust the background blur.
[
]: Adjust the colour balance.
Press or rotate the rear dial to adjust
• Press [ ( Q.MENU)] button to reset the setting to the default state
(AUTO).
• To adjust automatically, reset the setting to the default state (AUTO).
Press [MENU/SET] or the rear dial to set

18 VQT5B69 (ENG)
Taking Pictures with different picture effects
[Creative Control] Mode
You can select your own settings from various effects and take pictures while
confirming these effects on the LCD monitor.
Set mode dial to [ ]
Press to select an effect, and then
press [MENU/SET]
• A brief description of selected picture effect
appears when you press [DISP.] button.
Preview screen
■
Adjust the effect to fit your preferences
Press the rear dial to display the options
Press to select the item
• The items that can be adjusted differ depending on the selected picture
effect.
[
]: Adjust the brightness.
[
]: Adjust the background blur.
[
]: Adjust the setting conditions of the selected effect, etc.
Press or rotate the rear dial to adjust
• Press [ ( Q.MENU)] button to reset the setting to the default state
(AUTO).
• To adjust automatically, reset the setting to the default state (AUTO).
Press [MENU/SET] or the rear dial to set

(ENG) VQT5B69 19
Using the rear dial
You can use the rear dial to compensate the exposure or adjust the aperture
value and shutter speed. The items that can be adjusted differ according to the
recording mode.
Compensating the exposure
Press the rear dial to set Exposure Compensation to a
selected state
Exposure
Compensation value
Rotate the rear dial to compensate the exposure
• If the picture is too dark, adjust the exposure to the “+” direction.
• If the picture is too bright, adjust the exposure to the “-” direction.
Setting the aperture value/the shutter speed
Press the rear dial to select the items to
set
• Items that can be set will switch every time the
rear dial is pressed.
Programme Shift (Recording mode: )
• To adjust the setting, display the aperture value and shutter speed
by pressing the shutter button halfway.
Aperture Value (Recording mode: / )
Shutter Speed (Recording mode: / )
Rotate the rear dial to set

20 VQT5B69 (ENG)
Setting the menu
Refer to the following procedures to operate the menus.
Example: Setting [AF Mode] from
to in the [Program AE] Mode
Press [MENU/SET] to display the menu
Press to select [AF Mode] and then press
• Depending on the item, its setting may not appear or it may be
displayed in a different way.
Press to select and then press
[MENU/SET] to set
Press [MENU/SET] to close the menu
Switching to other menus
Example: Switching to the [Setup] menu from
[Rec] menu
Press [MENU/SET] to display the menu
Press
Press to select the [Setup] menu icon [ ]
Press
• Select a menu item next and set it.
/