Page is loading ...

PICTURE
TAKING
WITH
THE
No. 2 Folding Pocket
Brownie Camera
PRICE
10
CENTS
EASTMAN
KODAK
CO.
ROCHESTER,
N.
Y.,
U.S.
A.

KODAK
Trade
Mark,
1888
Eastman
Kodak Co.
Rochester,
N.
Y.
Manu(actu•·e•·•
OJ
Kodaks
Brownie
Cameras
Kodiopticons
Brownie
Developing
Boxes
Kodak
Film
Tanks
Kodak
Dry
Mounting
Tissue
Velox
Paper
Eastman
Solio
Paper
Eastman
Ferro-Prussiate
Paper
Eastman
Velvet
Bromide
Paper
Eastman
Royal
Bromide
Paper
Eastman
Standard
Bromide
Paper
Eastman
Enameled
Bromide
Pape
r
Eastman
Matte-Enamel
Bromi
de
Paper
Eastman
Platino
Bromide
Paper
Eastman
Non-Curling
Film
Tested
Chemicals
Tripods
and
Other
Spedalties
Trade Marks
Re
~
.
U. S. Pat. Office.
ldarch,
1913

PICTURE
TAKING
WITH
THE
No. 2
FOLDING
POCKET
Brownie Cam era
EASTMAN
KoDAK
Co.
ROCHESTER,
N.Y.
,
U.S.
A.

ORDER
FILM
BY
NUMBER
All
Kodak
Films may
be
distin-
guished by
the
numbers
on the
ends of the cartons.
120
1s
the
number
for film for this
camera
(No.
2
Folding
Pocket
Brownie).
The
number
appears
both
on
the carton and on the
·Cartridge.
NOTICE.
The
Duplex
paper (black on one side, red
on
the
-other)
now
used
in
Kodak
cartridges is superior to
•black paper,
in
that
it
has
no
deleterious effect upon
:the keeping qualities of the film
and
absolutely does
:away with numerous
markings.
In
watching for numbers
through
the red window,
one should now look for black numbers
on
red paper,
instead of, as formerly, white numbers on
black
paper.
Whenever
the
term
"duplex
paper"
is used in this
manual,
reference is
made
of course, to this black
an
d
re.d
pape.
r.

Before
Loading
BEFORE
taking
any
pictures
with
the
No. 2
Folding
Pocket
Brownie
Camera
read
the
following
instructions
carefully,
and
make
your-
self
perfectly
familiar
with
the
instrument,
taking
especial
care
to
learn
how
to
operate
the
shutter.
Work
it
for
both
time
and
instantaneous
expo-
sures
several
times
before
threading
up
the
film.
The
first
thing
for
the
amateur
to
bear
in
mind
is
that
the
light
which
serves
to
impress
the
photographic
image
upon
the
sensitive
film
in
a
fraction
of
a
second
when
it
comes
through
the
lens
can
destroy
the
film
as
quickly
as
it
makes
the
picture.
After
the
film
has
been
developed
and
all
developer thoroughly washed out,
it
may
be
quickly
transferred
in
subdued
white
light
to
the
fixing
bath
without
injury.
Throughout
all
the
operations
of
loading
and
unloading,
be
extremely
careful
to
keep
the
duplex
paper
wound
tightly
around
the
film
to
prevent
the
admission
of
light,

CONTENTS
PART
!-Loading
PART
11-Making
the
Exposures
PART
III-Removin
g
the
Film
PART
IV-Developing
PART
V
-Printing
on
Velox
Paper
PA
RT
VI-Mounting
PART
VII-Formulas
4

PART
I
Loading
the
Camera
THE
film
for
the
No.
2
Folding
Pocket
Brow-
.
nie
Camera,
the
regular
No
. 2
Brownie
film,
is
furnished
in
light-proof
cartridges
and
the
instrument
can,
therefore,
be
loaded
in
daylight.
The
operation
should,
how-
ever,
be
performed
in
a
subdued
light,
not
in
the
glare
of
bright
sunlight
. .
It
should
also
be
borne
in
mind
that
after
the
seal
is
broken
care
must
be
taken
to
keep
the
duplex
paper
taut
on
the
spool
otherwise
it
may
slip
and
loosen
suffi-
ciently
to
fog
the
film.
T~~.~k~
n
1.
To
load
the
camera,
take
a
position
at
a
table
where
the
daylight
is
somewhat
subdued,
and
open
back
of
camera
by
pressing
on
con-
cealed
springs
at
rear
upper
corner
of
each
side
of
Kodak
as
shown
in
Fig.
1.
The
back
of
5

camera
will
loosen
and
may
·
be
allowed
to
drop
down.
The
camera
is
now
ready
for
loading.
2.
At
each
end
of
the
camera
will
be
seen
a
recess
for
holding
the
·film
spools.
As
sent
out
from
the
factory,
there
is
one
empty
spool
at
the
winding
end
of
the
camera,
and
the
fresh
cartridge
is
to
be
inserted
in
the
opposite
end.
FIG
.
2.
To
accomplish
this,
pull
up
on
axis
pins
as
shown
in
Fig.
2.
3.
Now
insert
the
cartridge
as
shown
in
Fig.
3.
Important
Be
sure
and
get
the
top
of
spool
at
top
of
camera
(each
6
FIG.
3.

spool
is
marked
on
the
end)
when
inserting,
otherwise
your
film will
come
on
the
wron
g
side
of
duplex
paper
when
reeled
off a
nd
total
failure
will
result.
4.
Now
remove
the
gummed
slip
that
holds
down
the
end
of
duplex
paper
and
pass
the
dup
l
ex
paper
across
opening
in
the
back
of
the
ca
mera,
and
thread
into
slit
in
reel,
Fig
4.
Be
careful
in
so
doing
that
the
paper
draws
straight
and
true,
and
give
the
spool
two
or
th
,
re
e
turns
(
to
the
l
eft
from
the
key
end)
.
Fig.
5.
Caution
If
you
turn
off
too
much
of
the
duplex
paper
before
the
camera
is
closed,
the
film will
be
un-
covered
and
ruined.
FrG. 4
5.
The
camera
is
now
to
be
closed,
reversing
the
operation
shown
in
Fig
1,
page
5.
Throughout
the
f
oregoi
ng
operations,
from
the
time
the
g
ummed
slip
is
cut
on
the
fresh
roll
of
7

film
until
the
back
of
camera
is
closed,
keep
the
duplex
paper
wound
tightly
on
the
roll.
If
it
is
allowed
to
loosen,
light
will
be
admitted
and
the
film fogl('ed.
FIG.S
6.
The
roll
of
film
in
the
camera
is
covered
with
duplex
paper
and
this
must
be
reeled
off
before
a
picture
can
be
taken.
Turn
the
key
slowly
to
the
left
and
watch
in
the
little
red
window
at
the
back
of
the
camera.
When
fifteen
to
eighteen
turns
have
been
given,
a
black
index
h:md
will
appear
before
the
little
red
window,
this
hand
is a
warning
that
you
are
approaching
Fig.
1.
Then
turn
the
key
very
slowly
until
Fig.
1
appears
before
the
redwindow.
Fig.
6.
FIG.
6
The
fi11n
is
now
in
po
8
ition
for
takin
g
the
firs t
picture.

PART
II
Making
the
Exposures
B
EFORE
making
an
exposure
with
the
No.2
Folding
Pocket
Brownie
Camera,
.
either
time
or
instantaneous,
be
sure
of
four
things:
FIRST-That
the
shutter
is
adjusted
properly.
(For
time,
instantaneous
or
bulb
exposure
as
de
sir
ed.)
SECOND-That
the
diaphragm
stop
is
set
at
the
proper
opening.
THIRD-That
the
camera
is
focused.
FOURTH-That
an
unexposed
section
of
the
film is
turned
into
position.
SECTION I
Operating
the
Shutter
Perfect
familiarity
with
the
shutter
is
essential
to
successful
picture
taking
with
any
came
r
a.
9

The
following
directions
should,
therefore,
be
carefully
read
and
the
shutter
operated
sev~ral
times
before
threading
the
film
up
for
use.
"Snap
Shots"
For
all
C9rdinary
Instantaneous
Exposures
FIRST-Set
the
lever
A
at
the
point
"I.;'
This
adjusts
the
shutter
for
instantaneous
exposures.
SECOND-Set
the
lever
B
at
No.
1.
Lever
B
controls
the
Iris
diaphragm
and
No.
1
is
the
proper
opening
for
ordinary
instantaneous
ex-
posures.
THIRD-Press
down
the
release
C.
This
makes
the
exposure.
Time
Exposures
·
FIRST-Set
the
lever
A
at
the
point
T
(time).
'rhis
adjusts
the
shutter
for
time
exposures.
SECOND-Set
the
lever
Bat
No.
·2
or
3.
See
in-
structions
for
use
of
stops,
page
19.
THIRD-Touch
the
release
C.
This
opens
the
shutter.
Time
exposure
by
the
watch.
Again
press
the
release.
This
closes
the
shutter.
Bulb
.
Exposure
When
it
is
desirable
to
make
a
very
short
time
exposure
this
is
best
accomplished
by
making
a
"bulb
exposure."
FIRST-Set
the
lever
A
at
the
point
''B''
·
(bulb).
This
adjusts
the
.
shutter
for
bulb
exposures.
SECOND-Set
the
ie'
ver
B
controlling
the
stops,
at
No.
2 .
or
3
as
desired.
THIRD-Press
lever
to
open
the
shutter,
and
·.
no_-
'
lease
it
to
close
.
the
shutter.
This
makes
.
the
10

exposure.
The
shutter
will
remain
open
as
long
as
the
lever
is
under
pressure.
Do
not
oil
any
part
of
the
shutter.
In
case
of
accident
return
shutter
to
your
dealer
or
to
us
for
repairs.
SECTION
2
Instantaneous
Exposures--"Snap
Shots"
To
take
instantaneous
pictures
the
object
must
be
in
the
broad
open
sunlight,
but
the
camera
should
not.
The
sun
should
be
behind
the
back
or
over
the
shoulder
of
the
operator
.
Focus
on
the
Subject
Fr
G. 1.
Opening
the
Front
1.
Press
the
concealed
button
as
shown
in
Fig.
1,
and
push
down
the
bed
of
camera
to
the
limit
of
motion.
2.
Grasp
the
bottom
of
slide
plate
to
pull
out
the
front.
u

3..
At
the
front
of
camera
bed
and
on
the
side
opposite
finder,
you
will
.
s~e
a
scale
with
slots
marked
8, 20.
and
100
feet.
Fig.
2.
This
is
for
focusing
the
camera.
Before
extending
bellows
set
the
catch
in
the
slot
.corresponding
to
the
dis-
tance
away
of
the
principal
object
to
be
photo-
graphed.
FIG.
2
The
catch
is
set
by
downward
pressure
on
the
lever
and
then
moving
to
the
right
or
left.
It
is
not
necessary
to
estimate
the
distance
with
any
more
than
approximate
accuracy;
for
instance,
if
the
fo
cus
is
set
at
20
feet
(the
usual
distance
for
ordinary
street
work')
the
sharpest
part
of
the
picture
will
be
the
objects
at
that
distance
from
the
camera,
but
everything
from
12
to
50
feet
will
be
in
good
focus.
For
general
street
work
the
focus
may
be
kept
at
20 feet,
but
where
the
principal
object
is
nearer
or
farther
away,
the
focus
should
be
changed
accordingly.
For
dis-
tant
views
set
the
focus
at
100
feet.
Extending
the
·
Front
Now
extend
fr.ont
of
camera
to
limit
of
motion
(Fig.
3).
This
sets
the
focus
for
the
distance
12
.

you
have
placed
the
catch
on
the
scale.
A
click
will
be
heard
when
the
front
l
ocks.
FIG.
3.
Extending
the
Front
Making
the
Exposure
Aim
the
camera
at
the
object
to
be
photo-
graphed
and
loc
a
te
the
image
in
the
finder,
which
is
at
the
left
hand
corner
of
front-board.
The
finder
shows
the
s<;ope
of
view
and
gives
a
fac-simile
of
what
the
picture
will
be.
Hold
the
camera
steady-hold
it
level
as
shown
in
Fig.
4,
and
push
the
lever.
This
makes
the
exposure.
For
a
vertical
exposure
the
camera
must
be
held
on
its
end.
Fig.
5.
Reverse
the
finder
so
that
it
will
be
available
for
vertical
exposures.
The
finder
gives
the
scope
of
view
and
shows
a
fac-simile
of
the
picture
as
it
will
appear,
but
ou
13

FIG.
4.
Pressing
Snap
Shot
Le
v
er
a
reduced
scale.
Any
object
that
does
not
show
in
the
finder
will
not
show
in
the
picture.
It
will
be
noticed
that
the
top
of
the
finder
is
notched
as
shown
in
Fig.
6.
This
is
done
so
that
the
one
finder
will
correctly
show
the
view
in-
cluded
when
the
camera
is
held
in
either
horizon-
tal
or
vertical
position.
As
the
picture
taken
with
the
No. 2
Folding
Pocket
Brownie
is
oblong
it
will
readily
be
seen
that
unless
the
finder
was
made
in
this
manner
it
could
not
correctly
show
the
exact
view
intended
when
held
in
either
position,

VIEW
INCLUDED
WHEN
MAKING
A
HORIZONTAL
PICTURE.
VIEW
.INCLUDED
WHEN
MAKING
:
A
VERTICAL
PICTURE.
FIG.
6
Remember
that
only
the
view
indicated
in
the
dotted
lines will
show
in
the
picture.
FrG.
7
15

Hold it Level
The
camera
must
be
held
level.
If
the
operator
attempts
to
photograph
a
tall
building
while
standing
near
it,
by
pointing
the
camera
upwa
r,.
d
(thinking
thereby
to
center
it)
the
result
will
be
similar
to
Fig.
7.
This
was
pointed
too
high.
This
building
should
have
been
taken
from
the
middle
story
window
of
the
building
opposite.
The
operator
should
hold
the
camera
level,
after
withdrawing
to
a
proper
distance,
as
indi-
cated
by
the
image
shown
in
the
finder.
If
the
object
be
down
low,
like
a
small
child
or
a
dog,
the
camera
should
be
held
down
level
with
the
center
of
.the
object.
TURN
A
NEW
SECTION
OF
FILM
INTO
POSITION:
Turn
the
winding
key
slowly
to
the
left,
until
FIG. 8
the
next
number
appears
before
the
red
window.
Three
ov
four
turns
will
be
sufficient
to
accom-
plish
this.
See
Fig.
8.
Note-The
warning
hand
appears
only
before
number
one.
Repeat
the
foregoing
operations
for
each
picture.
16

SECTION
3
Time
Exposures-
Interiors
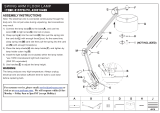
1.
Place
the
camera
in
p
ositio
n
on
a
tripod
or
some
other
firm
support.
Fig.
9.
Set
camera
in
su
ch a
position
that
the
·
finder
.
will
embrace
the
view
desired
.
The
diagram
shows
the
p
ro
per
position
for
the
camera.
It
s
hould
not
be
pointed
directly
at
a
window
as
the
glare
of
light
will
blur
the
picture
.
If
all
the
windows
cannot
be
,
avoid-
ed,
pull
down
the
shades
of
such
as
come
within
the
range
of
the
c
ame
r
a.
Make
the
exposure
w1th
the
shutter
as
described
on
page
10.
Time
Needed
for Interior
Exposures
This
table
is
for
the
largest
stop.
When
the
second
stop
is
used
double
the
time;
whe
.n
the
third
stop
is
used
give
four
tiJ;nes
the
time
of
table.
_.
White
walls
and
more
than
· orie
window:
bright
sun
outside,
2
seconds;
~rri!!zelrri!!~~zelzel~l2'2~~;::!~f
hazy
sun,
5
seconds
:
~
cloudy
bright,
10
seconds;
cloudy
dull,
20
seconds.
White
walls
and
only
one
window:
bright
sun
outside,
3
seconds;
h
azy
su
n, 8
seconrls;
cloudy
bright,
15
~eco
n dsi
cloudy
dull,
30
seconds;
-I
I
'J
Diagram
showing
pos
itions
of
Camera
17

Medium
colored
walls
and
hangings
and
more
than
one
window
:
bright
sun
outsid
e , 4
seconds;
hazy
sun
, 10
seconds;
cloudy
bright,
20
seconds;
cloudy
dull,
40
seconds.
Medium
colored
walls
and
hangings
and
only
one
window:
bright
sun
outside
, 6
seconds;
hazy
sun,
15
seconds;
cloudy
b~;ight.
30
seconds;
clciudy
dUll,
60
seconds
.
Dark
colored
walls
and
hangings
and
more
than
one
window:
bright
sun
outside,
10
seconds;
hazy
sun.
20
seconds:
cloudy
bright,
40
seconds;
cloudy
dull,
1
minute
and
20
seconds.
Dark
colored
walls
and
hangings
and
only
one
window:
bright
sun
outside,
20
seconds;
hazy
sun,
40
seconds;
cloudy
bright
, 1
minute,
20
seconds;
cloudy
dull,
2
minutes
and
40
seconds.
The
foregoing
is
calculated
for
rooms
whose
windows
get
the
direct
light
from
the
sky
and
for
hours
from
three
hours
after
sunrise
until
three
hours
before
sunset.
If
earlier
or
later
the
time
required
will
be
longer.
By
means
of
a
Kodak
Portrait
Attachment
used
with
the
No.
2
Folding
Pocket
Brownie
Camera,
head
and
shoulder
pictures
of
increased
size
may
be
obtained.
With
the
Kodak
Portrait
Attachment
in
position
and
the
focus
set
at
8
feet,
the
subject
should
be
placed
3 feet
from
the
lens.
With
the
focus
set
at
20
feet
the
subject
should
be
placed
3_%
feet
away.
With
the
focus
set
at
100
feet
the
subject
will
be
in
focus
placed
at
4
to
5
feet
distance.
18
/