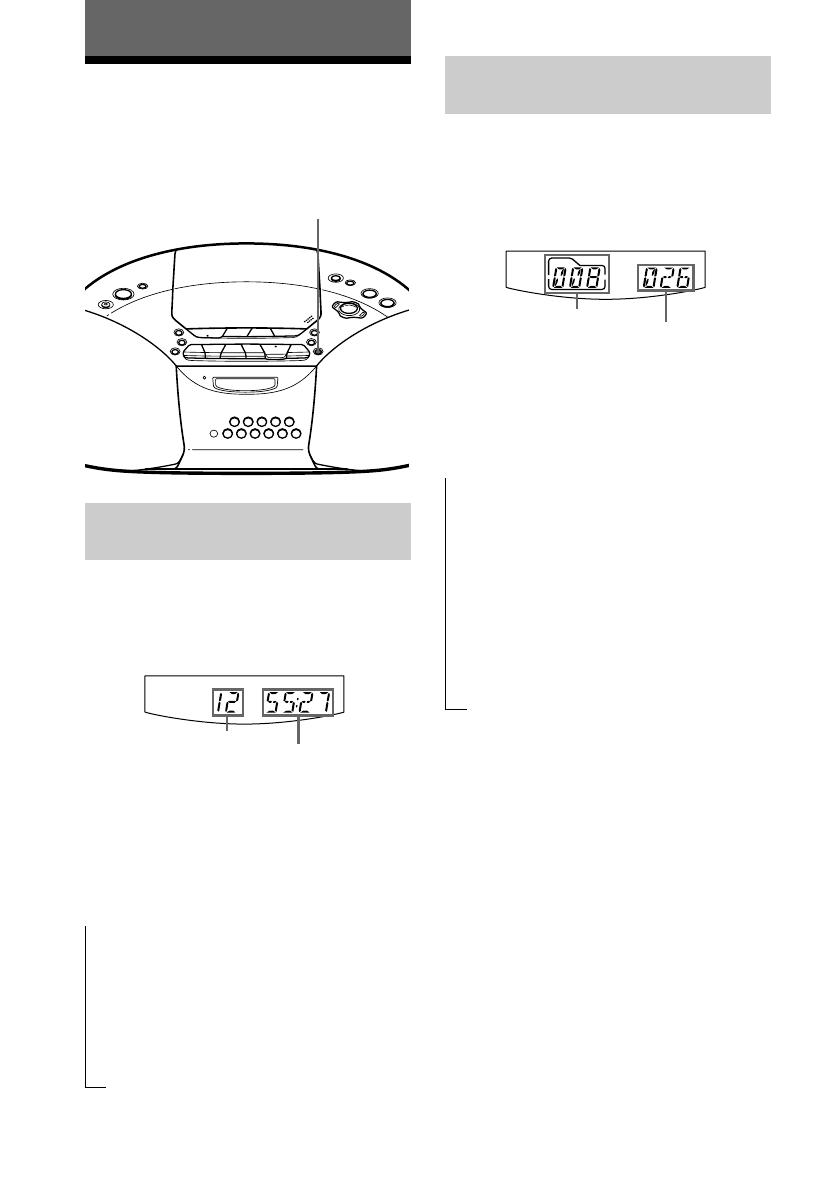
Sony CFD-S20CP Operating instructions

Category
CD players
Type
Operating instructions
3-241-606-33 (1)
©2002 Sony Corporation
CD Radio
Cassette-Corder
CFD-S20CP
Operating Instructions page 2
GB
Manual de instrucciones página 2
ES
GB
ES
2
GB
Warning
To prevent fire or shock hazard,
do not expose the player to rain
or moisture.
To avoid electrical shock, do not
open the cabinet. Refer
servicing to qualified personnel
only.
Information
For customers in Europe
This Compact Disc player is classified as a
CLASS 1 LASER product.
The CLASS 1 LASER PRODUCT mark is located
at the bottom.
Warning
Do not install the appliance in a confined space,
such as a bookcase or built-in cabinet.
To prevent fire or shock hazard, do not place
objects filled with liquids, such as vases, on the
appliance.
Notice for customers in the United
Kingdom
A moulded plug complying with BS 1363 is fitted
to this equipment for your safety and convenience.
Should the fuse in the plug supplied need to be
replaced, same rating fuse approved by ASTA or
BSI to BS 1362, (i.e. marked with or mark)
must be used.
If the plug supplied with this equipment has a
detachable fuse cover, be sure to attach the fuse
cover after you change the fuse. Never use the
plug without the fuse cover. If you should lose the
fuse cover, please contact your nearest Sony
service station.
Note
The name of the switch to turn on/off this player is
indecated as below:
“OPERATE” : European model
“POWER” : Other models
Basic Operations
3
GB
Table of contents
Basic Operations
Playing an audio CD or MP3 files.................. 4
Listening to the radio...................................... 8
Playing a tape ............................................... 10
Recording on a tape ...................................... 12
The CD Player
Using the display .......................................... 14
Locating a specific track............................... 15
Playing tracks repeatedly (Repeat Play) ....... 16
Playing tracks in random order
(Shuffle Play) ........................................... 17
Creating your own programme
(Programme Play)..................................... 17
The Radio
Presetting radio stations................................ 19
Playing preset radio stations ......................... 20
The Audio Emphasis
Adjusting the sound emphasis ...................... 21
The Timer
Falling asleep to music ................................. 22
Setting Up
Choosing the power sources ......................... 23
Additional Information
Precautions ................................................... 25
Troubleshooting............................................ 27
Maintenance ................................................. 29
Specifications ............................................... 30
About “MP3”................................................ 31
Index ............................................................. 33
GB
4
GB
Playing an audio CD or MP3 files
Connect the supplied mains lead (see page 23).
1 Press CD.
2 Press Z PUSH OPEN/CLOSE down
to open the CD compartment and
place the CD on the CD
compartment.
3 Close the lid of the CD compartment.
With the label side up
1
4 2, 3
Basic Operations
CD
Basic Operations
5
GB
Display
Playing
time
Track
number
To Press
adjust the volume VOL +*,
stop playback x
pause playback u* (X on the remote)
Press the button again to
resume play after pause.
go to the next track >
go back to the previous track .
remove the CD** Z PUSH OPEN/CLOSE
turn on/off the player OPERATE
(or POWER, see page 2)
* The button has a tactile dot.
**Once you open the CD compartment, the track to start play will
change to the beginning of the first track.
Tip
Playback starts from the
track you last stopped
playing (Resume play).
During stop, the track
number to be played are
displayed.
To cancel the resume play
to start play from the
beginning of the first track,
press x in stop mode.
u
OPERATE
(or POWER)
VOL +, –
x
Z PUSH
OPEN/CLOSE
continued
4 Press u (N on the remote).
The player plays all the tracks once.
To play a CD with MP3 files, see
page 6.
Use these buttons for additional operations
., >
6
GB
Note
Before playing a file, this
player reads all file and
folder information on the
CD. Depending on the file
structure, it may take more
than a minute to read them.
During this time, Reading
is displayed.
Tip
You can use the buttons
mentioned in the table on
page 5 for additional
operations in the same way
as when playing an audio
CD.
Playing a CD with MP3 files
1 Press CD.
2 Press Z PUSH OPEN/CLOSE to open the CD
compartment and place the CD on the CD
compartment (see page 4) .
3 Close the lid of the CD compartment.
4 Press u.
The player plays all MP3 files on the CD.
When you play a CD with MP3 files, the MP3
indicator lights up.
To select a folder
Press FOLDER + to go forward and FOLDER to go
backward (press FLDR + or FLDR on the remote).
To select a file
Press > to go forward and . to go backward.
Track number
u
., >
MP3
indicator
CD
After the file name is
displayed, the playing time
will appear
Z PUSH
OPEN/CLOSE
Playing an audio CD or MP3 files (continued)
FOLDER +, –
Basic Operations
7
GB
Example of folder structure and playing
order
The playing order of the folders and files is as follows:
Notes
A folder that does not
include an MP3 file is
skipped.
Maximum number of
folders: 255
Maximum number of files:
255
Folder names and file
names can be displayed
with up to 64 characters.
The characters A - Z, a - z,
0 - 9, and _ can be
displayed on this player.
Other characters are
displayed as *.
This player conforms to
Version 1.1 of the ID3 tag
format. If the file has the
ID3 tag information, song
title, artist name and
album name can be
displayed.
About CD-Rs/CD-RWs and MP3 files
This player can play CD-Rs/CD-RWs recorded in the CD-
DA format* and MP3 files recorded in the CD-ROM
format, but playback capability may vary depending on the
quality of the disc and the condition of the recording
device.
* CD-DA is the abbreviation for Compact Disc Digital Audio. It is
a recording standard used for Audio CDs.
CD-R
CD-RW
3
2
1
2
4
5
3
6
7
8
4
9
5
0
6
1
MP3 file
Folder
8
GB
Listening to the radio
Connect the supplied mains lead (see page 23).
1 Press RADIO BAND•AUTO
PRESET until the band you want
appears in the display.
Each time you press the button, the
band changes as follows:
Korean model: “FM” t “AM”
Other models: “FM” t “MW” t “LW”
2 Hold down TUNE + or – until the
frequency digits begin to change in
the display.
The player automatically scans the
radio frequencies and stops when it
finds a clear station.
If you can’t tune in a station, press
TUNE + or – repeatedly to change
the frequency step by step.
21
Display
Indicates an FM stereo
broadcast
RADIO BAND
AUTO PRESET
Basic Operations
9
GB
Use these buttons for additional operations
Tips
If the FM broadcast is
noisy, press MODE until
Mono appears in the
display and radio will play
in monaural.
If you need to change the
AM/MW tuning interval,
see page 23.
To Press
adjust the volume VOL +*,
turn on/off the radio OPERATE (or POWER, see page 2)
*VOL + has a tactile dot.
To improve broadcast reception
Reorient the aerial for FM. Reorient the player itself for
AM or MW/LW.
OPERATE
(or POWER)
VOL +, –
MODE
for FM for AM/MW/LW
10
GB
Playing a tape
23
With the side you want
to play facing you
Display
Connect the supplied mains lead (see page 23).
1 Press TAPE.
2 Press xZ to open the tape
compartment and insert a recorded
tape. Use TYPE I (normal) tape only.
Close the compartment.
3 Press n.
The player starts playing.
1
TAPE
Basic Operations
11
GB
Use these buttons for additional operations
To Press
adjust the volume VOL +*, –
stop playback xZ
fast-forward or rewind m or M
pause playback X
Press the button again to resume
play after pause.
eject the cassette xZ
turn on/off the player OPERATE (or POWER, see page
2)
*VOL + and n has a tactile dot.
xZ
X
m, M
OPERATE
(or POWER)
VOL +, –
12
GB
Connect the supplied mains lead (see page 23).
1 Press xZ to open the tape
compartment and insert a blank tape.
Use TYPE I (normal) tape only.
Close the compartment.
2 Select the programme source you
want to record.
To record from the CD player, insert
a CD (see page 4) and press CD.
To record from the radio, tune in the
station you want (see page 8).
Recording on a tape
3
1
With the side you want to
record on facing you
Display
CD
RADIO BAND
AUTO PRESET
Basic Operations
13
GB
To Press
stop recording xZ
pause recording X
Press the button again to
resume recording.
turn on/off the player OPERATE (or POWER, see
page 2)
3 Press z to start recording
(n is depressed automatically).
Use these buttons for additional operations
Tips
Adjusting the volume or the
audio emphasis (see page
21) will not affect the
recording level.
If the AM/MW/LW
programme makes a
whistling sound after
youve pressed z in step 3,
press MODE to select the
position of ISS
(Interference Suppress
Switch) that most decreases
the noise.
For the best results, use the
mains as a power source.
To erase a recording,
proceed as follows:
1 Insert the tape whose
recording you want to
erase.
2 Press TAPE.
3 Press z.
X
OPERATE
(or POWER)
TAPE
xZ
14
GB
The CD Player
Using the display
You can check information about the CD
using the display.
DISPLAY
ENT
MEMORY
Total playing time
Total track number
Total track number
Total folder number
t
Checking the information of
an audio CD
To check the total track number
and playing time of the CD
While the CD is stopped, you can check
them in the display.
To check the remaining time
Press DISPLAY•ENT•MEMORY while
playing a CD. The display changes as
follows:
The current track number and playing
time
r
The current track number and the
remaining time of the current track
r
The number of tracks left and the time
remaining on the CD
t
Checking the information of a
CD with MP3 files
To check the total folder number
and total track number on the
CD
While the CD is stopped, you can check
them in the display.
To check file information
Press DISPLAY•ENT•MEMORY while
playing an MP3 file. The display changes as
follows:
The current track number and playing
time
r
The current track number and the file
name
r
The folder number and the folder name*
r
The current track number and ID3: the
title name / the artist name / the album
name**
* If the folder does not have a folder name,
“Root” appears instead of a folder name.
** If the file does not have ID3 information, “No
Title”, “No Artist” or “No Album” appears in
the display.
15
GB
The CD Player
Locating a specific
track
You can quickly locate any track on a CD
using the number buttons.
You can also find a specific point in a track
while playing a CD.
To locate Press
a specific track the number button of the track
directly
a point while > (forward) or .
listening to (backward) while playing and
the sound hold it until you find the point
a point while > (forward) or .
observing (backward) in pause and hold
the display it until you find the point
Notes
Locating a specific track using the number
buttons is only available for the tracks in the
selected folder.
You cannot locate a specific track if "SHUF" or
"PGM" is lit in the display. Turn off the
indication by pressing x.
., > Number
buttons
Tips
When you locate a track numbered over 10,
press >10 first, then the corresponding number
buttons.
Example: To play track number 23, press >10
first, then 2 and 3.
To select a track numbered over 100 or more,
press >10 twice, then the corresponding number
buttons.
16
GB
Do this
1 Programme tracks (see step
3 on page 18).
2 Press REPEAT until “PGM
REP” appears.
3 Press u.
1 Programme folders (see
step 3 on page 18).
2 Press REPEAT until
“FLDR PGM REP”
appears.
3 Press u.
To repeat
programmed
tracks
programmed
folders
To cancel Repeat Play
Press REPEAT until “REP” disappears from
the display.
When playing MP3 files
When you select “REP ALL”, the player
plays all files (up to 255 files) of a CD
repeatedly.
Playing tracks
repeatedly (Repeat Play)
You can play tracks repeatedly in normal,
shuffle or programme play modes.
u
1 Press CD.
“CD” appears in the display.
2 Proceed as follows.
To repeat
a single
track
all tracks
on the
CD
a selected
folder
(MP3 CD
only)
tracks in
random
order
MODE REPEAT
Do this
1 Press REPEAT until “REP
1” appears.
2 Press the number button for
the track you want to
repeat.
1 Press REPEAT until “REP
ALL” appears.
2 Press u.
1 Press REPEAT until “REP
FLDR” appears.
2 Select the folder by
pressing FOLDER + or
FOLDER –, then press u.
1 Start Shuffle Play (see page
17).
2 Press REPEAT until
“SHUF REP” appears.
CD
FOLDER +, –Number
buttons
17
GB
The CD Player
Creating your own
programme (Programme Play)
You can arrange the playing order of up to
20 tracks or files on a CD. When playing an
MP3 files, you can also programme up to 20
folders (Programme Folder Play).
MODE
1 Press CD.
“CD” appears in the display.
2 Press MODE until “PGM” appears in
the display.
When you select Programme Folder
Play (MP3 CD only), press MODE until
“PGM FLDR” appears in the display.
u
DISPLAY
ENT
MEMORY
Playing tracks in
random order (Shuffle Play)
You can play tracks in random order.
MODE
1 Press CD.
“CD” appears in the display.
2 Press MODE until “SHUF” appears in
the display.
3 Press u to start Shuffle Play.
To cancel Shuffle Play
Stop playing first. Then press MODE until
“SHUF” disappears from the display.
When playing MP3 files
The player plays all files (up to 255 files) on
a CD in random order.
Tips
During Shuffle Play, you cannot select the
previous track by pressing ..
The resume function doesn't work during
Shuffle Play.
u
continued
CD
CD ., >
FOLDER
+, –
18
GB
Tips
You can play the same programme again, since
the programme is saved until you open the CD
compartment.
You can record your own programme. After
you’ve created the programme, insert a blank
tape and press z to start recording.
The resume function doesn't work during
Programme Play.
3 Press . or >, FOLDER + or –
then press DISPLAY•ENT•MEMORY
for the tracks or files* you want to
programme in the order you want.
*folders for Programme Folder Play.
4 Press u to start Programme Play.
To cancel Programme Play
Stop playing first. Then press MODE until
“PGM” disappears from the display.
To check the order of tracks
before play
Press DISPLAY•ENT•MEMORY.
Every time you press the button, the track or
folder number appears in the programmed
order.
To change the current
programme
Press x once if the CD is stopped and twice
if the CD is playing. The current programme
will be erased. Then create a new
programme following the programming
procedure.
Playing
order
Programmed
track
Audio CD (Programme Play)
MP3 CD (Programme Play)
Playing
order
Programmed
file
MP3 CD (Programme Folder Play)
Playing
order
Programmed
folder
Creating your own programme
(Programme Play) (continued)
The Radio
19
GB
The Radio
Presetting radio
stations
You can store radio stations into the player’s
memory. You can preset up to 30 radio
stations (Korean model), 20 for FM and 10
for AM in any order or 40 radio stations
(other models), 20 for FM and 10 for MW
and LW in any order.
1 Press RADIO BAND•AUTO PRESET
to select the band.
2 Hold down RADIO BAND•AUTO
PRESET until “AUTO” flashes in the
display.
3 Press DISPLAY•ENT•MEMORY.
The stations are stored in memory from
the lower frequencies to the higher
ones.
If a station cannot be preset
automatically
You need to preset a station with a weak
signal manually.
1 Press RADIO BAND•AUTO PRESET to
select the band.
2 Tune in a station you want.
3 Hold down the number buttons that you
want to preset the new station on for about
2 seconds.
To select the preset number over 10, press
>10 first, then the corresponding number
buttons.
You need to hold down the last number
button to enter for about 2 seconds.
(Example: To select 12, press >10 and 1
first, then hold down 2 for about 2
seconds.)
DISPLAY
ENT
MEMORY
Number
buttons
RADIO BAND
AUTO PRESET
20
GB
Playing preset radio
stations
Once youve preset the stations, use the
number buttons to tune in your favourite
stations.
1 Press RADIO BANDAUTO PRESET
to select the band.
2 Press the number buttons to tune in the
stored station.
To tune in a preset station over 10, press
>10 first, then corresponding number
buttons.
(Example: To tune in a preset station
12, press >10 and 1 first, and then press
2.)
Number
buttons
RADIO BAND
AUTO PRESET
  • Page 1 1
  • Page 2 2
  • Page 3 3
  • Page 4 4
  • Page 5 5
  • Page 6 6
  • Page 7 7
  • Page 8 8
  • Page 9 9
  • Page 10 10
  • Page 11 11
  • Page 12 12
  • Page 13 13
  • Page 14 14
  • Page 15 15
  • Page 16 16
  • Page 17 17
  • Page 18 18
  • Page 19 19
  • Page 20 20
  • Page 21 21
  • Page 22 22
  • Page 23 23
  • Page 24 24
  • Page 25 25
  • Page 26 26
  • Page 27 27
  • Page 28 28
  • Page 29 29
  • Page 30 30
  • Page 31 31
  • Page 32 32
  • Page 33 33
  • Page 34 34
  • Page 35 35
  • Page 36 36
  • Page 37 37
  • Page 38 38
  • Page 39 39
  • Page 40 40
  • Page 41 41
  • Page 42 42
  • Page 43 43
  • Page 44 44
  • Page 45 45
  • Page 46 46
  • Page 47 47
  • Page 48 48
  • Page 49 49
  • Page 50 50
  • Page 51 51
  • Page 52 52
  • Page 53 53
  • Page 54 54
  • Page 55 55
  • Page 56 56
  • Page 57 57
  • Page 58 58
  • Page 59 59
  • Page 60 60
  • Page 61 61
  • Page 62 62
  • Page 63 63
  • Page 64 64
  • Page 65 65
  • Page 66 66
  • Page 67 67
  • Page 68 68

Sony CFD-S20CP Operating instructions

Category
CD players
Type
Operating instructions

Ask a question and I''ll find the answer in the document

Finding information in a document is now easier with AI

in other languages