RAB Lighting BLED2X13/PC Operating instructions
- Type
- Operating instructions

LED BOLLARD INSTALLATION INSTRUCTIONS
IMPORTANT
READ CAREFULLY BEFORE INSTALLING FIXTURE. RETAIN THESE INSTRUCTIONS FOR FUTURE REFERENCE.
RAB xtures must be wired in accordance with the National Electrical Code and all applicable local codes. Proper
grounding is required for safety. THIS PRODUCT MUST BE INSTALLED IN ACCORDANCE WITH THE APPLICABLE
INSTALLATION CODE BY A PERSON FAMILIAR WITH THE CONSTRUCTION AND OPERATION OF THE PRODUCT
AND THE HAZARDS INVOLVED.
WARNING: Make certain power is OFF before installing or maintaining xture. No user serviceable parts
inside.
Thank you for buying RAB lighting
xtures. Our goal is to design the
best quality products to get the job
done right. We’d like to hear your
comments. Call the Marketing
Department at 888-RAB-1000, or
email: market[email protected]
LOCATION
1. The Bollard should be mounted to a rm level
surface.
2. Anchor bolts may be used in new concrete
installations. Use the provided template.
3. For all other applications use anchors suitable for
the mounting surface.
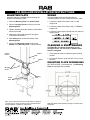
ANCHOR BOLTS INSTALLATION
CAUTION: Install according to all applicable local codes.
1. Install two Anchor Bolts in concrete foundation (by
others) using the template provided. Mounting Plate
may be used as template. Anchor Bolts should
protrude no more than 3”.
Concrete
Conduit
Anchor
Bolts
Mounting
Plate
MOUNTING fIXTURES
Depending on your model one or two xtures can be
mounted to each bollard.
1. Loosen three Door Screws and remove the Door.
2. Use the two #10-24 x 3/4” Mounting Screws to
thread into the Bollard extrusion.
3. Use the nuts and lockwashers provided to secure the
screws from inside the Bollard. Tighten securely.
4. Make sure the Housing Gaskets are properly
positioned.
5. Make electrical connections from the supply wires to
the xtures using approved connectors. Strain relief
the wires.
6. Replace the Door. Tighten screws.
7. Install the Bollard Cap and Gasket and tighten the
two set screws.
Bollard
Door
Screws
Bollard
Cap
Gasket
Door
Housing
Gaskets
Mounting
Screws

LED BOLLARD INSTALLATION INSTRUCTIONS
BLED-IN-0412
WIRING
Universal voltage driver permits operation at
100-240V(10W) or 100-277V(13W) and at 50 or 60Hz.
1. Connect the black xture lead to the (+) LINE
supply lead.
2. Connect the white xture lead to the (-) COMMON
supply lead.
3. Connect the bare copper Ground wire from xture to
supply ground.
Note: These instructions do not cover all details or variations
in equipment nor do they provide for every possible situation
during installation, operation or maintenance.
CLEANING & MAINTENANCE
CAUTION: Be sure xture temperature is cool
enough to touch. Do not clean or maintain while
xture is energized.
1. Clean glass lens with non-abrasive glass cleaning
solution.
2. Do not open xture to clean the LED. Do not touch
the LED.
The design of the LED Bollard is protected by U.S. patent
D599,050; D599,049 and patents pending in Canada, China
and Taiwan.
MOUNTING PLATE
Assemble xture(s) to bollard before mounting the
Bollard to the Mounting Plate.
1. Place the Mounting Plate over Anchor Bolts.
2. Use four Leveling Screws or shims to level the
Mounting Plate.
3. Tighten assembly using the washers, lockwashers
and nuts provided.
4. Make sure supply leads extend far enough to
make xture connections.
5. Slide Gasket down around the bottom of the
Mounting Plate.
6. Use the four Mounting screws to mount the
Bollard to the Mounting Plate. Tighten securely.
Mounting
Plate
Anchor
Bolts
Leveling
Screws
Mounting
Screws
Bollard
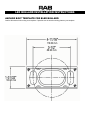
MOUNTING PLATE DIMENSIONS
NOT ACTUAL SIZE. Use dimensions. Use Mounting
Plate as a template when possible.
Gasket

LED BOLLARD INSTALLATION INSTRUCTIONS
ANCHOR BOLT TEMPLATE fOR BLED BOLLARD
Conrm dimensions before using as a template. If possible use the actual mounting plate as your template.
119.06 mm
88.90 mm
50.00 mm
-
 1
1
-
 2
2
-
 3
3


RAB Lighting BLED2X13/PC Operating instructions
- Type
- Operating instructions
Ask a question and I''ll find the answer in the document
Finding information in a document is now easier with AI
Related papers
Other documents
-
RAB 2594 User manual
-
 VONN Lighting VOB14798BL Dimensions Guide
-
 VONN Lighting VOB14796BL Dimensions Guide
-
e-conolight E-BBD Series Installation Instructions Manual
-
Vestil Movable Bollard Owner's manual
-
BEA Bollards User guide
-
Cooper Lighting BSL, BRL Louvered Bollard Installation guide
-
 AMP Lighting APL-3022-L-4-B-BZ-BUNDLE Installation guide
-
 Kichler Lighting 16131AZT28 User manual
-
 Kichler Lighting 16131AZT28 User manual


