Sylvania SMPK 2062 User guide

Category
MP3/MP4 players
Type
User guide

This manual is also suitable for

Electrical and electronic equipment ( EEE ) contains materials, parts and
substances which can be dangerous to the enviroment and harmful to human
health if waste of electrical and electronic equipment ( WEEE ) is not disposed
of correctly.
Equipments which are marked with the WEEE logo (as shown on the left ),
should not be thrown away with your household waste. Contact your Local
Authority Waste Disposal Department as they will be able to provide details
of the recycling options available in your area.
Note:
SMPK2062
Your Pocket Guide
Portable Media Player
Install Software
Get Connected
Transfer Media
Plug Your Ears & Enjoy
1
2
What’s in the box?
Portable Media Player
Digital Earphone
Battery Charger Your Pocket Guide
USB Cable
What’s in the box?
CD-ROM containing:
Media player driver for
Windows® 98/98SE
Software for converting
.act files into .wav files.
Software for formatting
internal memory.
Your Pocket Guide
C11
Portable Media Player
Install Software
Get Connected
Transfer Media
Plug Your Ears & Enjoy
Insert the CD into the CD ROM drive of your PC.
Click to start driver installation.
Follow the on-screen-menu to complete the installation.
Setup.exe
Click once you reach the
screen.
Close Installation
Complete
For Windows® 98/98SE users, please install the driver in the CD-ROM before downloading any files to your player.
4
Software Utilities Installation
Software Installation
/ /
/ /
/
Windows® 98 98SE ME 2000 XP Vista
Pentium Class or faster Processor
CD-ROM Drive
64MB RAM
30MB free hard disk space
USB Port
3
You’ll need a computer with:
System Requirement
Connect & Charge
Connect
Your player will be charged while being connected to PC through the USB cable.
5
! You will see the charging animation in the bottom right hand corner of the display.
The player is fully charged when the charging animation stops.
Z
Z
Z
Z
Z
Z
Z
Z
Synchronize songs to the player
Step 2: Connect the player to your PC by USB cable.
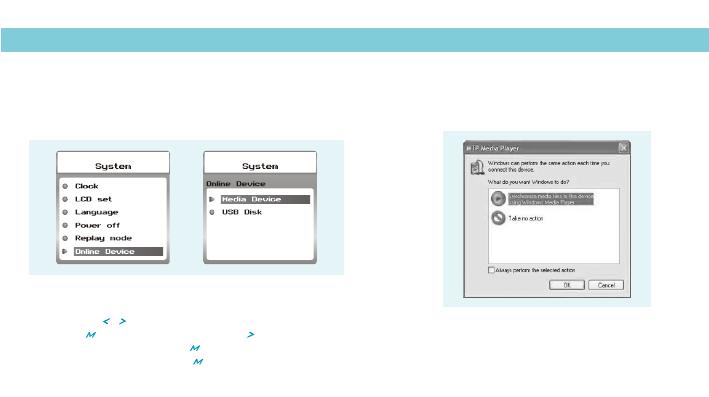
A dialog box will appear, choose
and Click to proceed.
Synchronize media
files to this device using Windows Media Player
OK
You can use Windows Media Player 10 on Windows® XP SP2
to synchronize music which are downloaded from Internet legally and validly with license to the player.
If the song is downloaded illegally without license, it cannot be synchronized.
Step 1: Set the Online Device of the player as Media Device
before connecting it to your PC.
You can press / to select on the main menu,
then press to enter its sub-menu. Press to select
, and then press to enter its options list,
select , and press to confirm your setting.
Setup
Online Device
Media Device
6
Synchronize songs to the player
Step 3: Windows Media Player will find device automatically.
And after a while, a dialog box of will appear,
choose and click .
Device Setup
Manual Finish
Step 4: Windows Media Player will be operating.
Drag and drop your downloaded songs into its Sync List,
and press . Then the songs will be
synchronized to the player.
Start Sync
7
Synchronize songs to the player
Step 5: The synchronized music can be found in the player.
Click into on the desktop, and you can see
an Audio Device named as ,
click into it to view your synchronized songs.
My Computer
Actions Mtp Device 000001
8
Step 6: If you want to remove the MTP device,
you can press / to select on the main menu,
press to enter its sub-menu.
Press to select , press to confirm,
then you will see disappear.
Setup
Remove MTPinfo
Actions Mtp Device 000001
System
Online Mode
Memory info
Firmware version
Firmware upgrade
DRM Time
Remove MTPinfo
Synchronize songs to the player
DRM Time
9
When you successfully synchronize music to the player,
the current time shown on your PC will be
synchronized to the player, too.
Press / to select on the main menu,
press to enter its sub-menu.
Press to select , press to confirm,
then you can see the screen of DRM Time.
Setup
DRM Time
Step 1:
Set the Online Device of the player as USB Disk
(Refer to Page 6), then connect it to your PC
by USB cable. Once the connection is successfully
made, the above screen display (1) would be
shown. Try re-connecting the player if the above
screen doesn't appear.
Step 2:
The above screen (2a) would appear.
(Apply only to Windows® XP)
Choose and click
to close the window.
Take no action OK
Double click on your
desktop and the above window (2b)
would appear. Look for the
icon.
My Computer
Removable Disk
10
Get Your Player Connected
Transfer
Z
Z
Z
Z
Z
Z
Z
Z
3
Step 3:
Double click the icon.
Note: Do not disconnect the USB cable
once you click into the removable disk
window. Such action may cause data loss
or problems to the player.
Removable Disk
Drag and drop your media files into the
removable disk.
You can create any folder or directory
in the removable disk.
Close the removable disk window and
disconnect the player from your PC
after the data transfer.
11
Transfer Music, lmage & Movie
Software Operation
You can convert your favorite video file in any other format into the .AMV format with the
help of the ( ).
The converting progress is shown as below.
AMV converter Programs\MP3 Player Utilities 4.13\AMV Converter
Software Operation
12
2
Software Operation
To enjoy the converted movie on your PC, you can
play it thru the (
).
AMV player Programs\MP3 Player
Utilities 4.13\AMV Player
13
Enjoy Your AMV Movie
Your can enjoy songs from both PC and your player thru
the (
).
Media Manager Programs\MP3 Player Utilities 4.13\
Media Manager
Software Operation
You can also convert your recorded .ACT voice
into .WAV format thru the .Media Manager
Software Operation
14
Software Operation
You are also allowed to format the memory of your player,
or divide it into two partitions in
.
Programs\
MP3 Player Utilities 4.13\MP3 Player Disk Manager
If the updated version is available, please use
to upgrade it.
MP3 Player Firmware Upgrade Tool
15
Setup
16
Step 1:
After entering System Set Function menu page,
Select and press to enter the
Setting Screen.
Step 2:
Press / to move among
Year : Month : Day : Hour : Minute : Second.
And press / to adjust their values.
Press to confirm after you finish setting clock.
Clock Clock
Clock Setting
17
Next button
Previous button
Play/Pause button
MODE button
Top View
Front View Right View
Earphone jack
Microphone
USB port
Vol+ button
Vol- button
On/Off switch
Bottom View
Switch the On/Off switch
Turn On/Off
Power On/Off
Scroll through lists
Select Option
Return to previous menu
Play/Pause songs
Jump to next song
Fast Forward
Move back to previous song
Fast Backward
Display lyrics
Stop lyrics display
Volume up
Volume down
Select image
Jump to next image
Jump to previous image
Hold
long
Hold
long
Quit to main menu
Hold for 2 seconds
General
Music
Images
To
Press
long
Hold
Hold
long
Hold
long
Hold
long
Hold
long
Fast Backward
Play/Pause a movie
Jump to next movie
Fast Forward
Move back to previous movie
Movie
Music Playback
Music Playback
Select on the main menu and press
to enter the music mode, then you can select
different songs by pressing / , and you can
easily play the song you’ve chosen by a simple
press of .
Music
Display Lyrics
18
While enjoying music, you can press to pause
or continue the music; press / to move back
to the previous song or jump to the next song;
Hold / long to move your song forward or
rewind it. If you want to adjust the volume,
please press / .
The edited lyrics will be displayed synchronously
if you press for 2 seconds while playing music.
And you can press once to quit the lyrics display scene.
  • Page 1 1
  • Page 2 2
  • Page 3 3
  • Page 4 4
  • Page 5 5
  • Page 6 6
  • Page 7 7
  • Page 8 8
  • Page 9 9
  • Page 10 10
  • Page 11 11
  • Page 12 12
  • Page 13 13
  • Page 14 14
  • Page 15 15
  • Page 16 16
  • Page 17 17
  • Page 18 18
  • Page 19 19
  • Page 20 20
  • Page 21 21
  • Page 22 22
  • Page 23 23
  • Page 24 24
  • Page 25 25
  • Page 26 26
  • Page 27 27
  • Page 28 28
  • Page 29 29
  • Page 30 30
  • Page 31 31
  • Page 32 32

Sylvania SMPK 2062 User guide

Category
MP3/MP4 players
Type
User guide
This manual is also suitable for

Ask a question and I''ll find the answer in the document

Finding information in a document is now easier with AI