Page is loading ...

Model 2188
Turntable
1.0-m, 1.2-m, 1.5-m, 2.0-m
User Manual

ii |
ETS-Lindgren Inc. reserves the right to make changes to any products herein to improve
functioning or design. Although the information in this document has been carefully reviewed and
is believed to be reliable, ETS-Lindgren does not assume any liability arising out of the
application or use of any product or circuit described herein; nor does it convey any license under
its patent rights nor the rights of others. All trademarks are the property of their respective
owners.
© Copyright 2005-2018 by ETS-Lindgren Inc. All Rights Reserved. No part of this document
may be copied by any means without written permission from ETS-Lindgren Inc.
Trademarks used in this document: The ETS-Lindgren logo is a trademark of ETS-Lindgren Inc.;
WD-40 is a registered trademark of the WD-40 company.
Revision Record | MANUAL,TURNTABLES,2188 | Part #399771, Rev. E
Revision Description Date
A Initial Release November, 2005
B Added two meter turntable information,
updated illustrations and drawings
January, 2006
C Rebrand July, 2008
D Added 1.0 meter turntable information April, 2017
E Changed 2090 to EMCenter January, 2018

| iii
Table of Contents
Notes, Cautions, and Warnings ......................................................................... v
1.0 Introduction ................................................................................................... 7
Standard Configuration ....................................................................................................... 7
Turntable Assembly ..................................................................................................... 7
EMCenter Modular RF Platform ......................................................................................... 8
Optional Items..................................................................................................................... 8
Infrared Remote Controller .......................................................................................... 8
Additional Fiber Optic Cables ...................................................................................... 9
ETS-Lindgren Product Information Bulletin ........................................................................ 9
2.0 Maintenance ................................................................................................ 11
Recommended Maintenance Schedule ........................................................................... 11
Routine Maintenance ................................................................................................. 12
6-Month Service ......................................................................................................... 12
12-Month Service ....................................................................................................... 12
Replacement and Optional Parts...................................................................................... 13
Service Procedures .......................................................................................................... 13
3.0 Specifications .............................................................................................. 15
Electrical Specifications .................................................................................................... 15
Physical Specifications ..................................................................................................... 15
4.0 Turntable Installation Considerations ....................................................... 17
Before You Begin—Precautions ....................................................................................... 17
Power and Signal Lines .................................................................................................... 18
Conduit ....................................................................................................................... 18
Electrical Considerations ........................................................................................... 18
Access ........................................................................................................................ 18
5.0 Electrical Installation .................................................................................. 19
6.0 Assembly and Installation .......................................................................... 21
Required Tools ................................................................................................................. 21
Assembly Instructions ....................................................................................................... 22
Floor Flange Installation in a Paneled Floor .............................................................. 25
Floor Flange Installation in a Concrete Pit ................................................................. 26
Motor Base Attachment .................................................................................................... 27
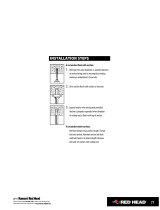
Post Installation Steps ...................................................................................................... 28
Final Level of Turntable ............................................................................................. 28

iv |
Conductive Grease Application .................................................................................. 28
7.0 Operation ..................................................................................................... 29
EMCenter Modular RF Platform ....................................................................................... 29
Motor Base Status Indicators ........................................................................................... 29
Appendix A: Warranty ...................................................................................... 31
Appendix B: Drawings ...................................................................................... 33
Appendix C: EC Declaration of Conformity .................................................... 35

| v
Notes, Cautions, and Warnings
Note: Denotes helpful information intended to provide tips for
better use of the product.
Caution: Denotes a hazard. Failure to follow instructions
could result in minor personal injury and/or property
damage. Included text gives proper procedures.
Warning: Denotes a hazard. Failure to follow instructions
could result in SEVERE personal injury and/or property
damage. Included text gives proper procedures.
See the ETS-Lindgren Product Information Bulletin for safety, regulatory, and
other product marking information.

vi |
This page intentionally left blank.

Introduction | 7
1.0 Introduction
The ETS-Lindgren Model 2188 Turntable is an electric-powered, variable-
speed turntable platform system designed for use with the EMCenter Modular RF
Platform (or next generation ETS-Lindgren controller, if applicable) to perform
EMI compliance testing. The Model 2188 is available in 1.0-meter, 1.2-meter,
1.5-meter, and 2.0-meter diameters. The turntable is ideal for installations in new
or existing test locations where pit excavation is not an option or must be
shallow.
The top of the turntable is conductive with a continuous ground brush to
electrically couple it to the ground plane. The ground brushes are attached
directly to the chamber floor by the floor flange and are in continuous contact with
the turntable top. The brushes point downward from the floor flange.
The drive motor and gearing are located beneath the platform. The Model 2188
is powered by an electric motor through a worm gear box with a chain and
sprocket final drive. The top of the turntable is removable to provide easy access
in the event that service is required. The electronics are located in a shielded
enclosure. Signal I/O is through fiber optic cable.
To prevent over-travel of the turntable in either direction of movement, hard limits
are provided in the form of pins that actuate switches located below the tabletop.
These pins allow limits to be set and allow as much as two full rotations. Rotation
speed can be varied from the front panel of the controller or through the
IEEE-488 interface bus.
Standard Configuration
TURNTABLE ASSEMBLY
Featuring continuous or non-continuous operation, the turntable assembly
includes:
Single-phase electric drive (208–230 VAC 50/60 Hz)
Variable-speed drive
Conductive top
Continuous rotation
10-meter fiber optic control cable
Fiber optic shield penetration kit
Fiber optic feedthroughs (2)
3-meter fiber optic control cable

8 | Introduction
EMCenter Modular RF Platform
The ETS-Lindgren EMCenter™ Modular RF Platform (with EMControl™ Positioner
Controller Plug-In Card) may be used to control the Model 2188 Turntable. For
information on connecting and using the EMCenter, see the EMCenter Modular RF
Platform User Manual, available for download at ets-lindgren.com.
The EMCenter replaces the 2090 Controller, which has been discontinued. The basic
controller configuration is an EMCenter with an EMControl card. This assembly is
ETS part number 125241.
Check ets-lindgren.com or contact ETS-Lindgren to ensure that your EMCenter, the
EMControl card, the backplane, and display all have the current firmware versions.
EMCenter: V5.21 (or later)
EMControl (7006-001) Card: V2.5.6 (or later)
Backplane: V2.3.0 (or later)
Display: V1.4.10 (or later)
The EMCenter is also expandable with a variety of additional options available.
Please contact ETS-Lindgren with any questions.
Note: If you are unfamiliar with the operation of the EMCenter, see the
manual, available for download from
ets-lindgren.com.
The EMCenter replaces the 2090 Controller, which has been discontinued.
The 2090 requires firmware revision V 3.21 or higher. It is available for
download at ets-lindgren.com and requires the program Flash Upgrade
Wizard V 4.0 (also available at ets-lindgren.com).
Optional Items
INFRARED REMOTE CONTROLLER
The Model 2188 is infrared compatible, and can be used with a universal remote
control programmed to a specific protocol, such as the ETS-Lindgren Infrared
Remote Controller (IR remote).

Introduction | 9
ADDITIONAL FIBER OPTIC CABLES
Additional lengths of fiber optic cable may be ordered.
ETS-Lindgren Product Information Bulletin
See the ETS-Lindgren Product Information Bulletin included with your shipment
for the following:
Warranty information
Safety, regulatory, and other product marking information
Steps to receive your shipment
Steps to return a component for service
ETS Lindgren calibration service
ETS Lindgren contact information

10 | Introduction
This page intentionally left blank.

Maintenance | 11
2.0 Maintenance
Before performing any maintenance, follow the safety
information in the ETS-Lindgren Product Information
Bulletin included with your shipment.
Regularly inspect all equipment and conduct scheduled
maintenance in accordance with the factory recommendations
provided.
WARRANTY
BEFORE SERVICING: CONTACT ETS-LINDGREN
(+1.512.531.6400)—Servicing or modifying the unit without
ETS-Lindgren authorization may void your warranty. If an
attempt to service the unit must be made, disconnect all
electrical power prior to beginning. Voltages exist at many points
within the instrument that could, if contacted, cause personal
injury. Only trained service personnel should perform
adjustments and/or service procedures upon this instrument.
Capacitors inside this instrument may still be charged even
when the instrument is disconnected from the power source.
Recommended Maintenance Schedule
Regular maintenance will prolong the effective operation and reliability of your
turntable. Follow the recommended schedule for routine, 6-month, and 12-month
service.
Do not perform maintenance while the turntable is operating.

12 | Maintenance
ROUTINE MAINTENANCE
Routine maintenance should be conducted prior to each use of the turntable.
Remove foreign objects from between turntable top and
floor flange—Visually inspect the turntable prior to use, and look for foreign
objects in the gap between the turntable top and the floor flange. Remove the
objects, if possible.
Check for excessive rotation—Attempt to rotate the turntable top by hand.
Excessive rotation may indicate a loose drive component.
Listen for excessive noise—Listen for excessive or unusual noise during
turntable operation.
6-MONTH SERVICE
Lubricate the casters—Lubricate the casters with good quality bearing
grease.
Inspect the ground brush for contaminates—Vacuum the ground brush to
remove unwanted debris. If required, add a small amount of conductive
lubricant to the brush interface.
Inspect the ground brush for wear—Visually inspect the ground brush for
wear; if necessary, replace the ground brush.
12-MONTH SERVICE
Lubricate the main bearing race—Lubricate the main bearing race with a
grease gun containing good quality bearing grease. The grease fittings are
located inside the race, 90 degrees apart, beneath the top. Three discharges
from the grease gun in each fitting are adequate.
Lubricate the chain and sprocket of the chain drive—Apply good quality
grease to the chain and sprocket.

Maintenance | 13
Replacement and Optional Parts
Following are the part numbers for ordering replacement or optional parts for the
Model 2188 Turntable.
Part Description Part Number
Turntable Assembly For a list of all turntable parts, see the
drawings located in the back pocket of
this manual.
IR Remote Controller 707030
Service Procedures
For the steps to return a system or system component to ETS-Lindgren for
service, see the Product Information Bulletin included with your shipment.

14 | Maintenance
This page intentionally left blank.

Specifications | 15
3.0 Specifications
Electrical Specifications
Nominal AC Voltage:
230 VAC
Input Frequency:
50/60 Hz
Phase:
Single Phase
AMP:
2.0
RPM:
0.5 / 2.0 variable
Physical Specifications
1.0-meter 1.2-meter 1.5-meter 2.0-meter
Height (Minimum):
16.51 cm
(6.12 in)
16.51 cm
(6.12 in)
16.51 cm
(6.12 in)
16.51 cm
(6.12 in)
Distributed Load
Rating:
500 kg
(1100 lb)
500 kg
(1100 lb)
1000 kg
(2200 lb)
1000 kg
(2200 lb)
Distributed Load Rating applies when:
Load is evenly distributed to each section;
No point loads under 0.37 sq m (4.0 sq ft) should exceed
500 kg (1100 lb);
And not over 400 kg (882 lb) should be applied to a
45-degree segment outboard of the casters.

16 | Specifications
This page intentionally left blank.

Turntable Installation Considerations | 17
4.0 Turntable Installation Considerations
Before assembling, installing, or connecting any components,
follow the safety information in the ETS-Lindgren
Product Information Bulletin included with your shipment.
Before You Begin—Precautions
Read this manual completely before starting installation. This
equipment should be installed and operated only by qualified
personnel.
Do not attempt to service unless qualified to do so. As with any
electrical equipment, make sure unit electrical power has been
disconnected and secured when performing scheduled
maintenance or adjustments.
WARRANTY
Do not make any modifications to this unit without consulting
the factory directly.
Regularly inspect all equipment for loose fasteners and wear.
Conduct scheduled maintenance in accordance with the factory
recommendations provided.
Only use replacement parts and fasteners ordered directly from
the factory.
Stay clear of all moving components on this equipment.
Do not operate turntable while someone is physically on the
turntable top.
Do not, at any time, place hands or feet in the vicinity of the
drive pinion on the turntable.

18 | Turntable Installation Considerations
Power and Signal Lines
CONDUIT
Power and signal line paths should be planned in advance. Conduit should be in
place before pouring concrete or installing the ground plane. Consider the size of
the cable bundle when selecting conduit diameter.
ELECTRICAL CONSIDERATIONS
Electrical connection is subject to local electrical codes, and
should only be performed by a qualified electrician.
A qualified and licensed electrical contractor should install power lines, and the
installation should comply with all applicable regulatory agencies. A dedicated
circuit should be used, with the shortest distance possible between the power
source and the turntable.
For more information on electrical installation, see page 19.
ACCESS
An access area beneath the turntable is advisable for large diameter
installations. A service switch should be installed to deactivate the turntable
during service.

Electrical Installation | 19
5.0 Electrical Installation
Before assembling, installing, or connecting any components,
follow the safety information in the ETS-Lindgren
Product Information Bulletin included with your shipment.
Electrical installation must be performed by a qualified
electrician, and in accordance with local and national electrical
standards.
Make sure the power is off and secured before proceeding.
The Model 2188 Turntable is configured to operate using 208-230 VAC,
single phase, 50/60 Hz service. This voltage level is recommended for operation
to reduce the surge currents necessary to power an electric motor.
1. The branch circuit supplying power to the motor base should be
protected from excess current according to local electrical codes. An
integral circuit breaker is mounted inside the main bearing on one of the
bearing support blocks. The circuit breaker is specifically designed for
the inductive load presented by the electric motor.
2. Make sure the conductor size is adequate for the motor load and the
distance from the mains source. Improperly sized conductors will lead to
a high voltage drop in the power conductors and cause reduced starting
torque and premature motor failure.
3. The motor base assembly is provided with a non-terminated flexible
conduit with input power leads exposed. The flexible conduit is to be
terminated into a junction box fitted on or near the motor base. Terminate
the power leads of the motor base assembly according to local electrical
code requirements. Following is the conductor color code:
Brown: AC high
Blue: AC neutral
Green/Yellow: Protective earth/safety ground

20 | Electrical Installation
Connect the fiber optic control cable and install the power connection according
to local electrical code. See the controller manual for information on connecting
the fiber optic cable. After the fiber optic cable is installed, secure it with a wire tie
to one of the leveling screws.
To feed the fiber optic connectors through a waveguide in the chamber, cables
are included to connect from the feedthroughs on the penetration panel to the
controller and motor base.
/