Page is loading ...

User Manual
WFM601
Serial Digital Component Monitor
070-8471-00
Please check for change information at the rear
of this manual.
This document supports software versions 1.0
through 1.3.
First Printing June 1993
Revised March 1994

89B;312= &/4=;873A 7- 55 ;312=< ;/</;?/. &/4=;873A 9;8.>-=< +;/ -8?/;/. ,B
'% +7. 08;/317 9+=/7=< 3<<>/. +7. 9/7.371 &2/ 08558@371 +;/ ;/13<=/;/. =;+./6+;4<
&&$"!) & &#$" +7. %"#D "
#;37=/. 37 '%
8; 0>;=2/; 3708;6+=387 -87=+-= &/4=;873A 7- 8;98;+=/ "003-/< #" 8A (35<87?355/ "$
'% #287/ &) &() +,5/
&(%&
&/4=;873A &/5/?3<387 3?3<387 9+;=3-39+=/< 37 =2/ ;8+.-+<= #;80/<<387+5< 8;>6 #"$' 87
=2/ 869>%/;?/ 708;6+=387 %/;?3-/ #;/<< ;/5/+</< 87 7/@ 9;8.>-=< 9;8.>-=D<9/-303-
7/@<5/==/;< +9953-+=387 3708;6+=387 =/-273-+5 9+9/;< +7. <80=@+;/ 53,;+;3/< 08; 9;81;+66+,5/
9;8.>-=< +;/ +6871 =2/ =B9/< 80 3708;6+=387 >958+./. ..3=387+55B 9;8.>-= <9/-3+53<=< 0;86
&/4=;873A @355 ,/ C87 537/ =8 +7<@/; :>/<=387< ;/1+;.371 9;8.>-= +9953-+=387< 89/;+=387 +7.
6+37=/7+7-/
7<=;>-=387< 08; +--/<<371 =2/ 3708;6+=387 87 869>%/;?/ -+7 ,/ 08>7. 37 =2/ ->;;/7= &/4=;873A
&/5/?3<387 #;8.>-=< +=+581
869>%/;?/ +--/<< 3< ->;;/7=5B +?+35+,5/ 37 =2/ '% +7+.+ >;89/ +9+7 ><=;+53+ +7.
!/@ */+5+7.

WARRANTY
Tektronix warrants that this product, that it manufactures and sells, will be free from defects in materials
and workmanship for a period of three (3) years from the date of shipment. If any such product proves defec-
tive during this warranty period, Tektronix, at its option, either will repair the defective product without
charge for parts and labor, or will provide a replacement in exchange for the defective product.
In order to obtain service under this warranty, Customer must notify Tektronix of the defect before the expi-
ration of the warranty period and make suitable arrangements for the performance of service. Customer
shall be responsible for packaging and shipping the defective product to the service center designated by
Tektronix, with shipping charges prepaid. Tektronix shall pay for the return of the product to Customer if
the shipment is to a location within the country in which the Tektronix service center is located. Customer
shall be responsible for paying all shipping charges, duties, taxes, and any other charges for products re-
turned to any other locations.
This warranty shall not apply to any defect, failure or damage caused by improper use or improper or inade-
quate maintenance and care. Tektronix shall not be obligated to furnish service under this warranty a) to
repair damage resulting from attempts by personnel other than Tektronix representatives to install, repair
or service the product; b) to repair damage resulting from improper use or connection to incompatible
equipment; or c) to service a product that has been modified or integrated with other products when the
effect of such modification or integration increases the time or difficulty of servicing the product.
THIS WARRANTY IS GIVEN BY TEKTRONIX WITH RESPECT TO THIS PRODUCT IN LIEU
OF ANY OTHER WARRANTIES, EXPRESSED OR IMPLIED. TEKTRONIX AND ITS VEN-
DORS DISCLAIM ANY IMPLIED WARRANTIES OF MERCHANTABILITY OR FITNESS FOR
A PARTICULAR PURPOSE. TEKTRONIX’ RESPONSIBILITY TO REPAIR OR REPLACE DE-
FECTIVE PRODUCTS IS THE SOLE AND EXCLUSIVE REMEDY PROVIDED TO THE CUS-
TOMER FOR BREACH OF THIS WARRANTY. TEKTRONIX AND ITS VENDORS WILL NOT
BE LIABLE FOR ANY INDIRECT, SPECIAL, INCIDENTAL, OR CONSEQUENTIAL DAM-
AGES IRRESPECTIVE OF WHETHER TEKTRONIX OR THE VENDOR HAS ADVANCE NO-
TICE OF THE POSSIBILITY OF SUCH DAMAGES.


German Postal Information
'35+(+%#5' 0( 5*' #/6(#%563'3.1035'3
' *'3'$9 %'35+(9 5*#5 5*' '3+#- 0.10/'/5 0/+503 #/& #-- (#%5039@+/45#--'&
015+0/4 %0.1-+'4 8+5* 5*' /5'3('3'/%' 6113'44+0/ 3'26+3'.'/54 0( 045#- ')6-#5+0/
() .'/&'& 1'3 ()
*' '3.#/ 045#- '37+%' 8#4 /05+(+'& 5*#5 5*' '26+1.'/5 +4 $'+/) .#3,'5'&
*' '3.#/ 045#- '37+%' *#4 5*' 3+)*5 50 3'@5'45 5*' 4'3+'4 #/& 50 7'3+(9 5*#5 +5 %0.1-+'4
!
'4%*'+/+)6/) &'4 '345'--'34.1035'634
+'3.+5 8+3& $'4%*'+/+)5 &#< &'3&+' '3+#- 0.10/'/5 0/+503 6/& #--'
(#$3+,+/45#--+'35'/ 15+0/'/ +/ ;$'3'+/45+..6/) .+5 &'/ '45+..6/)'/ &'3
.54$-#55@'3(?)6/) () 6/& "64#5:7'3(?)6/) (6/,'/545>35 4+/&
'3 '654%*'/ 6/&'41045 863&'  /7'3,'*3$3+/)'/ &+'4'4 '3=5'4 #/)':'+)5 6/& &+'
'3'%*5+)6/) :63 ;$'313?(6/) &'3 '3+' #6( +/*#-5'/ &'3 '45+..6/)'/ '+/)'3=6.5
!
50 5*' 64'301'3#503
*' '3.#/ 045#- '37+%' 3'26+3'4 5*#5 945'.4 #44'.$-'& $9 5*' 01'3#50364'3 0( 5*+4
+/4536.'/5 .645 #-40 %0.1-9 8+5* 045#- ')6-#5+0/ () #3 '%5
(?3 &'/ '/65:'3'53'+$'3
+' 70. '53'+$'3 :64#..'/)'45'--5' /-#)' +//'3*#-$ &'3'3 &+'4'4 '3=5 '+/)'4'5:5
8+3& .6< '$'/(#--4 &'/ 03#644'5:6/)'/ /#%* #3 "+(( &'3 () )'/?)'/
50 5*' 64'301'3#503
*' '3.#/ 045#- '37+%' 3'26+3'4 5*#5 5*+4 '26+1.'/5 8*'/ 64'& +/ # 5'45 4'561 .#9
0/-9 $' 01'3#5'& +( 5*' 3'26+3'.'/54 0( 045#- ')6-#5+0/ () #3 '%5
#3' %0.1-+'& 8+5*
(?3 &'/ '/65:'3'53'+$'3
+'4'4 '3=5 ( +/ '<#6($#65'/ /63 $'53'+$'/ 8'3&'/ 8'// &+' 03#644'5:6/)'/ &'4
#3 "+(( &'3 () '+/)'*#-5'/ 8'3&'/

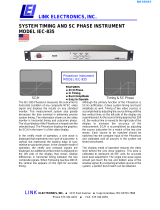
WFM601 Serial Component Monitor
WAVEFORM
MENUSWEEP
FILTER
CURSOR
LIN SEL
PRESET
CONFIG
GAIN
CRT
POWER
ON/
STANDBY
LINE
FIELD
MAG
REF
EXT
PICTURE
MENU
VECTOR
LIGHTNING
BOWTIE
SERIAL A
VIDEO DISPLAY
AUDIO
ANALOG
MULTIPLE
VIDEO IN
SERIAL
EDH DET
ALARMSERIAL B
CH3
CH1
CH2
PARADE
CLEAR
.7
.6
.8
.5
.4
.3
.2
.1
–.1
–.2
–.3
Tek
COMPONENT ANALOG
2% & 4% K
PB
100%
50%
WFM601 Serial Digital Component Monitor

WFM601 Serial Component Monitor
i
Contents
Getting Started
Product Description 1–1. . . . . . . . . . . . . . . . . . . . . . . . . . . . . . . . . . . . . . . . .
Features 1–1. . . . . . . . . . . . . . . . . . . . . . . . . . . . . . . . . . . . . . . . . . . . . . . . . . .
Description Of Features 1–2. . . . . . . . . . . . . . . . . . . . . . . . . . . . . . . . . . . . . . .
More Information 1–2. . . . . . . . . . . . . . . . . . . . . . . . . . . . . . . . . . . . . . . . . . . . . .
Options 1–2. . . . . . . . . . . . . . . . . . . . . . . . . . . . . . . . . . . . . . . . . . . . . . . . . . .
Accessories 1–3. . . . . . . . . . . . . . . . . . . . . . . . . . . . . . . . . . . . . . . . . . . . . . . .
Field Upgrade Kits 1–4. . . . . . . . . . . . . . . . . . . . . . . . . . . . . . . . . . . . . . . . . .
Installation 1–5. . . . . . . . . . . . . . . . . . . . . . . . . . . . . . . . . . . . . . . . . . . . . . . .
Packaging 1–5. . . . . . . . . . . . . . . . . . . . . . . . . . . . . . . . . . . . . . . . . . . . . . . . .
Packaged Accessories 1–6. . . . . . . . . . . . . . . . . . . . . . . . . . . . . . . . . . . . . . . .
Mechanical Installation 1–6. . . . . . . . . . . . . . . . . . . . . . . . . . . . . . . . . . . . . . .
Electrical Installation 1–11. . . . . . . . . . . . . . . . . . . . . . . . . . . . . . . . . . . . . . . . .
Functional Check 1–13. . . . . . . . . . . . . . . . . . . . . . . . . . . . . . . . . . . . . . . . . . .
Required Equipment 1–13. . . . . . . . . . . . . . . . . . . . . . . . . . . . . . . . . . . . . . . . .
Initial Equipment Connections 1–14. . . . . . . . . . . . . . . . . . . . . . . . . . . . . . . . .
Procedure 1–14. . . . . . . . . . . . . . . . . . . . . . . . . . . . . . . . . . . . . . . . . . . . . . . . . .
Operating Basics
At A Glance 2–1. . . . . . . . . . . . . . . . . . . . . . . . . . . . . . . . . . . . . . . . . . . . . . .
Front Panel Controls and Indicators 2–1. . . . . . . . . . . . . . . . . . . . . . . . . . . . .
Rear Panel Connectors 2–3. . . . . . . . . . . . . . . . . . . . . . . . . . . . . . . . . . . . . . .
Functional Overview 2–7. . . . . . . . . . . . . . . . . . . . . . . . . . . . . . . . . . . . . . . . .
Displaying a Signal 2–8. . . . . . . . . . . . . . . . . . . . . . . . . . . . . . . . . . . . . . . . . .
Using the Menus 2–9. . . . . . . . . . . . . . . . . . . . . . . . . . . . . . . . . . . . . . . . . . . .
Remote Operation 2–17. . . . . . . . . . . . . . . . . . . . . . . . . . . . . . . . . . . . . . . . . . .
Reference
Making A Measurement 3–1. . . . . . . . . . . . . . . . . . . . . . . . . . . . . . . . . . . . .
Electronic Graticules 3–3. . . . . . . . . . . . . . . . . . . . . . . . . . . . . . . . . . . . . . . . .
Adjusting Instrument Gain 3–7. . . . . . . . . . . . . . . . . . . . . . . . . . . . . . . . . . . .
Measurement Theory 3–9. . . . . . . . . . . . . . . . . . . . . . . . . . . . . . . . . . . . . . . . .
Vector Display 3–9. . . . . . . . . . . . . . . . . . . . . . . . . . . . . . . . . . . . . . . . . . . . . .
Lightning Display 3–10. . . . . . . . . . . . . . . . . . . . . . . . . . . . . . . . . . . . . . . . . . .
Diamond Display 3–12. . . . . . . . . . . . . . . . . . . . . . . . . . . . . . . . . . . . . . . . . . . .
Bowtie Display 3–13. . . . . . . . . . . . . . . . . . . . . . . . . . . . . . . . . . . . . . . . . . . . .
Appendices
Appendix A: Specification A–1. . . . . . . . . . . . . . . . . . . . . . . . . . . . . . . . . . .
Appendix C: Multipin Connectors B–1. . . . . . . . . . . . . . . . . . . . . . . . . . . .
REMOTE Connector B–1. . . . . . . . . . . . . . . . . . . . . . . . . . . . . . . . . . . . . . . . .
RS232 Connector B–3. . . . . . . . . . . . . . . . . . . . . . . . . . . . . . . . . . . . . . . . . . . .
Appendix C: User Service C–1. . . . . . . . . . . . . . . . . . . . . . . . . . . . . . . . . . . .

Contents
ii
WFM601 Serial Component Monitor
Cleaning or Replacing the Fan Filter C–1. . . . . . . . . . . . . . . . . . . . . . . . . . . . . . . . . .
Fuse Replacement C–1. . . . . . . . . . . . . . . . . . . . . . . . . . . . . . . . . . . . . . . . . . . . . . . .
Graticule Light Replacement C–1. . . . . . . . . . . . . . . . . . . . . . . . . . . . . . . . . . . . . . . .
Cleaning C–3. . . . . . . . . . . . . . . . . . . . . . . . . . . . . . . . . . . . . . . . . . . . . . . . . . . . . . . .
Replacing the CRT Filter C–4. . . . . . . . . . . . . . . . . . . . . . . . . . . . . . . . . . . . . . . . . . .
Appendix D: Software Version D–1. . . . . . . . . . . . . . . . . . . . . . . . . . . . . . . .
Determining Software Version D–1. . . . . . . . . . . . . . . . . . . . . . . . . . . . . . . . . . . . . . .
Glossary
Glossary entries G-1. . . . . . . . . . . . . . . . . . . . . . . . . . . . . . . . . . . . . . . . . . . . . . . .
Index
Index entries I-1. . . . . . . . . . . . . . . . . . . . . . . . . . . . . . . . . . . . . . . . . . . . . . . . . . .

Contents
WFM601 Serial Component Monitor
iii
List of Figures
Figure 1-1: Dimensions of the 1700F00 plain cabinet. 1–6. . . . . . . . . . . . . . .
Figure 1-2: 1700F02 portable cabinet. 1–7. . . . . . . . . . . . . . . . . . . . . . . . . . .
Figure 1-3: Rear view of the instrument, showing the securing screws. 1–8.
Figure 1-4: The 1700F05 side-by-side rack adaptor. 1–9. . . . . . . . . . . . . . . .
Figure 1-5: Instrument in a 1700F05 with a blank front-panel (1700F06). 1–9
Figure 1-6: A 1700F05 rack mount. cab. with a 1700F07 utility drawer 1–10
Figure 1-7: Considerations for custom installation of an instrument. 1–11. . . .
Figure 1-8: Channel 1 of the SMPTE color bar signal on the WFM601. 1–15.
Figure 1-9: Parade display of Y and PB. 1–16. . . . . . . . . . . . . . . . . . . . . . . . . .
Figure 1-10: Parade display of Y, PB, and PR. 1–17. . . . . . . . . . . . . . . . . . . . .
Figure 1-11: WFM601 on screen RGB display. 1–18. . . . . . . . . . . . . . . . . . . .
Figure 1-12: WFM601 calibrator display. 1–19. . . . . . . . . . . . . . . . . . . . . . .
Figure 1-13: Calibrator signal, Gain Cal on, and both gains misadjusted. 1–20
Figure 1-14: One field display of CH 1 (Y) signal. 1–21. . . . . . . . . . . . . . . . .
Figure 1-15: Two field display of CH 1 (Y) signal. 1–21. . . . . . . . . . . . . . . . .
Figure 1-16: Two Line Magnified Display. 1–22. . . . . . . . . . . . . . . . . . . . . . . .
Figure 1-17: A two–line differentiated step display. 1–23. . . . . . . . . . . . . . . . .
Figure 1-18: Two field line select display with line number 150 selected. 1–24
Figure 1-19: Line select, 15-line display; lines150-164 displayed. 1–24. . . . .
Figure 1-20: Vector color bar display with electronic graticule. 1–25. . . . . . . .
Figure 1-21: Picture monitor display of the SMPTE color bar signal. 1–26. . .
Figure 1-22: Audio display with small phase error. 1–27. . . . . . . . . . . . . . . . .
Figure 1-23: Lightning display of the component color difference signals. 1–27
Figure 1-24: Diamond display. 1–28. . . . . . . . . . . . . . . . . . . . . . . . . . . . . . . . .
Figure 1-25: The bowtie display. 1–28. . . . . . . . . . . . . . . . . . . . . . . . . . . . . . . .
Figure 2-1: Front panel for the WFM601 Serial Component Monitor. 2–1. .
Figure 2-2: Rear panel for the WFM601 Monitor. 2–4. . . . . . . . . . . . . . . . . .
Figure 2-4: Elements of the WFM601 menu driven selections. 2–10. . . . . . . .
Figure 2-5: Parade display of Y–PB–PR shown in line select. 2–12. . . . . . . . .
Figure 2-6: Parade display with EAV/SAV turned on. 2–15. . . . . . . . . . . . . . .
Figure 2-7: Parade display with the PB and the PR with 0 offset. 2–16. . . . . .
Figure 3-1: WFM601 waveform measurement graticule. 3–1. . . . . . . . . . . . .
Figure 3-2: WFM601 vectorscope graticule. 3–3. . . . . . . . . . . . . . . . . . . . . .
Figure 3-3: Electronic graticule used for evaluating the Lightning display. 3–4

Contents
iv
WFM601 Serial Component Monitor
Figure 3-4: Graticule for the diamond display. 3–5. . . . . . . . . . . . . . . . . . . . .
Figure 3-5: Electronic graticule for measurement of stereo audio phase. 3–6.
Figure 3-6: Vector display relationship of the R–Y (V) and B–Y (U). 3–10. . .
Figure 3-7: Construction of the lightning waveform. 3–11. . . . . . . . . . . . . . . .
Figure 3-8: The lightning graticule demonstrating interchannel timing errors 3–11
Figure 3-9: Construction of the Diamond GBR display. 3–13. . . . . . . . . . . . . .
Figure 3-10: Typical bowtie display as seen on the Tektronix WFM601. 3–14
Figure B-1: Rear view of the rear-panel REMOTE connector. B–1. . . . . . . .
Figure B-2: Rear view of the rear-panel REMOTE connector. B–3. . . . . . . .
Figure C-1: Graticule light replacement. C–2. . . . . . . . . . . . . . . . . . . . . . . . . .

Contents
WFM601 Serial Component Monitor
v
List of Tables
Table 2–1: EDH CRT error reporting . 2–14
Table A-1: Waveform Vertical Deflection A–2. . . . . . . . . . . . . . . . . . . . . . . . . . . . . . . . . . . . . .
Table A-2: Serial Digital Interface (Serial A & Serial B) A–3. . . . . . . . . . . . . . . . . . . . . . . . .
Table A-3: Serial Video Output (Follows Serial A/B Channel Selection) A–3. . . . . . . . . . . . .
Table A-3: Serial Video Output (Follows Serial A/B Channel Selection) A–3. . . . . . . . . . . . .
Table A-4: Serial Video Diagnostics (EDH) A–4. . . . . . . . . . . . . . . . . . . . . . . . . . . . . . . . . . .
Table A-5: External Reference A–4. . . . . . . . . . . . . . . . . . . . . . . . . . . . . . . . . . . . . . . . . . . . . .
Table A-6: Waveform Horizontal Deflection A–5. . . . . . . . . . . . . . . . . . . . . . . . . . . . . . . . . . .
Table A-7: Calibrator A–5. . . . . . . . . . . . . . . . . . . . . . . . . . . . . . . . . . . . . . . . . . . . . . . . . . . . .
Table A-8: Analog Audio Mode A–6. . . . . . . . . . . . . . . . . . . . . . . . . . . . . . . . . . . . . . . . . . . . .
Table A-9: Component Vector Mode A–6. . . . . . . . . . . . . . . . . . . . . . . . . . . . . . . . . . . . . . . . .
Table A-10: Lightning Mode A–7. . . . . . . . . . . . . . . . . . . . . . . . . . . . . . . . . . . . . . . . . . . . . . .
Table A-11: Bowtie Mode A–7. . . . . . . . . . . . . . . . . . . . . . . . . . . . . . . . . . . . . . . . . . . . . . . . .
Table A-12: Picture Monitor Outputs A–7. . . . . . . . . . . . . . . . . . . . . . . . . . . . . . . . . . . . . . . . .
Table A-13: Power Source A–8. . . . . . . . . . . . . . . . . . . . . . . . . . . . . . . . . . . . . . . . . . . . . . . . .
Table A-14: CRT Display A–8. . . . . . . . . . . . . . . . . . . . . . . . . . . . . . . . . . . . . . . . . . . . . . . . . .
Table A-15: Environmental Characteristics A–9. . . . . . . . . . . . . . . . . . . . . . . . . . . . . . . . . . . .
Table A-16: Certification A–10. . . . . . . . . . . . . . . . . . . . . . . . . . . . . . . . . . . . . . . . . . . . . . . . . .
Table A-17: Physical Characteristics A–10. . . . . . . . . . . . . . . . . . . . . . . . . . . . . . . . . . . . . . . . .

Contents
vi
WFM601 Serial Component Monitor

WFM601 Serial Component Monitor
vii
Safety Summary
Please take a moment to review these safety precautions. They are provided for
your protection and to prevent damage to the monitor. This safety information
applies to all operators.
Symbols and Terms
These two terms appear in manuals:
CAUTION.
WARNING.
These two terms appear on equipment:
H
H
This symbol appears in manuals:
Static-Sensitive De-
vices
These symbols appear on equipment:
DANGER
High Voltage
Protective ground
(earth) terminal
ATTENTION
Refer to
manual

Safety Summary
viii
WFM601 Serial Component Monitor
Specific Precautions
Power Source
This product is intended to operate from a power source that will not apply more
than 250 V
rms
between the supply conductors or between either supply conductor
and ground. A protective ground connection, through the grounding conductor in
the power cord, is essential for safe system operation.
Grounding the Product
This monitor is grounded through the power cord. To avoid electric shock, plug
the power cord into a properly wired receptacle where earth ground has been
verified by a qualified service person. Do this before making connections to the
input or output terminals of the monitor.
Without the protective ground connection, all parts of the monitor are potential
shock hazards. This includes knobs and controls that may appear to be insulators.
Use the Proper Power Cord
Use only the power cord and connector specified for your product. Use only a
power cord that is in good condition.
Use the Proper Fuse
To avoid fire hazard, use only the fuse specified in the parts list for your product,
matched by type, voltage rating, and current rating.
Do Not Operate Without a Cabinet
To avoid personal injury, do not operate the monitor unless it is properly
installed in a cabinet or rack adapter, such as those listed in the Accessories
Section. When power is supplied to the monitor, line voltage will be present in
the instrument, even when the
POWER switch is set to STANDBY.
Do Not Operate in Explosive Atmospheres
To avoid explosion, do not operate this product in an explosive atmosphere
unless it has been specifically certified for such operation.
Do Not Service Alone
Do not perform internal service or adjustment of this product unless another
person capable of rendering first aid and resuscitation is present.

WFM601 Serial Component Monitor
ix
Preface
This manual is a guide for operators of the WFM601 monitors, and contains
instructions for daily use.
Please complete and mail the “Business Reply Card” at the front of this manual
to receive a service manual when it becomes available.
Manual Overview
Getting Started provides the material needed to place the instrument in service.
It contains ”Product Description”, ”Installation”, and ”Functional Check”.
Operation Basics provides information needed for dailly operation. It has ”At
a Glance”, which describes the controls and connectors, and a ”Functional
Overview”, which discusses the menus.
Reference contains the basic measurements, gain calibration, and a discussion
of ”Measurement Theory.”
Appendix A provides instrument specifications, both electrical and mechanical.
Appendix B describes remote control interfaces.
Appendix C covers routine service procedures, such as replacing fuses and
graticule light bulbs.
Appendix D describes the software version used in this instrument.
The appendixes are followed by a glossary of specialized terms and an index.

Preface
WFM601 Serial Component Monitor
x

Getting Started


Rev Mar 1994
WFM601 Serial Component Monitor
1–1
Product Description
The WFM 601 is capable of measuring and monitoring 4–2–2 component serial
digital. It incorporates a straight through (non–filtered) display or a differen-
tiated step filter. The assignable cursors, along with the crt readout can be used
for time, and voltage measurements. The system of menus and crt readout
simplifies the configuration of this monitor for measurement or monitoring of
signal characteristics.
The following list composes the feature set for the WFM 601:
Features
H GBR or Y P
R
P
B
display format.
H Any or all of channels 1, 2, or 3 displayed.
H Parade or Overlay display.
H Flat or Diff’d Step filtering.
H X1, X5, X10, and Variable display gain.
H X25 Magnified sweep.
H 1 and 2 Line or Field sweep.
H Bar Cursors; amplitude, time, or amplitude + time, +marker.
H Line Select with readout; 1 line or 15 line, all fields or 1 of 2 fields.
H Picture Monitor Out with bright up (Y or G channel only).
H Vector Display; fixed or variable gain, 75% or 100% bars, SMPTE/EBU N10.
H Lightning or Diamond display; vertical gain (same as waveform), horizontal gain
fixed, magnified, or variable, 75% or 100% bars, SMPTE/EBU N10.
H Electronic graticules for Lightning, Diamond, Vector, and Audio Displays.
H Displays audio input from Remote Connector as a lissajous pattern.
H Monitor Output; GBR or Y
P
R
P
B
(follows A/B switching). gamut error bright
up.
H EDH: (Follows A/B switching) LED for presence and an alarm, rear panel TTL
low through Remote Connector.
H Reclocked Serial Component Digital output following A/B switching.

Product Description
1–2
WFM601 Serial Component Monitor
H Video Reference: Internal Serial Component signal (follows A/B switching),
External Composite.
Description Of Features
A notable feature of this monitor is the menu-assisted operation. An expanded
feature set is possible through the use of menus and multi-use controls and
buttons. When the operator selects a menu item, such as Voltage and or Timing
Cursors, Variable Gain, or Line Select, an on-screen label shows the current
function of the controls.
Many instrument configurations that required moving internal jumpers in older
instruments are made through an on-screen menu in the
WFM601. The operator
can also recall up to 10 front-panel setups through the Recall menu; 9 recalls
are user-programmable and 1 is factory-programmed. The Filter menu provides
the means to select the Differentiated Step Filter in addition to flat.
The monitors have a bright, post-accelerated CRT with lighted internal graticule.
The parallax-free internal graticule structure contains targets and markings for
both the vector and waveform functions.
The bright CRT allows use in high ambient light conditions, such as those
encountered in field production applications.
Vertical and horizontal instrument gain can be set using the calibrator signal.
The 1 Volt calibrator signal is available in 100 kHz rate.
More Information
H Standard and optional accessories are listed in the Accessories section, which
follows the list of options.
H Instrument options are listed on the next page.
H A complete listing of instrument specifications begins on Appendix page A-1.
Options
Power cord options are the only options currently available. Field upgrade kits
listed in this section can also be used with these the
WFM601. monitor.
Menu
CRT
Calibrator
/