Page is loading ...

Avaya Video Conferencing Manager
Deployment Guide
Issue 1
June 2010

2 Avaya Video Conferencing Manager Deployment Guide
© 2010 Avaya Inc.
All Rights Reserved.
Notices
While reasonable efforts have been made to ensure that the information in this document is complete and accurate
at the time of printing, Avaya assumes no liability for any errors. Avaya reserves the right to make changes and
corrections to the information in this document without the obligation to notify any person or organization of such
changes.
Documentation disclaimer
Avaya shall not be responsible for any modifications, additions, or deletions to the original published version of this
documentation unless such modifications, additions, or deletions were performed by Avaya. End User agree to
indemnify and hold harmless Avaya, Avaya's agents, servants and employees against all claims, lawsuits,
demands and judgments arising out of, or in connection with, subsequent modifications, additions or deletions to
this documentation, to the extent made by End User.
Link disclaimer
Avaya is not responsible for the contents or reliability of any linked Web sites referenced within this site or
documentation(s) provided by Avaya. Avaya is not responsible for the accuracy of any information, statement or
content provided on these sites and does not necessarily endorse the products, services, or information described
or offered within them. Avaya does not guarantee that these links will work all the time and has no control over the
availability of the linked pages.
Warranty
Avaya provides a limited warranty on this product. Refer to your sales agreement to establish the terms of the
limited warranty. In addition, Avaya's standard warranty language, as well as information regarding support for this
product, while under warranty, is available to Avaya customers and other parties through the Avaya Support Web
site: http://www.avaya.com/support
. Please note that if you acquired the product from an authorized Avaya reseller
outside of the United States and Canada, the warranty is provided to you by said Avaya reseller and not by Avaya.
Licenses
THE SOFTWARE LICENSE TERMS AVAILABLE ON THE AVAYA WEBSITE, http://support.avaya.com/LicenseInfo
ARE APPLICABLE TO ANYONE WHO DOWNLOADS, USES AND/OR INSTALLS AVAYA SOFTWARE,
PURCHASED FROM AVAYA INC., ANY AVAYA AFFILIATE, OR AN AUTHORIZED AVAYA RESELLER (AS
APPLICABLE) UNDER A COMMERCIAL AGREEMENT WITH AVAYA OR AN AUTHORIZED AVAYA RESELLER.
UNLESS OTHERWISE AGREED TO BY AVAYA IN WRITING, AVAYA DOES NOT EXTEND THIS LICENSE IF
THE SOFTWARE WAS OBTAINED FROM ANYONE OTHER THAN AVAYA, AN AVAYA AFFILIATE OR AN AVAYA
AUTHORIZED RESELLER, AND AVAYA RESERVES THE RIGHT TO TAKE LEGAL ACTION AGAINST YOU AND
ANYONE ELSE USING OR SELLING THE SOFTWARE WITHOUT A LICENSE. BY INSTALLING,
DOWNLOADING OR USING THE SOFTWARE, OR AUTHORIZING OTHERS TO DO SO, YOU, ON BEHALF OF
YOURSELF AND THE ENTITY FOR WHOM YOU ARE INSTALLING, DOWNLOADING OR USING THE
SOFTWARE (HEREINAFTER REFERRED TO INTERCHANGEABLY AS "YOU" AND "END USER"), AGREE TO
THESE TERMS AND CONDITIONS AND CREATE A BINDING CONTRACT BETWEEN YOU AND AVAYA INC.
OR THE APPLICABLE AVAYA AFFILIATE ("AVAYA").
Avaya grants End User a license within the scope of the license types described below. The applicable number of
licenses and units of capacity for which the license is granted will be one (1), unless a different number of licenses
or units of capacity is specified in the Documentation or other materials available to End User. "Designated
Processor" means a single stand-alone computing device. "Server" means a Designated Processor that hosts a
software application to be accessed by multiple users. "Software" means the computer programs in object code,
originally licensed by Avaya and ultimately utilized by End User, whether as stand-alone products or pre-installed
on Hardware. "Hardware" means the standard hardware originally sold by Avaya and ultimately utilized by End
User.

Avaya Video Conferencing Manager Deployment Guide 3
License types
Designated System(s) License (DS). End User may install and use each copy of the Software on only one
Designated Processor, unless a different number of Designated Processors is indicated in the Documentation or
other materials available to End User. Avaya may require the Designated Processor(s) to be identified by type,
serial number, feature key, location or other specific designation, or to be provided by End User to Avaya through
electronic means established by Avaya specifically for this purpose.
Shrinkwrap License (SR). Customer may install and use the Software in accordance with the terms and conditions
of the applicable license agreements, such as "shrinkwrap" or "clickthrough" license accompanying or applicable to
the Software ("Shrinkwrap License"). (see "Third-party Components" for more information).
Copyright
Except where expressly stated otherwise, no use should be made of materials on this site, the Documentation(s)
and Product(s) provided by Avaya. All content on this site, the documentation(s) and the product(s) provided by
Avaya including the selection, arrangement and design of the content is owned either by Avaya or its licensors and
is protected by copyright and other intellectual property laws including the sui generis rights relating to the
protection of databases. You may not modify, copy, reproduce, republish, upload, post, transmit or distribute in any
way any content, in whole or in part, including any code and software. Unauthorized reproduction, transmission,
dissemination, storage, and or use without the express written consent of Avaya can be a criminal, as well as a civil,
offense under the applicable law.
Third Party Components
Certain software programs or portions thereof included in the Product may contain software distributed under third
party agreements ("Third Party Components"), which may contain terms that expand or limit rights to use certain
portions of the Product ("Third Party Terms"). Information regarding distributed Linux OS source code (for those
Products that have distributed the Linux OS source code), and identifying the copyright holders of the Third Party
Components and the Third Party Terms that apply to them is available on the Avaya Support Web site:
http://support.avaya.com/Copyright
Preventing toll fraud
"Toll fraud" is the unauthorized use of your telecommunications system by an unauthorized party (for example, a
person who is not a corporate employee, agent, subcontractor, or is not working on your company's behalf). Be
aware that there can be a risk of toll fraud associated with your system and that, if toll fraud occurs, it can result in
substantial additional charges for your telecommunications services.
Avaya fraud intervention
If you suspect that you are being victimized by toll fraud and you need technical assistance or support, call
Technical Service Center Toll Fraud Intervention Hotline at +1-800-643-2353 for the United States
and Canada. For additional support telephone numbers, see the Avaya Support Web site:
http://support.avaya.com
Suspected security vulnerabilities with Avaya products should be reported to Avaya by sending mail to:
Trademarks
Avaya and Aura are trademarks of Avaya, Inc.
Avaya is a registered trademark of Avaya Inc.
Avaya Aura is a trademark of Avaya Inc.
All non-Avaya trademarks are the property of their respective owners.
Downloading documents
For the most current versions of documentation, see the Avaya Support Web site:
http://www.avaya.com/support
Contact Avaya Support
Avaya provides a telephone number for you to use to report problems or to ask questions about your product. The
support telephone number is 1-800-242-2121 in the United States. For additional support telephone numbers, see
the Avaya Web site: http://www.avaya.com/support
Patent Notice
For patents covering LifeSize® products, refer to http://www.lifesize.com/support/legal.

4 Avaya Video Conferencing Manager Deployment Guide
Welcome to Avaya Video Conferencing Manager
Avaya Video Conferencing Manager is a comprehensive management software solution for
network administrators who manage video and voice communications systems in an IP
environment. With Avaya Video Conferencing Manager, network administrators can do the
following:
• Monitor and manage multi-vendor video and voice communications devices across the
entire enterprise from a web browser. Avaya Video Conferencing Manager includes
full-featured, standards-based video device management capabilities with real-time
status and event notification.
• Manage and automate video and voice call scheduling. Enable call participants to
schedule calls through Avaya Video Conferencing Manager using a central scheduling
function, such as a help desk or video network operations center, or integrate Avaya
Video Conferencing Manager with Microsoft Exchange Server to leverage existing
information technology resources and enable users to schedule video and voice
conferences using Microsoft Outlook.
• Generate reports for tracking inventory and analyzing device utilization and
performance.

Avaya Video Conferencing Manager Deployment Guide 5
About this Guide
This guide is for network administrators or anyone who manages video and voice
communications systems in an IP environment and who needs to know how to install,
upgrade, use, or maintain Avaya Video Conferencing Manager. Topics addressed in this
guide include the following:
• planning an Avaya Video Conferencing Manager deployment
• planning to install Avaya Video Conferencing Manager software
• installing or upgrading Avaya Video Conferencing Manager
• configuring Avaya Video Conferencing Manager
• discovering and managing devices
• managing call scheduling
• generating reports
• using Avaya Video Conferencing Manager Administrator
• maintaining and troubleshooting an installation
Preparing for an Avaya Video Conferencing Manager
Deployment
Planning is essential to successfully deploying enterprise-level software solutions. To avoid
unexpected problems and to stay on schedule, Avaya recommends a phased approach to
deploying Avaya Video Conferencing Manager that includes planning, installing, testing, and
training before going live. Use the information in this section to prepare an Avaya Video
Conferencing Manager deployment plan for your organization.
6 Avaya Video Conferencing Manager Deployment Guide
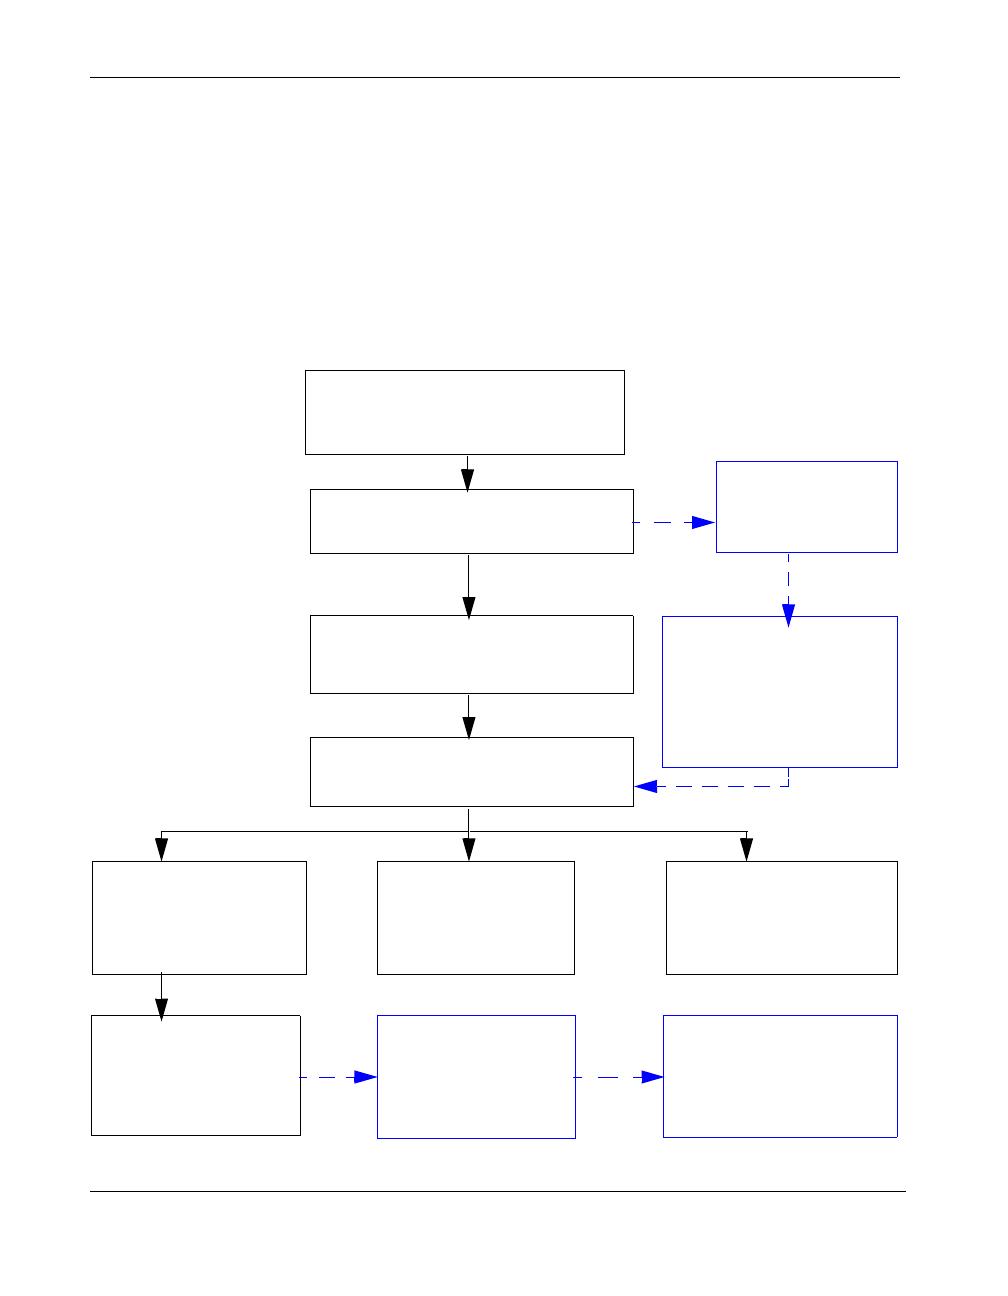
Deployment Overview
The following diagram shows the high-level tasks and associated dependencies involved in
deploying Avaya Video Conferencing Manager for the first time. Use this diagram as a guide
when preparing a schedule to include in your deployment plan. The tasks associated with
Microsoft Exchange Server integration appear in blue with dotted line connectors. If you
intend to integrate Microsoft Exchange Server with Avaya Video Conferencing Manager, you
must enable the integration during installation of Avaya Video Conferencing Manager. You
cannot enable the feature after installing Avaya Video Conferencing Manager.
Satisfy hardware and software
prerequisites
Discover devices
Specify default device
passwords
Register mailboxes
with devices in Avaya
Video Conferencing
Manager
Enable Microsoft Exchange
Server integration?
Create Avaya Video
Conferencing Manager
user accounts (optional)
Configure alarms
and global settings
(optional)
Configure Microsoft
Exchange Server
mailboxes
Gather
configuration
information
Install Avaya Video
Conferencing Manager
with Microsoft Exchange
Server integration
enabled
Install Avaya Video Conferencing
Manager without Microsoft
Exchange Server integration
Activate Avaya Video
Conferencing Manager with
No
Yes

Avaya Video Conferencing Manager Deployment Guide 7
Planning for Integration with Microsoft Exchange Server
The most important decision to make when planning an Avaya Video Conferencing Manager
deployment is whether to enable Microsoft Exchange Server integration when you install
Avaya Video Conferencing Manager. Avaya Video Conferencing Manager integrates with
Microsoft Exchange Server 2003 or Microsoft Exchange Server 2007 to enable Microsoft
Outlook users to schedule video or voice conference calls in Avaya Video Conferencing
Manager without having an Avaya Video Conferencing Manager user account or knowledge
about how to use Avaya Video Conferencing Manager. Without this feature, users of video
and voice communications systems typically must call a help desk or similar scheduling
facility to schedule a call through Avaya Video Conferencing Manager.
Note: If you intend to integrate Microsoft Exchange Server with Avaya Video Conferencing
Manager, you must enable the integration during installation of Avaya Video
Conferencing Manager. You cannot enable the feature after installing Avaya Video
Conferencing Manager.
In this release, enabling Microsoft Exchange Server integration also allows invitees to a
video call scheduled through Microsoft Outlook to specify a video communications system
through which they can be reached. To be included in the scheduled call, the device must be
an external device that is not managed by Avaya Video Conferencing Manager. This
enables invitees in your organization who are mobile, but who have access to video
communications systems, and invitees external to your organization to include an external
video communications device in a scheduled call. By default, this feature is disabled.
When you enable this feature, Avaya Video Conferencing Manager sends an email to all
human participants that are included in the meeting invitation. The email lists the IP
addresses of the video communications devices that are scheduled in the call and includes
reply instructions. If a human participant wishes to participate through a video device that is
not included in the scheduled call and not managed by Avaya Video Conferencing Manager,
the participant can reply to the email with the command call@IPaddress, where
IPaddress is the address of the external video communications device to use in the call.
Avaya Video Conferencing Manager then adds this device to the scheduled call and notifies
the meeting organizer and all other human invitees of the change to the list of scheduled
devices. If Avaya Video Conferencing Manager has no database entry for the device, it adds
the device and its IP address to its database as an external device. The device then appears
on the Devices page as an external device. For more information about external devices in
Avaya Video Conferencing Manager refer to “Adding a New External Device” on page 48.

8 Avaya Video Conferencing Manager Deployment Guide
This feature also enables the meeting organizer to convert a video call from one that is
placed automatically by Avaya Video Conferencing Manager to one that is placed manually
by meeting participants. For more information about enabling and using this feature, refer to
“Specifying a Preferred Method of Participation” on page 83.
Caution: Enabling this feature allows a meeting invitee to add an external device to
Avaya Video Conferencing Manager’s database without having a user account in Avaya
Video Conferencing Manager. Avaya Video Conferencing Manager does not check the
validity of the IP address of an external device that is added to a call through this
mechanism. When the list of scheduled devices changes due to a reply from a human
invitee to the email messages generated by this feature, all human invitees receive an
email indicating the change. Avaya recommends that you use this feature in a test
environment to ensure that it meets your needs before deploying it in your organization.
The Avaya Video Conferencing Manager installation program prompts you to choose a
mechanism for authenticating Avaya Video Conferencing Manager users: either OpenLDAP
(using the OpenLDAP server that installs with Avaya Video Conferencing Manager) or
Active Directory.
Note: If you choose to enable Microsoft Exchange Server integration, you must use Active
Directory for user authentication in Avaya Video Conferencing Manager and the
Active Directory server that you specify for user authentication, must be the same
Active Directory server used by your Microsoft Exchange Server installation.
Integrating Microsoft Exchange Server with Avaya Video Conferencing Manager requires
you to complete configuration tasks in both products. Ensure that your deployment plan
includes coordinating configuration tasks with your Microsoft Exchange Server administrator
and Active Directory administrator.
Enabling Microsoft Exchange Server integration is an optional step during the Avaya Video
Conferencing Manager installation process. If you choose to enable this feature, you can
disable it at any time after the installation process completes using configuration options in
Avaya Video Conferencing Manager Administrator.
For more information about Avaya Video Conferencing Manager Administrator, refer to
“Using Avaya Video Conferencing Manager Administrator” on page 88.

Avaya Video Conferencing Manager Deployment Guide 9
Microsoft Exchange Server Integration Overview
Integrating Avaya Video Conferencing Manager with Microsoft Exchange Server includes
the following tasks:
1. Create an email account in Microsoft Exchange Server for Avaya Video Conferencing
Manager. This is the email account Avaya Video Conferencing Manager monitors to
provide scheduling integration with Microsoft Exchange Server and Microsoft Outlook.
Set the size of this mailbox to 500MB. Log into this account in Microsoft Outlook at least
once to make it available for Avaya Video Conferencing Manager. While logged in,
ensure the email box is set to the correct time zone.
Avaya recommends that you set the archive interval for the Avaya Video Conferencing
Manager mailbox to one week to prevent this mailbox from exceeding its storage limit.
Caution: This email box must be dedicated for use by Avaya Video Conferencing
Manager. Do not send general email to it or use it to send email. You must not open this
email box or modify any email messages in it. Doing so will interfere with the integration
of Microsoft Outlook scheduling with Avaya Video Conferencing Manager scheduling.
Avaya Video Conferencing Manager supports only the Microsoft authentication protocol
NT LAN Manager (NTLM). Avaya Video Conferencing Manager does not function
properly if forms-based authentication is enabled in Microsoft Exchange Server 2003.
2. When the Avaya Video Conferencing Manager installation program prompts you to
choose a mechanism for authenticating Avaya Video Conferencing Manager users,
enter values for the Configure for Active Directory option. Ensure that the Active
Directory server that you specify is the same one used by your Microsoft Exchange
Server.
3. When prompted by the Avaya Video Conferencing Manager installation program to
enable integration with Microsoft Exchange Server, be prepared to supply the following
information:
- If Microsoft Exchange Server requires HTTPS, select the corresponding check box.
- The version of Microsoft Exchange Server (either Microsoft Exchange Server 2003
or Microsoft Exchange Server 2007) that you wish to integrate with Avaya Video
Conferencing Manager.
- Microsoft Exchange Server hostname or IP address. _______________________
- Domain name for the server. __________________________________________
- Avaya Video Conferencing Manager email address. This is the email address of the
account described in task 1.
____________________________________________________________

10 Avaya Video Conferencing Manager Deployment Guide
- Avaya Video Conferencing Manager email password. This is the password for the
email account described in task 1.
4. After installing or upgrading Avaya Video Conferencing Manager, you can deploy the
integration in one of the following ways. Refer to “Configuring Microsoft Exchange
Server” on page 36 for detailed configuration steps for these options.
Option 1:
Create a resource mailbox in Microsoft Exchange Server for each conference room that
contains a video or voice communications system managed by Avaya Video
Conferencing Manager, if one does not already exist. Forward each conference room
mailbox to the Avaya Video Conferencing Manager mailbox. In Avaya Video
Conferencing Manager, associate the managed video or voice communications system
with the email address of the mailbox resource for the conference room. When Microsoft
Outlook users add conference rooms to a meeting request, Avaya Video Conferencing
Manager automatically schedules the video or voice communications device associated
with these conference rooms and places the call at the scheduled meeting time.
Note: If your network includes MCUs managed by Avaya Video Conferencing
Manager and you wish to allow meeting participants to select an MCU to include in a call
scheduled through Microsoft Outlook, you must also create a resource mailbox in
Microsoft Exchange Server for each MCU; forward each MCU mailbox to the Avaya
Video Conferencing Manager mailbox; and associate the MCU with the email address of
the mailbox resource for the MCU.
Benefits:
With this option, Microsoft Outlook users do not need to be aware of or add the
video or voice communications devices to the meeting request as separate invitees.
Avaya Video Conferencing Manager automatically places the scheduled call to the
devices that reside in the conference rooms that the meeting organizer includes in
the meeting request.
Limitations:
Users may not want to use video or voice communications devices in the meetings.
Consider using this option if conference rooms that contain video or voice
communications devices are dedicated for use as video or voice conferencing
rooms. Users who wish to select an MCU to add to a call must remember to add the
MCU as a separate invitee.

Avaya Video Conferencing Manager Deployment Guide 11
Option 2:
Create a resource mailbox in Microsoft Exchange Server for each video or voice
communications system managed by Avaya Video Conferencing Manager. Forward
each mailbox to the Avaya Video Conferencing Manager mailbox. In Avaya Video
Conferencing Manager, associate the managed video or voice communications system
with the email address of the mailbox resource. When Microsoft Outlook users create
meeting requests, they add the conference rooms and the voice or video
communications devices located in each room as separate invitees.
Note: If your network includes MCUs managed by Avaya Video Conferencing
Manager and you wish to allow meeting participants to select an MCU in a call
scheduled through Microsoft Outlook, you must also create a resource mailbox in
Microsoft Exchange Server for each MCU; forward each MCU mailbox to the Avaya
Video Conferencing Manager mailbox; and associate the MCU with the email address of
the mailbox resource for the MCU.
Benefits:
Microsoft Outlook users can create meeting requests with or without voice or video
communications devices as invitees.
Limitations:
Microsoft Outlook users who want to use video or voice communications devices
must include both the conference rooms and the video or voice communications
devices as invitees to schedule calls.
Scheduling devices for a conference call in Avaya Video Conferencing Manager
does not prevent the conference rooms that contain these devices from being
reserved for the same meeting time by another meeting organizer in Microsoft
Outlook.

12 Avaya Video Conferencing Manager Deployment Guide
Preparing Your Environment
Whether you are installing Avaya Video Conferencing Manager for the first time or
upgrading from a previous release, ensure that your environment meets the hardware and
software prerequisites, including port access and client support requirements, in “Planning
to Install Avaya Video Conferencing Manager Software” on page 14.
Gathering Device Usernames and Passwords
After you install Avaya Video Conferencing Manager, you can use it to discover and manage
supported devices. When Avaya Video Conferencing Manager attempts to manage a
device, it logs on to the device’s command line or administrative interface using the logon
information that you supply for each make of supported device in the Passwords page. If
the logon information is missing in the Passwords page, or has changed on the device, you
must manually update the login information on each discovered device in Avaya Video
Conferencing Manager before Avaya Video Conferencing Manager can manage it. Before
you discover devices, gather logon information for the devices that you intend to manage
with Avaya Video Conferencing Manager. For more information, refer to “Specifying Default
Passwords for Device Management” on page 30.
Planning for Users
Avaya Video Conferencing Manager supports multiple users and controls user access to
functionality through the use of roles. After you install Avaya Video Conferencing Manager
you can add users. Review the information about user roles and accounts in “Managing
User Accounts” on page 40 to determine which users to add and roles to assign. “Appendix
A: User Role Access” on page 101 identifies the access level by role for each task that users
can perform in Avaya Video Conferencing Manager.
Configuring Alarms
Avaya Video Conferencing Manager includes hundreds of alarms that span 15 categories.
Before training users to monitor and respond to alarms, Avaya recommends that you
determine which alarms you wish to monitor. Refer to “Appendix B: Alarms by Category”
on page 106 for a complete list of alarms, including each alarm’s description and default
status. After you install Avaya Video Conferencing Manager, set the monitoring status of the
alarms that you wish to monitor to ON and the status of all others to OFF on the Alarms
Configuration page in Avaya Video Conferencing Manager Administrator.

Avaya Video Conferencing Manager Deployment Guide 13
You can also forward traps from all managed video and voice communications devices to
third party monitoring systems using the Northbound Settings page in Avaya Video
Conferencing Manager Administrator or on a device-specific basis using the Northbound
tab in the Device details page for a single device. For more information refer to “Using
Avaya Video Conferencing Manager Administrator” on page 88 and “Forwarding SNMP
Traps with Northbound Settings” on page 53.
Configuring Global Settings
Avaya Video Conferencing Manager Administrator enables you to set configuration options
that affect how certain features work in Avaya Video Conferencing Manager and to disable
or re-enable Microsoft Exchange Server integration and associated options. Review the
information about this tool in “Using Avaya Video Conferencing Manager Administrator”
on page 88 to determine which configuration options you wish to change for your
environment. Avaya recommends that you configure these options before training users.
Developing a Test Environment and Plan
Avaya recommends that you create a test environment for learning how to use Avaya Video
Conferencing Manager, testing new features, and training new users. For example, after you
install Avaya Video Conferencing Manager, discover a few devices at a time in a very limited
IP address range or use a specific IP address to add a limited number of a variety of devices
to use as test devices for device management and call scheduling tasks. Isolate or limit
access to these devices. Use the device management and call scheduling procedures in this
guide to create a test plan.
If you plan to enable Microsoft Exchange Server integration, be sure to include call
scheduling through Microsoft Outlook as part of the test plan for these devices. Use the
information in “Scheduling Conferences in Microsoft Outlook” on page 80 and, if you plan to
enable it, “Specifying a Preferred Method of Participation” on page 83.

14 Avaya Video Conferencing Manager Deployment Guide
Developing a Training Plan
Use the procedures in this manual and information about user roles to assist you in
developing a training plan and training materials customized to your environment. If you
enabled Microsoft Exchange Server integration with your installation, both Avaya Video
Conferencing Manager users and Microsoft Outlook users will need to know how to
schedule video and voice calls through Microsoft Outlook. Refer to “Scheduling
Conferences in Microsoft Outlook” on page 80 and, if you plan to enable it, “Specifying a
Preferred Method of Participation” on page 83.
If you installed Avaya Video Conferencing Manager without enabling Microsoft Exchange
Server integration, and plan to use it for call scheduling, you may need to establish a training
plan for users who staff a centralized scheduling function, such as a help desk or video
network operations center, and procedures for meeting participants who wish to use a
centralized scheduling service.
Planning for Reports
Examine the reports available in Avaya Video Conferencing Manager to determine which
ones you want to generate and how often. Avaya Video Conferencing Manager includes a
reports subscription feature that automates report generation and delivery. For more
information, refer to “Generating Reports” on page 86.
Planning for Maintenance
After you install and configure Avaya Video Conferencing Manager and discover devices,
Avaya recommends that you back up your installation. For more information about backing
up the Avaya Video Conferencing Manager database, refer to “Database Management”
on page 89. If you plan to enable Microsoft Exchange Server integration, be sure to read
“Maintenance with Microsoft Exchange Server Integration” on page 96.
Planning to Install Avaya Video Conferencing Manager
Software
Before you install Avaya Video Conferencing Manager, ensure that your environment meets
the following requirements.
Caution: If you are upgrading from a previous release, refer to “Upgrading Avaya Video
Conferencing Manager” on page 25 for important information about upgrade
prerequisites.
If you plan to delay the installation after completing hardware and software prerequisite
tasks, consider securing the hardware or restricting access to it to prevent use that may
interfere with the installation process or cause the installation to fail.

Avaya Video Conferencing Manager Deployment Guide 15
Hardware
Avaya Video Conferencing Manager supports the following minimum server configuration:
• 2.4GHz Pentium 4 processor
•1GB RAM
• At least 500MB of free hard disk drive space (Avaya recommends 4GB)
Note: Dual NIC cards are not supported on the Avaya Video Conferencing Manager
server.
Software
Ensure that the following software is installed on the server before you install Avaya Video
Conferencing Manager:
• Microsoft Windows Server 2003 with Service Pack 1 (minimum) or Service Pack 2
(recommended)
• You must install and activate the following Windows components on the server. Refer to
“Installing Windows Components” on page 20 for information about installing these
components:
- Application Server Console
- ASP.NET
- Enable Network COM+ Access
- Enable Network DTC Access
- Internet Information Server (IIS) v6.0 or later
• If you intend to use SSL to access Avaya Video Conferencing Manager from a web
client, ensure that you obtain a valid server certificate.
Avaya Video Conferencing Manager is not supported on a server with an Active Directory
installation or that is a domain controller. Ensure that Active Directory is not installed on the
server on which you intend to install Avaya Video Conferencing Manager and that the server
is not a domain controller.

16 Avaya Video Conferencing Manager Deployment Guide
The Avaya Video Conferencing Manager installation program installs an OpenLDAP server,
the Microsoft .NET Framework 2.0 if not already installed, and PostgreSQL v8.3. You must
be logged in as a user with administrator privileges to install these programs. Before you run
the installation program, ensure that the following prerequisites are met on the computer on
which you intend to install Avaya Video Conferencing Manager:
• You have administrator rights to install the applications.
• An existing OpenLDAP installation does not exist.
• An existing PostgreSQL installation does not exist.
• If OpenSSL exists on the server, ensure that the version is 0.9.7 or later or delete the
LIBEAY32.dll and SSLEAY32.dll files (located in the C:\windows\system32 folder).
The Avaya Video Conferencing Manager installation program installs a compatible
version of these files if OpenSSL does not exist on the server. If the Avaya Video
Conferencing Manager installation program detects an earlier version, an error message
appears indicating that you must delete the LIBEAY32.dll and SSLEAY32.dll files. When
you click OK in the message dialog box and then click Next in the installation dialog
box, the installation program quits. You must then delete the LIBEAY32.dll and
SSLEAY32.dll files and uninstall Avaya Video Conferencing Manager before running the
Avaya Video Conferencing Manager installation program again. To uninstall Avaya
Video Conferencing Manager, refer to “Removing Avaya Video Conferencing Manager”
on page 99.
Caution: If you are performing an upgrade and the Avaya Video Conferencing
Manager installation program encounters an incompatible existing version of OpenSSL,
uninstalling Avaya Video Conferencing Manager removes the installation. You cannot
continue the upgrade or return your existing Avaya Video Conferencing Manager
installation to its previous state without uninstalling Avaya Video Conferencing Manager,
reinstalling the previous version and restoring its database from a backup. If you are
planning to upgrade your Avaya Video Conferencing Manager installation, ensure that
you check for an existing OpenSSL installation before performing the upgrade. For more
information about upgrade prerequisites, refer to “Upgrading Avaya Video Conferencing
Manager” on page 25.

Avaya Video Conferencing Manager Deployment Guide 17
Client Support
You can access the Avaya Video Conferencing Manager user interface from a computer
equipped with the following:
• A supported web browser (refer to the Release Notes at support.avaya.com)
• 256MB memory
• Adobe Flash Player (refer to the Release Notes at support.avaya.com for supported
versions)
Note: Adobe Flash Player is included with the Avaya Video Conferencing Manager
installation program as an optional installation step, or you can download it directly from
www.adobe.com.
Ports
The Avaya Video Conferencing Manager installation program automatically installs and
prompts you to configure an OpenLDAP server. The OpenLDAP server installs on the same
server as the Avaya Video Conferencing Manager software and uses TCP port 389 by
default. You can accept the default port if not already in use, or specify a different port for the
server to use. Ensure that any firewalls that are installed on the Avaya Video Conferencing
Manager server are configured to allow incoming traffic on this port.
Avaya Video Conferencing Manager is based on Microsoft’s .NET framework and uses TCP
port 8085 for IIS to Avaya’s server communication.
Avaya Video Conferencing Manager uses TCP port 3336 when scheduling conferences
through Radvision and MCUs.
The user interface is hosted on IIS on a Microsoft Windows Server 2003 platform on port 80,
or port 443 if the SSL option is used. Dynamic updates are provided through TCP and UDP
port 4296 of the web server.
Avaya Video Conferencing Manager also requires TCP port 483 for Adobe Flash security.
Adobe Flash clients retrieve a master policy file from this port on the server.

18 Avaya Video Conferencing Manager Deployment Guide
Avaya Video Conferencing Manager supports management of video communications
devices through standard APIs such as those listed in the following table. Communication
with these devices is through default ports provided for FTP, SNMP, and HTTP.
Data Storage
Avaya Video Conferencing Manager stores data in the PostgreSQL database management
system. The installation program installs PostgreSQL on the same server as Avaya Video
Conferencing Manager.
A database instance is created using Trusted Windows Authentication. The connection
mechanism uses the PostgreSQL Data Provider. Avaya Video Conferencing Manager uses
an LDAP-based H.350 compliant address book.
Protocol Ports
FTP TCP port 21 for outbound communication from Avaya Video
Conferencing Manager to Codian, Tandberg, and Polycom devices
Telnet TCP port 23 for outbound communication from Avaya Video
Conferencing Manager to Tandberg devices
TCP port 24 for outbound communication from Avaya Video
Conferencing Manager to Polycom devices
SSH TCP port 22 outbound communication from Avaya Video
Conferencing Manager
SNMP v1, v3 UDP port 161 for inbound communication
Avaya Video Conferencing Manager connects to this port on a
device to retrieve data from the device.
UDP port 162
Avaya Video Conferencing Manager listens on this port to
receive traps from a device. When the device needs to forward
a trap, it connects to the Avaya Video Conferencing Manager
server on this port to deliver the trap.
HTTP TCP and UDP port 80
HTTPS TCP port 443
LDAP TCP port 389 for OpenLDAP (unless changed during installation)
for inbound communication from Avaya devices to the Avaya Video
Conferencing Manager server

Avaya Video Conferencing Manager Deployment Guide 19
Installing Avaya Video Conferencing Manager
Before installing Avaya Video Conferencing Manager, ensure that your environment meets
all hardware and software requirements described in “Planning to Install Avaya Video
Conferencing Manager Software” on page 14. If you intend to enable and configure
Microsoft Exchange Server integration with your Avaya Video Conferencing Manager
installation, ensure that you have read and understand the requirements for enabling and
configuring this feature as described in “Preparing for an Avaya Video Conferencing
Manager Deployment” on page 5 and collected the information required to enable this
feature during the installation process.
Caution: If you are upgrading from a previous release, refer to “Upgrading Avaya Video
Conferencing Manager” on page 25 for important information about upgrade
prerequisites.
Installing Avaya Video Conferencing Manager includes the following tasks:
• Install Microsoft Windows components.
• Run the Avaya Video Conferencing Manager installation program.
If you are upgrading from a previous release, complete the steps in “Upgrade Prerequisites”
on page 25.
The Avaya Video Conferencing Manager installation program also installs Avaya Video
Conferencing Manager Administrator, a web-based tool you can use to view and change the
status of services and modify application, alarm, OpenLDAP, email, Microsoft Exchange,
conference, database management (backup and restore), license, and report configuration
settings. For more information, refer to “Using Avaya Video Conferencing Manager
Administrator” on page 88.

20 Avaya Video Conferencing Manager Deployment Guide
Installing Windows Components
Before installing Avaya Video Conferencing Manager, you must install the following
Microsoft Windows components on the server:
• Application Server Console
• ASP.NET
• Enable Network COM+ Access
• Enable Network DTC Access
• Internet Information Server (IIS)
To install the Microsoft Windows components, follow these steps:
1. From the Windows Control Panel, choose Add or Remove Programs and click
Add/Remove Windows Components in the left panel.
2. From the Windows Components Wizard, select Application Server and click Details.
3. Enable the following required subcomponents:
- Application Server Console—Provides a central location from which to administer
web applications.
-ASP.NET—Required to deploy ASP.NET web applications to a production server.
Avaya Video Conferencing Manager is an ASP.NET web application.
- Enable Network COM+ Access—Builds on Component Object Model (COM)
integrated services and features. Most Avaya Video Conferencing Manager
components are service components.
- Enable Network DTC Access—Coordinates COM+ transactions. Avaya Video
Conferencing Manager components use DTC for remote calls.
- Internet Information Server (IIS)—Provides the infrastructure for .NET and
existing web applications and services. The default enabled subcomponents
Internet Information Service Manager and World Wide Web Service are
required to run Avaya Video Conferencing Manager.
4. Click OK.
5. Click Next to complete the installation.
6. Close the Add or Remove Programs window.
/