Page is loading ...

Chapter 1
Getting to Know Forms
and Reports
In This Chapter
Introducing forms
Understanding reports
Using forms and reports together
Introducing queries to your forms and reports
Looking for extra add-ons
W
ithout forms and reports, an Access database is just a jumble of hard-
to-use information. But with really good forms and reports, that same
database becomes both informative and a joy to use. Well-designed forms
and reports make your Access databases into something that’s far beyond
the ordinary in utility, ease of use, and flexibility.
If you’ve been playing around with Access for a while, you have probably at
least tried to create some forms and reports. Maybe some of your efforts
didn’t seem too bad, but you’ve probably had your share of frustration, too.
Creating forms and reports that really do what you want them to do can be
an awfully exasperating experience.
In this chapter, I show you a number of interesting things about forms, reports,
and their sidekick queries so that you can see what each of them can do and
why they’re all important. You see how queries can greatly enhance the capa-
bilities of forms and reports. I finish up the chapter by very briefly mentioning
some really cool tools (find out even more about them in Chapter 20).
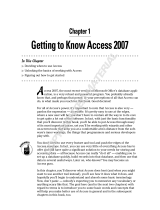
Finding Forms Fascinating
In order to understand the importance of forms in an Access database, begin
by looking at the alternative. Figure 1-1 shows the
Datasheet view of a typical
05_046593 ch01.qxp 11/27/06 1:23 PM Page 9
COPYRIGHTED MATERIAL

Access table. (A table is the structure in which Access stores information in
your database.) The Datasheet view looks an awful lot like an Excel work-
sheet. You are likely pretty familiar with this view of a database because it
seems as though almost everyone’s first attempt at a database is to just
create a list in a spreadsheet. Welcome to the “if the only tool you have is a
hammer, everything looks like a nail” club!
In Datasheet view, each record is displayed in a single row, with columns for
each of the database fields. Even though this view of the data is probably
pretty familiar, it isn’t very convenient. For one thing, unless you’re keeping
track of only a little information about each item, it’s really hard to see an
entire record in Datasheet view because everything has to fit into one row.
That means you have to scroll back and forth to see all of the fields. Depending
on the length of each field, sometimes you can’t even see the entire contents
of a single field on-screen. And don’t even think about seeing a single record
wrap around and take up multiple rows — making everything fit on-screen
simply is not an option.
Of course, some other factors make the Datasheet view pretty inconvenient
for most purposes. Can you imagine how little fun it would be to scroll through
screen after screen trying to find a specific record in Datasheet view? Now
imagine that instead of finding a single record, you want to find a dozen or
so related records in a table containing 10,000 or more records. It’s almost
enough to make you want to move to a desert island where there aren’t any
computers, isn’t it?
Each field is in a column
Records appear
in rows
Record navigation tools
Figure 1-1:
The Access
Datasheet
view of the
information
in a table
looks like an
Excel
spreadsheet.
10
Part I: Accessing Both Ends: Getting Data In and Info Out
05_046593 ch01.qxp 11/27/06 1:23 PM Page 10

Fortunately, there’s a good solution at hand in the guise of forms. Access
forms provide a much more convenient way for you to interact with your
database. Learning to create great forms is certainly going to be a lot easier
than packing up your stuff for that move to a desert island. The following
sections give you a look at some of the ways forms can help you.
Streamlining data input with forms
No database has much value until it contains information. You wouldn’t be
able to get any useful data from an empty database, so a very important task
in creating a database is inputting your data. Sure, you might have some exist-
ing data that you can import, but even that data required input at some point.
Entering data into a table in Datasheet view really isn’t much fun. You first
have to open the table and then locate the record where you want to enter
your data. Maybe you’re adding to an existing record, or perhaps you’re
adding a new record right after the last existing one in the datasheet. When
you’ve selected the correct record, you have to move the insertion point to
each field in turn and type in the information. It’s easy to accidentally start
typing into the wrong field — especially if the table layout doesn’t quite
match the layout of the information you’re entering (and how often do you
see data on paper that doesn’t match the layout of the table?).
Forms can make inputting data much easier in several ways:
Forms typically have labels that make seeing exactly which field
you’re filling in far easier.
Forms can have drop-down lists so that you simply choose the proper
information from the list without worrying about mistyping the data.
Forms are usually laid out with plenty of room to see all the fields in a
record.
That makes keeping track of which record you’re entering a
much easier task.
You can easily create forms for special purposes, such as entering data
in specific sets of fields.
In this case, the form might not need to include
all of the fields; when you use only what you need, you end up with a
simpler, less confusing form.
Forms don’t have to be laid out using the same field order as the
table.
This is an especially handy feature if you’re inputting data that is
laid out quite differently than your table.
You can set up forms to validate the data so that users can’t mess up
your database by entering bogus information.
Even if some of these form features seem a little bit beyond your interests or
immediate needs right now, don’t worry — you’ll find out about all of them
and get many more great ideas in the chapters that follow.
11
Chapter 1: Getting to Know Forms and Reports
05_046593 ch01.qxp 11/27/06 1:23 PM Page 11

Entering data with the Form Wizard
Using a form to enter data into an Access database is much easier than enter-
ing data directly into a table in Datasheet view. Figure 1-2 shows a simple
form you might create with the Form Wizard in Access. In this case, the form
is not optimized in any way — it appears the way the wizard created it.
If you compare the form shown in Figure 1-2 with the Datasheet view shown
in Figure 1-1, you can see pretty easily how much more convenient the form
is for entering data. Each of the fields is clearly labeled (even if the Form
Wizard didn’t quite figure out the proper size for a couple of the labels). Here
are a couple of ways that the Form Wizard makes entering data easier:
Easy movement between fields: You can move between the fields by
clicking the field you want or by pressing the Tab key. Because the fields
are labeled, you can easily move to specific fields, skipping the fields
you don’t want to use for now.
Easy movement between records: You can use the navigation controls
at the bottom of the form to navigate between records. This feature is
just like the navigation controls you commonly use, but with a notable
exception: In forms, pressing Page Down moves you to the next record,
and Page Up moves you to the previous record. In Datasheet view, Page
Down and Page Up move you to a new screen page of records. (The
number of records you jump depends on how many records are visible
on the screen, and this can change depending on how you display the
datasheet window. Don’t you just love the inconsistency?)
Field labels
Enter data in the fields
Use drop-down list boxes to choose from a list
Use these controls to navigate between records
Figure 1-2:
Even a
simple form
makes
entering
data into
your Access
database
easier.
12
Part I: Accessing Both Ends: Getting Data In and Info Out
05_046593 ch01.qxp 11/27/06 1:23 PM Page 12

In Datasheet view, you can use the Up-Arrow and Down-Arrow keys to
move a single record at a time, but in a form, the arrow keys move the
insertion point between fields.
Customizable drop-down lists: Because you can modify the underlying
table with
lookup fields (fields that enable a user to select from a list of
predefined values — see Chapter 17), you can ensure that the fields
contain specific values that are found in related tables. For example, in
Figure 1-2, the TypeID, OwnerID, and AuctionID fields can contain only
specific values that are found in some related tables; the possible values
for these fields appear in the drop-down lists in these boxes. Rather than
typing an entry in these fields (and risking errors due to mistyping), you
simply choose a value from the drop-down list.
Larger input areas: To make entering longer values easier, the wizard pro-
vides larger input areas (in this case the Title and Description fields). In
fact, if you type more information than can fit into the on-screen display of
one of these fields, Access automatically adds a scrollbar along the right
side of the field so that you can view the entire value. How’s that for handy?
The database I use in these examples contains some features, such as lookup
fields, that you might not yet be using in your Access databases. I explain all
of the special features in later chapters as appropriate so that you will be
able to incorporate them into your databases.
Editing information with forms
Forms are also much handier than the Datasheet view for editing existing
database information. When you’re editing information, forms retain all of the
advantages they offer when you’re first entering data, of course, but some
additional features are especially useful for editing. As Figure 1-3 shows, if
you right-click a form field, Access pops up a very handy context menu that
provides some really cool options.
The pop-up menu commands are extremely helpful for editing the filters.
Sort A to Z: Choose this option to sort the records of a selected field in
ascending alphabetical order. For example, if you originally decided to
view the data shown in the State field and chose to sort the results in
ascending alphabetical order, Alabama appeared first. This and the next
option are best used in a secondary field after you have applied a filter
(note the many filter variations that appear in the context menu)
because these options won’t have any effect in a filtered field.
Sort Z to A: Choose this option to sort the records in descending order.
Text Filters: To filter the data, select the field you want filtered and right-
click. Access then proposes a set of appropriate text filters. (Other types
of fields, such as number fields, will have different filters.)
13
Chapter 1: Getting to Know Forms and Reports
05_046593 ch01.qxp 11/27/06 1:23 PM Page 13

Be sure to use the Clear Filter command (from the pop-up menu) when you
finish editing records. Otherwise you may find yourself confused later when
the form doesn’t display all of the records that you know should be in your
database.
Viewing data by using forms
You can use a form when you simply want to view the data without entering
new information or editing existing records. The same pop-up menu that
appears when you right-click on a form field is just as handy when you simply
want to view the records, too.
Recognizing Why Reports Rock
Okay, so forms are great, but what about reports? The following sections look
at some of the ways that you can use reports; they’re well worth the effort it
takes to create them.
Using reports to show results
One very useful purpose for reports is to show results that aren’t otherwise
displayed in a table format. You can create a report to see important details
at a glance. Figure 1-4 shows an example of a report that summarizes results
Figure 1-3:
Right-click a
form field to
display this
menu of
options.
14
Part I: Accessing Both Ends: Getting Data In and Info Out
05_046593 ch01.qxp 11/27/06 1:23 PM Page 14

from an auction database created in Access. In this case, the report summa-
rizes by state, with sum, average, minimum, and maximum results.
Figure 1-4 provides a good example of how a report can provide information
that simply doesn’t appear on its own in an Access table. Tables don’t sum-
marize the data from a collection of records, so unless you want to sit down
with a calculator to figure out such details, you should create reports to get
this kind of information from your database.
Using reports to present data
in a professional format
You might not need all the information Figure 1-4 includes. You might, for
example, simply want a list that provides a snapshot of what’s in your data-
base. This is especially true if you want to distill complex information quickly
and efficiently for your boss or client. If you just want to check things over
for yourself, open a table and click the Print button (choose a small table so
you won’t waste paper). If you want to show off your data for others, the
extra effort of creating a report makes sense for several good reasons:
Providing a professional layout: Unless you’re printing the data from a
very small and simple table, the results of printing directly from a table’s
datasheet view probably won’t fit the width of your paper. Good luck
trying to make sense of the resulting printout!
Easing report navigation: You can easily include page numbers and
dates on your reports — in fact, the Access Report Wizard adds this
information automatically. Keeping track of a report that has dates and
Figure 1-4:
Access
reports can
include
totals and
other
types of
calculations.
15
Chapter 1: Getting to Know Forms and Reports
05_046593 ch01.qxp 11/27/06 1:23 PM Page 15

page numbers printed on it is much easier — especially if you have a
limited amount of time to orally guide others through your exhaustive
100-page report.
Presenting data in a logical format: You can use as much or as little
room as necessary for the fields on a report to accommodate the
amount of data that’s in each record. Compared to the single line for
each record on a printout of a table’s Datasheet view, this feature alone
is worth the effort.
Adding a title: Including a title on a report is easy. With a title, you’ll be
able to figure out the purpose of the report early on a Monday morning
before your first cup of coffee kicks in.
Using reports to show data analysis
Of course, you can summarize data in an Access report, but that’s just the tip
of the iceberg in terms of the types of data analysis you can do. Here are just
a few examples of some other ways you can use a report to analyze the infor-
mation in an Access database:
Compare similar results: You can produce a report that shows how
each salesperson’s results compare to the average of all of your com-
pany’s representatives.
Compare data over time: You can use a historical sales report to deter-
mine which ice cream flavors to stock at each of your ice cream stands.
Predict opportune moments: You can use a report to show how temper-
ature patterns affect the populations of various types of pests and use
this information to predict the best time to send out flyers for your
extermination business.
Determine the best course of action: You can create a report that tells
you whether it’s worthwhile to set up a calling committee for your club’s
annual meeting based on an analysis of the results from several past
meetings.
Using reports to preserve the moment
In most cases, an Access database is constantly changing as new data is
entered, existing data is edited, and old data is deleted. Sometimes, though,
you may have good reasons to preserve a record of exactly how things were
at a particular moment in time. Consider these possibilities:
If you maintain the membership list for the local branch of your favorite
club, you know that sometimes members can be a bit slow about renew-
ing their memberships. I’ve seen instances in which members have
16
Part I: Accessing Both Ends: Getting Data In and Info Out
05_046593 ch01.qxp 11/27/06 1:23 PM Page 16

come back after several years away. Keeping all of the past members in
the database may not always be reasonable, but having an end-of-year
membership report stored away is a useful way to keep the data in case
you need it again in the future.
If you run a small business, you probably want to keep track of your
exact inventory at various times of the year. A dated report of your
inventory stored offsite could be extremely valuable if you ever needed
to file an insurance claim after an untimely disaster or did a one-on-one
with the tax man.
If you go into business with someone else, an Access report showing
exactly which items you contributed to the business could save some
arguments in the event you later split up. (Sure, you both know now that
the extremely rare Babe Ruth baseball card is yours, but wouldn’t it be
nice to be able to prove it when your former partner tries to sell it for
$10,000?)
Even if you do keep the printouts, it’s also a good idea to keep backup copies
of your database in case of an emergency. But be very careful that you don’t
accidentally overwrite your current database file with an old copy if you do
need to open your old file; you can easily destroy months or even years of
work if you’re careless.
Seeing Why Both Forms and
Reports Have a Place
Forms and reports seem somewhat similar in that they both provide ways
to look at data that aren’t available in the datasheet view of a table. Do you
really have to learn how to create both of them? Yes. Using forms and reports
isn’t an either/or proposition.
Even though forms and reports share some characteristics, they do have
important differences, and your databases will lack a little something if you
use one (and not both) of these tools.
Here’s a list of things you should know about choosing reports or forms:
If you want to add, remove, or change data in a table, use a form.
Sure, you can filter the data that appears in a report so that it appears as
though some of the data has been removed from the database, but that’s
not the same as actually deleting data.
Use reports to view data in more than one record in a more perma-
nent format.
In general, forms display only a single record at a time.
In addition, because reports typically are meant to be printed, and
17
Chapter 1: Getting to Know Forms and Reports
05_046593 ch01.qxp 11/27/06 1:23 PM Page 17

they often include the date, reports provide a permanent record of the
information.
It’s not
strictly true that forms can display only a single record at a time.
As you find out in later chapters (such as Chapter 10), some forms that
are based on multiple tables can include a section called a
subform that
can display multiple records from the second table in Datasheet view.
Both forms and reports depend on a table (or a query, as discussed
in the next section) to provide the information that they display.
You
can’t create a form or a report unless you first have a table or query to
use as a basis for the form or report. One important result of this fact
is that Access forms and reports can exist only within an Access data-
base file.
Access forms and reports are usually tied to an Access table (but they
can also get their data from a query). When you create a form or a
report, the name of the table is saved along with the form or report. If
you (or someone else) delete the table, you can’t open the form or
report associated with it unless you have associated the form or report
with a different table.
Understanding the Value of Queries
I know, the title of this book doesn’t mention queries, but queries are a funda-
mental and vital part of making your Access forms and reports really useful.
Queries are nothing to be afraid of, and they might end up being your favorite
part of Access!
Introducing the query concept
So just what is a query? In its simplest form, a query acts like a filter; you can
use a query to choose specific information that you want to see from a table. A
more complex query takes you well beyond the scope of a filter (see Chapter 5).
Figure 1-5 shows an example of a basic query, known as a
select query.
When you run a query, Access displays the results in Datasheet view, as
shown in Figure 1-6. In this example, I set the criteria value in the State field
to Nevada, and this is reflected in the results shown in Figure 1-6.
The query results in Figure 1-6 are shown in a Datasheet view that looks
almost identical to the Datasheet view of an ordinary Access table, with only
the title bar as a tip-off that this is really a query. You can, indeed, use a
query as a substitute for a table as the basis for a form or a report . . . or for
another query!
18
Part I: Accessing Both Ends: Getting Data In and Info Out
05_046593 ch01.qxp 11/27/06 1:23 PM Page 18

Using queries to enhance
forms and reports
Because you can use a query as the basis for an Access form or report, you
now have a powerful tool that enables you to do otherwise impossible things
with those forms and reports. Consider these possibilities:
You can create a form that’s based on a query that selects records that
fall within specific date ranges. For example, say you want to follow up
with customers who placed an order last year but who haven’t ordered
in several months. Use a query.
Figure 1-6:
Running a
query
results in a
filtered
display that
matches the
specified
criteria.
The table that is the source of the data
The fields that will be included in the results
The criteria used to filter the results
Figure 1-5:
A query
enables you
to choose
records that
meet
specific
criteria.
19
Chapter 1: Getting to Know Forms and Reports
05_046593 ch01.qxp 11/27/06 1:23 PM Page 19

You can create queries that combine data from several tables to produce
information that is a composite of the information from those tables.
You might want to use this data to create form letters that include new
product information for products similar to those ordered in the past by
specific customers.
You can easily create a query that includes only the orders placed by a
specific customer. This is a great tool if the customer wants a record of
all its orders in the several months or years.
Because queries are so important, I put information about them throughout
the book. In fact, Chapter 2 digs right in to give you a solid basis in queries so
that, when you create forms or reports, you know what your options are.
Queries, Forms, and Reports
Basics You Need to Know
In Access, all of your data is stored in tables. You can create totally self-
contained tables or relate multiple tables so that you can consolidate data
efficiently. Databases that work from a single, self-contained table are often
called
flat file databases. Databases that include two or more related tables
are called
relational databases. Fortunately, you use the same tools in Access
no matter which type of database you use.
As I mention earlier in this chapter, forms and reports are based on either a
table or a query. Queries can be based on tables or even on other queries —
although queries based on queries can be kind of confusing to work with.
Access provides two primary methods of creating queries, forms, and reports.
You can start with a wizard, as shown in Figure 1-7, or you can create the
query, form, or report from scratch by using
design mode.
Whether you start with a wizard or in design mode, you begin the process of
creating a query, form, or report by choosing the table (or tables) you want
to use, and then you choose which fields to include. Remember that you can
also choose an existing query in place of a table.
In most cases, you can choose as many or as few fields as you like. You are
likely to find that some fields in a table (or query) are simply unnecessary.
For example, if you want to create a report that summarizes the values of the
items in your collection, you don’t need to include the field that tracks when
you received each item.
20
Part I: Accessing Both Ends: Getting Data In and Info Out
05_046593 ch01.qxp 11/27/06 1:23 PM Page 20

After you select the fields you want to use, the next step depends on which
task you’re performing. If you’re creating a query, you may want to specify
criteria or a sort order. If you’re creating a form or a report, specify the layout
of the form or report. If you’re using a wizard to create the form or report,
you simply choose from a set of predefined layouts. If you’re working in
design mode, you need to manually place the fields where you want them.
When your query, form, or report is finished, you name and save the final
layout. If necessary, you can always return to the query, form, or report in
design mode to make additional changes.
It’s easy to become confused when you save objects in Access. Even though
you use the standard File
➪Save command to save queries, forms, and
reports, you aren’t saving those items outside of Access. The objects are all
saved within the Access database file, and you can view those objects only
from within Access.
Access Add-Ons and Extra Cool Tools
You may not realize this, but quite a few add-ons and extras are available to
help you work with Access. These tools aren’t built in to Access, but they do
offer an awful lot of help when you’re developing an Access database. Most of
these add-ons come from third-party developers, although Microsoft does
offer a few, too.
Figure 1-7:
Access has
wizards like
this one to
help you
create
queries,
forms, or
reports.
21
Chapter 1: Getting to Know Forms and Reports
05_046593 ch01.qxp 11/27/06 1:23 PM Page 21

Just what can you do with these add-on tools? Here’s a sampling:
Document the various objects in your Access database so that you can
easily maintain and correct the database.
Compare Access databases to see how they differ. You’ll find this
opportunity invaluable for databases that were created by multiple
people on multiple computers.
Repair database corruption so that you can recover from the problems
that always seem to occur just before you plan on doing your backup.
Locate and correct problems that slow down your database.
Create better forms using options that you can automatically add to the
forms without a bunch of programming.
Turn existing paper forms into electronic ones that you can use to
enter data into an Access database without having to learn a whole new
way of working.
Share Access reports with someone who doesn’t have Access installed
on his or her PC.
Send Access data to a PowerPoint slideshow.
I’m certain that at least one of these possibilities has you interested. I’m sure
you’ll find Chapter 20 to be very useful.
22
Part I: Accessing Both Ends: Getting Data In and Info Out
05_046593 ch01.qxp 11/27/06 1:23 PM Page 22
/