Page is loading ...


Installation
54-0239 Rev. A TracVision A5 Shop Manual © 2004 KVH Industries, Inc., All rights reserved.
• ProvidesexcellentsatelliteTVreceptionwhiledrivingalongthe
openroad.
• AntennatrackstheDIRECTV101Wsatellite,whichislocatedin
thesouthernsky.
• SystemincludesanintegratedDIRECTVreceiver(withpicture-in-
guideAPG),anRFconverter,andanRFremotecontrol.
• Fordetailedinstallationinstructions,refertothe
TracVisionA5
InstallationGuide
.Forcompleteoperationinstructions,refertothe
TracVisionA5User’sGuide
.
TracVision A5 Overview
Effective April 2004
Subject to change without notice
12V Power (50 watts max)
Receiver
TracVision A5 Antenna
Antenna Cable
In-vehicle Components
Customer-supplied Components
Mobile Video Display(s)
RF Converter
RF Remote Control

Installation
54-0239 TracVision A5 Shop Manual © 2004 KVH Industries, Inc., All rights reserved.
• Twopeoplearerequiredtolifttheantenna.Donottrytoinstallthe
antennabyyourself.
• Removetheshippingrestraintsfromunderneath,asshowninthe
photosabove.Donotfliptheantennaupsidedown.
• Nevertilttheantennagreaterthan45°oncetherestraintsare
removed.
Safe Handling
Effective April 2004
Subject to change without notice

Installation
54-0239 TracVision A5 Shop Manual © 2004 KVH Industries, Inc., All rights reserved.
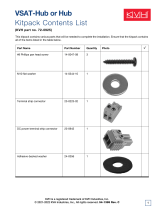
• Positiontheroofrackcrossbars35
1
/2"apart,measuredcenter-to-
center.
• Atleast1"clearanceisrequiredbetweentheundersideofthe
antennaandtheroof.Toraisetheantennahigher,usethe
spacerssuppliedinthekitpack(seepage2.6oftheInstallation
Guidefordetails).
• Alwaysusethetamper-resistantTORXhardwaresuppliedinthe
kitpack.Donotuseanysubstitutes.
Mounting to a Roof Rack
Effective April 2004
Subject to change without notice
Flat-head
TORX Screws
Cover
Roof Rack Crossbar
Retaining Block
Rubber Cushions
Swivel Nuts
Swivel Nuts
Rubber Cushions
Flat Washers
Lock Nuts
Button-head
TORX Screws
Mounting Bracket
Antenna

Installation
54-0239 TracVision A5 Shop Manual © 2004 KVH Industries, Inc., All rights reserved.
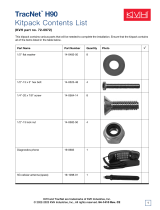
• KVH’sroof-mountkitisdesignedonlyforflatmetalroofsupto
3
/16"thick.
• Installajacknutinalleight
7
/16"mountingholes.Ensurethejack
nutsaresecurelyattachedtotheroof.
• Atleast1"clearanceisrequiredbetweentheundersideofthe
antennaandtheroof.Toraisetheantennahigher,usethe
spacerssuppliedinthekitpack(seepage3oftheroof-mount
instructionsfordetails).
• Alwaysusethetamper-resistantTORXhardwaresuppliedinthe
kitpack.Donotuseanysubstitutes.
Mounting to the Roof
Effective April 2004
Subject to change without notice
Cover
Flat-head
TORX Screws
Mounting Block
Jack Nuts
Button-head
TORX Screws
Mounting Bracket
Antenna

Installation
54-0239 TracVision A5 Shop Manual © 2004 KVH Industries, Inc., All rights reserved.
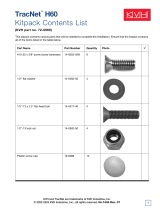
• KVH’sHummerkitisdesignedonlyforstandard2"-thickHummer
roofrackcrossbars.
• Positiontheroofrackcrossbars39
1
/2"apart,measuredcenter-to-
center.
• Cuteachcrossbar’srubberstripintothreepiecesasshown
above.ThesemeasurementsarecriticaltopositiontheT-nuts
properly.
• Alwaysusethetamper-resistantTORXandpin-in-hexhardware
suppliedinthekitpack.Donotuseanysubstitutes.
Mounting to Hummer Rack
Effective April 2004
Subject to change without notice
Flat Washer
Pin-in-hex Screw
Crossbar
T- n u t
(in center channel)
Button-head
TORX Screws
T-nuts
19" Rubber Strips
26.25" Rubber Strip
Crossbar

Augat Tool
Installation
54-0239 TracVision A5 Shop Manual © 2004 KVH Industries, Inc., All rights reserved.
• Ifyoumustcuttheantennacable,terminatethecablewiththe
suppliedSnap-N-Seal
®
F-connector.Low-qualityconnectorswill
degradesystemperformance.
• AlwaysuseanAugattool(KVHP/N19-0242)
toattachF-connectors.
• Donotkinkorstresstheantennacable.
• Tightenallconnectionsadequately.
• Usehigh-qualityvideocablebetweenreceiverandmonitor(s).
• PlacetheRFconverteratleast3feetawayfromthereceiverand
otherelectronicdevices.
Proper Wiring
Effective April 2004
Subject to change without notice
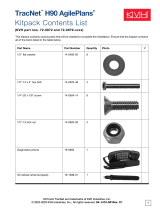
TracVision A5 Wiring Diagram
Antenna
For detailed system wiring
instructions, refer to the
TracVision A5 Installation Guide
.
RF Converter
Receiver
Vehicle Roof
CAUTION
KVH
®
is a registered trademark of KVH Industries, Inc. HUGHES
™
is a trademark of Hughes Electronics Corporation.
This device complies with Part 15J of the FCC rules. Operation is subject to the following two conditions:
(1) This device must not cause harmful interference, and (2) This device must accept any interference
received, including interference that may cause undesired operation.
Product Warranty void if outer casing removed
.
VEHICLE POWER
(10-16 VDC)
VHF
ANTENNA IN
S-VIDEO
TO KVH
ANTENNA
TO VIDEO
TruSurround, SRS and symbol are trademarks of SRS Labs, Inc.
SATELLITE IN
AUDIO R
AUDIO L
VIDEO
Service/
Maintenance
Only
DC Power
Ground
To Vehicle
Audio
To Vehicle Video
(Option 1)
To Vehicle Video
(Option 1)
To Vehicle Video
(Option 3)
To Vehicle Video
(Option 2)
To VHF Antenna
(Optional)
Vehicle Power
(10-16 VDC)
Fuse
RF REMOTE
INPUT
OUT TO TV
COMPOSITE VIDEO
TO IRD
SATELLITE IN
DIAGNOSTIC PORT 1
DIAGNOSTIC PORT 2

Installation
54-0239 TracVision A5 Shop Manual © 2004 KVH Industries, Inc., All rights reserved.
Before you start:
• Beforeconnectingthepowercable,removethekeyfromthe
ignitionandremovethenegativeleadfromthevehiclebattery.
Connecting the receiver power cable’s red (positive) wire:
• Connecttheredwireto+12VDCswitched(accessory)power.
Withthevehiclerunningandthereceiverturnedon,poweratthe
receivermustmeasureatleast11VDC.
• Donotwireanyotherdevicetothesamepowercircuit.
Connecting the receiver power cable’s black (negative) wire:
• Connecttheblackwiretoitsowndedicatedchassisground(such
asapillargroundscrew)within18"ofthereceiver.
• Theblackwiremustmakecontactbetweenthemetalofthe
groundscrewandthemetalofthevehicleframe.
Connecting to Power
Effective April 2004
Subject to change without notice
VEHICLE POWER
(10-16 VDC)
VHF
ANTENNA IN
S-VIDEO
TO KVH
ANTENNA
TO VIDEO
SATELLITE IN
AUDI O R
AUDI O L
VIDEO
RF REMOTE
INPUT
OUT TO TV
COMPOSITE VIDEO
TO IRD
SATELLITE IN
DIAGNOSTIC PORT 1
DIAGNOSTIC PORT 2
Fuse
(6 Amp)
+12 VDC Switched Power
(Accessory Power)
Ground
Pillar Ground Screw
TracVision A5 Receiver
Supplied Cable

Installation
54-0239 TracVision A5 Shop Manual © 2004 KVH Industries, Inc., All rights reserved.
Do not connect the receiver directly to the vehicle’s battery
without following these additional steps:
• Installaprotectivefuse(6amps)within18"ofthebattery.
• Installarelay,switchedfromtheignition,betweenthebatteryand
thereceiver.
• Usefire-resistantAWG8wirefromtherelaytothebattery.
Connecting to Power (cont’d)
Effective April 2004
Subject to change without notice
VEHICLE POWER
(10-16 VDC)
VHF
ANTENNA IN
S-VIDEO
TO KVH
ANTENNA
TO VIDEO
SATELLITE IN
AUDI O R
AUDI O L
VIDEO
RF REMOTE
INPUT
OUT TO TV
COMPOSITE VIDEO
TO IRD
SATELLITE IN
DIAGNOSTIC PORT 1
DIAGNOSTIC PORT 2
Ground
Fuse
(6 Amp)
Vehicle
Battery
+12 VDC
Ground
Switched
Relay
Ground
Ignition
Ground
AWG 8
Wire
Pillar Ground Screw
+–
TracVision A5 Receiver
Fuse
(6 Amp)
Supplied Cable

Installation
54-0239 TracVision A5 Shop Manual © 2004 KVH Industries, Inc., All rights reserved.
9 Youaffixedtheantennaserialnumberlabeltothered
ActivationCard.
9 Youverifiedtheroofrackcrossbarsaresecurelyfastened
tothevehicleandaresturdyenoughfortheantenna.
9 Youremovedtheantenna’sshippingrestraintsfrombelow.
9 Youusedthepropertamper-resistantmountinghardware.
9 Youallowedatleast1"ofclearancebetweentheantenna
andthevehicle’sroof.
9 Youverifiedthattheantennaissecurelyattachedtothevehicle.
9 YouusedanAugattooltoattachtheF-connectortothe
antennacable(ifyoucutthecable).
9 Youconnectedtheantennacable,high-qualityaudio/video
cables,andRFconvertercablesecurelytothereceiver.
9 Youconnectedthereceiver’spowercableto+12VDC
switched(accessory)power.
9 YouplacedtheRFconverter3feetawayfromthereceiverand
otherelectronicdevices.
9 Youinstalledthereceiverinadrylocationawayfromanyheat
sources,allowing2inchesofemptyspaceforventilation.
9 Youinstalled2“AAA”-sizebatteriesintheremotecontrol.
Installation Checklist
Effective April 2004
Subject to change without notice

PLEASE NOTE!
IftheTracVisionsystemwasleftonwhenthevehiclewaslastturned
off,TracVisionwillautomaticallyturnonwhenyoustartupthe
vehicle.DO NOT DO ANYTHING!Wait30-60secondsforthe
ProgramGuidetoloadandyouarereadytowatchTV–ifthe
ProgramGuidedoesn’tload,checkforblockageasnotedinstep7.
1. Turnonthecar.
2. Ensurethatthereceiver’spowerswitch
isturnedon.Thelightshouldbelit.
(Thereceiverbeepstwice.)
3. TurnonthevideoscreenandselecttheA5receiverinput
(notthe
DVD/VCRinput)
.
4. Donotmovethevehiclefor20seconds.
5. IftheTracVisionsystemwasleftonwhenthevehiclewaslast
turnedoff,Message1 thenMessage2 willappearonthescreen.
54-0239 TracVision A5 Shop Manual © 2004 KVH Industries, Inc., All rights reserved.
Proper Operation
Effective April 2004
Subject to change without notice
Activation & Operation
Installation
If your satellite dish is ready for DIRECTV
®
service, please wait until your
Advanced Program Guide
™
is prepared.
Searching for satellite signal...
Installation
If your satellite dish is ready for DIRECTV
®
service, please wait until your
Advanced Program Guide
™
is prepared.
Acquiring guide data...
Message 1 Message 2
then
CONTINUED ON NEXT PAGE...

54-0239 TracVision A5 Shop Manual © 2004 KVH Industries, Inc., All rights reserved.
6. IfMessage1doesnotappearafter30seconds
,
presstheremotecontrol’sSATbutton.Then
pressthePOWERbutton.Thereceiverbeeps
twice.Donotmovethevehiclefor20seconds.
(A singlebeepindicatesthatthesystemis
turnedoff.)
7. IfMessage2doesnotappearafterMessage1
,ensurethatthe
antennahasaclearviewofthesatelliteandthereisnostanding
water(rain,dew,orice)onthedome.Theantennarequiresan
unobstructedviewofthesouthernskytoreceivesatelliteTV
signals.Oncetheantennafindsthesatellite,andthereceiver
downloadstheProgramGuide (itmaytake60seconds), youcan
startwatchingTV.
Note:
OnlytheDIRECTVpreviewchannels(suchaschannels100
and201)areviewableuntilthecustomeractivatesthereceiver.
Proper Operation (cont’d)
Effective April 2004
Subject to change without notice
Activation & Operation
PWR
DVD VCR AUX TV SAT
GUIDE
MENU
TURBO
FAV
N
E
L
I
N
E
G
U
I
D

54-0239 TracVision A5 Shop Manual © 2004 KVH Industries, Inc., All rights reserved.
Activating a Receiver
• BeforethecustomercanstartenjoyingsatelliteTV,he/shemust
activatethereceiver
(afterthesystemhasbeeninstalled)
.
• Don’tforgettogivethecustomertheredActivationCard,which
comesattachedtothebackofthereceiver.Thecustomerneeds
thiscardinordertoactivatethereceiver.
• BesuretoaffixtheantennaserialnumberlabeltotheActivation
Card.
• KVH’sActivationDepartment:1-866-551-8004
Replacing a Receiver
• FirstcallKVHTechnicalSupportat1-401-847-3327(press3,5,
then1toskiptherecording).
• Beforeyoureturnareceiver,pleasefillouttheTracVisionA5
ReceiverReturnForm
(seeTechnicalBulletin04_T_LND_12V_1)
andfaxittoKVHat1-401-845-8133.KVHneedsthisinformation
beforeitcanshipareplacement.
• Besuretotellthecustomerthathe/shemustcallKVHtoactivate
thenewreceiveranddeactivatetheoldreceiver(ifitwas
activated).Onlythecustomercanactivate/deactivateareceiver.
• DIRECTVwillcontinuetobillthecustomeruntilhe/she
deactivatestheoldreceiver.
Using the Receiver
Effective April 2004
Subject to change without notice
Activation & Operation

54-0239 TracVision A5 Shop Manual © 2004 KVH Industries, Inc., All rights reserved.
• Don’tforgettogivethecustomertheActivationCard!The
customermustcallKVHat1-866-551-8004 toactivate.
• Makesurethecustomerunderstandshowtousetheremote
controlandhowtoturnonandoperatetheTracVisionA5.Refer
tothe QuickStartGuide andUser’sGuide.
• Letthecustomerknowthenewheightofthevehiclewiththe
antennainstalled.
• Itisdangerous towatchtelevisionoroperatetheremotecontrol
whiledrivingavehicle.TheTracVisionA5isdesignedforrear-
seatentertainmentonly.
• Donotmovethevehiclefor20secondsafterturningonthe
TracVisionA5.Thisallowstheantennagyrostoinitializeproperly.
• TheantennatrackstheDIRECTV101Wsatellite.Itcannotreceive
channelsonothersatellites.
• Theantennamusthaveaclearview
ofthesouthernskytoreceive
satellitesignals.Commoncausesof
blockageincludetrees,buildings,
overpasses,tunnels,andmountains.
Thesystemwillnotworkinsidea
garage.
• Heavyrain,dew,snow,oricemaytemporarilyinterruptreception
or,ifstartingup,impairtheantenna’sabilitytofindthesatellite.
What to Tell the Customer
Effective April 2004
Subject to change without notice
Activation & Operation

54-0239 TracVision A5 Shop Manual © 2004 KVH Industries, Inc., All rights reserved.
DO...
• DOremoveallwireshippingrestraintsfromunderneaththe
antenna.
• DOgetanotherperson’shelptolifttheantenna.
• DOinstallallthreeTORXscrewsateachmountingbracket.
• DOapplythreadlocker(Loctite425)tothethreadsofthe
mountingscrewsifyouarereusingthem.
Becarefulnottodrip
threadlockeronthevehicle.
• DOallowatleast1"clearancebetweenantennaandroof.
• DOmakesuretheantennaissecurelyattachedtothevehicle.
• DOmakesuretheroofrackcrossbarsaresecurelyfastenedto
thevehicle,ifyouaremountingtheantennatotheroofrack.
• DOinformthecustomerofthevehicle’sheightwiththeantenna
installed.
DO NOT...
• DO NOTfliptheantennaupsidedowntoremoverestraints.
• DO NOTattempttolifttheantennabyyourself.
• DO NOTuseanysubstitutemountinghardware.
• DO NOTtwistorbendtheantennaframe.
Do’s and Don’ts - Antenna
Effective April 2004
Subject to change without notice
Do’s & Don’ts

54-0239 TracVision A5 Shop Manual © 2004 KVH Industries, Inc., All rights reserved.
DO NOT...
• DO NOTmounttheantennatoaslopedsurface.
• DO NOTtilttheantennagreaterthan45°oncetherestraintsare
removed.
• DO NOT painttheantenna.
• DO NOTuseKVH’sroof-mountkitiftheroofisgreaterthan
3
/16"
thick.
• DO NOTinstalltheantennaonan18-wheel,commercialtruck.
Theexcessivevibrationexperiencedonthesevehicleswillimpair
theantenna’sabilitytotrackthesatellite.
• DO NOTmounttheantennasidewaysonthevehicle’sroof.Be
suretheconnectorisfacingtherearofthevehicle.Thefrontof
theantennaisaerodynamicallydesignedfortheleastnoiseand
bestmoistureprotection.
• DO NOTuseabrasivecleaners,volatilesolvents(suchasmethyl
alcohol),orcompoundsthatreactwithplasticwhencleaningthe
antenna.
Do’s and Don’ts - Antenna (cont’d)
Effective April 2004
Subject to change without notice
Do’s & Don’ts

54-0239 TracVision A5 Shop Manual © 2004 KVH Industries, Inc., All rights reserved.
DO...
• DOinstallthereceiverinadry,well-ventilatedareaawayfromany
heatsources.
• DOallowatleast2inchesofemptyspacearoundthereceiverfor
ventilation.
• DOplacetheRFconverteratleast3feetawayfromthereceiver.
• DOsetuptheprogramguideforthecustomer’stimezone(see
page8.11oftheTracVisionA5User’sGuide).
• DOgivetheActivationCardtothecustomer.Besuretoaffixthe
antennaserialnumberlabeltothecard.
• DOorderanadditionalA5receiverfromKVHifthecustomer
requeststworeceivers.
• DObesuretoreadcarefullythe“Power”Do’sandDon’ts.
DO NOT...
• DONOTinstallthereceivernearaheatvent.
• DO NOT installthereceiverinanenclosedspacewithno
ventilation.
• DO NOTplacetheRFconverterbehindametalsurfaceorinan
areasurroundedbymetal(e.g.,underaseat).
Do’s and Don’ts - Receiver
Effective April 2004
Subject to change without notice
Do’s & Don’ts

54-0239 TracVision A5 Shop Manual © 2004 KVH Industries, Inc., All rights reserved.
DO...
• DOterminatetheantennacablewiththesuppliedSnap-N-Seal
F-connector.
• DOuseanAugattooltoinstallF-connectors.
• DOchecktheintegrityoftheF-connectors.Resistancemeasured
betweencenterconductorandshieldshouldindicateanopen
circuit.
• DOmaintainabendradiusofatleast3"whenroutingtheantenna
cable.
• DOusehigh-qualityvideocablesbetweenreceiverand
monitor(s).
• DOtightenallconnectionsadequately.
• DOusetherubberboottoprotecttheantennaconnector.
DO NOT...
• DO NOT useascrew-on,push-on,twist-on,oranyotherover-the-
counterconnectortoterminatetheantennacable. Low-quality
connectorswilldegradesystemperformanceandmaydamage
theTracVisionequipment.
• DO NOTkinkorstresstheantennacable.
Do’s and Don’ts - Wiring
Effective April 2004
Subject to change without notice
Do’s & Don’ts

54-0239 TracVision A5 Shop Manual © 2004 KVH Industries, Inc., All rights reserved.
DO NOT...
• DO NOTroutetheantennacablewhereitmaybecomechafed.
• DO NOTdisconnectthetwoshortcablesthatconnectfromone
jacktoanotheronthereceiver’srearpanel.Thesystemwillnot
workifthesecablesaredisconnected.
• DO NOTconnectanyothertypeofreceivertotheTracVision
system.
Do’s and Don’ts - Wiring (cont’d)
Effective April 2004
Subject to change without notice
Do’s & Don’ts

54-0239 TracVision A5 Shop Manual © 2004 KVH Industries, Inc., All rights reserved.
DO...
• DOremovethekeyfromtheignitionandremovethenegative
leadfromthevehicle’sbatterybefore connectingthereceiver
powercable.
• DOconnectthereceiverpowercable’sred(positive)wireto
+12VDCswitched(accessory)power.
• DOconnectthereceiverpowercable’sblack(negative)wiretoa
baremetalchassisground(suchasapillargroundscrew)within
18"ofthereceiver.
• DOusefire-resistantAWG8wire,installaprotectivefuse(rated
for6amps)within18"ofthebattery,andinstallarelay,switched
fromtheignition,betweenthebatteryandthereceiver,ifyouare
connectingthereceivertothebattery.
DO NOT...
• DO NOTconnectthereceivertounswitchedpower.
• DO NOTwireanyotherdevicetothesamepowercircuit.
• DO NOT connectthereceiverdirectlytothebatterywithout
followingtheadditionalstepsdescribedabove.
• DO NOTuseinadequateAWGwiring.
• DO NOT groundanyotherdeviceatthesamegroundingpointas
thereceiver.
Do’s and Don’ts - Power
Effective April 2004
Subject to change without notice
Do’s & Don’ts
/