
USER MANUAL
MANUAL DE USUARIO
BEDIENUNGSANLEITUNG
MODE D’EMPLOI
HANDLEIDING
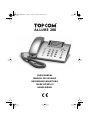
ALLURE 200
All_200NFEDSp.book Page 1 Tuesday, February 3, 2004 10:42 AM

2 Allure 200
100 300 600
FLASH
+
+-
3XAAA Alkaline Batteries
(Not Included)
-
16
17
18
100 300 600
FLASH
+
+-
3XAAA Alkaline Batteries
(Not Included)
-
16
17
18
100 300 600
FLASH
+
+-
3XAAA Alkaline Batteries
(Not Included)
-
16
17
18
100 300 600
FLASH
+
+-
3XAAA Alkaline Batteries
(Not Included)
-
16
17
18
100 300 600
FLASH
+
+-
3XAAA Alkaline Batteries
(Not Included)
-
16
17
18
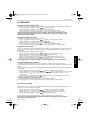
1
M3
M1 M2
M4
M5
M6
M7
M8
2
3
4
5
6
7
8
9
ABC
DEF
GHI
JKL
MNO
PQRS
TUV
WXYZ
0
#
VIP
Allure 200
Ø
/P
R
+
-
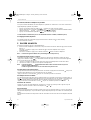
1
2
4
5
3
6
7
8
9
10
11
12
13
14
15
All_200NFEDSp.book Page 2 Tuesday, February 3, 2004 10:42 AM

Topcom Allure 200
3
Topcom Allure 200
1 BUTTONS/LED 4
2 DISPLAY 4
3 INSTALLATION 4
3.1 BATTERY INSTALLATION 4
3.2 INITIALIZATION 4
a. Display language 4
b. Memory capacity 4
4 SETTINGS 5
4.1 SETTING THE LANGUAGE OF THE DISPLAY TEXT. 5
4.2 SETTING THE DISPLAY CONTRAST. 5
4.3 SETTING THE DATE AND TIME 5
4.4 SETTING THE LOCAL PREFIX (5 DIGITS) 5
4.5 SETTING THE LONG PREFIX 6
4.6 PARALLEL TELEPHONE ALLOW/FORBID 6
4.7 TONE/PULS SETTING 6
5 MAKING A PHONE CALL 6
5.1 LAST NUMBER REDIAL 6
5.2 DEACTIVATING THE MICROPHONE (MUTE) 6
5.3 MUSIC ON HOLD. 6
5.4 RINGER VOLUME 7
5.5 FLASH KEY 7
6 CALLER ID 7
6.1 GENERAL INFORMATION 7
6.2 CALL LIST 7
6.2.1 Scrolling through the Call List 7
6.2.2 Calling a number from the Call List 7
6.2.3 Erasing numbers from the Call List 7
6.3 VIP LIST 7
6.3.1 Assigning a number to the VIP list. 7
6.3.2 Selecting and calling a number from the VIP List 7
6.3.3 Erasing individual numbers from the VIP List 8
6.4 VOICE MAIL 8
7 PHONE BOOK 8
7.1 USE OF THE ALPHANUMERICAL KEYPAD 8
7.2 ADDING A NUMBER TO THE PHONE BOOK 8
7.3 SELECTING AND CALLING A NUMBER FROM THE PHONE BOOK. 8
7.4 CHANGING A NUMBER AND NAME FROM THE PHONE BOOK 8
7.5 ERASING A NUMBER AND NAME FROM THE PHONE BOOK 8
8 MEMORY NUMBERS 9
8.1 ADDING A NUMBER TO A DIRECT MEMORY 9
8.2 CALLING A DIRECT MEMORY NUMBER 9
9 SLEEP MODE 9
10 ALARM 9
11 SAFETY INSTRUCTIONS 9
12 CLEANING 9
13 WARRANTY 10
13.1 WARRANTY PERIOD 10
13.2 WARRANTY HANDLING 10
13.3 WARRANTY EXCLUSIONS 10
14 TECHNICAL DATA 10
The CE symbol indicates that the unit complies with the essential requirements of the R&TTE directive.
All_200NFEDSp.book Page 3 Tuesday, February 3, 2004 10:42 AM

4 Topcom Allure 200
Topcom Allure 200
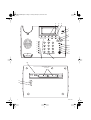
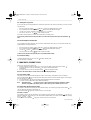
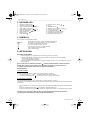
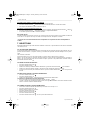
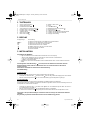
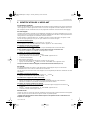
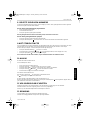
1BUTTONS/LED
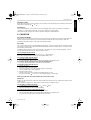
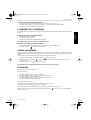
2 DISPLAY
Display information Description
You received new messages in the telephone network mailbox
XX NEW You have received ‘XX’ new messages in your call list
REP You have received the call more than once
VIP You have selected the number as VIP
The battery is almost empty and needs to be replaced
The handsfree function is activated
The alarm is enabled
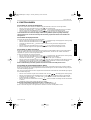
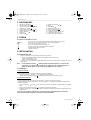
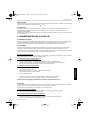
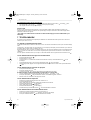
3 INSTALLATION
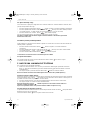
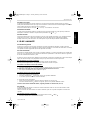
3.1 Battery installation
• Put batteries in the battery compartment to activate the display :
- Open the battery compartment at the bottom of the unit using a screwdriver.
- Insert 3 AAA Alcaline batteries (1,5V).
- Close the battery compartment.
Connect one end of the line cord to the telephone line wall socket and the other end to the bottom of the phone.
Note:When the battery indicator is shown, the batteries must be replaced. When the batteries are
removed, you have 5 minutes to replace them. After that time, the memory will be lost.
Never change batteries when the telephone line is connected !
3.2 Initialization
a.
Display language
After installing the batteries, the default display language is shown.
• Use the Up or Down button to select the desired display language.
• Press the Handsfree button to go to the next setting ‘Memory capacity’
b. Memory capacity
The maximum capacity of the Allure 200 is 110 entries including names and numbers.
This number can be dedicated to the Phonebook and/or the Caller ID list. In this setting you have to select the capacity
of the Phonebook.
• Use the Up or Down button to select the phonebook memory ‘MAX DATABANK = XXX (default 032)’
• Press the Handsfree button to confirm the phonebook memory.
• The Caller ID list memory size will be displayed briefly and the unit will go to standby mode.
To have access to the memory setting, you have to remove the batteries for more than 10 minutes.
All stored information will be erased after initialisation.
1‘Handsfree’ indicator
2‘New Calls’ indicator
3Direct Memory buttons (M1-M8)
4 Music on Hold button
5 Volume Down / VIP button /VIP
6 Volume Up / Delete button /
7 Phone Book button
8 Up button
9 Down button
10 Dial / Alarm button /
11 Flash
12 Mute button
13 Redial / Pause button
14 Handsfree button
15 Alphanumerical keyboard
16 Ring volume switch
17 Flash time switch
18 Telephone line input
All_200NFEDSp.book Page 4 Tuesday, February 3, 2004 10:42 AM

Topcom Allure 200 5
Topcom Allure 200
ENGLISH
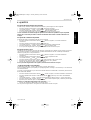
4 SETTINGS
4.1 Setting the language of the display text.
When you did not change the language during initialisation, you can select it as follow:
• Press the Volume Up / Delete / button for 3 seconds.
• Use the Up or Down to select the desired display language
• Press the Volume Up / Delete / button to go to the next setting.
•If no button is pressed within 10 seconds, the unit will return to standby mode.
!!! Only the words on the 3rd line of the display will be indicated in the selected language. In standby the
display will indicate ‘ALL CALLS 000’ for indicating the number of stored calls in the call list only in
English.
4.2 Setting the display contrast.
You can select the desired contrast as follows:
• Press the Volume Up / Delete / button for 3 seconds, the display language is shown.
• Press the Volume Up / Delete / button again.
• Use the Up or Down button to select the desired display contrast.
• Press the Volume Up / Delete button / to go to the next setting.
•If no button is pressed within 10 seconds, the unit will return to standby mode.
4.3 Setting the Date and Time
When you have a subscription to the Caller ID service and your telephone provider sends the date and time together
with the telephone number, the phone’s clock will be set automatically. The year must always be set manually.
It is also possible to set the clock manually:
• Press the Volume Up / Delete / button for 3 seconds, the display language is shown.
• Press the Volume Up / Delete / button 2 times. The year will blink.
• Use the Up or Down button to select the year.
• Press the Volume Up / Delete / button confirm the year and change to month.
• Repeat the previous steps for changing and confirming month, day, hour and minutes.
•After confirming the minutes, you will go to the next setting.
If no button is pressed within 10 seconds, the unit will return to standby mode.
4.4 Setting the Local Prefix (5 digits)
The Local prefix must be set, when you are not allowed to dial out your own area code.
If there is an incomming call, starting with the programmed prefix, the code will not be displayed and not be stored in
the call list.
ex. When 012 is programmed and 0123456789 is the incomming call number, 3456789 is displayed and stored in the
call list.
• Press the Volume Up / Delete / button for 3 seconds, the display language is shown.
• Press repeatedly the Volume Up / Delete / button until ‘SET LOCAL CODE ‘ is display.
• Use the Up or Down button to select the first digit of the local code (0-9 or ‘-’ to unselect)
• Press the Volume Up / Delete / button confirm the first digit and change next digit.
• Repeat the previous steps for the other digits (max. 5 digits).
When no local prefix is used set (- - - - -).
•After confirming the last digit, you will go to the next setting.
If no button is pressed within 10 seconds, the unit will return to standby mode.
All_200NFEDSp.book Page 5 Tuesday, February 3, 2004 10:42 AM

6 Topcom Allure 200
Topcom Allure 200
4.5. Setting the Long Prefix
If you need to dial out a one digit prefix before a telephone number from the call list or phonebook, you have to set the
Long Dial Prefix.
• Press the Volume Up / Delete / button for 3 seconds, the display language is shown.
• Press repeatedly the Volume Up / Delete / button until ‘LONG PRFIX‘ is display.
• Use the Up or Down button to select prefix (0-9 or ‘-’ to unselect)
• Press the Volume Up / Delete / button confirm the prefix.
If no button is pressed within 10 seconds, the unit will return to standby mode.
To dial out the prefix before the selected number out of the call list of phonebook, press the dial button
twice.
4.6 Parallel telephone allow/forbid
You can forbid that another telephone can be placed in parallel with the allure 200. If you activate this function the
parallel telephone call will be disturbed.
• Press the Volume Up / Delete / button for 3 seconds, the display language is shown.
• Press repeatedly the Volume Up / Delete / button until ‘Parallel Allow‘ is display.
• Use the Up or Down button to select ‘Parallel Forbid’
• Press the Volume Up / Delete / button confirm the setting
!!!! This function will not work when the phone is installed behind a PABX.
4.7 Tone/Puls setting
To change the dial mode, press the mute key briefly in standby mode.
The selected mode is displayed.
5MAKING A PHONE CALL
There are 2 ways to make a phone call :
1. Enter the telephone number. If needed, you can erase the last digits by pressing the Erase button .
Pick up the handset or press the Dial button . The phone number will be dialled
automatically.
2. Pick up the receiver or press the Handsfree button . Enter the telephone number.
Note: The call duration timer is shown on the 1e line of the display [h:mm:ss].
5.1 Last number redial
The Allure 200 saves the 8 last dialled telephone numbers in the memory with indication of the call duration.
Press the Redial button to scroll through the Redial memory. When the desired number appears on the display,
there are two ways to call back :
1. Press the Dial button . The desired number will be dialled automatically in handsfree.
2. Pick up the receiver. The number will be dialled automatically.
Note: The Redial button can also be used as a Pause button while entering a telephone number !
The letter ‘P’ appears on the display on the location where you have added a pause of 3 sec.
5.2 Deactivating the microphone (mute)
It is possible to deactivate the microphone of the handset during a conversation by pressing the Mute button . You
can now talk freely without the caller hearing you.
Press the Mute button again if you want to resume your conversation.
5.3 Music on hold.
It is possible to put the caller on Hold during a conversation by pressing the Music on Hold button . You can now
talk freely without the caller hearing you. The caller will hear a digital melody. The melody can be changed by pressing
the Up or Down button.
Press the Music on Hold button again if you want to resume your conversation.
All_200NFEDSp.book Page 6 Tuesday, February 3, 2004 10:42 AM

Topcom Allure 200 7
Topcom Allure 200
ENGLISH
5.4 Ringer volume
When you receive a phone call, the unit will ring. The ring volume can be adjusted by means of the Ring Volume switch
at the bottom of the phone (Hi- , Lo- ).
5.5 Flash Key
Press the Flash button (R) to use certain services as ‘Call Waiting’ (if this service is provided by your telephone
company); or to transfer phone calls when you are using a telephone exchange (PABX).
The flashtime can be selected by the switch on the bottom of the phone (100/300/600ms).
6 CALLER ID
6.1 General information
When you have a subscription to the Caller ID service, the caller’s phone number and name (when supported by the
network) will appear on the display. If you saved the telephone number with the name in the Phone Book, the
programmed name will be shown on the display (name tagging function).
6.2 Call list
The size of the call list has been set when initializing the telephone. The phone numbers you have received more then
once, will not be stored, but the repeat indicator REP will be displayed. Every incoming number is saved in the Call List
with indication of date and time.
In standby mode the number of received calls is shown on the display ‘ALL CALLS 000 (always English). The new
message LED will blink until you have checked all New messages.
6.2.1 Scr
olling through the Call List
You can scroll through the Call list by pressing the Up - or Down button.
If no button is pressed within 15 seconds, you will return to standby mode.
6.2.2 Calling a n
umber from the Call List
• Select the desired telephone number.
• Press the Dial button . The number will be dialled automatically in handsfree mode.
If you want to dial the long prefix (see 4.5), press the dial button twice.
•Pick up the handset if you want to communicate over the handset.
6.2.3 Erasing n
umbers from the Call List
a) Erasing one number
• Select the number you wish to erase.
• Press the Erase button briefly. “ERASED” appears on the display.
• The next number in the call list is displayed.
b) Erasing the entire Call List
• Enter the Call List and select a number not indicated with VIP (see 6.3)
• Press the Erase button for 2 seconds , “ALL ERASED“ appears on the display.
When erasing the entire call list, VIP numbers will remain saved (see 6.3).
6.3 VIP list
Numbers can be protected to be removed out of the call list when selecting ‘erase all’. Therefore the number must be
assigned as VIP.
All VIP numbers are visible in the Call list, but can also be checked in a separate VIP list.
6.3.1 Assigning a n
umber to the VIP list.
• Scroll through the Call list by pressing the Up or Down button.
• Press the VIP button. The VIP icon will be displayed.
6.3.2 Selecting and calling a n
umber from the VIP List
• Press the VIP button repeatedly to scroll through the VIP list
• Press the Dial button . The number will be dialled automatically in handsfree mode.
•Pick up the handset if you want to communicate over the handset.
All_200NFEDSp.book Page 7 Tuesday, February 3, 2004 10:42 AM

8 Topcom Allure 200
Topcom Allure 200
6.3.3 Erasing individual numbers from the VIP List
• Select the VIP number you wish to erase out of the Call list by pressing the Up or Down button.
• Press the Erase button briefly. “ERASED” appears on the display.
• The next number in the call list is displayed.
6.4 Voice mail
When you have received a voice mail message in your Personal Voice Mail Box, the Voice Mail symbol appears on
the display. As soon as you have listened to the messages in the mailbox, the symbol disappears.
* Voice mail is a network feature. Check with your network operator if this is available on your line.
7 PHONE BOOK
The size of the phonebook has been set when initializing the telephone. Default, 32 telephone numbers with name can
be stored (see 3.2).
7.1. Use of the alphanumerical keypad
Use the alphanumerical keypad to enter text. To select a letter, press the corresponding button. For ex. if you press
numerical button ‘5’, the first character (J) will be shown on the display. Press multiple times if you want to select
another character under this button.
Press button ‘2’ twice to select the letter ‘B’. If you want to select ‘A’ as well as ‘B’, press
button ‘2’ once to select ‘A’, wait for 2 seconds until the cursor has moved to the next location and press then button ‘2’
twice to select ‘B’. To add a space, press 1. Wrong entered characters can be erased by pressing the Erase button .
7.2 Adding a number to the Phone Book
• Press the Phonebook button .
• Press the Up button
• Enter the name by means of the alphanumerical keypad and press the Phonebook button to confirm.
• Enter the desired telephone number and press the Phonebook button to confirm.
•Follow the previous steps for adding another number or press the Phonebook button twice to leave the
setting.
7.3 Selecting and calling a number from the Phone Book.
• Press the Phone Book button
• Press the Down button
• Enter the first letter of the desired name by means of the alphanumerical keypad.
Numbers will be sorted on the first letter only.
• Search for the name in the Phone Book by pressing the Up or Down button.
•When the desired name is shown on the display, pick up the handset or Press the handsfree button. The number
will be dialled automatically.
7.4 Changing a number and name from the Phone Book
• Select the desired number from the Phone Book by name as mentioned in 7.3.
• Press the Phonebook button
• Edit the name when necessary.
• Press the Phonebook button
• Edit the number when necessary.
• Press the Phonebook button
• Press the Phonebook button twice to leave the phonebook.
7.5 Erasing a number and name from the Phone Book
• Select the desired number from the Phone Book by name as mentioned in 7.3.
• Press the Erase button for 2 seconds , “ERASED“ appears on the display.
• Press the Phonebook button to leave the menu.
All_200NFEDSp.book Page 8 Tuesday, February 3, 2004 10:42 AM

Topcom Allure 200 9
Topcom Allure 200
ENGLISH
8MEMORY NUMBERS
You can program 8 Direct numbers (max 16 digits). These memory numbers can be dialled by pressing M1-M8.
8.1 Adding a number to a Direct Memory
• Press M1 for 2 seconds.
• Enter the telephonenumber.
• Press the desired Direct Memory key (M1-M8)
Direct memories can only be overwritten not erased.
8.2 Calling a Direct Memory number
• Press the desired Direct Memory key, the stored number is displayed.
• Press handsfree or pick up the handset.
9 SLEEP MODE
To avoid that you are disturbed during a specific period, you can activate the sleep mode. The telephone will not ring
during sleep mode, except for calls dedicated as VIP in the call list. VIP calls will always ring.
Once the sleep mode time is past, the telephone will always ring.
• Press the Music on Hold/Sleep button for 2 seconds
• Press the Sleep button repeatedly to select the sleep time (0-24 hours in steps of 1 hour)
• Press the dial key to confirm the setting
To disable the sleep mode, follow the same steps and select 00-00
10 ALARM
The allure 200 has an alarm function.
To set the alarm
• Press the alarm button for 2 seconds
• Press the Up or Down button to select the hour
• Press the alarm button to confirm
• Press the Up or Down button to select the minutes
• Press the alarm button to confirm
To activate/deactivate the alarm
Press the alarm button briefly to switch the alarm On or Off.
When ON, the alarm icon is shown on the display.
The alarm sound is the same melody as the ‘music on hold’ melody (see 5.3)
When the alarm sound is heard, press the handsfree button twice, otherwise the melody will continue for one minute.
11 SAFETY INSTRUCTIONS
Do not place the basic unit in a damp room or at a distance of less than 1.5 m away from a water source. Keep water
away from the telephone.
Do not use the telephone in environments where there is a risk of explosions.
Dispose of the batteries and maintain the telephone in an environment-friendly manner.
12 CLEANING
Clean the telephone with a slightly damp cloth or with an anti-static cloth. Never use cleaning agents or abrasive
solvents.
All_200NFEDSp.book Page 9 Tuesday, February 3, 2004 10:42 AM

10 Topcom Allure 200
Topcom Allure 200
13 WARRANTY
13.1 WARRANTY PERIOD
The Topcom units have a 24-month warranty period. The warranty period starts on the day the new unit is purchased.
The warranty on batteries is limited to 6 months after purchase. Consumables or defects causing a negligible effect on
operation or value of the equipment are not covered.
The warranty has to be proven by presentation of the original purchase receipt, on which the date of purchase and the
unit-model are indicated.
13.2 WARRANTY HANDLING
A faulty unit needs to be returned to a Topcom service centre including a valid purchase note.
If the unit develops a fault during the warranty period, Topcom or its officially appointed service centre will repair any
defects caused by material or manufacturing faults free of charge.
Topcom will at its discretion fulfil its warranty obligations by either repairing or exchanging the faulty units or parts of
the faulty units. In case of replacement, colour and model can be different from the original purchased unit.
The initial purchase date shall determine the start of the warranty period. The warranty period is not extended if the unit
is exchanged or repaired by Topcom or its appointed service centres.
13.3 WARRANTY EXCLUSIONS
Damage or defects caused by incorrect treatment or operation and damage resulting from use of non-original parts or
accessories not recommended by Topcom are not covered by the warranty.
Topcom cordless phones are designed to work with rechargeable batteries only. The damage caused by the use of
non-rechargeable batteries is not covered under warranty.
The warranty does not cover damage caused by outside factors, such as lightning, water and fire, nor any damage
caused during transportation.
No warranty can be claimed if the serial number on the units has been changed, removed or rendered illegible.
Any warranty claims will be invalid if the unit has been repaired, altered or modified by the buyer or by unqualified, non-
officially appointed Topcom service centres.
14 TECHNICAL DATA
Dialling options: DTMF (tone)/PULSE
Flash: 100/300/600ms
Batteries: 3 x 1.5V, AAA non-rechargeable
Ambient temperature: +5 °C to +45 °C
Permitted relative air humidity: 25 to 85 %
Always call hotline first, before returning the unit for service.
All_200NFEDSp.book Page 10 Tuesday, February 3, 2004 10:42 AM
Page is loading ...
Page is loading ...
Page is loading ...
Page is loading ...
Page is loading ...
Page is loading ...
Page is loading ...
Page is loading ...
Page is loading ...
Page is loading ...
Page is loading ...
Page is loading ...
Page is loading ...
Page is loading ...
Page is loading ...
Page is loading ...
Page is loading ...
Page is loading ...
Page is loading ...
Page is loading ...
Page is loading ...
Page is loading ...
Page is loading ...
Page is loading ...
Page is loading ...
Page is loading ...
Page is loading ...
Page is loading ...
Page is loading ...
Page is loading ...
Page is loading ...
Page is loading ...

This product is in compliance with the essential requirements and other relevant provisions of the R&TTE directive 1999/5/EC.
The Declaration of conformity can be found on :
http://www.topcom.net/support/cedeclarations.php
All_200NFEDSp.book Page 43 Tuesday, February 3, 2004 10:42 AM

U8006191
All_200NFEDSp.book Page 44 Tuesday, February 3, 2004 10:42 AM
-
 1
1
-
 2
2
-
 3
3
-
 4
4
-
 5
5
-
 6
6
-
 7
7
-
 8
8
-
 9
9
-
 10
10
-
 11
11
-
 12
12
-
 13
13
-
 14
14
-
 15
15
-
 16
16
-
 17
17
-
 18
18
-
 19
19
-
 20
20
-
 21
21
-
 22
22
-
 23
23
-
 24
24
-
 25
25
-
 26
26
-
 27
27
-
 28
28
-
 29
29
-
 30
30
-
 31
31
-
 32
32
-
 33
33
-
 34
34
-
 35
35
-
 36
36
-
 37
37
-
 38
38
-
 39
39
-
 40
40
-
 41
41
-
 42
42
-
 43
43
-
 44
44


Ask a question and I''ll find the answer in the document
Finding information in a document is now easier with AI
in other languages
- français: Topcom 200 Le manuel du propriétaire
- español: Topcom 200 El manual del propietario
- Deutsch: Topcom 200 Bedienungsanleitung
- Nederlands: Topcom 200 de handleiding
Related papers
Other documents
-
Emerson EM-50 User manual
-
Alcatel 29446 Owner's manual
-
SWITEL TF550 User manual
-
Profoon TX-230 User manual
-
National Geographic IN103TOP User manual
-
Doro AFTI 22 User guide
-
-
-
ATLINKS TEMPORIS 10 Owner's manual
-
BELGACOM MAESTRO 2005 User manual