Page is loading ...
Page is loading ...
Page is loading ...
Page is loading ...

5
Nespresso Art. FNA1
Deutsch 6
English 11
Français 16
Nederlands 21
Español 26
Italiano 31
FNA1.som.PM6.5 18/02/04, 9:405
Page is loading ...
Page is loading ...
Page is loading ...
Page is loading ...
Page is loading ...

11
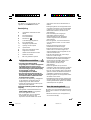
English
Thank you for chooinsg this appliance from
the KRUPS range.
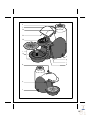
Description
a Removable water tank with lid
b Function selector
c Start/ stop switch
d «Steam» function button « »
e Temperature indicator light
f Capsule holder head
f1 opening and closing handle
f2 capsule cage
f3 capsule holder
g Steam /hot water nozzle
h Cappuccino accessory
i Drip tray with removable grille
i1 fill indicator
j Container for used capsules
Safety advice
•Please read these instructions carefully
before using your appliance for the first
time and retain them for future use: any
use which does not conform to the
instructions will absolve KRUPS from
any liability.
•Do not leave this appliance within reach
of unsupervised children. The use of this
appliance by young children or by
disabled persons must be supervised at
all times.
• Check that the voltage indicated on the
information plate on the appliance does in
fact match that of your electrical system.
•Only use an earthed socket to connect the
appliance.
Wiring instructions for U.K and Ireland
only :
APPLIANCES WITH FITTED PLUG
Important : For your convenience this
appliance is supplied complete with a plug
incorporating a 13 amp fuse.
In the event of replacing a fuse in the plug
supplied, a 13 amp fuse approved by ASTA to
BS1362 must be used.
If the socket outlets are not of the 13A BS
1363 type, and therefore do not accept the
plug connected to this appliance, cut off the
plug if moulded type or remove the plug if
connected by screw terminals.
When the plug is a moulded type and this is
cut off from the appliance, the connected
wires are a shock hazard. Do not under any
circumstances connect a cut off plug into the
electrical socket outlet. The cut off plug must
be disposed of in a safe manner that prevents
any form of connection.
If the fuse cover is detachable, never use the
plug with the cover omitted. Replacement
covers can be obtained from your service
agent.
Fit the appropriate plug according to the
instructions in paragraph "Fitting a plug".
With alternative plugs a 15 amp fuse must be
fitted either in the plug or adaptor or at the
main fuse box.
APPLIANCES WITHOUT FITTED PLUG
FITTING A PLUG - IMPORTANT
The wires in the mains lead are coloured in
accordance with the following code:
GREEN & YELLOW : EARTH
BLUE : NEUTRAL
BROWN : LIVE
As the colours in the mains lead of this
appliance may not correspond with the
coloured markings identifying the terminals in
your plug, proceed as follows:
The wire which is coloured GREEN & YELLOW
must be connected to the terminal in the plug
which is marked with the letter ‘E’ or by the
earth symbol or coloured green or green
and yellow. The wire which is coloured BLUE
must be connected to the terminal which is
marked with the letter ‘N’ or coloured black.
The wire which is coloured BROWN must be
connected to the terminal which is marked
with the letter ‘L’ or coloured red.
This appliance is manufactured to conform to
the Low Voltage Electrical Equipment (Safety)
Regulations 1989 and is designed to comply
with BS 3456. It complies with the
requirements of the EEC Directive (89/336/
EEC).
Any connection error will nullify the
guarantee.
FNA1.PM6.5 18/02/04, 9:3911

12
• Your appliance is intended solely for
domestic and indoor use.
•Unplug your appliance as soon as you have
finished using it and when you clean it. Do
not unplug it by pulling on the cord.
•Do not use the appliance if it is not working
correctly, or if it has been damaged. If this
happens, please contact an approved KRUPS
service centre (see list in the service booklet).
•Any intervention other than normal cleaning
and maintenance by the customer must be
carried out by an approved KRUPS service
centre.
•Do not place the appliance, the power cord
or the plug in water or in any other liquid.
•Do not allow the cord to hang down within
reach of children.
•The power cord must not be close to or in
contact with the hot parts of your appliance,
close to a source of heat or resting on a
sharp edge.
•If the power cord or the plug are damaged,
do not use the appliance. To prevent any
risk, you must have these replaced by an
approved KRUPS service centre (see list in
the service booklet) .
•Do not place the appliance on a hot surface
such as a hotplate and never use it close to a
naked flame.
•For your own safety, please use only the
KRUPS accessories and spare parts which are
suitable for your appliance.
•Do not use the appliance when the drip tray
and the grille are not in place.
•All KRUPS appliances are subjected to strict
quality controls. Practical user tests are done
with appliances selected at random, which
explains any signs of use.
Before first use
It is recommended that you first rinse the
water heating system:
•Take the water tank (a) and fill it with cold
water (1).
•Replace the tank (a) by positioning it firmly
such that the connecting valve situated
beneath the tank opens.
•Plug in the appliance and set the switch (c)
to «I». The temperature indicator light (e)
flashes (green).
The capsule-holder head (f) must be closed
and empty.
•Place a fairly large container under the
coffee outlet.
Once the appliance reaches the correct
temperature, the temperature indicator light
(e) becomes fixed (green).
•Set the function selector (b) to the « »
position and allow half the tank to run
through.
•When the container is full, set the function
selector (b) to the central position and empty
the container.
•Then place the container under the steam/
hot water nozzle (g). Turn the nozzle
outwards if necessary.
•Set the function selector (b) to the « »
position and allow the other half of the tank
to run through.
•When the container is full, set the function
selector (b) to the central position and empty
the container.
•If necessary repeat the operation until the
tank has been completely emptied.
•Reset the switch (c) to «0».
Using the various functions of
your appliance
. THE ESPRESSO FUNCTION
• Fill the tank (a) with fresh water (1) and set
the switch (c) to «I». The temperature
indicator light (e) flashes (green).
•Raise the handle (f1) to open the capsule-
holder head (f) (2).
•Place a NESPRESSO capsule on the holder
(f3) (3) (flat side down) and lower the
handle (f1) (2).
• Place a cup under the coffee outlet.
Once the appliance reaches the correct
temperature, the temperature indicator light
(e) becomes fixed (green).
•Set the function selector (b) to the « »
position. The coffee starts to flow.
•You can stop the flow by returning the
function selector (b) to the central position.
FNA1.PM6.5 18/02/04, 9:3912

13
• Raise the handle (f1) to eject the used
capsule which will automatically be collected
in the container (j). This container can hold a
maximum of 12 capsules. We advise you to
empty it at regular intervals.
Tips :
• Water quality is vital for a good espresso, so
we recommend that you use only fresh cold
water.
• Preheat the cups before making
espresso, as this will help it to retain its
temperature. A simple way to do this : first
fill the cups with hot water (see paragraph
«The Hot Water Function »).
. THE STEAM FUNCTION
You can use the steam function to:
. easily obtain milk with more or less froth to
make a cappuccino or a café crème,
. heating liquids.
Practical tips :
. Cappuccino : 1/3 coffee, 1/3 hot milk, 1/3
milk foam.
. Café crème : 1/2 coffee, 1/2 hot milk, not
too frothy.
1. Frothing milk
•For best results, make sure the cappuccino
accessory (h) is correctly positioned on the
end of the steam/hot water nozzle (g). This
accessory must only be used for foaming
milk.
•Fill the tank (a) with fresh water (1) and
position the switch (c) to «I». The
temperature indicator light (e) flashes
(green).
•Press the « » function button (d) : The
temperature indicator light (e) turns yellow
and flashes.
•Pour the desired quantity of skimmed or
semi-skimmed milk into a narrow jug which
will fit beneath the nozzle (g). Both the
milk and the jug should be nice and
cold.
Once the appliance reaches the correct
temperature, the temperature indicator light
(e) becomes fixed (yellow).
•Immerse the tip of the nozzle (g) in the milk
(4).
•Set the function selector (b) to the position
« ». The tip must not touch the bottom of
the container so as not to prevent the
passage of steam.
•Once you have obtained the foam, reset the
function selector (b) to the central position
and remove your jug.
•Immediately after use, remove the cappuc-
cino accessory (h) and clean the steam/hot
water nozzle (g) using a damp sponge. You
can also produce steam for a moment,
pointing the nozzle (g) towards the grille, in
order to eliminate any remaining trace of
milk.
2. Heating liquids
We advise you to remove the cappuccino
accessory (h).
•Fill the tank (a) with fresh water (1) and
position the switch (c) to «I». The
temperature indicator light (e) flashes
(green).
•Press the « » function button (d) : the
temperature indicator light (e) turns yellow
and flashes.
Once the appliance reaches the correct
temperature, the temperature indicator light
(e) becomes fixed (yellow).
•Then immerse the tip of the steam/hot water
nozzle (g) in the container holding the liquid
to be heated (5).
•Set the function selector (b) to the « »
setting. Once the liquid is hot, reset the
function selector (b) to the central position.
• For any liquid other than water, clean the
steam/hot water nozzle (g) immediately after
use with a damp sponge. You can also
produce steam for a moment, pointing the
nozzle (g) towards the grille, in order to
eliminate any remaining trace.
3. Important notes
Caution: during and after steam operation,
the nozzle (g) is very hot.
When you no longer wish to use the
steam function :
. press button (d) « ». The temperaturee
indicator light (e) turns green again and
flashes.
FNA1.PM6.5 18/02/04, 9:3913

14
. place a cup beneath the coffee outlet, and
the capsule holder head must be closed and
empty.
. set the function selector (b) to the « »
position.
. once the cup is full, reset the function
selector (b) to the central position.
As soon as the temperature indicator light (e)
becomes fixed (green), you can start to
prepare an espresso or hot water.
. THE HOT WATER FUNCTION
•Fill the tank (a) with fresh water (1) and
position the switch (c) to «I». The
temperature indicator light (e) flashes
(green).
Once the appliance reaches the correct
temperature, the temperature indicator light
(e) becomes fixed (green).
•Place a container under the steam/hot water
nozzle (g).
•Set the function selector (b) to the « »
position : hot water will come out of the
nozzle (g).
•Stop the flow of hot water by returning the
function selector (b) to the central position.
Note :
• Follow this operation to preheat cups before
making an espresso.
Cleaning
•Before doing any cleaning of the appliance,
unplug it.
•Do not wash the accessories of your
appliance in the dishwasher.
• Clean the body of the appliance using a
damp cloth.
• After use, always empty the water tank.
. Drip tray (i) and container for used
capsules (j)
•After every use, the drip tray will fill with
water. This is perfectly normal. The fill
indicator (i1), indicates when to empty the
tray.
•Remove the grille and the fill indicator (i1),
take out the container and empty the drip
tray (6).
• If necessary, clean the drip tray with hot
water and a little non-abrasive washing-up
liquid, rinse and dry. When refitting, put
back the container, the indicator then the
grille.
. The steam / hot water nozzle (g)
Be careful : it may still be burning hot.
•Clean the nozzle after every use using a
damp cloth.
•If the opening in the nozzle outlet is
blocked, clear it using a fine needle.
. Cappuccino accessory (h)
•To completely clean the cappuccino
accessory, separate parts A, B and C (7).
•Rinse the three parts in hot water and dry
them.
•If the small hole in part A is blocked, clean it
using a fine needle.
Descaling
Descale your appliance at regular
intervals !
Descaling your NESPRESSO is essential to
guarantee that your appliance is working at its
best, will last for a long time and produce top
quality coffee.
Depending on how hard the water is in your
region, this descaling should be performed
every two to six months. However, if the
water in your region is very hard or if you use
the appliance a great deal, it would be
advisable to do this more frequently.
The NESPRESSO Club will supply you with a
descaling kit comprising a sachet of descaling
product, a sachet of cleaning product and a
set of instructions for using these products.
You can order this kit in the same way as the
NESPRESSO capsules.
Warning : In no circumstances should you
use vinegar or descalers intended for
other machines.
Use the following method :
The appliance must be plugged in but
switched off (swtich (c) on «0»). It will be
more effective if the appliance is cold.
•Raise the handle (f1) to open the capsule-
holder head (f) (2 ). Take off the capsule
holder (f3) (8a/8b) and lower the handle (f1)
(2).
FNA1.PM6.5 18/02/04, 9:3914

15
• Remove the water tank (a). Fill this with 0.5
litre warm water (1) and carefully mix in the
contents of one sachet of descaler.
•Replace the water tank (a) with its lid.
Then:
. place a medium-sized container under the
coffee outlet.
. position the switch (c) to «I».
. set the function selector (b) to the « »
position.
. allow 1/3 of the descaling solution to run
through.
. position the switch (c) to “0”.
. empty the container. Leave the product to
work for about five minutes.
. repeat this operation twice more until the
descaling solution has been completely
emptied.
• Reset the function selector (b) to the to the
central position.
•Rinse the water reservoir (a) thoroughly and
refill with fresh water.
•Set the switch (c) to «I».
•Place a container under the coffee outlet.
•Set the function selector (b) to the « »
position.
•Allow the contents of the tank to flow
through so as to rinse the water system of
the appliance.
• Raise the handle (f1) to open the capsule-
holder head (f). Replace the capsule holder
(f3).
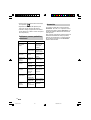
Problems, causes, solutions
Problems Causes Solutions
The espresso is not The cups are Preheat them
hot enough. cold. (see paragraph
«Hot water
function»).
The appliance is Wait until the
not hot. temperature
indicator light
(e) becomes fixed
(green).
There is no head The capsule is past Check the use-by
on the espresso. its expiry date. date of the capsule.
The appliance takes The appliance See chapter
a long time to needs descaling. «Descaling».
heat up
Very loud noise No water in Fill the tank.
from the pump. the tank (a).
The tank (a) has Press firmly on
been badly fitted. the tank.
No hot water or The steam/hot Unblock the hole
steam coming from water nozzle is in the nozzle using
the steam/hot water blocked. a fine needle.
nozzle (g).
The milk is not The milk is not fresh Change the milk.
very foamy. or too warm.
The jug is too warm. Run the jug under
cold water.
There is water The drip tray Empty it at regular
around the (i) is overflowing. intervals.
appliance.
Accessories
We would like to invite you to discover all the
different flavours of NESPRESSO. This is why
your appliance is accompanied by a set of
NESPRESSO cups and saucers and an
assortment of different espressos.
For further information about the various
kinds of coffees on offer, or on the operation
or the maintenance of your machine, please
contact your NESPRESSO Club.
FNA1.PM6.5 18/02/04, 9:3915
Page is loading ...
Page is loading ...
Page is loading ...
Page is loading ...
Page is loading ...
Page is loading ...
Page is loading ...
Page is loading ...
Page is loading ...
Page is loading ...
Page is loading ...
Page is loading ...
Page is loading ...
Page is loading ...
Page is loading ...
Page is loading ...
Page is loading ...
Page is loading ...
Page is loading ...
Page is loading ...

FNA1 D/UK/F/NL/E/I 826 584-A
Fna1DCouv.PM6.5 18/02/04, 9:401
-
 1
1
-
 2
2
-
 3
3
-
 4
4
-
 5
5
-
 6
6
-
 7
7
-
 8
8
-
 9
9
-
 10
10
-
 11
11
-
 12
12
-
 13
13
-
 14
14
-
 15
15
-
 16
16
-
 17
17
-
 18
18
-
 19
19
-
 20
20
-
 21
21
-
 22
22
-
 23
23
-
 24
24
-
 25
25
-
 26
26
-
 27
27
-
 28
28
-
 29
29
-
 30
30
-
 31
31
-
 32
32
-
 33
33
-
 34
34
-
 35
35
-
 36
36


Ask a question and I''ll find the answer in the document
Finding information in a document is now easier with AI
in other languages
- italiano: Krups fna 1 Manuale utente
- français: Krups fna 1 Manuel utilisateur
- español: Krups fna 1 Manual de usuario
- Deutsch: Krups fna 1 Benutzerhandbuch
- Nederlands: Krups fna 1 Handleiding
Related papers
-
Nespresso by Krups Essenza Mini Pod Coffee Bundle Owner's manual
-
Nespresso by Krups Citiz Pod Coffee Machine Bundle Owner's manual
-
Krups EA900050 User manual
-
-
-
-
-
-
-
Krups EA815 User manual
Other documents
-
DeLonghi EN 191.C Datasheet
-
-
-
Magimix NESPRESSO M150 User manual
-
AEG LM7000 User manual
-
-
 Renato's UNIQUE User manual
-
Nespresso EN660.R Owner's manual
-
-
