Sangean MMR-88DAB User manual
- Category
- Supplementary music equipment
- Type
- User manual
Sangean MMR-88DAB is a versatile and portable DAB radio that offers a wide range of features for a variety of listening needs. With its solar-powered charging and dynamo crank, you can power up the radio even when there's no electricity. The telescopic antenna and LED flashlight make it a great companion for outdoor activities or emergencies. Plus, you can use it to charge your mobile phone or MP3 player with the USB charging socket.
Sangean MMR-88DAB is a versatile and portable DAB radio that offers a wide range of features for a variety of listening needs. With its solar-powered charging and dynamo crank, you can power up the radio even when there's no electricity. The telescopic antenna and LED flashlight make it a great companion for outdoor activities or emergencies. Plus, you can use it to charge your mobile phone or MP3 player with the USB charging socket.


-
 1
1
-
 2
2
-
 3
3
-
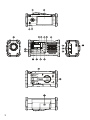 4
4
-
 5
5
-
 6
6
-
 7
7
-
 8
8
-
 9
9
-
 10
10
-
 11
11
-
 12
12
-
 13
13
-
 14
14
-
 15
15
-
 16
16
-
 17
17


Sangean MMR-88DAB User manual
- Category
- Supplementary music equipment
- Type
- User manual
Sangean MMR-88DAB is a versatile and portable DAB radio that offers a wide range of features for a variety of listening needs. With its solar-powered charging and dynamo crank, you can power up the radio even when there's no electricity. The telescopic antenna and LED flashlight make it a great companion for outdoor activities or emergencies. Plus, you can use it to charge your mobile phone or MP3 player with the USB charging socket.
Ask a question and I''ll find the answer in the document
Finding information in a document is now easier with AI
Related papers
-
Sangean MMR-88 User manual
-
Sangean MMR-99DAB User manual
-
-
Sangean U5 DBT User manual
-
Sangean UTILITY 40 DBT (U-4 DBT BLK) Owner's manual
-
Sangean WFR-28C User manual
-
Sangean WFR-28 User manual
-
-
-
Sangean MMR-99 Owner's manual
Other documents
-
Caliber WORKXL1 Owner's manual
-
Roberts solarDAB 2 User guide
-
Roberts Radio Blutune User manual
-
Perfectpro SOLOWORKER Owner's manual
-
Roberts Play BT User guide
-
-
-
Roberts Dreamdock 2 User guide
-
-