Page is loading ...

S-1200/ S-1200U OWNER’S REFERENCE

S-1200/ 1200U Reference Surround Sound Preamp / Processor
2 © 2009 by Krell Industries LLC All rights reserved
THERE ARE NO USER-SERVICEABLE PARTS INSIDE ANY KRELL PRODUCT.
Please contact your authorized dealer, distributor, or Krell if you have any questions not addressed
in this reference manual.
WARNING: Do not place the component where it could be exposed to dirt or excessive moisture.
The ventilation grids on the top and bottom of the S-1200/ 1200U must be unobstructed at all
times. Do not place flammable material on top of or beneath the component.
When making connections to this or any other component, make sure all components are off. Turn
off all system power before connecting the S-1200/ 1200U to any other component. Make sure
all cable terminations are of the highest quality, free from frayed ends, short circuits or cold solder
joints.
CONTACT INFORMATION: Krell Industries, LLC
45 Connair Road
Orange, CT 06477-3650 USA
TEL 203-799-9954
FAX 203-891-2028
WEBSITE http://www.krellonline.com
Krell® is a registered trademark of Krell Industries LLC., and is restricted for use by Krell Industries LLC., its subsidiaries, and authorized agents.
All other trademarks and tradenames are registered to their respective companies.
Manufactored under license from Dolby Laboratories. Dolby Pro Logic and the double-D symbol are trademarks of Dolby Laboratories.

Table of Contents
3S-1200/ 1200U
Introduction (9)
Specications (10)
Getting Started (13)
UNPACKING AND PLACEMENT (13)
1. Accessories included
AC Power guidelines (13)
Back Panel Description (Diagram) (14)
Front Panel and Remote Control Function (Diagram) (15)
Initial Setup (16)
OSD (On Screen Display) (16)
1. Connection and Operation of the OSD (16)
2. AC Power cord connection (16)
3. Video output Connection (16)
5. Power Button (16)
6. Menu Button (16)
Main Menu, Navigation and Setup (17)
CONFIGURE VIDEO OUTPUT (S-1200U only) (17)
1. Overview (17)
2. OSD Default Output (17)
3. Analog Video Scaler (17)
A. Setting maximum Video output resolution (17)

Table of Contents Cont...
4 S-1200/ 1200U
LISTENING ROOM SETUP (18)
1. Overview (18)
2. Configure Speakers (18)
A. Quantity (18)
B. Full Range (18)
C. LIM (?) Hz (18)
D. Front (19)
E. Center (19)
F. Surround (19)
G. Back (19)
H. 7.1 Surround (19)
I. Subwoofer (20)
3. Speaker Distance (21)
A. Left ,Right (21)
B. Center (21)
C. L Surr, R Surr (21)
D. L Back, R Back (21)
E. Sub (21)
4. Calibrate Room Setup (22)
A. Auto Noise Sequence (22)
B. Manual Noise Sequence (22)
C. Program Material (22)
CONFIGURE DEVICES (23)
1. Overview (23)
A. Defining inputs and outputs for audio and video sources (23)
B. Video input and output connections (23)
1. Digital Video Options (23)
a. HDMI
2. Analog Video Options (23)
a. Component Video
b. S-Video
c. Composite Video

Table of Contents Cont...
5S-1200/ 1200U
C. Audio Input and Output connections (24)
1. Digital Audio Options (24)
a. HDMI
b. Optical S/PDIF
c. Coaxial S/PDIF
2. Analog Audio Options (24)
a. Balanced
b. Single-Ended
c. Multi-Channel
2. Changing default input presets. (25)
3. Configure Video (25)
A. Assigning Video Inputs (25)
1. Setting the Main Video Input (25)
4. Configure Audio (26)
A. Assigning Audio Inputs (26)
1. Analog (26)
2. Digital (26)
3. Lip Sync (26)
4. EQ Memory (26)
B. Setting the Analog audio Input (26)
1. Analog (27)
2. Digital (27)
C. Choosing an Analog Decode Preference (27)
D. Auto Migration (28)
E. Choosing a Digital Decode Preference (28)
F. Assign Lip Sync Delay (30)
G. Assign EQ Memory (30)

Table of Contents Cont...
6 S-1200/ 1200U
5. Configure Trigger (31)
A. Overview (31)
B. Configure Trigger (31)
C. Delay (31)
CONFIGURE LEVEL ADJUSTMENT (32)
1. Overview (32)
2. Device Trim (32)
3. Analog Input Trim (32)
A. Anti-Clip
B. Input Gain
4. Music Mode Sub Trim (32)
5. DTS Control Trim (33)
6. PLII Control Trim (33)
7. Maximum Volume Limit (33)
OPERATION (34)
1. Overview (34)
2. OSD Operation (34)
A. OSD On Time (34)
B. Line Number (34)
C. Menu Back ground (34)
1. Transparent
2. Solid
D. LCD Contrast (34)
3. Audio Operation (34)
A. Mute Mode (34 )
B. Dolby Hold Mode (35)
C. DTS Mode Hold (35)
D. EX Auto Switching (35)
E. Dynamic Range (35)

Table of Contents Cont...
7S-1200/ 1200U
4. 7.1 Input Setup (35)
5. Program Remote (35)
6. System Information (36)
7. Room EQ Setup (36)
A. Overview (36)
B. Memory (36)
C. Channel (36)
D. Filter Parameters (36)
1. Type (36)
a. HPF (36)
b. LPF (37)
c. Notch (37)
d. Lshlf (37)
e. Hshlf (38)
f. Pking (38-39)
2. Frequency (39)
3. Shape (39)
4. Level (39)
E. Apply (39)
Basic Operation of the S-1200/ 1200U (40)
1. Power On/ Off and Stand-By (40)
2. Volume Control (40)
3. Quick level adjustment buttons (40)
A. Center
B. Surr
C. Back
D. Sub
E. Bal
F. EQ assignment

Table of Contents Cont...
8 S-1200/ 1200U
4. Tape/ VCR inputs and outputs (41)
5. Button Mode Presets (41)
6. Save and Recall (41)
7. Factory Reset (41)
Firmware Updates (42)
Questions and Answers (43)
RS-232 and RC-5 Control (44)
Warranty (46)
Service (47)

Introduction to the KRELL S-1200/ 1200U
9S-1200/ 1200U
Thank you for your purchase of the S-1200/ 1200U Surround Sound Preamplifier/ Processor. Coupling legendary
Krell preamplifier technology, state of the art digital processing, and the latest in HDMI 1.3 surround formats, the
S-1200 is an ideal centerpiece for any high performance music and home theater system. Based on award-winning
preamplifier technology, all eight S-1200U analog output stages are built to the same exacting standard and feature
balanced and single-ended cable connections. Only Krell designed preamplifier circuitry is employed within every
channel utilizing discrete current based Class A, direct coupled circuitry for the greatest signal purity and highest
bandwidth. Performance robbing op amps or integrated circuits are not used anywhere in the audio path. Preamp
mode bypasses all digital circuitry and routes analog stereo inputs directly to a balanced resistor ladder volume
control for ultimate music reproduction.
The heart of Krell surround sound preamp/processors is sound quality that is paired to the latest in surround
processing technology. The S-1200 includes the finest Krell audio and video engineering plus the latest in
connectivity technology, HDMI 1.3, to insure the ultimate home theater experience. The audio signal path is a direct
descendant of the Evolution 707 Reference Surround preamp/processor. The S-1200 also uses the same DSP engine
and 1080p video stage from the Evolution 707.
At the hub of the S-1200 digital signal processing is a pair of dual core 32 bit Crystal CS497004 DSP’s performing
1.8 giga operations per second. Digital signals are then routed to 24 bit ESS Sabre DACS.
Video content is treated to the same high performance engineering as the audio signals. All-discrete video circuitry
takes full advantage of the new Deep Color HDMI 1.3 specifications. Maximum color depth has been increased from
24 bits to 48 bits and bandwidth from 165MHz to 340 MHz. Full video transcoding converts composite, S-Video,
or component inputs to HDMI signals. Furthermore, the S-1200U model includes upconversion to a maximum of
1080p resolution. The S-1200 is a true “one connection solution” with on-screen display, configuration menus, and
status messages available from all active video outputs including HDMI.

Specications
10 S-1200/ 1200U
SIGNAL-TO-NOISE RATIO
“A” Weighted 96 dB
TOTAL HARMONIC DISTORTION (THD)
Unweighted 20 Hz-20 kHz, +0, - 0.5 dB
INPUTS
ANALOG AUDIO (1) Pair Balanced via XLR connectors
(5) Pairs Single-ended via RCA connectors
(1) Discrete 7.1 via RCA connectors
(1) Tape in via RCA connectors
(1) VCR audio in via RCA connectors
DIGITAL AUDIO (4) HDMI via HDMI connectors
(4) EIAJ optical via Toslink connectors
(4) Coaxial via RCA connectors
DIGITAL VIDEO (4) HDMI via HDMI connectors
ANALOG VIDEO (3) Component Video via RCA connectors
(4) S-video via DIN connectors
(3) Composite Video via RCA connectors
OUTPUTS
ANALOG AUDIO
(8) Balanced via XLR Connectors
R, L, C, SR, SL, SBR, SBL, SW
(8) Single-ended via RCA Connectors
R, L, C, SR, SL, SBR, SBL, SW
(1) Tape out via RCA connectors
(1) VCR audio out via RCA connectors
DIGITAL AUDIO (1) EIAJ optical via TosLink connector
(1) Coaxial via RCA connector
DIGITAL VIDEO (1) HDMI via HDMI connector
ANALOG VIDEO (1) Component Video via RCA connectors
(1) S-video via DIN connectors
(1) Composite Video via RCA connector
CONTROL
(1) IR Receiver for Remote Control
(1) RS-232 via DB9 Female Connector Straight Wired
(1) RC-5 via 1/8” stereo “trs” Receptacle

Specications Cont...
11S-1200/ 1200U
(1) 12vdc Remote Trigger Input via 1/8” Monor
receptacle
(4) 12vdc Remote Trigger Outputs via 1/8 Mono
receptacles
(2) Proprietary KRELL CAN ports via RJ-45 Connectors
DIGITAL DECODING MODES
Dolby True HD
Dolby Digital Plus
Dolby Digital 5.1
Dolby Digital EX
Dolby Pro Logic IIx
DTS Master Audio
DTS High Resolution Audio
DTS 5.1
DTS ES Discrete 6.1
DTS ES Matrix 6.1
DTS Neo:6
PCM 5.1
PCM 7.1
PREAMP (Direct Analog Only)
PREAMP 5.1 (Direct Analog Only)
SURROUND ENHANCEMENT MODES
General Admission
Front Row
On Stage
Enhanced Stereo
Orchestra
Mezzanine
Full Range + Sub
Monophonic
Party
RS-232 DB9 Pin Out
1. Data Carrier Detect
2. Received Data
3. Transmitted Data
4. Data Terminal Ready
5. Signal Ground
6. Data Set Ready
7. Request To Send
8. Clear To Send
9. Ring Indicator
RC-5 pin out
Tip = RC-5 data, Ring = +5 V, Sleeve = GND
XLR Pin Out
Pin 1 (ground) Pin 2 (non-inverting “Hot”) Pin 3
(Inverting)

Specications Cont...
12 S-1200/ 1200U
Maximum Input
Balanced 8.2 Vrms
Single Ended 4.1 Vrms
Maximum Output
Balanced 14.6 Vrms
Single Ended 7.3 Vrms
Audio Input Impedance
Balanced 51K Ω
Single Ended 47K Ω
Audio Output Impedance
Balanced 160 Ω
Single Ended 160 Ω
Power Consumption
Stand-by TBA
Operation TBA
DIMENSIONS
Inches (L) 17.15 x (W) 17.25 x (H) 5.65
Centimeters (L) 43.56 x (W) 43.82 x (H) 14.35
WEIGHT
18lbs Unit only
8.16kg Unit only
24lbs Shipping Weight
10.89kg Shipping weight
All operational features, functions and specifications are subject to change without notification.

Getting Started
13S-1200/ 1200U
UNPACKING AND PLACEMENT
The S-1200/ 1200U is a precision instrument and should be handled with the utmost care when deciding
where it is to be placed and while it is being unpacked and finally installed. Makes sure the installation location
is dry and level, and able to provide adequate ventilation. The S-1200/ 1200U runs warm to the touch and
requires the bottom and top of the unit be free from obstruction with good circulation of air. Allow a minimum
of 3 inches above the unit for proper ventilation. Additional ventilation may be required when the unit
occupies the same space with other electronics that generate heat like power amplifiers. Please consult an
authorized KRELL dealer or KRELL industries to insure proper installation guidelines.
1. Accessories included
A. 1 AC Power cord
B. 1 Handheld Remote control
C. 1 Trigger cable
D. 1 CD w/ Owner’s reference
E. 1 Quick start guide
F. 1 Warranty registration card
G. 2 AAA Batteries
H. 1 T-10 torx wrench
AC Power Guidelines
The S-1200/ 1200U is designed to work all over the world. The operating voltage is determined at the factory
and is specifically set to operate in the country of final destination. The S-1200/ 1200U requires good clean
power and doesn’t require additional filtration. Make sure the AC line voltage is within plus or minus 10% of
the specified AC line voltage setting for proper operation.
NOTE: The S-1200/ 1200U may not operate correctly when AC regeneration or voltage conversion devices are
utilized.

Getting Started
14 S-1200/ 1200U
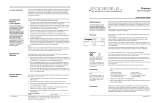
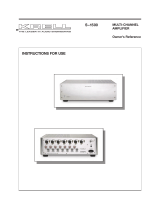
Back Panel Description
1 Component video inputs 11 12v Trigger outputs 21 EIAJ optical digital inputs
2 Component video/ OSD output 12 HDMI 1.3 Inputs 22 VCR audio output
3 S-video inputs 13 Main Power Switch 23 VCR audio input
4 Composite video inputs 14 Single-ended audio outputs 24 Tape output
5 S-video output 15 AC power cord receptacle 25 Tape input
6 Composite video output 16 RC-5 control port 26 Single-ended analog inputs
7 Composite OSD output 17 RS-232 control port 27 Balanced analog inputs
8 S-video OSD output 18 Coaxial digital output 28 Balanced audio outputs
9 HDMI output 19 Coaxial digital inputs 29 Multichannel analog input

Getting Started
15S-1200/ 1200U
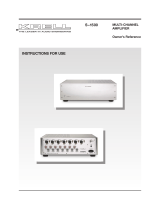
Front Panel and Remote Control Function
1 Device input select 10 Save system setup
2 Balance adjust 11 IR receive window
3 Volume Up/ Down adjustment 12 Power Standby button
4 Display window 13 Navigate right adjustment
5 Surround mode select 14 Enter button
6 Quick center channel adjust 15 Activate OSD Menu button
7 Quick Surround channel adjust 16 Navigate left adjustment
8 Quick Sub channel adjust 17 Previous screen adjustment
9 Setup memory recall 18 Mute audio select

Initial Setup
16 S-1200/ 1200U
OSD (On Screen Display)
1. Connection and Operation of the OSD
The OSD (On Screen Display) connection of the S-1200/ 1200U to a video display is the single
most important connection to the setup of this processor. The entire configuration and setup of the
S-1200/ 1200U is performed while viewing the OSD.
Note: Do not connect any inputs at this time.
2. Attach the AC power cord to the receptacle on the back of the S-1200/ 1200U.
3. Plug the Power cord into an AC receptacle and turn on the rear power switch.
The S-1200/ 1200U will go through an initialization process and display the current software
revision installed. Wait for the initialization to complete before proceeding.
4. Connect the Video Output of the S-1200/ 1200U to a Video Monitor
The OSD can be displayed from any video output. HDMI, component, s-video and composite
video are all supported. Care should be taken in selecting which video format to use. Older
monitors, projectors and televisions do not have the ability to display some of the latest video
output formats. Use composite video if you are uncertain as to the video display’s capabilities.
NOTE: When using the HDMI output for OSD do not connect an HDMI input at this time. It can
make initial setup more difficult as the S-1200/ 1200U will be communicating with the source
before the setup of inputs and outputs has occurred.
5. Press the Power button on the front panel.
Within a few seconds the video display will show a blue screen with white text.
NOTE: If you are using an analog output such as component or composite video, press cd on the
front panel, this will go to an analog defaulted video setting and expedite your setup.
NOTE: If a blue screen with text does not occur, check the following:
A. Video connections
B. Input of the video display
C. S-1200/ 1200U is in operation mode
If a problem still persists, turn the S-1200/ 1200U off via the rear panel switch and turn it
back on.
6. Press the Menu Button
Now that a video connection has been established, press the Menu button, the set-up menu will
appear on the video display. It is now possible to navigate the set-up menu using a combination of
the up, down, left, right, enter, and previous buttons. These can be accessed via the Front panel of
the S-1200/ 1200U or the remote control.

Main Menu, Navigation and Setup
17S-1200/ 1200U
CONFIGURE VIDEO OUTPUT (S-1200U only)
1. Overview
Configure video output sets the analog video scaler to an appropriate video output resolution.
Analog video can be up-scaled up to 1080P 60Hz allowing video parity for all video sources
(S-1200U only) Once this has been set all analog video sources will be up-scaled and output to this
resolution. HDMI inputs are NOT affected by this setting.
NOTE: Make sure your video display is capable of displaying the output resolution selected, a series
of error messages requiring user response will appear if the output resolution is set incorrectly.
The S-1200 is able to transcode incoming video signals. Video input from composite, S-video or
Component sources can be output over the HDMI output.
NOTE: The video output will be determined by the source.
2. OSD Default Output
Sets the output format for the On Screen Display. The OSD options are listed in the chart below.
3. Output Format (S-1200 only)
Sets the video frequency for the video output of the transcoder. For example If the output is set to
50Hz then any video frequency from the incoming source will be converted to 50Hz.
The Options are:
Follow Source (Uses the same frequency as the source component), 50Hz and 60Hz
4. Analog Video Scaler (S-1200U only)
A. Setting maximum Video output resolution
These are the available analog scaler output formats for the S-1200u
480i - 720 x 480 60Hz 720p- 1280 x 720 60Hz 1080p - 1920 x 1080 30Hz
480p- 720 x 480 60Hz
1080i - 1920 x 1080 50Hz
(Outside the USA)
1080p - 1920 x 1080 50Hz
(Outside the USA)
576i- 720 x 576 50Hz
(Outside the USA)
1080i - 1920 x 1080 60Hz 1080p - 1920 x 1080 60Hz
576p- 720 x 576 50Hz
(Outside the USA)
1080p - 1920 x 1080
24Hz
720p- 1280 x 720 50Hz
(Outside the USA)
1080p- 1920 x 1080 25Hz
(Outside the USA)

Main Menu, Navigation and Setup Cont...
18 S-1200/ 1200U
LISTENING ROOM SETUP
1. Overview
Listening room setup is comprised of three major parts; configure speakers, speaker distance
and calibrate volume. This group of settings defines the speaker crossover parameters as well as
distance of speaker relative to the listening position and speaker SPL (sound pressure levels). Each
loudspeaker in the system can be set to a specific crossover point to insure proper utilization of that
speaker’s frequency response and its relationship to the subwoofer.
2. Configure Speakers
Defines number of speakers and the frequency relationship to the subwoofer or LFE channels for
each group of speakers in the surround system. The quantity and frequency options are available
for each group of speakers listed below.
A. Quantity - Sets the number of channels in the system.
B. Full Range – This setting allows the passing of full spectrum audio frequencies including
LFE information.
C. LIM ( ? ) (limited) Hz – Sets the low pass filter frequency. Low frequency information
below this setting is channeled to the sub woofers or LFE channels.
The following settings are available to any of the speakers in the system except the
subwoofer. This setting will specify a point where the low frequency response of each
speaker respectively will be re-routed to the subwoofer or LFE enabled speakers. Choose
a setting from the chart below that corresponds to the low frequency specification of the
speakers in use.
LIM 40 Hz LIM 75 Hz LIM 120 Hz LIM 190 Hz
LIM 45 Hz LIM 80 Hz LIM 130 Hz LIM 200 Hz
LIM 50 Hz LIM 85 Hz LIM 140 Hz LIM 210 Hz
LIM 55 Hz LIM 90 Hz LIM 150 Hz LIM 220 Hz
LIM 60 Hz LIM 95 Hz LIM 160 Hz LIM 230 Hz
LIM 65 Hz LIM 100 Hz LIM 170 Hz LIM 240 Hz
LIM 70 Hz LIM 110 Hz LIM 180 Hz LIM 250 Hz

Main Menu, Navigation and Setup Cont...
19S-1200/ 1200U
D. Front - Speaker channels positioned front Left and front Right respective to the listening
position.
1. Quantity – N/A
NOTE: Left and Right front speakers are a minimum requirement for surround or
two channel music play back. The quantity value cannot be changed.
2. Crossover - Full, LIM (?) Hz
E. Center - Speaker channels positioned front Center respective to the listening position.
1. Quantity - NO, 1
2. Crossover - Full, LIM (?) Hz
F. Surround - Speaker channels positioned to the Left and Right midway into the room
respective to the listening position.
1. Quantity - NO, 1 and 2
2. Crossover - Full, LIM (?) Hz
G. Back – Speaker channels positioned to the Left and Right behind the listening position
respectively.
1. Quantity - NO, 1 and 2
2. Crossover - Full, LIM (?) Hz
H. 5.1 Surround – This setting allows the steering of surround information to be routed
additionally to the rear speakers, surround speakers or both during 5.1 channel playback in
a 7.1 system.
NOTE: This function is to utilize the rear speakers for 5.1 source material only. 7.1 material
generates the rear channel information.
The options are:
1. Both - Routes Surround information to both the Surround speakers and the Back
speakers.
2. Back - Routes Surround information to the Back speakers.
3. Surround - Routes Surround information to the Surround speakers.

Main Menu, Navigation and Setup Cont...
20 S-1200/ 1200U
I. Subwoofer – A speaker channel (s) specifically utilized for LFE (Low Frequency Effects)
information and low frequency information to surround speakers set to limited.
1. Quantity - NO, 1
2. Crossover - N/A
• SMALL + LFE – LFE and Subwoofer functions are enabled. All low frequency
from speakers set to limited as well as the LFE effects are sent to the subwoofer(s).
/