Polycom VSX 7000e Series User manual

Category
Teleconferencing equipment
Type
User manual

This manual is also suitable for

Polycom VSX 7000e Series is a high-quality video conferencing system designed for medium to large conference rooms. With its advanced features and capabilities, it enables seamless communication and collaboration among multiple participants.

Key features and possible use cases:

  • Multipoint Conferencing: Connect up to four sites simultaneously for interactive discussions, presentations, and training sessions.

  • Camera Control: Operate multiple cameras to capture different angles and perspectives of the conference room, ensuring all participants are visible.

  • Content Sharing: Share presentations, documents, and videos from a computer or document camera, facilitating effective knowledge sharing and collaboration.

POLYCOM VSX7000e
USER GUIDE
HELP, HINTS, and TIPS
1
TABLE OF CONTENTS
Polycom Remote……………………………..…………………………………2
Placing/Receiving Calls……..………….……………………………………3
Camera Control………………………………………………………………….4
Multipoint Calls………………………………………………………………….6
Monitors…………………………………………..……………………………….7
Using Other Peripherals..……………………………………………………8
Conferencing Tips………………………………………………..…………….9
For additional help, go to www.polycom.com, Support, Learning Center and Training,
VSX End User Training.
2
POLYCOM REMOTE
3
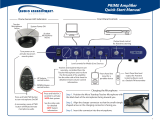
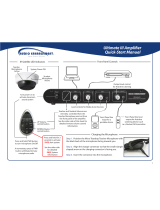
PLACING/RECEIVING CALLS
1. Calls can be placed manually, from the Directory, or from Recent Calls.
2. The Home screen on the Polycom system is always the Place a Call screen.
Pressing the red Return to Home button on the remote will always return the user
to the Place a Call screen.
3. To place a call manually, type in the IP address using the keypad on the remote
control. Make sure to enter the IP address exactly as shown, including the dot,
then press the green Call button on the remote control.
4. To place a call using the Directory, select the Directory button on the screen or
press the green Directory button on the remote control. Scroll using the up/down
arrows, select the entry desired, then press the green Call button on the remote
control.
5. To place a call using the Recent Calls list, select the Recent Calls button on the
screen. A screen will display up to 99 of the last calls made and/or received, date
call was made, time call was placed, and if the call was outgoing or incoming.
Scroll using the up/down arrows, select the entry desired, then press the green
Call button on the remote control.
6. To end a call, press the red End a Call button on the upper right side of the
remote control.
7. When receiving a call, the Polycom system can be set to Auto Answer or to give a
prompt asking if you want to answer the call.
8. It is recommended that the system be set to Auto Answer calls.
9. Volume can be adjusted by pressing Volume on the remote control. Changing the
volume affects only the sound heard at your site.
10. To mute or unmute the microphone, press Mute on the remote control. (Muting
the microphone does not mute audio being sent to the far site from a VCR/DVD or
computer.
4
CAMERA CONTROL
1. The blue buttons on the remote control operate the cameras at both the near
(your site) and far site (the receiving site), the ability to preset the camera
locations, to zoom in using the selected camera, and to switch between the
cameras and other equipment (camera button).
2. Once a particular camera is selected, the red arrows will move the camera left
or right and tilt the camera up or down.
3. When focusing the camera on the teacher, try to fill the screen with the teacher
rather than the wall and table. Be careful of extreme close-ups as well. What
ever is appropriate in a face to face classroom is appropriate for a
videoconferencing classroom.
4. Always face the camera, talking into the camera. This way the far site feels as if
you are looking at them. If students will be seen on camera, make sure they
face the camera as well.
5. The microphones are very sensitive, so talk normally looking into the camera.
6. Pressing the camera button and using the left/right arrow keys, will allow the
selection of the front camera, back camera, or the DVD/VCR. Press the center
Enter button once the desired device is selected.
7. The site that initiates the call has control of the far cameras. (It is
recommended that the sending teacher initiate the call, unless there are
problems doing so. When controlling the far camera, the onscreen camera icon
will be pointing away from you.)
8. Camera presets should be used once needed camera locations are established.
(It is recommended that one setting be the ceiling in case of an emergency.)
9. To clear previously set camera presets, press Preset on the remote control, then
Delete.
5
10. To set camera presets, move the camera to the desired position, press Preset,
then hold down the number desired. (Note the same numbers are used for
front and back camera.)
6
MULTIPOINT CALLS
1. Point to Point calls are when only two sites are connected. Multipoint calls are
when several sites are connected in a call. The VSX7000e can connect up to four
sites, your site and three others.
2. To add second site to a call, press the green Call/Hang Up button. Highlight Add
Call, and either manually type in the IP address or choose the address from the
Directory.
3. When in a multipoint call, there are four different viewing modes for the remote
site, automatic, discussion, presentation, and full screen.
4. To change the multi-point mode, select System (lower left corner on the Place a
Call screen), select Admin Settings, select Monitors, select Multipoint Setup, the
scroll to the desired Multipoint mode and select it by pressing Enter.
5. Automatic is the default mode and switches between discussion and presentation
modes automatically based on the interaction between the sites.
6. Discussion mode will show all sites involved in a call in a split screen, which all
sites can see. (This will be shown on the back monitor.)
7. Presentation mode shows the teacher full screen on the far site’s screen. The
teacher will see the far site on the back monitor. (This is usually the
recommended setting for teaching.)
8. Full screen mode is voice activated and will show whichever site is speaking full
screen.
9. A multipoint call can be ended by hanging up all calls at the same time or
individually.
7
MONITORS
1. When sending a course, the front monitor displays the teacher and should be
facing the teacher so that he/she can see what the far site is seeing and the back
monitor displays the far site so that the teacher can see his/her students.
2. When receiving a course, usually the front monitor shows the teacher and the
back monitor displays a self view. The content can be displayed on the front
monitor (instead of the teacher) or through the LCD projector.
3. What is displayed in the Picture-In-Picture (PIP) depends on how the Polycom
system has been configured.
4. To show, move, or turn off the PIP during a call, press the PIP on the remote
control.
5. While the PIP has a yellow border, press PIP repeatedly to move it to different
corners of the screen.
6. After a brief pause, the PIP border turns blue. After the border turns blue, press
PIP to turn the PIP off.
7. If the PIP is not showing, press IP on the remote control and then press Near
twice and select the Swap PIP icon.
8. To specify when the system displays the PIP, select System from the Place a Call
screen, then select User Settings, scroll to PIP, select a setting (explained below),
press Enter on the remote control, then press Home to save any changes and
return to the home screen.
9. There are four settings from which to choose: selecting Camera will show the PIP
when any of the camera control buttons are pressed; selecting Auto will show the
PIP on connection and when the remote control is picked up; selecting On will
show the PIP on connection and during the call; and Off will show the PIP only
when PIP is pressed on the remote control.
8
USING OTHER PERIPHERALS
1. To show content using the computer, make sure the computer video is configured
to the same resolution and refresh rate as the Polycom system.
2. The Elmo is connected to the computer using a USB cable. Therefore the content
shown on the document camera (Elmo) is displayed on the computer screen and
can be used with any program on the computer.
3. Press the blue ImageShare selection button to start and stop displaying content
from the computer or document camera.
4. To show a VCR/DVD, make sure the VCR/DVD is powered on before the call is
placed. Press Camera on the remote control and select a video source. Press
Enter on the remote control, then Home to save settings and return to the Place a
Call screen.
5. To switch back to camera, press Camera on the remote control and select Camera
for the video source. Follow steps above to save changes.
6. To use the document camera, the program loaded on the teacher’s computer,
must be started before content can be sent using the document camera.
9
CONFERENCING TIPS
1. Have a list of numbers handy for troubleshooting. Numbers needed are school
tech coordinator, system tech coordinator, T2 Technical Support (for help with
Polycom problems) 877-847-7000 x2292, Interwrite Learning Support 800-856-
0732, and your ACCESS Support Center.
2. When sending a class, it is helpful to have IP addresses of the sites to be called
pre-programmed into the Directory.
3. Set your camera presets before the call so that they can be quickly accessed
during the call.
4. Have all needed materials ready for use and all peripherals (computer, document
camera, and/or VCR/DVD) to be used on and ready. If possible, test the
equipment with your content beforehand.
5. Avoid wearing bright colors, all light or all dark clothing or very busy patterns.
Light pastels and muted colors look the best on the screen. Also avoid wearing
noisy jewelry.
6. Close any drapes or blinds in the room as daylight is a variable light source and
can conflict with interior room lighting.
7. Talk to both sides about noise during the call. The microphones are sensitive and
can pick up side conversations or whispers easily. All noises are amplified and
paper crumbling can sound like a volcano!
8. Speak normally as the microphones will pick up your voice. If you are a fast
talker, you may need to speak slower and clearer.
9. Since each side’s volume acts independently, ask the students at the far site if
they can hear you. Have them introduce themselves so that you can be sure you
can hear them.
10. If in a multipoint call, it is sometimes helpful to have the receiving sites (far sites)
mute their microphones while teaching or giving notes.
10
11. Avoid muting the near site microphone and only addressing your students.
12. Sometimes the audio has a slight delay, so pause briefly for others to ask or
answer questions, participate in discussions, or make comments.
13. Try to keep the screen filled with people or content rather than the wall, table,
etc.
14. Have the students make name cards and display them prominently so that you
can learn their names. Call on them as if they were in the room with you.
15. Make a sign to display in the room to identify your school.
16. The sending teacher should initiate the connection calls unless there is a problem
connecting. This gives the teacher control over when the call is placed and knows
when the other students are connected into the call.
17. Remember if it works in your face to face classroom, it will work in the IVC
classroom.
18. Establish rules, guidelines, and standards of behavior for videoconferencing and
go over them with all sites and students involved.
19. Students at all sites should sit where they can be seen in a camera shot. At no
time should students be allowed to sit off to the side out of camera view.
20. Use natural gestures without a lot of movement. It takes the camera about 15
seconds to re-adjust the focus. Remember body language is intensified on
camera and can easily be misread by students who don’t know your reputation or
your personality.
21. Maintain eye contact with the far site by looking into the camera above the back
monitor. Since your students are displayed on the back monitor, this is easy to do
so that the students feel as if you are looking at them.
22. Be animated and change activities often to keep the student’s attention and to
involve the students actively in their learning. Do not give notes or talk the entire
time.
11
23. Plan ahead for interruptions and have a plan on how to handle them.
Interruptions should be kept to a minimum for optimal class time.
24. Being prepared is the key to successful videoconferencing. Making sure that all
materials needed are on hand and that the receiving site has their materials also.
This means organization, planning, and sending information and materials to the
receiving site ahead of time.
  • Page 1 1
  • Page 2 2
  • Page 3 3
  • Page 4 4
  • Page 5 5
  • Page 6 6
  • Page 7 7
  • Page 8 8
  • Page 9 9
  • Page 10 10
  • Page 11 11
  • Page 12 12

Polycom VSX 7000e Series User manual

Category
Teleconferencing equipment
Type
User manual
This manual is also suitable for

Polycom VSX 7000e Series is a high-quality video conferencing system designed for medium to large conference rooms. With its advanced features and capabilities, it enables seamless communication and collaboration among multiple participants.

Key features and possible use cases:

  • Multipoint Conferencing: Connect up to four sites simultaneously for interactive discussions, presentations, and training sessions.

  • Camera Control: Operate multiple cameras to capture different angles and perspectives of the conference room, ensuring all participants are visible.

  • Content Sharing: Share presentations, documents, and videos from a computer or document camera, facilitating effective knowledge sharing and collaboration.

Ask a question and I''ll find the answer in the document

Finding information in a document is now easier with AI