Page is loading ...

FULL SIZE TRUCK
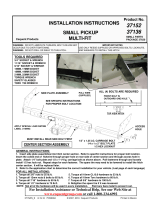
MULTI-FIT HITCH
Model Number:
37096
• Quick and Easy Installation
• Many NO DRILL Applications
• No Special Tools Required for Installation
• Unique OEM Protective Coating
This Instruction Sheet contains IMPORTANT safety information.
Please read and keep for future reference.
For assistance with this product or to order
replacement parts, please contact:
Cequent Consumer Products, Inc.
29000-2 Aurora Road
Solon, OH 44139
Questions Service: (800) 234-6992
ReeseBrands.com
Date of Purchase: _____________________
Rev. B 1/15
37096_IN

Use ONLY REESE supplied or approved bolts, locknuts, and washer to install
this hitch.
THIS WARNING IS GIVEN IN COMPLIANCE WITH CALIFORNIA PROPOSITION 65
WARNING: This product contains chemicals known to the state of California to cause
cancer, birth defects or other reproductive harm.
READ and Follow all Instructions and safety messages before installing
the Multi-Fit Hitch.
Failure to follow these instructions may result in DEATH or SERIOUS INJURY
DO NOT lubricate threads. Bolt failure may occur due to over tightening.
DO NOT drill or weld to this hitch.
This product complies with safety specification and requirements for the State of New York and VESC
regulation V-5 for connecting devices and towing systems. Weight distributing hitch rating is 6500 lb
maximum gross trailer weight and 650 lb maximum tongue weight. Weight carrying hitch rating is 5000 lb
maximum gross trailer weight and 500 lb maximum tongue weight. Consult vehicle owners manual for
towing recommendations and limitations.
2

GENERAL INSTRUCTIONS:
1. Remove center section from box and pull side plate assemblies from shipping location. Insert side plate assemblies
into hitch center section. Refer to specific instructions for proper position. Insert the coiled end of pull wire through
hole on rear side of center section and through end of tube. Attach 1/4” bolt plate and 1/2 x 1-1/4 long carriage bolt
as shown above. Pull fasteners through and loosely install 1/2 hex lock nut. Repeat steps for each fastener. The
spare tire may need to be lowered to install the hitch. It will be replaced later.
2. Refer to the application chart to determine the correct installation for your vehicle. (Last page of each language)
FOR ALL INSTALLATIONS: UNLESS OTHER WISE NOTED
1. Torque all 3/8" nuts to 35 lb.ft. 5. Torque all 10mm CL10.9 hardware to 53 lb.ft.
2. Torque all 12mm nuts & bolts to 65 lb.ft. 6. Torque all 5/8” hardware to 100 lb.ft.
3. Torque all 1/2” hardware to 75 lb.ft 7. Torque all 14mm CL10.9 hardware to 115 lb.ft.
4. Torque (4) center section locknuts to 110 lb. ft. 8. Retighten the spare tire if it was loosened.
NOTE: Not all of the hardware will be used in every installation. Paint any bare metal to prevent rust.
TOOLS REQUIRED
3/4” SOCKET & WRENCH
9/16” SOCKET & WRENCH
15MM, 17MM, 18 MM SOCKET
19MM, 21MM, 22MM SOCKET
TORQUE WRENCH
SAFETY GLASSES
SIDE PLATE ASSEMBLY (UP)
SEE SPECIFIC INSTRUCTIONS
FOR PROPER SIDE PLATE ASSEMBLY POSITION
(UP OR DOWN)
MUST INSTALL REAR SIDE BOLT FIRST
1/2” x 1 1/4” CARRIAGE BOLT
1/4” x 1” x 2” BOLT PLATE
1/2” HEX LOCKNUT
PULL WIRE
(SUPPLIED)
CENTER SECTION
CENTER SECTION LOCKNUT
CENTER SECTION
LOCK NUT
CENTER SECTION ASSEMBLY
4

TOOLS REQUIRED
9/16”, 3/4” SOCKET
21MM SOCKET
TORQUE WRENCH
SAFETY GLASSES
VEHICLE FRAME
1/4” x 1-1/2” x 3”
BOLT PLATE
99-13 CHEVROLET SILVERADO/ GMC SIERRA 1500 PICKUP
1. Remove the two (2) rear M14 bumper bracket bolts.
2. Raise hitch side brackets into position, aligning hole 2 in bracket with the rear most weldnut in frame.
3. Install the M14 X 45 MM hex bolt, 9/16” lock washer, and 3/8” bolt plate though hole 2 and into weldnut in
frame, both sides, finger tight.
4. Install 1/2” x 2 1/4” carriage bolt and block into forward hole of frame that aligns with hole 5 in hitch side
bracket, as shown.
5. Install 3/8” bolt plate, 1/2” conical washer and nut, both sides, finger tight.
6. Install center section as pre-assembled on front page with (4) 3/8” x 1 ¼” bolts and washer nuts, both sides.
Align center section of hitch with center of vehicle. Finger tighten fasteners.
7. Tighten hitch side bracket to frame. Tighten side plate assembly to side bracket. Tighten side bracket
assembly to center section.
HOLE 5
HOLE 2
3/8” x 1 1/4 bolt
3/8” WASHER NUTS
SIDE PLATE ASSEMBLY
CENTER SECTION
HITCH SIDE BRACKET
NOTE:
General assembly - loosely assemble center section (page 1); loosely install side brackets on vehicle (this page);
install center section assembly; tighten all fasteners to proper specifications (page 1)
3/8” x 1-1/4” x 2 1/2”
BOLT PLATE
1/2” X 2 1/4” CARRIAGE BOLT
M14 X 45MM CL10.9 BOLT
EXISTING WELDNUT ON
BUMPER BRACKET
1/2” CONICAL WASHER
1/2” NUT
9/16” LOCK WASHER
3/8” x 1-1/4” x 2 1/2”
BOLT PLATE
5
INSTALLATION A

TOOLS REQUIRED
9/16”, 3/4” SOCKET
21MM SOCKET
TORQUE WRENCH
SAFETY GLASSES
VEHICLE FRAME
1/4” x 1-1/2” x 3”
BOLT PLATE
01- 07 CHEVROLET SILVERADO/ GMC SIERRA 2500HD PICKUP (07 – CLASSIC ONLY)
1. Remove the two (2) rear most M14 bumper bracket bolts.
2. Raise hitch side brackets and 3/8” bolt plate into position, aligning hole 3 in bracket with the rear most weldnut in frame.
3. Install the M14 x 45mm hex bolt and 9/16 lock washer though hole 3 and into weldnut in frame, both sides, finger tight.
4. Install 1/2” x 2 1/4” carriage bolt and block into hole of frame that aligns with hole 4 in hitch side bracket, as shown.
5. Install 1/2” x 2 1/4” hex bolt and block into hole of frame that aligns with hole 2 in hitch side bracket, as shown.
6. Install 3/8” bolt plate between frame and hitch side bracket at hole 2 and 4, as shown.
7. Finger tighten 1/2” conical washer and nut, both sides.
8. Install center section as pre-assembled on front page with (4) 3/8” x 1 ¼” bolts and washer nuts, both sides. Align
center section of hitch with center of vehicle. Finger tighten fasteners.
9. Tighten hitch side bracket to frame. Tighten side plate assembly to side bracket. Tighten side bracket assembly to
center section.
HOLE 4
HOLE 2
3/8” x 1 1/4 bolt
3/8” WASHER NUTS
SIDE PLATE ASSEMBLY
CENTER SECTION
HITCH SIDE BRACKET
NOTE:
General assembly - loosely assemble center section (page 1); loosely install side brackets on vehicle (this page);
install center section assembly; tighten all fasteners to proper specifications (page 1)
3/8” x 1-1/4” x 2 1/2”
BOLT PLATE
1/2” X 2 1/4” CARRIAGE BOLT
M14 X 45mm BOLT
EXISTING WELDNUT ON
BUMPER BRACKET
1/2” CONICAL WASHER
1/2” NUT
HOLE 3
1/2” NUT
1/2” CONICAL WASHER
9/16” LOCK WASHER
1/2” x 2 1/4” HEX BOLT
INSTALLATION B
6

TOOLS REQUIRED
9/16”, 3/4” SOCKET
18MM SOCKET
TORQUE WRENCH
SAFETY GLASSES
VEHICLE FRAME
1/4” x 1-1/2” x 3”
BOLT PLATE
97-04 FORD F-150 PICKUP (OLD BODY STYLE)
1. Lower spare tire.
2. Place 1/2” x 2 1/4” bolts and 1/4” bolt plate in rear most hole in frame. Both sides.
3. Aligning hole 1 in bracket with the rear most hole in frame. Raise hitch side bracket, 3/8” bolt plate, 1/2”
conical washer, and 1/2” nut into position, both sides. loosely install nut.
4. Install the 1/2” x 2 1/4” carriage bolt and 1/4” bolt plate though hole in frame that aligns with hole 5 in hitch
side bracket. Install 3/8” bolt plate, 1/2” conical washer and 1/2” nut, both sides, loosely install nut.
5. Install the M12 x 45mm hex bolt and 1/4” bolt plate though hole in frame that aligns with hole 4 in hitch side
bracket. Install 1/2” conical washer and m12 nut, both sides, finger tight.
6. Install center section as pre-assembled on front page with (4) 3/8” x 1 ¼” bolts and washer nuts, both sides.
Align center section of hitch with center of vehicle. Finger tighten fasteners.
7. Tighten hitch side bracket to frame. Tighten side plate assembly to side bracket. Tighten side bracket
assembly to center section.
8. Raise spare tire back into place.
HOLE 5
HOLE 1
3/8” x 1 1/4 bolt
3/8” WASHER NUTS
SIDE PLATE ASSEMBLY
CENTER SECTION
HITCH SIDE BRACKET
NOTE:
General assembly - loosely assemble center section (page 1); loosely install side brackets on vehicle (this page);
install center section assembly; tighten all fasteners to proper specifications (page 1)
3/8” x 1-1/4” x 2 1/2”
BOLT PLATE
1/2” X 2 1/4” CARRIAGE BOLT
1/2” CONICAL WASHER
1/2” NUT
1/2” CONICAL WASHER
1/2” NUT
3/8” x 1-1/4” x 2 1/2”
BOLT PLATE
1/2” CONICAL WASHER
1/2” NUT
1/2” x 2 1/4” HEX BOLT
3/8” x 1-1/4” x 2 1/2”
BOLT PLATE
M12 NUT
1/2” CONICAL WASHER
M12 X 45MM BOLT
1/4” X 1” X 1 1/2”
BOLT PLATE
HOLE 4
EXISTING HOLES
7
INSTALLATION C

TOOLS REQUIRED
9/16”, 3/4” SOCKET
1/2” DRILL BIT
18MM SOCKET
TORQUE WRENCH
SAFETY GLASSES
VEHICLE FRAME
1/4” x 1-1/2” x 3”
BOLT PLATE
99-04 FORD F-250, F-350 SUPER DUTY PICKUP
1.Lower spare tire.
2.Place 1/2” x 2 1/4” bolts and 1/4” bolt plates in noted existing holes in frame. Both sides.
3. Aligning hole 3 and 4 in bracket with bolts in frame. Raise hitch side bracket, 3/8” bolt plate, 1/2” conical washer, and
1/2” nut into position, as shown, both sides. loosely install nuts.
4. Using hole 1 in bracket as a guide, drill a 1/2” hole in frame.
5. Install the M12 x 45mm hex bolt and 1/4” bolt plate though hole in frame. Install 1/2” conical washer and M12 nut, both
sides, finger tight.
6. Install center section as pre-assembled on front page with (4) 3/8” x 1 ¼” bolts and washer nuts, both sides. Align
center section of hitch with center of vehicle. Finger tighten fasteners.
7. Tighten hitch side bracket to frame. Tighten side plate assembly to side bracket. Tighten side bracket assembly to
center section.
8. Raise spare tire back into place.
HOLE 1
3/8” x 1 1/4 bolt
3/8” WASHER NUTS
SIDE PLATE ASSEMBLY
CENTER SECTION
HITCH SIDE BRACKET
NOTE:
General assembly - loosely assemble center section (page 1); loosely install side brackets on vehicle (this page);
install center section assembly; tighten all fasteners to proper specifications (page 1)
3/8” x 1-1/4” x 2 1/2”
BOLT PLATE
1/2” X 2 1/4” CARRIAGE BOLT
1/2” NUT
1/2” CONICAL WASHER
1/2” CONICAL WASHER
1/2” NUT
1/2” x 2 1/4” HEX BOLT
3/8” x 1-1/4” x 2 1/2”
BOLT PLATE
M12 NUT
M12 X 45MM BOLT
1/4” X 1” X 1 1/2”
BOLT PLATE
HOLE 4
EXISTING HOLES
DRILLED HOLE
HOLE 3
INSTALLATION E
8

TOOLS REQUIRED
9/16”, 3/4” SOCKET
1/2” DRILL BIT
18MM SOCKET
TORQUE WRENCH
SAFETY GLASSES
94-01 DODGE 1500 PICKUP, 94-02 DODGE 2500 & 3500 PICKUP (SHORT BED)
1.Lower spare tire.
2.Place 1/2” x 2 1/4” carriage bolts and 1/4” bolt plates in noted existing large hole in end of frame. Both sides.
3. Aligning hole 1 in bracket with bolts in frame. Raise 3/8” bolt plate, hitch side bracket, 1/4” bolt plate, 1/2” conical
washer, and 1/2” nut into position, as shown, both sides. loosely install nuts.
4. Pull both hitch side brackets to the rear most of hole in frame.
5. If the vehicle frame has a hole that lines up with hole #4 in hitch side bracket, install fasteners and bolt plates as shown.
If hole doesn’t exist or is to small, drill 1/2” hole in vehicle frame, approximatly centered in #4 hole if small hole doesn’t
exist. Install fasteners and bolt plates as shown.
6. Using hole 3 in bracket as a guide, drill a 1/2” hole in frame. Make sure that there is enough room to place 1/4 x 1 x 1 1/2”
bolt plate flat on the inside of the frame, next to the frame cross member.
7. Install the M12 x 45mm hex bolt and 1/4” bolt plate though hole in frame. Install 3/8” bolt plate, 1/2” conical washer and
M12 nut as shown, both sides, finger tight.
8. Install center section as pre-assembled on front page with (4) 3/8” x 1 ¼” bolts and washer nuts, both sides. Align
center section of hitch with center of vehicle. Finger tighten fasteners.
9. Tighten hitch side bracket to frame. Tighten side plate assembly to hitch side bracket. Tighten side plate assembly to
center section.
10. Raise spare tire back into place.
NOTE:
General assembly - loosely assemble center section (page 1); loosely install side brackets on vehicle (this page);
install center section assembly; tighten all fasteners to proper specifications (page 1)
VEHICLE FRAME
1/4” x 1-1/2” x 3”
BOLT PLATE
HOLE 1
3/8” x 1 1/4” BOLT
3/8” WASHER NUTS
SIDE PLATE
ASSEMBLY
CENTER SECTION
HITCH SIDE
BRACKET
3/8” x 1-1/4” x 2 1/2”
BOLT PLATE
1/2” X 2 1/4”
CARRIAGE BOLT
1/2” NUT
1/2” CONICAL WASHER
1/2” CONICAL WASHER
1/2” NUT
1/2” x 2 1/4” HEX BOLT
3/8” x 1-1/4” x 2 1/2”
BOLT PLATE
M12 NUT
M12 X 45MM BOLT
HOLE 4
EXISTING HOLES
DRILLED HOLE ON
SOME MODELS
HOLE 3
DRILLED HOLE
1/2” CONICAL WASHER
1/4” x 1-1/2” x 3” BOLT PLATE
1/4” X 1” X 1 1/2”
BOLT PLATE
1/4” x 1-1/2” x 3”
BOLT PLATE
1/4” X 1” X 1 1/2”
BOLT PLATE
3/8” x 1-1/4” x 2 1/2”
BOLT PLATE
1/2” x 2 1/4”
HEX BOLT
M12 X 45MM
BOLT
1/2” X 2 1/4”
CARRIAGE BOLT
3/8” x 1 1/4
BOLT
FRAME CROSS
MEMBER
SUSPENSION
SUPPORT
(HEAVY DUTY
MODELS ONLY)
9
INSTALLATION F

TOOLS REQUIRED
9/16”, 3/4” SOCKET
1/2” DRILL BIT
18MM SOCKET
TORQUE WRENCH
SAFETY GLASSES
94-01 DODGE 1500 PICKUP, 94-02 DODGE 2500 & 3500 PICKUP (LONG BED)
1.Lower spare tire.
2.Place 1/2” x 2 1/4” carriage bolts and 1/4” bolt plates in noted existing large hole in end of frame. Both sides.
3. Aligning hole 1 in bracket with bolts in frame. Raise 3/8” bolt plate, hitch side bracket, 1/4” bolt plate, 1/2” conical
washer, and 1/2” nut into position, as shown, both sides. loosely install nuts.
4. Pull both hitch side brackets to the forward most of hole in frame.
5. If the vehicle frame has a hole that lines up with hole #4 in hitch side bracket, install fasteners and bolt plates as shown.
If hole doesn’t exist or is to small, drill 1/2” hole in vehicle frame, approximatly centered in #4 hole. Install fasteners and
bolt plates as shown.
6. Using hole 3 in bracket as a guide, drill a 1/2” hole in frame. Make sure that there is enough room to place 1/4 x 1 x 1 1/2”
bolt plate flat on the inside of the frame.
7. Install the M12 x 45mm hex bolt and 1/4” bolt plate though hole in frame. Install 3/8” bolt plate, 1/2” conical washer and
M12 nut as shown, both sides, finger tight.
8. Install center section as pre-assembled on front page with (4) 3/8” x 1 ¼” bolts and washer nuts, both sides. Align
center section of hitch with center of vehicle. Finger tighten fasteners.
9. Tighten hitch side bracket to frame. Tighten side plate assembly to hitch side bracket. Tighten side plate assembly to
center section.
10. Raise spare tire back into place.
NOTE:
General assembly - loosely assemble center section (page 1); loosely install side brackets on vehicle (this page);
install center section assembly; tighten all fasteners to proper specifications (page 1)
VEHICLE FRAME
1/4” x 1-1/2” x 3”
BOLT PLATE
HOLE 1
3/8” x 1 1/4” BOLT
3/8” WASHER NUTS
SIDE PLATE
ASSEMBLY
CENTER SECTION
HITCH SIDE
BRACKET
3/8” x 1-1/4” x 2 1/2”
BOLT PLATE
1/2” X 2 1/4”
CARRIAGE BOLT
1/2” NUT
1/2” CONICAL WASHER
1/2” CONICAL WASHER
1/2” NUT
1/2” x 2 1/4” HEX BOLT
3/8” x 1-1/4” x 2 1/2”
BOLT PLATE
M12 NUT
M12 X 45MM BOLT
HOLE 4
EXISTING HOLES
DRILLED HOLE ON
SOME MODELS
HOLE 3
DRILLED HOLE
1/2” CONICAL WASHER
1/4” x 1-1/2” x 3” BOLT PLATE
1/4” X 1” X 1 1/2”
BOLT PLATE
1/4” x 1-1/2” x 3”
BOLT PLATE
1/4” X 1” X 1 1/2”
BOLT PLATE
3/8” x 1-1/4” x 2 1/2”
BOLT PLATE
1/2” x 2 1/4”
HEX BOLT
M12 X 45MM
BOLT
1/2” X 2 1/4”
CARRIAGE BOLT
3/8” x 1 1/4
BOLT
FRAME CROSS
MEMBER
SUSPENSION
SUPPORT
(HEAVY DUTY
MODELS ONLY)
10
INSTALLATION G

3/8” x 1 1/4 bolt
CENTER SECTION
1/2” X 2 1/4”
HEX BOLT
1/2” CONICAL
WASHER
3/8” WASHER
NUTS
SIDE PLATE ASSEMBLY
HITCH SIDE BRACKET
3/8” x 1-1/4” x 2 1/2”
BOLT PLATE
HOLE 2
(SHORT BED)
HOLE 5
(SHORT BED)
VEHICLE FRAME
HOLE 4
(LONG BED)
HOLE 1
(LONG BED)
1/2” NUT
1/4” x 1” x 3” BOLT PLATE
3/8” x 1-1/4” x 2 1/2”
BOLT PLATE
3/8” x 1-1/4” x 2 1/2”
BOLT PLATE
1/2” CONICAL
WASHER
1/2” X 2 1/4” CARRIAGE BOLT
HOLE 3
TOOLS REQUIRED
9/16”, 3/4” SOCKET
TORQUE WRENCH
SAFETY GLASSES
88-00 CHEVY & GMC C/K PICKUP SERIES (CLASSIC):
1. Lower spare tire.
2. If your vehicle has rivets on the bottom of the frame, you will need to install one 3/8” thick spacer between the frame and hitch side
bracket at each bolting location. These are needed for clearance between the bracket and the rivet head. The bracket cannot be bolted
directly against the rivets.
3. Install 1/2” X 2 1/4” hex bolt, 1/2” conical washer, and 3/8” thick spacer with the head on the bottom of the frame. Finger tighten 1/2”
conical washer and 1/2” nut on each bolt. For short beds use hole 2. For long beds use hole 1. NOTE: SOME DUAL PIPE EXHAUST
SYSTEMS WILL HIT THE BRACKET. THE EXHAUST WILL NEED TO BE MODIFIED.
4. Short Beds: Insert 1/2” carriage bolts with bolt plates down through the 1” diameter hole in the frame and into hole 5 in the hitch side
bracket. Finger tighten 1/2” conical washer and 1/2” nut on each bolt.
5. Long Beds: Insert 1/2” carriage bolts with bolt plates down through the 1” diameter hole in the frame and into hole 4 in the hitch side
bracket. Finger tighten 1/2” conical washer and 1/2” nut on each bolt.
6. Install center section as pre-assembled on front page with (4) 3/8” X 1 1/4” bolts and washer nuts, both sides. Align center section of
hitch with center of vehicle. Finger tighten fasteners.
7. Tighten hitch side brackets to vehicle frame. Tighten side plate assemblies to side brackets. Tighten side bracket assemblies to center
section. Refer to front page for specified torque values.
8. Raise spare tire back into place.
9. Be sure the spare tire in not rubbing against the brake hose. If needed, bend the hose mounting bracket to ensure proper clearance.
NOTE:
General assembly - loosely assemble center section (page 1); loosely install side brackets on vehicle (this page);
install center section assembly; tighten all fasteners to proper specifications (page 1)
11
INSTALLATION H

VEHICLE FRAME
HOLE 5
HOLE 2
3/8” x 1 1/4 bolt
CENTER SECTION
1/4” x x 1” x 1 1/2”
BOLT PLATE
12MM HEX BOLT
M12 NUT
1/2” X 2 1/4”
HEX BOLT
1/4” x 1” x 1 1/2”
BOLT PLATE
1/2” CONICAL
WASHER
1/2” NUT
3/8” x 1-1/4” x 2 1/2”
BOLT PLATE
3/8”
WASHER
NUTS
SIDE PLATE ASSEMBLY
HITCH SIDE BRACKET
3/8” x 1-1/4” x 2 1/2”
BOLT PLATE
1/2” CONICAL
WASHER
3/8” x 1-1/4” x 2 1/2”
BOLT PLATE
TOOLS REQUIRED
9/16”, 3/4”, 18MM SOCKET
1/4”, 1/2” DRILL BIT
1/2” DRILL
TORQUE WRENCH
SAFETY GLASSES
87-96 Ford Full Size Pickup & 1997 F-250 Heavy Duty / F-350 Heavy Duty:
1. Lower spare tire.
2. Apply masking tape to the bottom of frame in area “A” and area “B”. Same on both frame rails.
3. Measure from the outside of the frame inward 1” and make a line in area “A” and area “B”.
4. Measure from the rear of the frame forward 3/4” and make a line in area “A”. From that mark, measure 14 5/8” forward and make a
mark in area “B”.
5. Hold side bracket up to bottom of frame. Double check hole 2 and 5 in side bracket for proper alignment with marks. If they don’t line
up, adjust the marks in area “B”.
6. Center punch and pilot drill with 1/4” drill bit. Enlarge the pilot hole with 1/2” drill bit. Total of 4 holes ( 2 per frame rail).
7. Install 12MM hex bolt and block into the hole of frame that aligns with hole 5 in hitch side bracket, as shown.
8. Install 1/2” X 2 1/4” hex bolt and block into the hole of frame that aligns with hole 2 in hitch side bracket, as shown.
9. Install 3/8” bolt plate between frame and hitch side bracket at hole 2 and 5, as shown.
10. At hole 2, place 3/8” bolt plate underneath hitch side bracket and finger tighten 1/2” conical washer and nut, both sides.
11. At hole 5, finger tighten 1/2” conical washer and nut, both sides.
12. Install center section as pre-assembled on front page with (4) 3/8” X 1 1/4” bolts and washer nuts, both sides. Align center section of
hitch with center of vehicle. Finger tighten fasteners.
13. Tighten hitch side brackets to vehicle frame. Tighten side plate assemblies to side brackets. Tighten side bracket assemblies to
center section. Refer to front page for specified torque values.
14. Raise spare tire back into place.
NOTE:
General assembly - loosely assemble center section (page 1); loosely install side brackets on vehicle (this page);
install center section assembly; tighten all fasteners to proper specifications (page 1)
BOTTOM VIEW OF DRIVER SIDE FRAME
AREA “B”
1/2” DRILLED HOLE
AREA “A”
1/2” DRILLED HOLE
FORWARD
REAR OF FRAME
RIVET
12
INSTALLATION I

13
37096 REESE TOWPOWER MULTI-FIT APPLICATION CHART
MAKE & MODEL
MODEL YEARS
87
88
89
90
91
92
93
94
95
96
97
98
99
00
01
02
03
04
05
06
07
08
09
10
11
12
13
14
CHEVROLET SILVERADO 1500 PICKUP
A
A
A
A
A
A
A
A
A
A
A
A
A
A
A
CHEVROLET SILVERADO 2500HD PICKUP
B B B B B B B
CHEVROLET C/K SERIES PICKUP (CLASSIC)
H
H
H
H
H
H
H
H
H
H
H
H
H
DODGE FULL SIZE PICKUP
- 1500 (SHORTBED) F F F F F F F F
DODGE FULL SIZE PICKUP
- 2500 & 3500 (SHORTBED) F F F F F F F F F
DODGE FULL SIZE PICKUP
- 1500 (LONGBED) G
G
G
G
G
G
G
G
DODGE FULL SIZE PICKUP
- 2500 & 3500 (LONGBED) G
G
G
G
G
G
G
G
G
FORD F
-150 PICKUP (OLD BODY SYLE) I I I I I I I I I I C C C C C C C C
FORD F
-250/350 SUPER DUTY PICKUP I I I I I I I I I I I E E E E E E E E E E E E E E E E
GMC SIERRA 1500 PICKUP
A
A
A
A
A
A
A
A
A
A
A
A
A
A
A
GMC SIERRA 2500HD PICKUP
B B B B B B B
GMC C/K SERIES PICKUP (CLASSIC)
H
H
H
H
H
H
H
H
H
H
H
H
H

REESE One (1) Year Limited Warranty
1. Warranty. Cequent Consumer Products, Inc. warrants to the original consumer purchaser ("You") that
the Product will be free from defects in material or workmanship for one year from the date of your retail
purchase. Cequent Consumer Products, Inc. makes no other warranties. If the Product does not
comply with the Warranty, Cequent Consumer Products, Inc. will replace the Product without charge and
within a reasonable time or, at Cequent Consumer Products, Inc. option, otherwise refund the purchase
price.
2. Limitations on the Warranty. The Warranty does not cover the following: (a) normal wear and tear; (b)
service or labor charges incurred in removing or replacing any Product; (c) the finish on the Product; (d)
a Product that has been damaged through abuse, neglect, misuse or as a result of any accident or in
any other manner; (e) a Product which is misapplied, overloaded, or improperly installed; and (f) a
Product altered in any manner by anyone other than Cequent Consumer Products, Inc.
3. Obligations of Purchaser. To obtain the benefits of the Warranty, You must promptly present the
defective Product and proof of purchase to Cequent Consumer Products Inc., 29000-2 Aurora Road,
Solon, Ohio 44139 or any of its branches, factories, or authorized dealers listed in local directories. Any
returned Product that is replaced or refunded becomes the property of Cequent Consumer Products,
Inc.
4. Legal Rights. This Warranty gives You specific legal rights, and You also may have other rights which
vary from state to state. ANY IMPLIED WARRANTY OF MERCHANTABILITY OR FITNESS FOR A
PARTICULAR PURPOSE ON ANY PRODUCT SHALL BE LIMITED TO ONE YEAR FROM THE DATE
OF RETAIL PURCHASE BY YOU. Some states do not allow limitations on how long an implied
warranty lasts, so the above limitation may not apply to You.
5. Remedy Limits. Replacement of the Product or refund in the manner provided above is Your exclusive
remedy and shall constitute fulfillment of all liabilities of Cequent Consumer Products, Inc. to You
whether based on contract or otherwise. Cequent Consumer Products, Inc. shall not be liable or
assume responsibility for the loss of the use of any vehicle, loss of time, rental of vehicles, loss or
damage to personal property, expenses such as gasoline, telephone, lodging, or towing, or any other
incidental or consequential damages incurred as a result of the use or ownership of any Product. Some
states do not allow the exclusion or limitation of incidental or consequential damages, so the above
limitation or exclusion may not apply to You. Any of the above remedy limitations shall be inoperative to
the extent they are not permitted by applicable state law.
The proper attachment of this product in accordance with the enclosed instructions is critical to its proper performance.
Cequent Consumer Products, Inc. has no control over, or responsibility for, the attachment or the installation. Cequent
Consumer Products, Inc. is NOT responsible nor will be held liable for any damage resulting from its attachment or improper
use. Cequent Consumer Products, Inc. shall not be liable for any claims of any kind greater than the purchase price of the
product. Warranty information available at www.trimascorp.com/terms.
Cequent Consumer Products, Inc.
29000-2 Aurora Road
Solon, OH 44139
Questions: (800) 234-6992
ReeseBrands.com
14

26
37096 TABLEAU D'IDENTIFICATION
Marque et modèle
Années des modèles
87
88
89
90
91
92
93
94
95
96
97
98
99
00
01
02
03
04
05
06
07
08
09
10
11
12
13
14
CHEVROLET SILVERADO 1500 PICKUP
A A A A A A A A A A A A A A A
CHEVROLET SILVERADO 2500HD PICKUP
B B B B B B B
CHEVROLET PICKUP
- C/K SERIES (CLASSIQUE)
H
H
H
H
H
H
H
H
H
H
H
H
H
DODGE FULL SIZE PICKUP
- 1500 (SHORT LIT)
F F F F F F F F
DODGE FULL SIZE PICKUP
- 2500 & 3500 (SHORT LIT)
F F F F F F F F F
DODGE FULL SIZE PICKUP
- 1500 (LONG LIT)
G
G
G
G
G
G
G
G
DODGE FULL SIZE PICKUP
- 2500 & 3500 (LONG LIT)
G
G
G
G
G
G
G
G
G
FORD F
-150 PICKUP (STYLE ANC. CARR.)
I I I I I I I I I I C C C C C C C C
FORD F
-250/350 SUPER DUTY PICKUP I I I I I I I I I I I E E E E E E E E E E E E E E E E
GMC SIERRA 1500 PICKUP
A A A A A A A A A A A A A A A
GMC SIERRA 2500HD PICKUP
B B B B B B B
GMC PICKUP
- C/K SERIES (CLASSIQUE)
H
H
H
H
H
H
H
H
H
H
H
H
H

39
TABLA DE APLICACION 37096
Marca y modelo
Anos de modelo
87
88
89
90
91
92
93
94
95
96
97
98
99
00
01
02
03
04
05
06
07
08
09
10
11
12
13
14
CHEVROLET SILVERADO 1500 TIPO PICKUP
A A A A A A A A A A A A A A A
CHEVROLET SILVERADO 2500HD TIPO PICKUP
B B B B B B B
CHEVROLET PICKUP
- C/K SERIES (CLÁSICO)
H
H
H
H
H
H
H
H
H
H
H
H
H
DODGE FULL SIZE PICKUP
- 1500 (PLANTO CORTO)
F F F F F F F F
DODGE FULL SIZE PICKUP
- 2500 & 3500 (PLANTO CORTO)
F F F F F F F F F
DODGE FULL SIZE PICKUP
- 1500 (PLANTON LARGO)
G
G
G
G
G
G
G
G
DODGE FULL SIZE PICKUP
- 2500 & 3500 (PLANTON LARGO)
G
G
G
G
G
G
G
G
G
FORD F
-150 TIPO PICKUP ANTIGUA CARROCERIA
I I I I I I I I I I C C C C C C C C
FORD F
-250/350 SUPER DUTY PICKUP
I I I I I I I I I I I E E E E E E E E E E E E E E E E
GMC SIERRA 1500 TIPO PICKUP
A A A A A A A A A A A A A A A
GMC SIERRA 2500HD TIPO PICKUP
B B B B B B B
GMC PICKUP
- C/K SERIES (CLÁSICO)
H
H
H
H
H
H
H
H
H
H
H
H
H
/