Page is loading ...

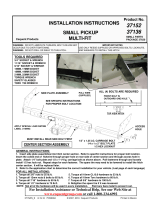
INSTALLATION INSTRUCTIONS
TOOLS REQUIRED
5/8” DRILL BIT
15/16” SOCKET
15/16” WRENCH
3/4” SOCKET
3/4” WRENCH
2 CLAMPS
TORQUE WRENCH
SMALL PARTS
PACKAGE 37424
SOLON, OHIO
WARNING: DO NOT LUBRICATE THREADS, BOLT FAILURE MAY
OCCUR DUE TO OVER TIGHTENING.
WARNING: DO NOT DRILL OR WELD TO THIS HITCH.
IMPORTANT NOTES
USE ONLY REESE SUPPLIED OR APPROVED BOLTS, LOCKNUTS,
AND WASHERS TO INSTALL THIS HITCH
MULTI-FIT PICK-UP
RIVET IN FRAME
5/8” BOLT
1/4 BOLT PLATE
3/8” SPACER
5/8” LOCK WASHER
5/8” NUT
1/2” BOLT
1/2” LOCK WASHER
1/2” NUT
FRAME
FRONT
REAR
1973-1996 Ford Full Size Pickup & 1997 F-250 Heavy Duty / F-350 Heavy Duty:
1. Assemble the three pieces of the hitch together on the floor before attaching it to the truck. Using 1/2” bolts, lock washers and nuts, bolt the
brackets to the center section as shown. Place the brackets on the outside of the center section. Bolt through the holes shown in the
illustration. Leave the bolts loose enough to center brackets on truck frame. NOTE: Be sure to use four holes to bolt each bracket to the center
section.
2. Clamp the hitch to the frame with a 3/8” thick spacer between the hitch and the frame at the rear. Align the ends of the brackets with the end
of the frame as shown.
3. Using the holes in the bracket as a guide, drill 5/8” diameter holes into the frame at the locations shown.
4. Insert 5/8” bolts with bolt plates down through the frame and into the bracket. Place a 3/8” thick spacer between the frame and the bracket at
the rear mounting hole. Install a 3/8" thick spacer, lock washer and nut on each bolt.
5. Tighten the nuts in the following order: First torque the 1/2" nuts to 70 ft•lb. Then torque the 5/8" nuts to 115 ft•lb.
NOTE: SIDE BRACKETS WILL DEFLECT WHEN TIGHTENED
3/8” SPACER
For Installation Assistance or Technical Help, See our Web Site at
www.CequentConsumerProducts.com or call 1-800-234-6992
Product No.
37094
1
37094IN 04-04-114 © 2014 CEQUENT CONSUMER PRODUCTS

TOOLS REQUIRED
15/16” SOCKET
15/16” WRENCH
3/4” SOCKET
3/4” WRENCH
5/8" DRILL BIT
TORQUE WRENCH
TOOLS REQUIRED
15/16” SOCKET
15/16” WRENCH
3/4” SOCKET
3/4” WRENCH
TORQUE WRENCH
5/8” BOLT
1/4” BOLT PLATE
3/8” SPACER
5/8” LOCK WASHER
5/8” NUT
1/2” BOLT
1/2” NUT
1/2” LOCK WASHER
5/8” BOLT
1/4” BOLT PLATE
3/8” SPACER
3/8” SPACER
5/8” LOCK WASHER
5/8” NUT
1/2” BOLT
1/2” NUT
1/2” LOCK WASHER
1997-2003 FORD F-150 & LIGHT DUTY F-250:
2004 FORD F-150 HERITAGE (OLD BODY STYLE)
1. Align the bracket with the rear edge of the frame. Place 3/8" thick
spacers between the bracket and the frame as shown. Attach
brackets to the frame as shown with 5/8” bolts and bolt plates down
through the frame, spacers, and bracket. Bolt into the first and last
holes in the bracket. Install 3/8” thick spacer with 5/8” lock washer
and nut on the each bolt. Leave the nuts loose at this time.
2. Install the center section of the hitch as shown with the frame
brackets on the inside of the center section. Use the 1/2” bolts with
lock washers and nuts. NOTE: Be sure to use four holes to bolt
each bracket to the center section.
3. Tighten the nuts in the following order:
First torque the 1/2" nuts to 70 ft•lb.
Then torque the 5/8" nuts to 115 ft•lb.
FRONT
REAR
FRONT
REAR
3/8” SPACER
3/8” SPACER
1998-2004 FORD F-250 & F-350 SUPER DUTY:
1. Align the bracket with the rear edge of the frame. Attach the
brackets to the frame as shown with 5/8” bolts and bolt plates
down through rear holes in the frame. Install 3/8" thick spacers,
5/8" lock washers, and nuts on these bolts. Leave the nuts loose
at this time.
2. Install the center section of the hitch as shown with the frame
brackets on the outside of the center section. Bolt through the
holes shown. Use the 1/2” bolts with lock washers and nuts.
NOTE: Be sure to use four holes to bolt the brackets to the
center section. Tighten enough for the brackets to make full
contact with the center section.
3. With the 5/8” drill, drill the two forward holes. Install fasteners as
shown. Install 3/8” thick spacers, 5/8” lock washers and nuts on
the bolts. Leave the nuts loose at this time.
4. Tighten the nuts in the following order: First torque the 1/2" nuts
to 70 ft•lb. Then torque the 5/8" nuts to 115 ft•lb.
2

1988-2000 CHEVY & GMC (CLASSIC):
1. The 12mm diameter bolts and weld nuts at the end of the frame must be removed. ( Wear Eye Protection) Method 1) Back out the
12mm diameter bolt halfway. Drive the bolt upward by striking the bolt head with a ball peen hammer to break the nut loose. Ream out the
bolt hole to 5/8” diameter. Method 2) Remove the 12mm bolt and discard. Using a 5/8” drill bit, drill out the nut. Then remove the remainder
with a hammer and chisel. Some vehicles have an additional 8mm diameter bolt on the passenger’s side. Remove the bolt and reinstall it with
the head on the bottom of the frame.
2. If your vehicle has rivets on the bottom of the frame or the 8mm bolt, you will need to install one 3/8” thick spacer between the frame and the
bracket at each bolting location. These are needed for clearance between the bracket and the rivet head or 8mm bolt. The bracket can not be
bolted directly against the rivets or 8mmbolt.
3. Using the supplied hardware, insert 5/8” diameter bolt with bolt plate down through the hole created from the removal of the 12mm nut. Fasten
the bracket to the frame. See the illustration. For short bed use hole 2. On long bed use hole 1. NOTE: SOME DUAL PIPE EXHAUST
SYSTEMS WILL HIT THE BRACKET. THE EXHAUST WILL NEED TO BE MODIFIED. Attach with 3/8” spacer, 5/8” lock washer, and 5/8’nut.
4. (Short Beds): Insert 5/8” bolts with bolt plates down through the 1” diameter holes in the frame and into holes (4) in the brackets. Install a 3/8”
thick spacer, 5/8” lock washer, and nut on each bolt. Leave the nuts loose at this time.
5. (Long Beds): Insert 5/8” bolts with bolt plates down through the 1” diameter holes in the frame and into holes (3) in the brackets. If the forward
holes are only 1/2" diameter, use the 5/8" drill bit to enlarge them. Install a 3/8” thick spacer, 5/8” lock washer and nut on each bolt. Leave the
nuts loose at this time.
6. Place the center section between the brackets as shown. The spare tire may need to be loosened. Bolt through the center section and the
bracket with 1/2” bolts, lock washers and nuts. NOTE: Be sure to use four holes to bolt the brackets to the center section.
7. Tighten the nuts in the following order:
First torque the 1/2" nuts to 70 ft•lb.
Then torque the 5/8" nuts to 115 ft•lb.
8. Retighten the spare tire if it was loosened.
9. Be sure that the spare tire is not rubbing against the brake hose. If needed, bend the bracket that the hose mounts to a little so that you have
clearance between the tire and the brake hose.
TOOLS REQUIRED
15/16” SOCKET
15/16” WRENCH
3/4” SOCKET
3/4” WRENCH
19MM WRENCH
19MM SOCKET
15MM SOCKET
15MM WRENCH
5/8” DRILL
TORQUE WRENCH
5/8” BOLT
1/4” BOLT PLATE
3/8” SPACER
3/8” SPACER
5/8” LOCK WASHER
5/8” NUT
1/2” BOLT
3/8” SPACER
1/4” BOLT PLATE
1/2” NUT
1/2” LOCK WASHER
FRONT
REAR
Hole 1
Hole 2
Hole
3
Hole 4
5/8” BOLT
3

TOOLS REQUIRED
15/16” SOCKET
15/16” WRENCH
3/4” SOCKET
3/4” WRENCH
21MM SOCKET
TORQUE WRENCH
TOOLS REQUIRED
15/16” SOCKET
15/16” WRENCH
3/4” SOCKET
3/4” WRENCH
21MM SOCKET
TORQUE WRENCH
5/8” BOLT
1/4” BOLT PLATE
3/8” SPACER
5/8” LOCK WASHER
5/8” NUT
1/2” BOLT
1/2” NUT
1/2” LOCK WASHER
3/8” SPACER
EXISTING FACTORY
FLANGE BOLT
5/8” BOLT
1/4” BOLT PLATE
3/8” SPACER
5/8” LOCK WASHER
5/8” NUT
1/2” BOLT
1/2” NUT
1/2” LOCK WASHER
3/8” SPACER
EXISTING FACTORY
14MM FLANGE BOLT
FRONT
REAR
FRONT
REAR
1999-2006 CHEVY SILVERADO & GMC SIERRA, 2007 CLASSIC
(LONG BEDS):
1. Remove the 14mm bolt from the bottom of the frame with a
21mm socket.
2. Bolt the brackets on with the 14mm bolt that was just removed
and a 3/8” thick spacer into the hole shown. Insert a 5/8” bolt
with a 1/4" bolt plate through the large hole in the frame and
into the bracket as shown. Install 3/8” thick spacers, 5/8” lock
washers and nuts on the bolts. Leave the bolts loose.
3. Install the center section between the brackets as shown.
Use the bolting location indicated. Install 1/2” bolts through the
center section and the bracket as shown. Install 1/2” lock
washers and nuts on the bolts. NOTE: Be sure to use four
holes to bolt the brackets to the center section.
4. Tighten the nuts in the following order:
First torque the 1/2" nuts to 70 ft•lb.
Then torque the5/8" nuts to 115 ft•lb, and the 14mm bolts to 85 ft-lb.
1999-2005 CHEVY SILVERADO & GMC SIERRA, 2007 CLASSIC
(SHORT BEDS):
1. Remove the 14mm bolt from the bottom of the frame with a
21mm socket.
2. Bolt the brackets on with the 14mm bolt that was just removed
and a 3/8” thick spacer into the hole shown. Insert a 5/8” bolt
with a 1/4" bolt plate through the large hole in the frame and
into the bracket as shown. Install 3/8” thick spacers, 5/8” lock
washers and nuts on the bolts. Leave the bolts loose.
3. Install the center section between the brackets as shown. Use
the bolting location indicated. Install 1/2" bolts through the
center section and the bracket as shown. Install 1/2” lock
washers and nuts on the bolts. NOTE: Be sure to use four
holes to bolt the brackets to the center section.
4. Tighten the nuts in the following order:
First torque the 1/2" nuts to 70 ft•lb.
Then torque the5/8" nuts to 115 ft•lb, and the 14mm bolts to 85 ft-lb.
4

2000-2006 TOYOTA TUNDRA :
1. Ream existing hole at the rear of the frame to except a 5/8” bolt and install the 5/8” bolts through the bolt plates and into
the frame. With the 3/8” spacer, 5/8” lock washer, and 5/8” nut bolt the brackets to the frame. Leave the bolts loose
enough to center bracket on frame of truck. Do not install fasteners in the forward hole in the brackets at this time.
2. Install the center section to the brackets as shown. Use the bolting location indicated. Install 1/2” bolts through the center
section and the bracket as shown. Install 1/2” lock washers and nuts on the bolts.
3. Using the forward most holes in the brackets as a guide drill a 5/8” hole and install the 5/8” bolts with 1/4” bolt plates
through the frame and brackets. Then install the 3/8” spacer, 5/8” lock washer, and 5/8” nuts.
NOTE: Be sure to use four holes to bolt the brackets to the center section.
4. Tighten the nuts in the following order:
First torque the 1/2" nuts to 70 ft•lb.
Then torque the 5/8" nuts to 115 ft•lb.
NOTE: SIDE BRACKETS MAY DEFLECT WHEN TIGHTENED
5/8” BOLT
1/4” BOLT PLATE
3/8” SPACER
5/8” LOCK WASHER
5/8” NUT
1/2” BOLT
1/2” NUT
1/2” LOCK WASHER
FRONT
REAR
TOOLS REQUIRED
15/16” SOCKET
15/16” WRENCH
3/4” SOCKET
3/4” WRENCH
21MM SOCKET
TORQUE WRENCH
SAFETY GLASSES
5

TOOLS REQUIRED
15/16” SOCKET
15/16” WRENCH
3/4” SOCKET
3/4” WRENCH
5/8" DRILL BIT
TORQUE WRENCH
FRONT
REAR
1971-1993 Dodge Pick Up:
1. Insert a 5/8” bolt with a 1/4” bolt plate down through the 1” diameter hole at the end of the frame. Do this on both sides. Fasten the frame
brackets as shown, to the frame with 3/8" thick spacers, lock washers and nuts. Leave the bolts loose enough to center bracket on frame of
truck.
2. Install the center section between the brackets as shown. Bolt through the center section and the brackets with 1/2” bolts, lock washers and
nuts. Use the holes shown. Leave the nuts finger tight at this time. Some spare tire carriers may need to be modified if the hitch hits the
carrier. NOTE: Be sure to use four holes to bolt the brackets to the center section.
3. Using the hole in the bracket as a guide, drill a 5/8” diameter hole through the frame. Use the farthest front hole. Do this on both sides.
4. Insert 5/8” bolts with 1/4” bolt plates down through the frame and the bracket. Install 3/8” thick spacers, 5/8” lock washers and nuts on the
bolts.
5. Tighten the nuts in the following order:
First torque the 1/2" nuts to 70 ft•lb.
Then torque the 5/8" nuts to 115 ft•lb.
NOTE: SIDE BRACKETS WILL DEFLECT WHEN TIGHTENED
1/2” NUT
1/2” LOCK WASHER
5/8” NUT
5/8” LOCK WASHER
1/2” BOLT
5/8” NUT
5/8” LOCK WASHER
3/8” SPACER
1/4” BOLT PLATE
5/8” BOLT
3/8” SPACER
6

TOOLS REQUIRED
5/8” DRILL BIT
3/8” DRILL BIT
15/16” SOCKET
15/16” WRENCH
3/4” SOCKET
3/4” WRENCH
13MM SOCKET
9/16” SOCKET
9/16” WRENCH
TORQUE WRENCH
FRAME
5/8” BOLT
1/4” BOLT PLATE
3/8” SPACER
3/8” SPACER
5/8” LOCK WASHER
5/8” NUT
1/2” BOLT
1/2” NUT
1/2” LOCK WASHER
FRONT
REAR
All 1994-2001 and 2002 2500/3500 Dodge Pick Up Short Bed:
1. The spare tire may need to be loosened for installation.
2. Bolt the brackets to the frame as shown with a 5/8” bolt and 1/4” bolt plate inserted through the 1” diameter hole in the end of the frame. Install
two 3/8” thick spacers between the frame and brackets at the rear bolting locations. Install 3/8" thick spacers, lock washers and nuts on the
bolts. NOTE: For some models, the exhaust hanger will need to be unbolted from the frame.
3. Install the center section between the brackets as shown. Use the hole pattern that works best for your truck. Insert 1/2" bolts through the
center section and the brackets. Install 1/2” lock washers and nuts on the bolts. Finger tighten the bolts at this time. NOTE: Be sure to use four
holes to bolt each bracket to the center section.
4. Using the hole in the bracket as a guide, drill a 5/8" hole through the frame. Use the hole shown in the diagram. Install 5/8” bolts with bolt
plates into the holes. Be sure to insert two 3/8” thick spacers between the frame and the brackets. Install 3/8” thick spacers, lock washers and
nuts on the bolts.
5. If the exhaust hanger was removed, drill a 3/8” hole through the hanger and attach it to the hitch bracket in one of the holes indicated. Use the
3/8" hardware provided to re-attach the exhaust hanger.
6. Tighten the nuts in the following order:
First torque the 1/2" nuts to 70 ft•lb.
Then torque the 5/8" nuts to 115 ft•lb.
7. If the spare tire was loosened, retighten it now.
RE-ATTATCH
EXHAUST
HANGER IN ONE
OF THESE HOLES
3/8” SPACER
7

TOOLS REQUIRED
3/8” DRILL BIT
15/16” SOCKET
15/16” WRENCH
3/4” SOCKET
3/4” WRENCH
13MM SOCKET
9/16” SOCKET
9/16” WRENCH
TORQUE WRENCH
RE-ATTATCH EXHAUST
HANGER IN ONE OF
THESE HOLES
FRAME
5/8” BOLT
1/4” BOLT PLATE
3/8” SPACER
3/8” SPACER
5/8” LOCK WASHER
5/8” NUT
1/2” BOLT
3/8" SPACER
1/2” NUT
1/2” LOCK WASHER
FRONT
REAR
All 1994-2001 and 2002 2500/3500 Dodge Pick Up Long Bed:
1. The spare tire may need to be loosened for installation.
2. Bolt the brackets to the frame as shown with a 5/8” bolt and 1/4” bolt plate inserted through the 1” diameter hole in the end of the frame. Install
two 3/8” thick spacers between the frame and brackets at the rear bolting locations. Install 3/8" thick spacers, lock washers and nuts on the
bolts. NOTE: For some models, the exhaust hanger will need to be unbolted from the frame.
3. Install the center section between the brackets as shown. Use the hole pattern that works best for your truck. Insert 1/2” bolts through the
center section and the brackets. Install 1/2” lock washers and nuts on the bolts. Finger tighten the bolts at this time. NOTE: Be sure to use four
holes to bolt each bracket to the center section.
4. Insert a 5/8” bolt with a 1/4" bolt plate through the 1” hole in the frame and into the bracket as shown. Insert two 3/8” thick spacers between
the frame and the bracket. Install a 3/8” thick spacer, 5/8” lock washer and nut on the bolt. Do this on both sides.
5. If the exhaust hanger was removed, drill a 3/8” hole through the hanger and attach it to the hitch bracket in one of the holes indicated. Use the
3/8" hardware provided to re-attach the exhaust hanger.
6. Tighten the nuts in the following order:
First torque the 1/2" nuts to 70 ft•lb.
Then torque the 5/8" nuts to 115 ft•lb.
7. If the spare tire was loosened, retighten it now.
8
/