Wolder miTab Neo User manual

Category
Smartwatches
Type
User manual

Wolder miTab Neo offers you the freedom to browse your favorite websites, watch YouTube videos, check emails, and read e-books. With its built-in 2MP rear camera, you can capture life's moments, while the 0.3MP front camera lets you video chat with friends and family. Expand the 8GB storage with a microSD card (up to 32GB) to store more photos, videos, and apps.

Wolder miTab Neo offers you the freedom to browse your favorite websites, watch YouTube videos, check emails, and read e-books. With its built-in 2MP rear camera, you can capture life's moments, while the 0.3MP front camera lets you video chat with friends and family. Expand the 8GB storage with a microSD card (up to 32GB) to store more photos, videos, and apps.

Fe
atures
Browse the Web.
Visit your favorite websites
Check your e-mail
Keep in touch with friends and family
Watch YouTube videos
Browse the worlds most popular video-sharing community
Read your favorite books
Download thousands of books with the included E-book reader
*
Discover thousands of apps for Android
Games, applications, and more with AP P C en ter
Connect to the Internet wirelessly
High-speed Wi-Fi 802.11 b/g/n networking
Enjoy your media library anywhere
Portable powerhouse plays popular music, video, and photo
form ats
microSD memory card reader
Increase your storage capacity (up to 32 GB supported)
Built-in camera
Convenient front-facing camera (0.3MP),
rear 2MP
Automatic orientation detection
Read any way you want; the display adjusts automatically!
Reading books in the ePub format requires the included E-book
reader application.
Requires optional HDMI cable
( T y p e A -to-Type C). 1080p HD video playback requires a video
file encoded at 1080p.
Streaming video quality will be affected by the source, and the
quality and condition of your network connection.
11
Un
it at a Glance
1. VOL+/VOL-
Press VOL+ to increase the volume level.
Press VOL-
to decrease the volume level.
2. POWER
Press to turn the unit on, or to turn the screen on
or off.
Press and hold to access the Power Off menu.
3. Headphone
Audio output connection for headphones.
4.USB
Connect to a USB device or a computer to transfer
data (e.g. music, videos, photos, files).
5. HDMI
Connect to a TV or other displays.
6.DC IN 5V
Change and power the tablet with the included
power adapter.
7.RESET
Press this button to reset the system when the
device is halted.
8. microSD
Load external microSD memory cards here.
12
3
4
5
6
7
8
Ge
tting Started
Turning the Tablet on or off
To turn the tablet on:
Press and hold the Power key until the LCD screen turns on.
Wait until the Home screen appears; the tablet is now ready for
use.
To turn the tablet off:
1. Press and hold the Power key until the Device Options menu
appears.
2. Touch ok the screen to turn off the tablet.
Turning the Screen On or off
(Standby)
When the tablet is on, you can turn off the
screen to conserve battery power. Simply press
the Power key once to turn the screen
off. Press the Power key again to turn the
screen back on.
To conserve battery power, the screen can be set to turn off
automatically when the tablet is not in use (between
15 seconds and 30 minutes).
This Screen timeout option can be found in the Display menu.
13
Ge
tting Started
Unlocking the Screen
When the screen turns off, you will have to
unlock the screen when you turn it back on.
To unlock the screen, drag the lock icon across
the screen towards the lock icon.
About Applications
To open an application, touch the application
icon on the home screen or in the Launcher
where you can tap the icon right up on the
home screen to get in..
Launcher screen:
.
The screen shown above is for illustrative
purposes only. Reserves the right to modify
and improve the final list of applications
available on the tablet.
14
Ab
out Applications
Preinstalled Applications
Some applications have been installed on your
tablet for your convenience.
These applications include:
Browse the web.
Perform simple mathematical operations.
Take pictures or videos with the
Front facing camera.
Check your e-mail.
Play music.
Access the Settings menu to adjust the
tablets options.
Preinstalled Applications
Installing Applications
You can also download and install additional applications from
the device’s applications AP P C e n t e r, the web browser, or other
sources.
15
Co
nnect to a Wi-Fi network
The Notification bar displays icons that indicate
your tablets Wi-Fi status
Notification that an open Wi-Fi network is
in range.
Connected to a Wi-Fi network (waves
indicate connection strength).
[no icon] There are no W i -Fi networks in range, or the Wi-Fi
radio is off.
1. Turn on the Wi-Fi radio if it is not already on. To turn on
W i -Fi:
a. Go to the Home screen: Press the Home key.
b. Open the Settings menu: tap the icon right up on the home
screen to get into the launcher, then touch Settings icon.
c. Open the Wireless & networks menu: Slide the icon to ON
status.
When Wi-Fi is on, the tablet will search and display a list of
available Wi-Fi networks.
If a network that you have connected to previously is found, the
tablet will connect to it. If you don’t see your network in the list,
you can force the tablet to re-scan. To scan for networks, tap
the Menu key, and then touch Scan.
16
WIFI1
WIFI2
Co
nnect to a Wi-Fi network
2. Select an available Wi-Fi network to connect to:
In the same Wi-Fi settings menu above, touch a network in the
list.
If the network is open, the tablet will prompt you to confirm
connection to the network. Touch Connect to confirm.
If the network is secured (as indicated by a Lock icon), the
tablet will prompt you to enter a password or other credentials.
Touch the Wireless password box to show the on-screen
keyboard and then use it to enter the password. Touch Connect
to confirm.
When you have successfully connected to a
W i -Fi network, the Notifications bar at the the low
of the screen will show a Wi-Fi signal indicator.
To learn about how to add a Wi-Fi network
when it is not in range or when the router
is set to obscure the network name (SSID);
or to configure advanced Wi-Fi options,
please refer to the manual.
17
WIFI1
Op
tional Connections
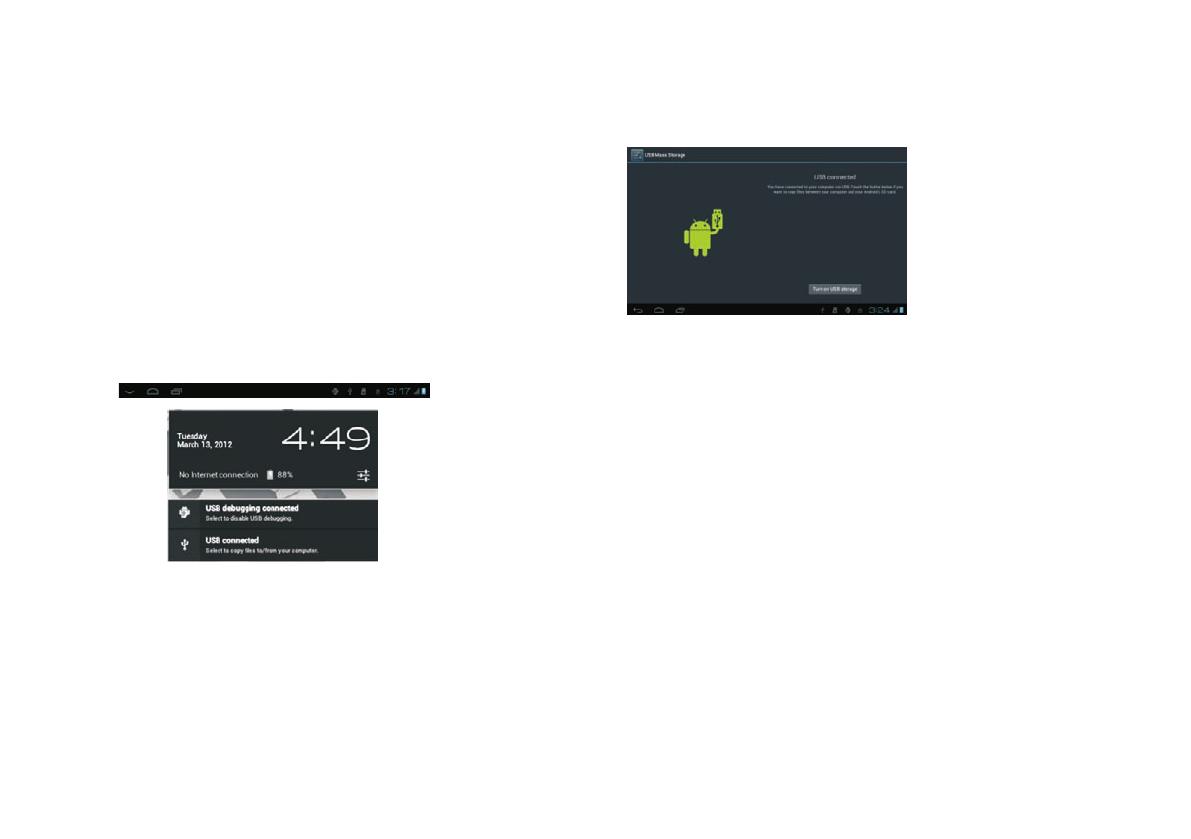
Connecting to a Computer
Connect the tablet to a computer to transfer files.
1.Connect your tablet to the computer.
With the included USB cable: Plug the small end of the cable
into the USB 2.0 high speed connector of the tablet. Plug the
large end of the cable into an available USB 2.0 high speed port
on the computer.
2.When your tablet is connected,slide up the USB icon right
down on the screen and then touch icon USB connected.
3.Mount the storage.
Touch button Turn on USB storage to mount the
tablets built-in storage. When it is mounted, you
can copy files to or from your tablet.
To connect the tablet to the TV:
1. Plug the small end of the HDMI cable into the
mini HDMI connector on the tablet.
2. Plug the large end of the HDMI cable into the
HDMI port on the TV.
3. Turn on the TV, and set its display mode to the
HDMI port that the tablet is connected to.
If you need help setting the display mode
of the TV, please refer to the documentation
provided by the TV manufacturer. If there
is no sound from the tablet on your TV, you
may need to set the HDMI switch settings,
on the TV.
18
Sp
ecifications
Processor
Amlogic 8726-MX Dual core
1.2GHz(cortex A9)
R A
M 1GB DDR3
St
orage
8G B flash built-in; micro
SD card slot (max.32GB supported)
Di
splay
8.0TFT LCD(1024x768), Capacitive
touch screen
W i -
Fi
Ne
tworking
IE
EE 802.11 b/g/n
Audio Output 3.5mm headphone
PC Interface USB 2.0 high speed
Additional
Features
Built-in microphone
Front facing camera(0.3MP), rear 2MP
1X1W speaker
Operating
Sy
st em
An
droid 4.0
P o
w e r
Rechargeable Li-poly battery power
Adapter(DC 5V, 2A)
Pl
ayback Time
(hours)
Up to 9 hours music,
4 hours video,
4
hours web browsing
Mu
sic was tested with a 128 kbps MP3 file; video
was tested with a 1920x1080 MPEG-4/AVC file;
browsing was tested with the screen brightness
set to default. Actual playback results may vary.
19
DECLARATION OF CONFORMITY
GL
OBAL WOLDER GROUP S.L, Polígono Industrial
de Barros nº29, 39408 Barros, Cantabria. España,
certifies that this product, referenced as Mitab Neo,
complies with the provisions of the Directive 99/05/CE
about Radio Equipment and Telecommunications
Terminal (R&TTE), and the Directive 2004/108/CEE of
Electromagnetic Compatibility standards in accordance
to harmonized standards.
20
  • Page 1 1
  • Page 2 2
  • Page 3 3
  • Page 4 4
  • Page 5 5
  • Page 6 6
  • Page 7 7
  • Page 8 8
  • Page 9 9
  • Page 10 10
  • Page 11 11
  • Page 12 12
  • Page 13 13
  • Page 14 14
  • Page 15 15
  • Page 16 16
  • Page 17 17
  • Page 18 18
  • Page 19 19
  • Page 20 20
  • Page 21 21
  • Page 22 22
  • Page 23 23
  • Page 24 24
  • Page 25 25
  • Page 26 26
  • Page 27 27
  • Page 28 28
  • Page 29 29
  • Page 30 30
  • Page 31 31
  • Page 32 32

Wolder miTab Neo User manual

Category
Smartwatches
Type
User manual

Wolder miTab Neo offers you the freedom to browse your favorite websites, watch YouTube videos, check emails, and read e-books. With its built-in 2MP rear camera, you can capture life's moments, while the 0.3MP front camera lets you video chat with friends and family. Expand the 8GB storage with a microSD card (up to 32GB) to store more photos, videos, and apps.

Ask a question and I''ll find the answer in the document

Finding information in a document is now easier with AI