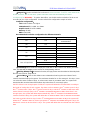
Optiview DVR Server 5.05 User manual
- Category
- Digital Video Recorders (DVR)
- Type
- User manual
This manual is also suitable for

DVR Server Manual ver.5.05/rel.092507
I
VR Enterprise DVR System
DVR Server (ver.5.05)
User Manual

DVR Server Manual ver.5.05/rel.092507
II
Contents
Chapter1 Start up and Main Interface ··························································· 2
1.1 Start up ····················································································································· 2
1.2 Main Interface ·········································································································· 2
1.2.1 Show tips ··············································································································· 2
1.2.2 Screen menu ·········································································································· 2
1.2.3 Interface description ····························································································· 5
1.2.4 System Menu ········································································································· 7
1.2.5 Network panel ····································································································· 13
1.2.6 PTZ Control panel ······························································································ 14
1.2.7 Color and Audio adjustment ··············································································· 17
1.2.8 Matrix & display ································································································· 17
1.2.9 DI/DO Control ···································································································· 18
Chapter2 Local setup ·················································································· 19
2.1 System setup ·········································································································· 20
2.1.1 System setup ········································································································ 20
2.1.2 Network setup ······································································································ 21
2.1.3 Boot setup ············································································································ 23
2.2 Camera setup ·········································································································· 24
2.2.1 Camera setup ······································································································ 24
2.2.2 Group setup ········································································································· 27
2.3 Sensor setup ··········································································································· 29
2.3.1 Sensor setup ········································································································ 29
2.3.2 Group setup ········································································································· 29
2.4 PTZ & Linkage setup ····························································································· 31
2.4.1 PTZ protocol setup ······························································································ 31
2.4.2 Motion detection relay & remote client alert ······················································ 31
2.5 E-mail setup ··········································································································· 33
2.5.1 SMTP setup ········································································································· 33
2.5.2 E-Mail setup ········································································································ 34
2.6 Digital matrix setup ································································································ 34
2.6.1 Matrix setup ········································································································ 34
2.6.2 Display setup ······································································································· 35
2.7 User setup ··············································································································· 36
2.7.1 User information ································································································· 36
2.7.2 User right setup ··································································································· 37

DVR Server Manual ver.5.05/rel.092507
III
Chapter3 IP Camera Setup ·········································································· 38
3.1 Functional buttons ·································································································· 38
3.2 Server setup ············································································································ 39
3.3 Channel setup ········································································································· 40
3.3 PTZ Control Setup ································································································· 41
3.4 Channel setup ········································································································· 42
3.5 Sensor setup ··········································································································· 43
3.6 Alarm setup ············································································································ 45
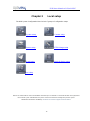
Chapter4 Local playback ············································································· 46
4.1 Main interface ········································································································ 46
4.2 Select playback channel ························································································· 46
4.3 Play file and related operations ·············································································· 47
4.4 Capture picture ······································································································· 49
4.5 Create clip file ········································································································ 49
4.5.1 Create file clip ····································································································· 49
4.5.2 Backup by time: ··································································································· 50
4.5.3 View Backup file ·································································································· 52
4.6 Search captured picture ·························································································· 54
4.7 Fast search ·············································································································· 55
4.8 Camera status ········································································································· 55
4.9 Show files ··············································································································· 57
Chapter 5 IE client ························································································ 59
5.1 Functions of IE Client ···························································································· 59
5.2 Main interface ········································································································ 59
5.2.1 Connection operations ························································································ 59
5.2.2 Connection/Record status ··················································································· 60
5.2.3 Partition mode ···································································································· 60
5.2.4 PTZ Control ········································································································ 60
5.2.5 Quit program ······································································································· 60
5.3 Local search ··········································································································· 61
5.4 Remote search ········································································································ 62
5.4.1 Fast download record data ················································································· 62
Chapter6 Mobile Client ················································································ 64

DVR Server Manual ver.5.05/rel.092507
IV
Chapter7 Appendixes ·················································································· 68
7.1 Appendix A: Fast key reference ············································································· 68
7.2 Appendix B: Audio preview ··················································································· 69
7.3 Appendix C: Update drivers of compressed card ·················································· 70
7.4 Appendix D: How to use “Copy File” folder. ························································ 71
7.5 Appendix F: Frequent Asked Questions ································································ 72
7.6 View the DVR via Internet····················································································· 74
7.7 How to turn ON Automatic Windows Login ························································· 76
7.8 DVR System Recovery Procedure ········································································· 78
Refer to the Tutorial video for other selected topic illustrated in video format.
The tutorials are small video file that can be played from the local DVR system.
It will illustrate many of the common task involved in working with your DVR system.
Please follow the link from the desktop ―Click here for Technical Support and Serial number‖.

DVR Server Manual ver.5.05/rel.092507
1
Thank you for purchasing VR Enterprise series DVR system. This User manual is designed to
inform you how to setup the DVR system and explain each function for you to make the most out of
the system professionally and meet your security recording needs.
IMPORTANT! Operators of the VR Enterprise series DVR system must thoroughly read this
manual prior to using the system.
VR Enterprise Series: DVR System Overview
The VR Enterprise series DVR system is fully designed with flexibility, reliability and
performance. This DVR system gives you greater option to customize the system settings.
You have the leverage and flexibility on the DVR depending on your specific Digital Video Recoding
requirements.
Cost Efficient – Uses IP infrastructure, so there is no need for costly dedicated cables
between sites and servers and manage the data, videos, audio, and other files efficiently. Uses
H.264 technology, which maximizes the use of the space on your HDD.
Leverage - Centralize control of setup parameters, scheduled alerts and maintenance of those
individual digital image devices like DVR, DVS, etc.
Straightforward Application and Management - Supports centralized network recording
management, flexible storage and HDD coverage and usage. Password-protected application
with multi-level user rights assignment per user.
System Features
Hardware support for H.264 compression, therefore giving you low HDD cost and excellent
video quality
Remote access via Internet web browser or through client software.
Computer Network support with High speed Internet.
connection is highly recommended.
Real-time, full-motion video capture & display (Max. 48 channel video input)
Real-time high-speed recording: Max. 30 frames/sec per channel
Synchronous audio recording (optional)
Motion detect (Whole area or max. 12 detection zones per channel)
Normal continuous recording and event recording (Motion detection or Optional external
sensor)
Electronic Map pop-up when there is an alarm event (optional)
System operation and alarm logging
Alarm-before recording, Auto send an alarm message
Remote recording
Alarm image auto send to email box as attachment
Matrix display and group display
Pan, tilt, zoom, focus & speed dome control
Search/playback by date/time directory (random-access), Duplex mode (Recording while
playback)

DVR Server Manual ver.5.05/rel.092507
2
Chapter1 Start up and Main Interface
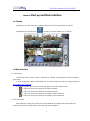
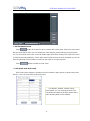
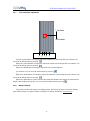
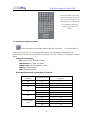
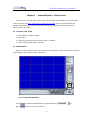
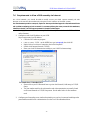
1.1 Start up
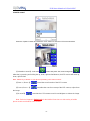
1).Before you run the DVR server, please make sure all devices are firmly connected.
Left-Double-Click shortcut icon to start it. The main interface is as follows:
1.2 Main Interface
1.2.1 Show tips
1. When the mouse moves closely or stops above a button, a text tip will be shown to interpret
its function.
2. Zoom in/out video image: Left-Double-Click a camera window to zoom in/out video image (or
press F11 on the keyboard).
3. Recording status: (an icon found at the top right corner of the video screen)
a. This icon means the system is recording normally.
b. This icon means the system is recording manually.
c. This icon means the system is recording in motion detection.
d. This icon means the system is recording in sensor detection.
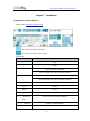
1.2.2 Screen menu
Press TAB key or Page UP (select next camera window) and Page Down (select previous
camera window) key on keyboard to select one live camera window.

DVR Server Manual ver.5.05/rel.092507
3
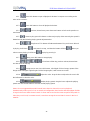
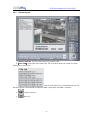
1. Full screen
Single-Right- Click image area, it will popup a menu, then select ―full screen‖ to change the
display mode to full screen (or press F12 on the keyboard). When you want to resume normal mode,
you should Single-Right- Click image area and select ―Restore display‖.
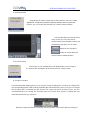
2. Instant playback
3. Alarm popup
Single-Right-Click desired camera window and select
―Instant playback‖. However, IP Camera‘s instant playback can
only be done doing a right click on a currently unused video
display window.
A submenu will be shown for you to choose a preset length
of time of instant playback .
The window that is playing back video data will indicate a
yellow border to be different from the live windows.
In the course of the instant playback, you can press Space
key to switch the play/pause status or direction key → and ←
to play next and previous frame.
If you want to stop the instant playback, you can
Single-Right-Click the play backing window, and select ―End
playback‖.
First, enable ―Alarm camera pop-up interval‖ in System Setup‖
menu by selecting the time interval in seconds. Single-Right-Click
video image area at the main interface and select ―Start alarm
popup‖. After setting up all these configurations, when there is a
motion detection alarm (set in PTZ & Linkage setup and Motion
detection setup) or an alarm triggered by sensor (set in Sensor
setup), system will display alarm cameras in sequence. When you
want to end this function, you can Single-Right-Click video image
area and select ―Pause alarm popup‖. (This functionality does not
apply IP camera through the IP Video Server, even IP camera have
alarms, their images will not pop up).

DVR Server Manual ver.5.05/rel.092507
4
4. OSD Adjustment
5. IP Camera setup
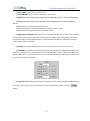
6. Change record disk
From the information display panel you can see the current recording disk, and when you Single-Click
the corresponding panel, it will show the available disk with its total free spaces. Also you can change
the recording disk by selecting the disk directly. The system will check the disk per 10s, and it is
recommended that you change the recording disk to local disk when system is writing data into
removable disk before you remove it.
When the capacity of HDD is not enough or there has been some errors while recording, the
Single-Right-Click video image area in main interface and select ―OSD
Adjustment‖ to adjust the position of OSD (IP Camera does not have this
function; you can set the OSD position in IP Camera setup remotely).
OSD includes time and channel name.
In this screen you can press time or
channel name and drag them to where you
want directly, after that, you can press
button to save and press
button to resume time and
channel name to default position.
This function is only available when you Right-single-Click an image of
IP camera Other information will be discussed in IP Camera Setup.

DVR Server Manual ver.5.05/rel.092507
5
DVR system will pop up information to inform you of the failure of recording and the corresponding
camera will stop recording.
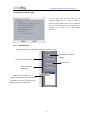
1.2.3 Interface description
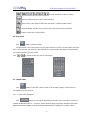
1. Partition mode
button to set the window‘s partition mode of the main screen. There are many types of
partitions. The available partition is determined by the total channels of the card. You can select
the suitable partition according to the number of video inputs; the partition number which is
bigger than total channel is not available with gray.
2. Videos-play-in-sequence mode switch
Press button to switch between playing all cameras in current windows in sequence and
not when the current partition number is smaller than the total channels of the card.
3. Emergency recording button
Press button to trigger recording of all cameras for 30 seconds even if they have
been set to record by any other modes. This function is useful to deal with emergency
situation where quick response is required.
4. Image capture
Press button to save a still image of selected camera to local hard disk for
reviewing or print.
5. Manual record switch
Press button to record manually and press it again to stop manual recording for
selected camera.
6. Information display panel
This panel shows day of the week, current date, current time, total free hard disk space, current

DVR Server Manual ver.5.05/rel.092507
6
record disk and description of selected camera.
7. Local setup submenu
Press button to enter Local setup submenu.
8. Local playback submenu
Press button to enter Local playback submenu to search local video/audio data.
9. System lock
Press button to prevent unauthorized user to operate system. Press this button
again; the unlock dialog box will be displayed. Input your User ID and password then press OK to
unlock it.
Default User ID is ―admin‖, with no password.
Note: If the DVR system is not configured as User Manage Mode ( Use Password is disabled) , the lock
button will be unusable and will allow any client access
10. Minimize button
Press button to minimize the main window (or press WIN + Z on keyboard).

DVR Server Manual ver.5.05/rel.092507
7
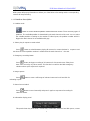
11. Exit program
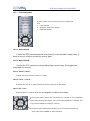
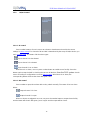
1.2.4 System Menu
opens up your option to go to other features menu such as remote voice chat,
Windows Explorer, electronic map, write working log, view system log and motion setup as shown
below:
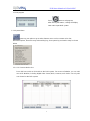
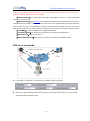
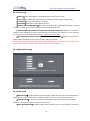
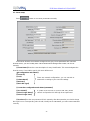
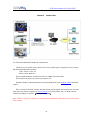
1.2.4.1 IP Camera Device List
Press this bar to add an IP Module to the DVR system. For resource limitation, you can add
max 16 IP Modules, including Digital video Server (DVS). However, each device can only add
one channel to the DVR system.
Press button to exit program.
After clicking this button, a dialog will display.
Click ―OK‖ to quit DVR system.

DVR Server Manual ver.5.05/rel.092507
8
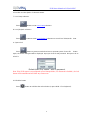
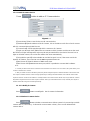
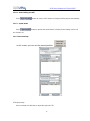
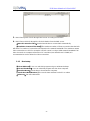
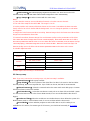
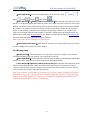
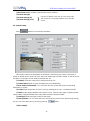
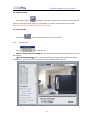
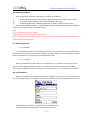
1.2.4.1.1 Add IP camera device
Press button to add an IP Camera device:
Figure2— 1
【Server Name】Set a name for the new IP camera device.
【IP Address】Input the address of the IP Camera, it is an IP address or IP alias of an IP camera
which is connected through DNS Server.
【Connect Port】Set the port through which connects to IP Camera.
【Login user ID/Login Pass】When the user wants to visit IP Camera and the server has used
the function of rights management, login user ID and password will be checked. If the user has no
rights to visit that camera, the connection will be shut down automatically.
【Using DNS to get IP】Select whether to use DNS to get IP or not, if the server end is the
dynamic IP address, users need to use the DNS to get the server‘s IP.
【DNS Server IP】Set IP address of DNS server host.
【DNS Server Port】DNS server host‘s port, which is provided to connect DNS software.
Note:
1. Currently our DVR server allows a maximum of 16 channels for IP cameras. For each device, the system allows you to
connect a maximum of 4 cameras.
2. After you add IP cameras to the DVR system, they will be assigned sequence numbers followed on local board cards.
The sequence numbers of the IP camera change dynamically according to the total numbers of local board cards and the
sequences of the IP cameras to be added. For example, if there are 32 channels local board card, and you add 2 IP cameras,
they will be assigned 33 and 34 as their sequence number. Then if you add another board card (4 channels), the sequence
number of them will change to 37and 38 dynamically.
1.2 .4.1.2 Modify IP Camera
Press button to modify/edit the IP camera‘s information.
1.2.4.1.3 Delete IP camera device
Press button to delete connected server. When system is in processing to add IP
camera device (―connecting…‖indicated in connect status column), user can not delete that IP
camera device.

DVR Server Manual ver.5.05/rel.092507
9
1.2.4.1.4 Decode card work mode
DVR system supports playing video of IP Camera to TV wall directly, then it uses the hard
decoding function of decoder, so you should set the work mode of decoder. If you don‘t use hard
decoding, you can‘t output video of IP Camera real-time, user can only play back recording data to
TV monitor by selecting Playback to TV Wall function.
Note:
Each NV4002MD card can decode 2 channels D1 or 4channels CIF.
Each NV4004MD card can decode 4 channels D1 or 8 channels CIF.
When you select the work mode, system will send out corresponding channels of IP camera
from the first IP camera. It will not influence soft decoding for cameras of local board cards.
2. Backup System Parameters
Select this function to export system configurations.
3. Import System Parameters
Select this function to import system configurations.
4. Burn backup data CD
Select this function to burn video data to CD, it is same to burn CD function in Local Playback.
5. Burn DVD disc
Burn DVD disc by invoking other professional burning software.
6. Remote chat
Select this function to connect a remote Client or Server for a live chatting via IP address. You
must have an audio card and Microphone installed in each PC.
7. Write working log
This is useful to record events that occur during the operator‘s shift.
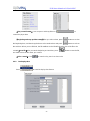
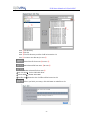
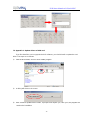
8. View System log
Select this function to view all actions of recording as well as operations. System log keeps a
record of system events such as program startup and shutdown, changing camera setup and all
operator or system daily activities sorted according to time and date. Users can view log by date and
system parameters. System parameter includes operations, system prompts, alarms and other
activities.

DVR Server Manual ver.5.05/rel.092507
10
9. Open Explorer
When keyboard is locked, Users can operate window resource via explorer.
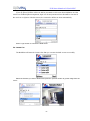
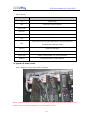
10. Open electronic map
Select this function to set E-map,
Click icon and then Right-Single-Click on the map, the setting picture will appear.
You can add or delete sensors and cameras that are pointed by the arrow or change the digital map.
If it is set to appear automatically, when the sensor is triggered, the map will appear
automatically and the sensor being triggered will be marked. For triggered camera, user can
Left-Double-Click it to view its video.
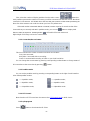
11. Open Screen Keyboard
This function allows the user to use soft keyboard, you can press this bar to open the screen
keyboard. Also, in the setup interface you can Left-Double-Click the blank to open this keyboard.
User can close this keyboard manually.

DVR Server Manual ver.5.05/rel.092507
11
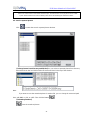
12. Play back to TV monitor
In DVR system, the recording data can be transmitted to TV monitor via Matrix card.
When system runs the ―Playback to TV Wall‖ process, the Matrix card will output recording data.
If this process does not run, matrix decode card will output real-time video according to your matrix
board setup. Otherwise, when you use matrix card to decode video data from IP Camera, you can‘t
use this function to play back recording video data to TV Monitor but only output real-time video of
local board and IP Camera to TV Wall according to you setting in Matrix setup. In this process, you
can play back record file by date and camera, and the record file will be played automatically.
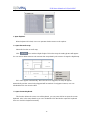
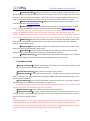
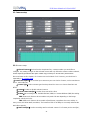
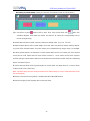
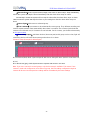
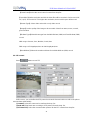
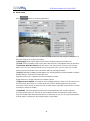
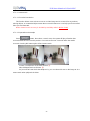
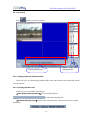
13. Motion Detect setup
By default, the entire screen is set as motion detection area where it is indicated with green
border around the image. To have a specific area for motion detection, you can click button
to cancel the full screen detection border; then Left-Single-Click and drag a rectangle. A green
rectangle will mark the area. The DVR will now detect motion only in the area inside the green
border line. You can set as many areas as you want. Any activities in the motion detection areas
(meaning any motion inside the green border line) will trigger recording, depending on the reaction
mode and alarms that may be generated along with electronic map icons flashing in alert mode or
whatever settings you have set on the DVR configuration. Click button to test the
sensitivity of motion detection. The sensitivity can be adjusted by dragging the slider bar below the
motion detection window.
Notice: motion sensitivity value will affect the accuracy of smart search

DVR Server Manual ver.5.05/rel.092507
12
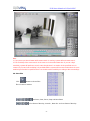
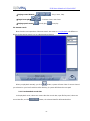
1. Add mask/Delete mask
Press button to set the area to be covered with a black mask. If there are some areas
that you don‘t want to show, you can draw those areas with the mouse until they change to black.
You can set several cover areas. Press this button again when finish adding. This must not be used
as masking for motion detection. This is often used on ATM machine or bank vault when you do not
want the punching of PIN numbers recorded on the video for security purposes.
Press button to delete all cover areas.
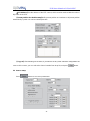
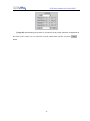
14. DVR board work mode setup
Each DVR system supports a maximum of 8 PCs 400XHC (total channel is equal to 64) series
board, so user can set its work mode via this GUI.
For 4004HC, 4008HC, 4016HC series
board model, you can set its work mode. The
new DVR board work mode will only take effect
after rebooting DVR Server software.

DVR Server Manual ver.5.05/rel.092507
13
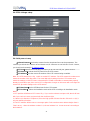
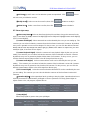
15. Keyboard shortcuts setup
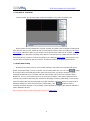
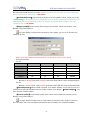
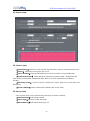
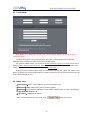
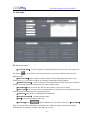
1.2.5 Network panel
This panel displays the network configuration of DVR system.
Information of network
adapter
IP address of the system
Subnet Mask
Default Gateway
(NetGate)
When client is linked, its IP
address will display in this window (the
current IP only).Press the right mouse
button to disconnect the client.
You can select from this setup which of the
keyboard shortcuts you do want to enable or
disable. These shortcuts allow you to use function
keys on your keyboard to run a command such as
zooming on a camera, run an auto tracking
cameras etc…

DVR Server Manual ver.5.05/rel.092507
14
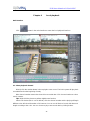
1.2.6 PTZ Control panel
1.2.6.1 Relay (On/Off)
Control the PTZ cameras internal relay (relay1) or the decoder‘s relay (relay 1).
Used to turn on a light or control an access gate.
1.2.6.2 Wiper (On/Off)
If using the PTZ cameras corresponding wiper control relay, this toggles the
relay/wiper on and off.
1.2.6.3 Zoom + / Zoom –
Controls the zoom function of the PTZ camera.
1.2.6.4 Focus + / Focus –
Overrides the auto-focus setup of the PTZ camera, adjust focus the image.
1.2.6.5 Iris + / Iris –
Overrides the PTZ cameras auto-iris and brighten or darken the image.
Pressing this button initiates the connected PTZ camera to do an automatic
tour of 360, but for speed domes, many PTZ factory forbid this command. This
may not be available to some PTZ cameras
By pressing and holding these buttons, the PTZ camera will move up,
down, right and left as well as other directions.
In DVR system, there are three ways to operate the
PTZ;
a. Panel operate;
b. Operate in video area directly ;
c. Keyboard operate

DVR Server Manual ver.5.05/rel.092507
15
1.2.6.6 Auto tracking (On/Off)
Press button to use the PTZ camera tracking the floating object automatically.
1.2.6.7 Speed Dome
Press button to operate the speed dome, including Preset Setup, Preset Call
and Preset Tour:
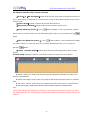
1.2.6.7.4 Preset Setup
In this screen you can set the preset position:
PTZ speed setup
Press and drag the slider bar to adjust the speed of PTZ.

DVR Server Manual ver.5.05/rel.092507
16
Add/Delete preset
In this section you can set the preset name with its sequence number, then you can press
/ button to add/delete a preset. When you want to modify the preset you can press button
to confirm your modification. For different cameras, they have different commands to open and set,
so you can choose the call mode in the drop-list for different cameras.
Home position
You can set a home position for the PTZ. When there are no PTZ actions after the setting time,
the system will return the PTZ to the home position.
Tour preset
In this section you can set the tour schedule. First you can choose a group, and then set the
track for this schedule; you can press / button to add/delete a preset to it. After you choose
the preset name you can set the time to keep on.
1.2.6.7.5 Preset call
When you select this function, system will show all the preset names you set in Preset Setup
menu; you can click one to move to it.
1.2.6.7.6 Preset Tour
When you select this function, system will show the entire tour groups you set in Preset Setup
menu; you can click one to execute it.
1.2.6.8 Control PTZ via video window
You can press the mouse and drag it to a direction to move the PTZ camera.
Page is loading ...
Page is loading ...
Page is loading ...
Page is loading ...
Page is loading ...
Page is loading ...
Page is loading ...
Page is loading ...
Page is loading ...
Page is loading ...
Page is loading ...
Page is loading ...
Page is loading ...
Page is loading ...
Page is loading ...
Page is loading ...
Page is loading ...
Page is loading ...
Page is loading ...
Page is loading ...
Page is loading ...
Page is loading ...
Page is loading ...
Page is loading ...
Page is loading ...
Page is loading ...
Page is loading ...
Page is loading ...
Page is loading ...
Page is loading ...
Page is loading ...
Page is loading ...
Page is loading ...
Page is loading ...
Page is loading ...
Page is loading ...
Page is loading ...
Page is loading ...
Page is loading ...
Page is loading ...
Page is loading ...
Page is loading ...
Page is loading ...
Page is loading ...
Page is loading ...
Page is loading ...
Page is loading ...
Page is loading ...
Page is loading ...
Page is loading ...
Page is loading ...
Page is loading ...
Page is loading ...
Page is loading ...
Page is loading ...
Page is loading ...
Page is loading ...
Page is loading ...
Page is loading ...
Page is loading ...
Page is loading ...
-
 1
1
-
 2
2
-
 3
3
-
 4
4
-
 5
5
-
 6
6
-
 7
7
-
 8
8
-
 9
9
-
 10
10
-
 11
11
-
 12
12
-
 13
13
-
 14
14
-
 15
15
-
 16
16
-
 17
17
-
 18
18
-
 19
19
-
 20
20
-
 21
21
-
 22
22
-
 23
23
-
 24
24
-
 25
25
-
 26
26
-
 27
27
-
 28
28
-
 29
29
-
 30
30
-
 31
31
-
 32
32
-
 33
33
-
 34
34
-
 35
35
-
 36
36
-
 37
37
-
 38
38
-
 39
39
-
 40
40
-
 41
41
-
 42
42
-
 43
43
-
 44
44
-
 45
45
-
 46
46
-
 47
47
-
 48
48
-
 49
49
-
 50
50
-
 51
51
-
 52
52
-
 53
53
-
 54
54
-
 55
55
-
 56
56
-
 57
57
-
 58
58
-
 59
59
-
 60
60
-
 61
61
-
 62
62
-
 63
63
-
 64
64
-
 65
65
-
 66
66
-
 67
67
-
 68
68
-
 69
69
-
 70
70
-
 71
71
-
 72
72
-
 73
73
-
 74
74
-
 75
75
-
 76
76
-
 77
77
-
 78
78
-
 79
79
-
 80
80
-
 81
81


Optiview DVR Server 5.05 User manual
- Category
- Digital Video Recorders (DVR)
- Type
- User manual
- This manual is also suitable for
Ask a question and I''ll find the answer in the document
Finding information in a document is now easier with AI
Related papers
Other documents
-
Pelco 1104-080 User manual
-
-
Svat ClearVu CVDVR900 User manual
-
Dante DLA6340 Operating instructions
-
 Planet Technology DVR-470 User manual
-
 MGDVRs LIVCAP series Installation and User Manual
-
Vacron VIA-PC300 User manual
-
-
Sentinel 4C User manual
-
Sentry LE Series User manual

