Page is loading ...

Wireless USB Adapter
User Guide

FCC STATEMENT
This equipment has been tested and found to comply with the limits for a Class B digital device,
pursuant to part 15 of the FCC Rules. These limits are designed to provide reasonable protection
against harmful interference in a residential installation. This equipment generates uses and can
radiate radio frequency energy and, if not installed and used in accordance with the instructions,
may cause harmful interference to radio communications. However, there is no guarantee that
interference will not occur in a particular installation. If this equipment does cause harmful
interference to radio or television reception, which can be determined by turning the equipment off
and on, the user is encouraged to try to correct the interference by one or more of the following
measures:
•
Reorient or relocate the receiving antenna.
•
Increase the separation between the equipment and receiver.
•
Connect the equipment into an outlet on a circuit different from that to which the
receiver is connected.
•
Consult the dealer or an experienced radio/ TV technician for help.
This device complies with part 15 of the FCC Rules. Operation is subject to the following two
conditions:
1) This device may not cause harmful interference.
2) This device must accept any interference received, including interference that may
cause undesired operation.
Any changes or modifications not expressly approved by the party responsible for compliance
could void the user’s authority to operate the equipment.
Note: The manufacturer is not responsible for any radio or tv interference caused by unauthorized
modifications to this equipment. Such modifications could void the user’s authority to operate the
equipment.

FCC RF Radiation Exposure Statement
This equipment complies with FCC radiation exposure limits set forth for an uncontrolled
environment. End users must follow the specific operating instructions for satisfying RF exposure
compliance. This transmitter must not be co-located or operating in conjunction with any other
antenna or transmitter. This equipment has been SAR-evaluated for use in hand. SAR
measurements are based on 5mm spacing from the body and that compliance is achieved at that
distance.
CE Mark Warning
This is a class B product. In a domestic environment, this product may cause radio interference, in
which case the user may be required to take adequate measures.

CONTENTS
Chapter 1 Installation Guide ................................................................................. 2
1.1 Software
Installation
. ......................................................................................... 2
1.1.1 Overview . ............................................................................................................ 2
1.1.2 Installation Guide ................................................................................................ 2
1.3 Uninstall Software ............................................................................................. 6
2.3.1 Uninstall the utility software from your PC .......................................................... 6
2.3.2 Uninstall the driver software from your PC ......................................................... 6
Chapter 2 Configuration ........................................................................................ 8
2.1 Configuration of
Utility
. ...................................................................................... 8
2.1.1 Site Survey........................................................................................................ 9
2.1.2 Profile . ............................................................................................................... 9
2.1.3 Link Information ................................................................................................ 2 0
2.1.4 Advanced .......................................................................................................... 2 2
2.1.5 About. ................................................................................................................ 2 3
2.1.6 An example for application ............................................................................... 23
2.2 Configure with Windows XP Wireless Zero Configuration .............................. 24
Chapter 3 AP Mode . ............................................................................................ 26
3.1 Config
AP
. ....................................................................................................... 26
3.2 Advanced ........................................................................................................ 28
3.3 Access Control List ......................................................................................... 28
3.4 Associate
List
. ................................................................................................. 31
3.5
About
. .............................................................................................................. 32
Appendix A: Glossary ......................................................................................... 3 3

ALFA WiFi USB Adapter User Guide
1
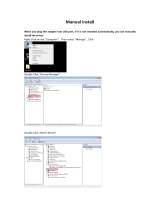
Chapter 1 Installation Guide
1.1 Software Installation
1.1.1 Overview
The Setup Wizard will guide you through the installation of the Utility and drivers. Before you
install the software, please connect the ALFA WiFi USB Device with your computer by USB
cable. After that, you will be prompted “Found New Hardware Wizard”, click the Cancel button,
and run the Setup Wizard program on the CD-ROM.
Note:
The Setup steps for Windows XP/ Vista/ 7/ Win 8/Win10 are very similar, so the following
installation guide takes Windows XP for example.
1.1.2 Installation Guide
1. After inserting the provided Resource CD into your CD-ROM drive, the Setup Wizard will
automatically pop up on your computer’s screen. Choose “Install Driver&Utility” as shown in
the following figure to start the installation.

ALFA WiFi USB Adapter User Guide
2
2. Then you’ll see the screen as below. You can choose which to be installed.
Figure 2-2 Setup Type

ALFA WiFi USB Adapter User Guide
3
3. In the following screen, select the configuration tool.
Figure 2-3 Setup Type
I. If you want to install the Wireless LAN Adapter Utility, please select the Ralink
Configuration Tool and click Next.
II. If you only want to use the Microsoft Zero Configuration Tool to configure the wireless
connection, please select Microsoft Zero Configuration Tool and click Next.
4. After that, you will see the next screen as below. Click Install to continue.
Figure 2-4 Ready to Install the Program

ALFA WiFi USB Adapter User Guide
4
6. The following screen for installing will appear.
Figure 2-5 Setup Status
7. After the files have been successfully copied, the screen in Figure 2-6 will appear. Click the
Finish button to finish the installation and reboot the system.
Figure 2-6 InstallShield Wizard Complete

ALFA WiFi USB Adapter User Guide
5
After installing the driver successfully, you should see an icon or in your system tray.
1.2 Uninstall Software
1.2.1 Uninstall the utility software from your PC
1. On the Windows taskbar, click the Start button, point to Programs – Ralink Wireless, and
then click Uninstall RT2870.
Figure 2-7 Uninstall the Utility

ALFA WiFi USB Adapter User Guide
6
2. Follow the Install Shield Wizard to uninstall the utility software from your PC.
1.2.2 Uninstall the driver software from your PC
1. On the Windows taskbar, click the Start button, and then click Control Panel.
2. Double-click the System icon, click on the Hardware tab in the System window.
3. Click on the Device Manager button, double-click Network adapters, and then right-click
82.11n USB Wireless LAN Card.
Figure 2-8 Device Manager
4. Click Uninstall shown in above Figure 2-8, the system will uninstall the driver software of the
adapter from your PC.

ALFA WiFi USB Adapter User Guide
7
Chapter 2 Configuration
2.1 Configuration of Utility
802.11n USB Adapter can be configured by its utility for Windows XP/ Vista/ 7. This section will
take the configuration in Windows XP for example and guide you to configure your wireless
adapter for wireless connectivity with trustable data security encryption features.
The configuration steps in Windows XP/ Vista/ 7 are similar. For the configurations in Windows
Vista/ 7, please refer to the instructions in Windows XP.
After the Adapter's driver and utility has been installed, the adapter’s tray icon, or , will
appear in your system tray. It means the utility is running on your system. If the utility does not run,
you can run the utility by clicking: Start> All programs> Ralink Wireless > Ralink Wireless
Utility. If the icon still does not appear, the driver or utility may be installed incorrectly or the
adapter is unplugged, please try again.
Icon means the connection has been established.
Icon means there is no connection.
Right-click the icon and choose Launch Config Utility, the configuration screen of the utility
will appear as shown in the figure below.
Figure 2-1 Configuration Screen
The utility provides complete and easy manage tools to:
Display current status information
Edit and add configured profiles
Display current diagnostics information
)
Note:
If your OS is Windows XP, you can use Windows XP to configure the wireless network settings.
(To use this function, you must upgrade the OS with service pack 2 or later). Just right-click
the icon at the bottom of the screen, and click Use Zero Configuration as Configuration
utility to switch the utility.

ALFA WiFi USB Adapter User Guide
8
2.1.1 Site Survey
Click the Site Survey icon on the screen of the Utility and the Site Survey screen with many
available wireless network choices will appear. The AP list will be updated every two seconds.
The AP list includes most used fields, such as SSID, network type, channel used, wireless mode,
security status and the signal percentage. The dialog box is shown in Figure 2-2.
Figure 2-2 Site Survey
(Rescan): Click the Rescan icon to refresh the list at any time.
(Add to Profile): Highlight an SSID and click the Add to Profile icon to add the network to
the profile.
(Connect): Highlight an SSID and click the Connect icon to connect to an available
network without adding it to the profile.
2.1.2 Profile
Click the icon on the screen of the Utility and the Profile List screen will appear as Figure 3-3.
The Profile List keeps a record of your favorite wireless settings at home, office, and other public
hot-spots. You can save multiple profiles, and activate the correct one at your preference. Figure
3-3 shows the basic profile section.
The Profile screen provides tools to:
Add a profile
Delete a profile
Edit a profile

ALFA WiFi USB Adapter User Guide
9
Import a profile
Export a profile
Add a WPS profile
- Click to add a new profile.
- Deletes an existing profile.
Figure 2-3 Profile List
- Click to edit an existing profile.
- Imports an existing profile.
- Exports an existing profile.
Profile Name - Name of profile, preset to PROF* (* indicate 1, 2, 3...).
SSID - The access point or Ad-hoc name.
Authentication - Indicates the authentication mode used.
Encryption - Indicates the encryption type used.
2.1.2.1. Add a profile
1. Click the A dd icon on the Profile List screen (Figure 3-3), the Profile configuration screen will
appear as shown in Figure 3-4. Enter the Profile Name and choose the SSID from the
pull-down list, then click the Next icon to continue.
Figure 2-4 Add a new profile
- Cancel button.

ALFA WiFi USB Adapter User Guide
10
- Back to the previous page.
- Continue to the next page.
Profile Name - Identifies the configuration profile. This name must be unique. Profile names
are not case-sensitive.
SSID - The IEEE 802.11 wireless network name. This field has a maximum limit of 32
characters.
Network Type: There are basically two modes of networking:
•
Infrastructure - All wireless clients will connect to an access point or wireless router.
•
Ad Hoc - Directly connecting to another computer, for peer-to-peer communication,
using wireless network adapters on each computer, such as two or more TL-WN727N
wireless adapters.
)
Note:
1) An Infrastructure network contains an Access Point or wireless router. All the wireless
devices or clients will connect to the wireless router or access point.
2) An Ad Hoc network contains only clients, such as laptops with wireless desktop adapters. All
the adapters must be in Ad Hoc mode to communicate.
2. In the following screen, select the corresponding Authentication mode and Encryption type
of the profile from the drop-down lists (here takes WPA2-PSK and A ES for example), then
click the Next icon to continue.
Figure 2-5 Authentication and Encryption
Authentication - You can choose the Authentication Type from the pull-down list with
seven options, Open, Shared, WPA, WPA-PSK, WPA2, WPA2-PSK, and 802.1X.
Encryption - Displays which encryption type that the adapter is using. When you select
Open as Authentication, there are two options: None and WEP. If you select Shared and
802.1X as Authentication, there is only one option: WEP. When you select WPA,
WPA-PSK or WPA2-PSK as Authentication, there are two options: TKIP and A ES. When
you select WPA2 as Authentication, four options are available: TKIP, A ES, TKIP(MFP) and
AES(MFP).

ALFA WiFi USB Adapter User Guide
11
3. In the screen that follows, enter the key of the AP in the empty field. Here takes Key
1234567890 for example. If the wireless network you are trying to connect is
security-enabled, you must enter the corresponding key to establish a successful connection.
Then click the Next icon to continue.
Figure 2-6 Enter the Key
4. The Pre-logon Connect configuration page as shown in Figure 3-7 will then appear. Click the
Next icon to continue.
Figure 2-7 Use Pre-logon Connection
Use Pre-logon Connection - Use ID and Password in Profile.
5. Click the A c t i v e icon in the screen below to connect to the chosen network. When the
screen looks like below, it shows that you have successfully added a new profile and
connected to the wireless network.

ALFA WiFi USB Adapter User Guide
12
Figure 2-8 Profile Added Successfully
2.1.2.2. Delete a profile
Highlight the desired profile name on Profile List and click the Delete icon . The profile will be
removed from the list.
Figure 2-9 Delete a Profile

ALFA WiFi USB Adapter User Guide
13
2.1.2.3. Edit a profile
Highlight the desired profile name on Profile List, and click the Edit icon , the Profile
configuration screen will appear as shown in Figure 2-10. You can make some changes of
the profile, for instance, you can change the Profile Name to name it like My Network.
Figure 2-10 Edit a Profile
2.1.2.4. Import a profile
1.
From the Profile List screen (shown in Figure 3-3), click the Import icon
. Then the Import
2.
Profile screen will appear.
Browse to the directory where the profile is located.
3.
Highlight the profile name.
4.
Click Open, the imported profile will then appear in the Profile List.
2.1.2.5. Export a profile
1. From the Profile List screen (shown in Figure 3-9), highlight the profile to be exported.
2. Click Export icon , the Export Profile window will then appear.
3. Browse the directory to export the profile to.
4. Click Save. The profile should then be exported to the specified location.

ALFA WiFi USB Adapter User Guide
14
2.1.2.6. Add a WPS profile
Click the Add WPS Profile icon of the Utility and you can configure the WPS function to
join an existing network quickly in the following screen.
Figure 2-11 Profile List
If the wireless card supports Wi-Fi Protected Setup (WPS), you can establish a wireless
connection between wireless card and router using either Push Button Configuration (PBC)
method or PIN method. For the configuration of WPS, here takes the Wireless Router of our
company for example.
)
Note:
To build a successful connection by WPS, you should also do the corresponding configuration of
the Access Point for WPS or WPS function meanwhile.

ALFA WiFi USB Adapter User Guide
15
I. PBC Method
If your Access Point is equipped with a push-button for Wi-Fi Protected Setup, you can connect
the adapter to the Access Point by Push-Button Configuration (PBC) method.
Step 1 Press the WPS button on your Access Point device.
Figure 2-12 Press the WPS Button
Step 2 Click the Add to Profile icon on the screen as Figure 2-11.
Step 3 Select Push-Button Configuration (PBC) on the screen below.
Step 4 Click Start PBC.
Figure 2-13 Push-Button Configuration
Figure 2-14 Start PBC
WPS

ALFA WiFi USB Adapter User Guide
16
Step 5 The Adapter will search for the AP to establish connection automatically.
Figure 2-15
Step 6 Then wait a moment until Figure 2-16 appears.
II. PIN Method
Figure 2-16
If your Access Point supports Wi-Fi Protected Setup and the PIN method, you can add the
adapter to the network by the following two ways:
1) Enter the PIN into my Access Point
Step 1 Click the Add to Profile icon on the screen as Figure 2-11.
Step 2 Select the desired SSID from the WPS AP List (take ALFA_free for example)
and then tick PIN/numeric code on the screen below.
/